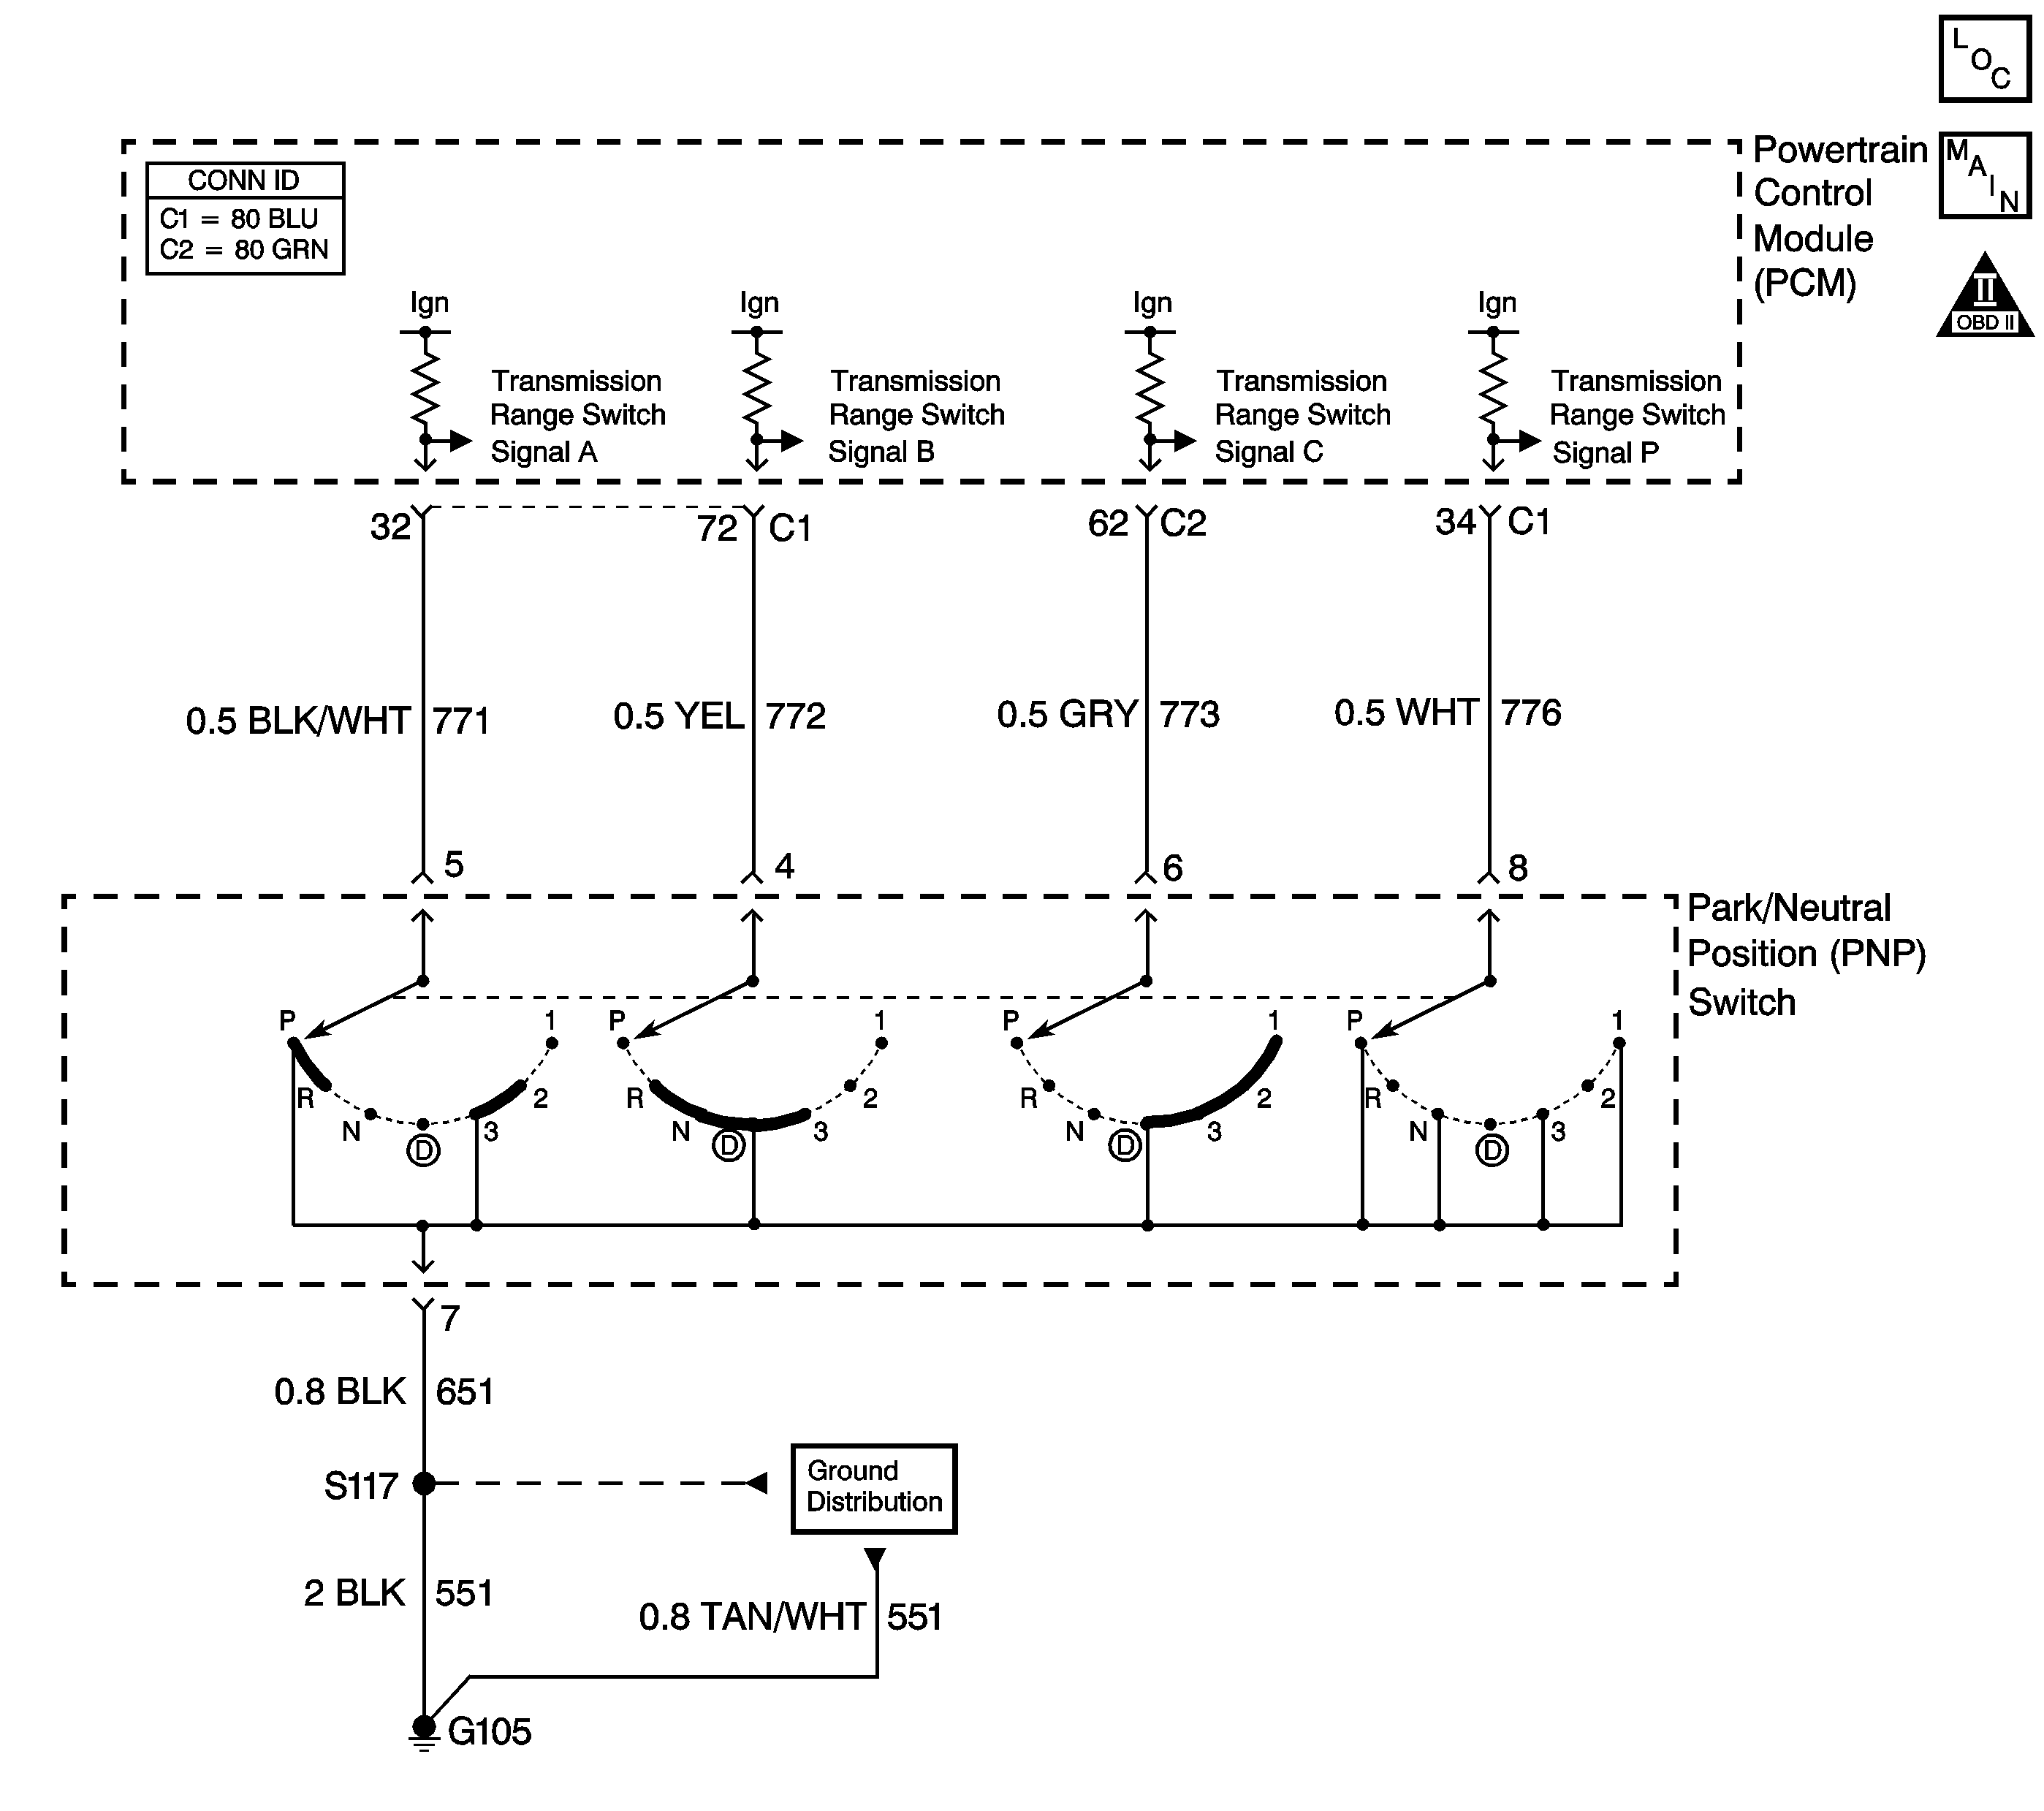
Circuit Description
The transmission range (TR) switch is part of the park/neutral position (PNP) and back-up lamp switch assembly, which is externally mounted on the transmission manual shaft. The TR switch contains four internal switches that indicate the transmission gear range selector lever position. The powertrain control module (PCM) supplies ignition voltage to each switch circuit. As the gear range selector lever is moved, the state of each switch may change, causing the circuit to open or close. An open circuit or switch indicates a high voltage signal. A closed circuit or switch indicates a low voltage signal. The PCM detects the selected gear range by deciphering the combination of the voltage signals. The PCM compares the actual voltage combination of the switch signals to a TR switch combination chart stored in memory.
Diagnostic Aids
Refer to the Transmission Range Switch Logic table for valid combinations of switch signal circuits A, B, C and Parity. On the table, HI indicates an ignition voltage signal. LOW indicates a zero voltage signal.
Test Description
The numbers below refer to the step numbers on the diagnostic table.
-
By disconnecting the TR switch, the ground path of all TR switch circuits is removed and the PCM should recognize all circuits as open. The scan tool should display HI for all range signal states.
-
This step tests the TR switch wiring for an open or the lack of the signal voltage from the PCM.
-
This step tests the TR switch wiring and the PCM by providing a ground path through a fused jumper wire. When grounded, the scan tool range signal states should change to LOW.
-
This step tests the TR switch wiring and the PCM by providing a ground path through a fused jumper wire. When grounded, the scan tool range signal states should change to LOW.
-
This step tests the TR switch wiring and the PCM by providing a ground path through a fused jumper wire. When grounded, the scan tool range signal states should change to LOW.
-
This step tests the TR switch wiring and the PCM by providing a ground path through a fused jumper wire. When grounded, the scan tool range signal states should change to LOW.
Step | Action | Values | Yes | No |
|---|---|---|---|---|
1 |
Does each selected transmission range match the scan tool TR Sw. display? | -- | Go to Step 2 | Go to Step 3 |
2 | Observe the IPC gear range display while selecting each transmission range: P, R, N, D4, D3, D2, D1. Does each selected transmission range match the IPC display? | -- | Go to Testing for Intermittent Conditions and Poor Connections in Wiring Systems | Go to Step 16 |
3 | With the scan tool, observe the TR Sw. A/B/C/P display. Does the scan tool TR Sw. A/B/C/P parameter indicate HI for all range signal states? | -- | Go to Step 13 | Go to Step 4 |
Does the scan tool TR Sw. A/B/C/P parameter indicate HI for all range signal states? | -- | Go to Step 5 | Go to Step 10 | |
Does the voltage measure within the specified value at all four terminals? | 10-12 V | Go to Step 6 | Go to Step 11 | |
Connect a fused jumper wire from the TR switch connector, signal circuit A, to ground while monitoring the scan tool TR Sw. A/B/C/P parameter. When signal circuit A is grounded, do any other signal circuits indicate LOW? | -- | Go to Step 12 | Go to Step 7 | |
Connect a fused jumper wire from the TR switch connector, signal circuit B, to ground while monitoring the scan tool TR Sw. A/B/C/P parameter. When signal circuit B is grounded, do any other signal circuits indicate LOW? | -- | Go to Step 12 | Go to Step 8 | |
Connect a fused jumper wire from the TR switch connector, signal circuit C, to ground while monitoring the scan tool TR Sw. A/B/C/P parameter. When signal circuit C is grounded, do any other signal circuits indicate LOW? | -- | Go to Step 12 | Go to Step 9 | |
Connect a fused jumper wire from the TR switch connector, signal circuit P, to ground while monitoring the scan tool TR Sw. A/B/C/P parameter. When signal circuit P is grounded, do any other signal circuits indicate LOW? | -- | Go to Step 12 | Go to Step 13 | |
10 | Test the signal circuits of the TR switch that did not indicate HI for a short to ground. Refer to Testing for Short to Ground and Wiring Repairs in Wiring Systems. Did you find and correct the condition? | -- | Go to Step 17 | Go to Step 15 |
11 | Test the signal circuits of the TR switch that did not indicate proper voltage for an open. Refer to Testing for Continuity and Wiring Repairs in Wiring Systems. Did you find and correct the condition? | -- | Go to Step 17 | Go to Step 15 |
12 | Test the affected signal circuits of the TR switch for a shorted together condition. Refer to Circuit Testing and Wiring Repairs in Wiring Systems. Did you find and correct the condition? | -- | Go to Step 17 | Go to Step 15 |
13 | Test the ground circuit of the TR switch for an open. Refer to Testing for Continuity and Wiring Repairs in Wiring Systems. Did you find and correct the condition? | -- | Go to Step 17 | Go to Step 14 |
14 | Replace the TR switch, this switch is part of the park/neutral position switch. Refer to Park/Neutral Position Switch Replacement . Did you complete the replacement? | -- | Go to Step 17 | -- |
15 | Replace the PCM. Refer to Control Module References in Computer/Integrating Systems for replacement, setup and programming. Did you complete the replacement? | -- | Go to Step 17 | -- |
16 | Replace the IPC. Refer to Control Module References in Computer/Integrating Systems for replacement, setup and programming. Did you complete the replacement? | -- | Go to Step 17 | Go to Step 2 |
17 |
Does each selected transmission range match the scan tool TR Sw. display? | -- | System OK | Go to Step 2 |
