Fuel Injector Balance Test Procedure
Step
| Action
| Value(s)
| Yes
| No
|
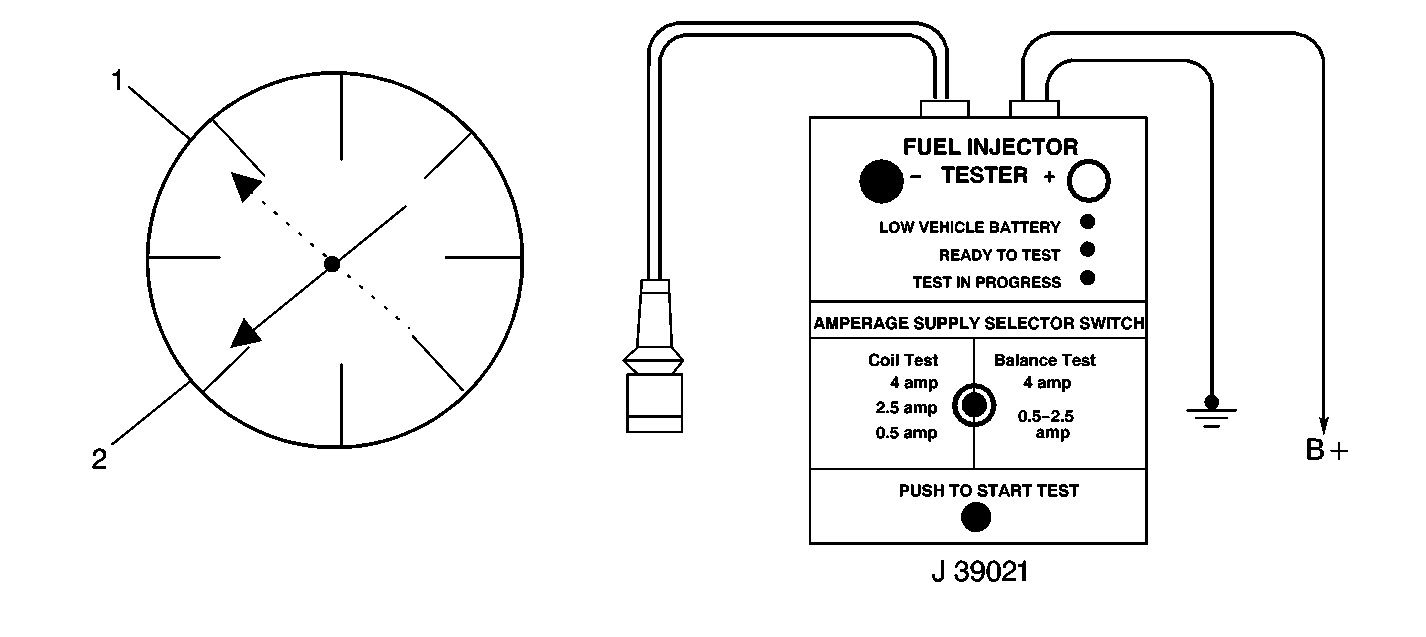
1
| Did you perform the Powertrain
On-Board Diagnostic (OBD) System Check?
| --
| Go to
Step 2
| Go to
Powertrain On Board Diagnostic (OBD) System Check
|
2
| Did you perform the Fuel Injector Coil Test?
| --
| Go to
Step 3
| Go to
Fuel Injector Solenoid Coil Test - Engine Coolant Temperature Between 10-35 Degrees C (50-95 Degrees F)
|
3
| Use a scan tool in order to observe
the engine coolant temperature (ECT).
Is the ECT more than the specified value?
| 94°C (201°F)
| Go to
Step 4
| Go to
Step 5
|
4
| Allow the engine to cool less than the specified value.
Is the ECT less than the specified value?
| 94°C (201°F)
| Go to
Step 5
| --
|
5
|
Caution: Remove the fuel tank cap and relieve the fuel system pressure before
servicing the fuel system in order to reduce the risk of personal injury.
After you relieve the fuel system pressure, a small amount of fuel may be
released when servicing the fuel lines, the fuel injection pump, or the connections.
In order to reduce the risk of personal injury, cover the fuel system components
with a shop towel before disconnection. This will catch any fuel that may
leak out. Place the towel in an approved container when the disconnection
is complete.
- Install the J 29658-D
Fuel
Pressure Gauge with the J 29658-500
Fuel Pressure Gauge 0-100 psi Adapter.
- Use a scan tool in order to energize the fuel pump.
- Place the bleed hose of the fuel pressure gauge into an approved
gasoline container.
- Bleed the air out of the fuel pressure gauge.
- Use a scan tool in order to pressurize the fuel system.
- Wait for the fuel pressure to build.
Important: Repeat pressurizing the fuel system with the scan tool as necessary
in order to achieve the highest possible fuel pressure.
- Observe the reading on the fuel pressure gauge.
Does the fuel pressure gauge read within the specified range?
| 358-405 kPa
(52-58 psi)
| Go to
Step 6
| Go to
Fuel System Diagnosis
|
6
| Turn off
the fuel pump.
Does the fuel pressure remain constant?
| --
| Go to
Step 7
| Go to
Fuel System Diagnosis
|
7
|
- Connect the J 39021
Fuel Injector Tester to a fuel injector using a J 39021-380
Fuel Injector Test Harness.
- Set the amperage supply selector switch on the fuel injector tester
to the Balance Test 0.5-2.5 amp position.
- Turn the fuel pump on and then off in order to pressurize the
fuel system.
- Record the fuel pressure indicated by the fuel pressure gauge
after the fuel pressure stabilizes. This is the first pressure reading.
- Energize the fuel injector by depressing the Push to Start Test
button on the fuel injector tester.
- Record the fuel pressure indicated by the fuel pressure gauge
after the fuel pressure gauge needle has stopped moving. This is the second
pressure reading.
- Repeat steps 1 through 6 for each fuel injector.
- Subtract the second pressure reading from the first pressure reading
for one fuel injector. The result is the pressure drop value.
- Obtain a pressure drop value for each fuel injector.
- Add all of the individual pressure drop values. This is the total
pressure drop.
- Divide the total pressure drop by the number of fuel injectors.
This is the average pressure drop. Refer to the table above.
Does any fuel injector have a pressure drop value that is more than
the average pressure drop or less than the average pressure drop by the specified
value?
| 20 kPa (3 psi)
| Go to
Step 8
| Go to
Symptoms
|
8
|
Notice: Do Not repeat any portion of this test before running the engine in
order to prevent the engine from flooding.
Retest any fuel injector that does not meet the specification.
Refer to the procedure in Step 7.
Does any fuel injector still have a pressure drop value that is more
than the average pressure drop or less than the average pressure
drop by the specified value?
| 20 kPa (3 psi)
| Go to
Step 9
| Go to
Symptoms
|
9
| Replace any malfunctioning fuel injectors. Refer to
Fuel Injector Replacement
Did you complete the repair?
| --
| System OK
| --
|