For 1990-2009 cars only
Instrument Panel Accessory Trim Plate Replacement - Right Side LHD
Removal Procedure
Caution: Refer to SIR Handling Caution in the Preface section.
- Disable the SIR system. Refer to Disabling the SIR System in SIR.
- Remove the IP (Instrument Panel) upper trim pad. Refer to Instrument Panel Upper Trim Pad Replacement .
- Remove the IP cluster trim panel. Refer to Instrument Cluster Trim Panel Replacement .
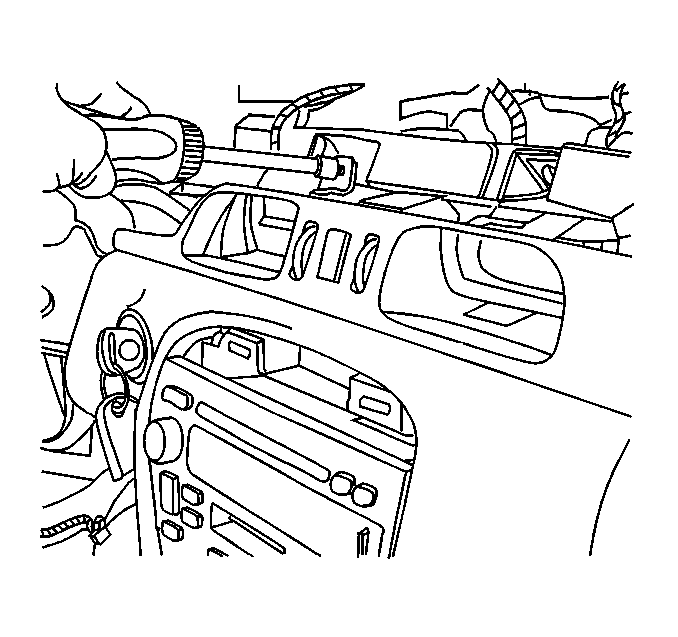
- Remove the screws from the accessory trim panel.
- Remove the PSIR module. Refer to Inflatable Restraint Instrument Panel Module Replacement in SIR.
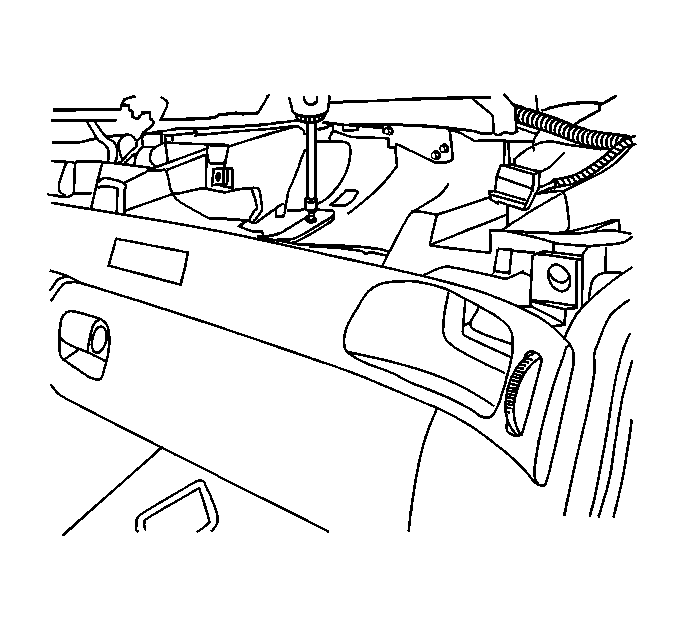
- Remove the two screws from the straps at the carrier.
- Pull rearward on the trim panel in order to disengage the three retainers, and remove the trim plate.
Installation Procedure
- Align the trim panel with the IP retainer.
- Push forward on the trim plate in order to engage the three retainers, while aligning the A/C housing with the A/C ducts.
- Install the screws to the accessory trim panel.
- Install the screws through the straps to the carrier.
- Install the IP cluster trim panel. Refer to Instrument Cluster Trim Panel Replacement .
- Install the PSIR module. Refer to Inflatable Restraint Instrument Panel Module Replacement .
- Install the IP upper trim pad. Refer to Instrument Panel Upper Trim Pad Replacement .
- Enable the SIR. Refer to Enabling the SIR System in SIR.
Notice: Refer to Fastener Notice in the Preface section.
Tighten
Tighten the screws to 2 N·m (18 lb in).
Tighten
Tighten the screws to 2 N·m (18 lb in).
Instrument Panel Accessory Trim Plate Replacement - Right Side RHD
Removal Procedure
Caution: Refer to SIR Handling Caution in the Preface section.
- Disable the SIR system. Refer to Disabling the SIR System in SIR.
- Remove the IP upper trim pad. Refer to Instrument Panel Upper Trim Pad Replacement .
- Remove the IP cluster trim panel. Instrument Cluster Trim Panel Replacement .
- Remove the screw near the IP cluster at the IP retainer.
- Pull rearward on the trim panel in order to disengage the three retainers, and remove the trim plate.

Installation Procedure
- Align the trim panel to the IP retainer.
- Push forward on the trim plate in order to engage the three retainers, while aligning the A/C housing with the A/C ducts.
- Install the screws.
- Install the IP cluster trim panel. Refer to Instrument Cluster Trim Panel Replacement .
- Install the IP upper trim pad. Refer to Instrument Panel Upper Trim Pad Replacement .
- Enable the SIR system. Refer to Enabling the SIR System in SIR.
Notice: Refer to Fastener Notice in the Preface section.
Tighten
Tighten the screws to 2 N·m (18 lb in).
