Removal Procedure

Important: It is necessary to record the remaining engine
oil life. If the replacement module is not programed with the remaining engine oil
life, the engine oil life will default to 100%. If the replacement module is not programmed
with the remaining engine oil life, the engine oil will need to be changed at 5000 km
(3,000 mi) from the last engine oil change.
Important: It is necessary to record the remaining automatic
transmission fluid life. If the replacement module is not programed with the remaining
automatic transmission fluid life, the automatic transmission fluid life will default
to 100%. If the replacement module is not programmed with the remaining automatic
transmission fluid life, the automatic transmission fluid will need to be changed
at 83000 km (50,000 mi) from the last automatic transmission fluid change.
- Using a scan tool, retrieve the percentage of remaining engine oil and the remaining
automatic transmission fluid life. Record the remaining engine oil and the remaining
automatic transmission fluid life.
Important: The key must be in the LOCK/OFF position
for a minimum of 30 seconds prior to disconnecting power to the PCM. This allows the
PCM to store the vehicle information into the EEPROM. Failure to wait the 30 seconds
may result in a EEPROM reset and the fluid life indexes being reset to 0.
Caution: Unless directed otherwise, the ignition and start switch must be in the OFF or LOCK position, and all electrical loads must be OFF before servicing
any electrical component. Disconnect the negative battery cable to prevent an electrical spark should a tool or equipment come in contact with an exposed electrical terminal. Failure to follow these precautions may result in personal injury and/or damage to
the vehicle or its components.
- Disconnect the negative battery cable.
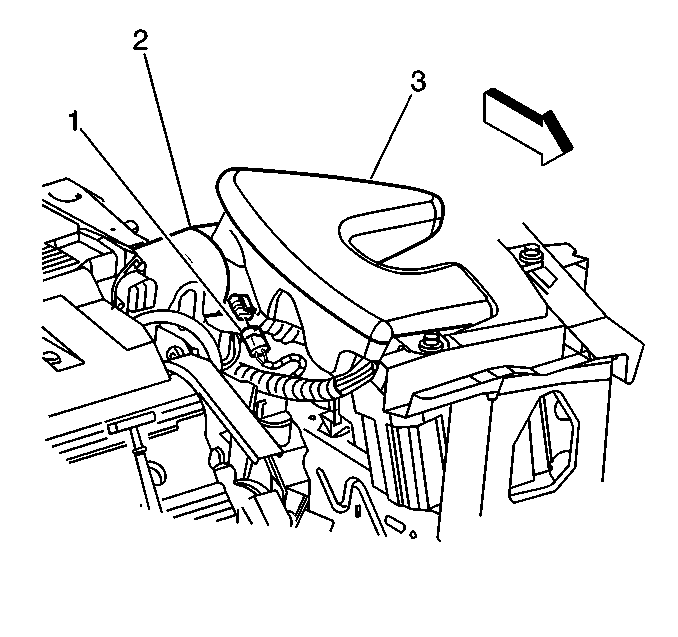
- Remove the screw retaining the intake air duct/resonator (3) to the PCM
housing.

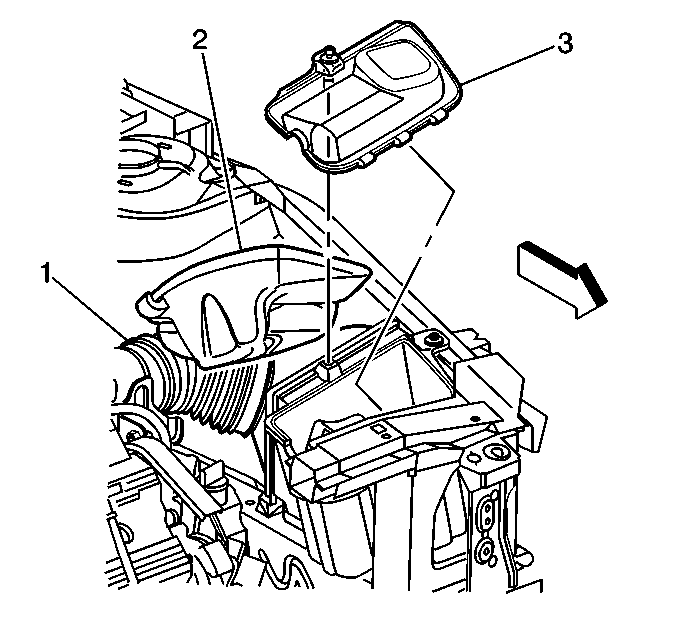
- Unsnap the air filter housing clamps on
top of the air cleaner housing assembly.
- Pull the intake air duct/resonator assembly (2) up enough to remove the
air cleaner cover (3) and the PCM.
- Slide the air cleaner element assembly toward the fender to separate the
air cleaner element assembly from the air inlet assembly.

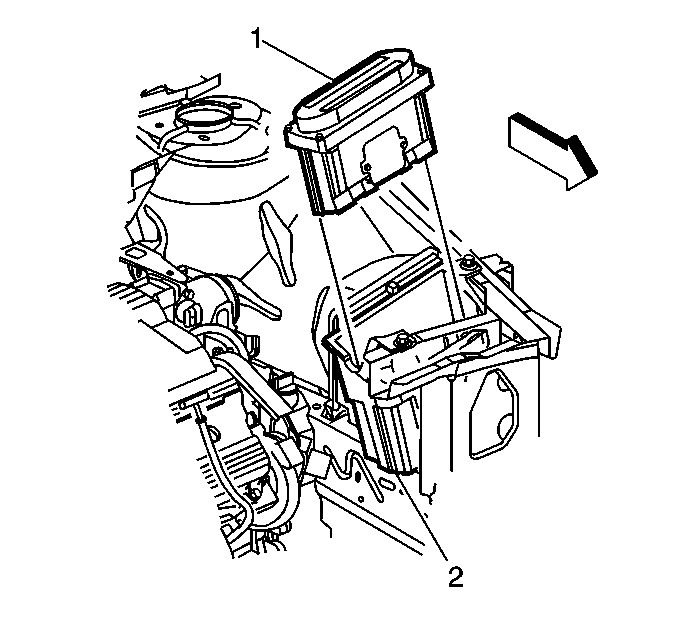
- Loosen the PCM connector attaching bolts.
- Disconnect both PCM connectors.
- Remove the PCM (1).
Installation Procedure

Important: The replacement PCM must be programmed (flashed)
using the latest Techline equipment and procedures.
- Install the PCM (1).
Notice: Use the correct fastener in the correct location. Replacement fasteners
must be the correct part number for that application. Fasteners requiring
replacement or fasteners requiring the use of thread locking compound or sealant
are identified in the service procedure. Do not use paints, lubricants, or
corrosion inhibitors on fasteners or fastener joint surfaces unless specified.
These coatings affect fastener torque and joint clamping force and may damage
the fastener. Use the correct tightening sequence and specifications when
installing fasteners in order to avoid damage to parts and systems.
- Install the PCM connectors.
Tighten
Tighten the PCM connectors screws to 8 N·m
(71 lb in).

- Install the air cleaner cover (3) onto the
air inlet housing.
- Snap the assembly clamps into place.

- Align the intake air duct/resonator assembly
(3) into place.
- Install the screw onto the intake air duct/resonator assembly.
Tighten
Tighten the intake air duct clamp to 10 N·m
(7 lb ft).
- Connect the negative battery cable.
- Start the engine. If the engine fails to start verify the following:
| • | The PCM contains the correct program (DTC P0602 not set). |
| • | The PCM connectors are fully engaged into the PCM. |
| • | That all fuses are present and not blown |
- Connect a scan tool and perform the following:
| • | Use the scan tool to reset transaxle fluid life to that recorded prior
to PCM removal. |
| • | Use the scan tool to reset engine oil life to that recorded prior to PCM
replacement. |


