Tools Required
| • | J 39946 Crankshaft
Rotation Socket |
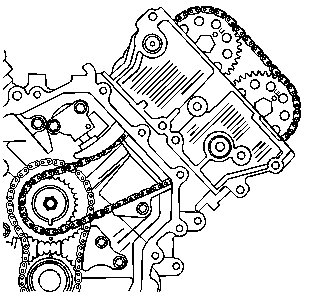
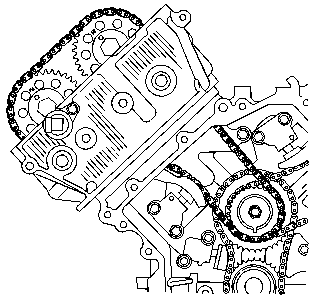
Setting the camshaft timing is necessary whenever the camshaft drive
system has been disturbed such that the relationship between any chain and
sprocket has been lost. Even when only one sprocket is involved
the following procedure should be observed since one crankshaft rotation
will not provide conditions where correct timing can be confirmed.
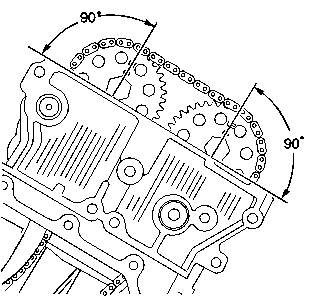
The camshafts and crankshaft events are correctly timed when the relationships
shown exist. The following procedure explains how to establish this condition.
Correct timing exists when the crank sprocket and the intermediate
shaft sprocket have their timing marks aligned and all four
camshaft drive pins are perpendicular (90 degrees) to
the cylinder head surface.
- Remove the following components for access:
- The primary and secondary
chain guides should be reinstalled if previously removed.
- Rotate the crankshaft (2) until the sprocket drive key (1)
is at approximately the 1 o'clock position. Use the J 39946
to rotate the crankshaft (2).
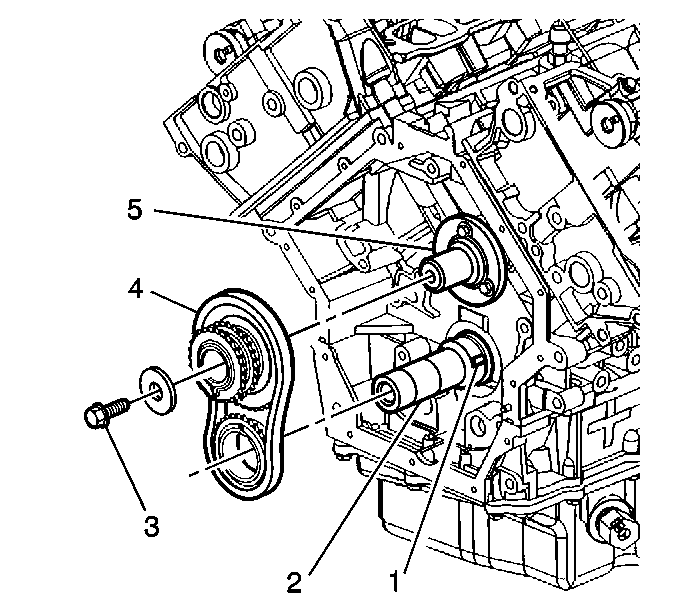
- Install the crankshaft and the intermediate shaft sprockets to
the primary drive chain with their timing marks adjacent to each other.
- Install the crank and intermediate sprocket assembly (4)
over their respective shafts.
- Rotate the crankshaft (2) as necessary to engage the crankshaft
key (1) in the sprocket without changing the relationship of the timing
marks to each other. Use the J 39946
to rotate the crankshaft (2).
Notice: Use the correct fastener in the correct location. Replacement fasteners
must be the correct part number for that application. Fasteners requiring
replacement or fasteners requiring the use of thread locking compound or sealant
are identified in the service procedure. Do not use paints, lubricants, or
corrosion inhibitors on fasteners or fastener joint surfaces unless specified.
These coatings affect fastener torque and joint clamping force and may damage
the fastener. Use the correct tightening sequence and specifications when
installing fasteners in order to avoid damage to parts and systems.
- Install the intermediate
sprocket retainer bolt (3).
Tighten
Tighten the bolt to 60 N·m (44 lb ft).
- Install the primary chain tensioner or release the tensioner shoe.
Tighten
Tighten the tensioner mounting bolts to 25 N·m (18 lb ft).
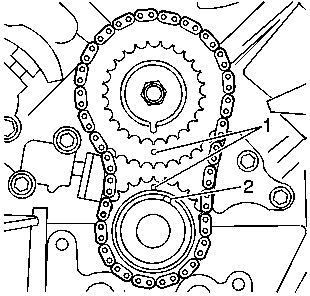
- Ensure the timing marks (1)
are aligned vertically.
- Install the J 44214
to lock the crankshaft in this position. If the engine is on a stand,
an alternate method should be devised.
- Route the secondary drive
chain for the LH cylinder head over the inner row of intermediate shaft teeth.
Important: The RE camshaft sprocket must contain the camshaft position sensor pick-up.
- Route the secondary drive chain over the chain guide and install the
exhaust camshaft sprocket to the chain such that the camshaft drive pin engages
the sprocket notch marked LE (left head exhaust). There should
be no slack in the lower section of the chain and the camshaft
drive pin must be perpendicular to the cylinder head face.
- Install the intake camshaft sprocket into the chain so that the
sprocket notch marked LI (left head intake) engages the camshaft drive
pin while the pin remains perpendicular to the cylinder head
face. A hex is cast into the camshafts behind the lobes for
cylinder -1 (or -2, LH) so that an open end wrench may
be used to provide minor repositioning of the camshafts.
- Loosely install the exhaust camshaft sprocket retainer bolt.
- Loosely install the intake camshaft sprocket retainer bolt.
- Install the chain tensioner
or release the tension on the shoe.
Tighten
| • | Tighten the tensioner mounting bolts to 25 N·m (18 lb ft). |
| • | Tighten the camshaft sprocket bolts to 120 N·m (89 lb ft). |
Important: The RE camshaft sprocket must contain the camshaft position sensor pick-up.
- Route the secondary drive chain for the right side cylinder head over
the outer row of the intermediate shaft teeth and repeat steps 11 through
15 for right side camshafts. Right side camshaft sprockets are
identified as RI (right intake) and RE (right exhaust). In addition
the RE sprocket must contain the camshaft position sensor pickup.
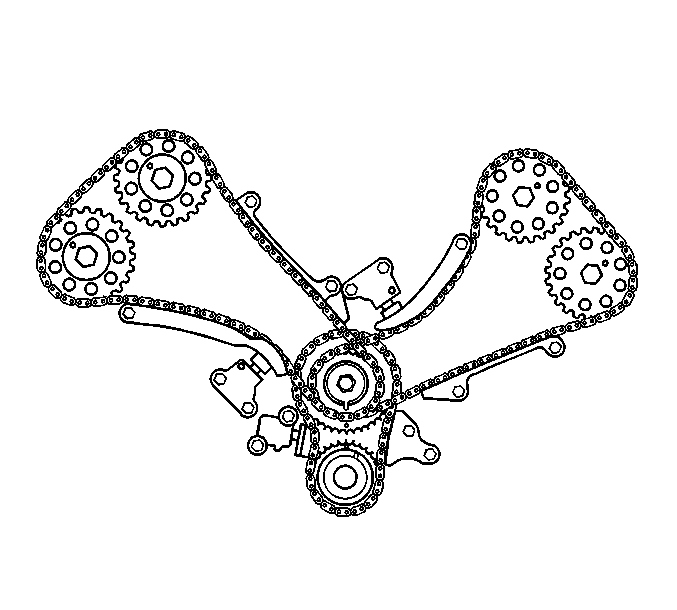
- Ensure all timing marks
are properly aligned.
- Install the following components:
