Powertrain Control Power and Ground Check 2 of 2
Powertrain Ground Check
Refer to Engine Controls Component Views for ground location views.
Circuit Description
There are several vehicle grounds that are essential for proper powertrain system operation. Loose or poor ground connections may cause widely varying problems, from flickering telltales to PCM DTCs to driveability problems. The PCM Power and Ground Check (2 of 2) should be performed when referred to by other diagnostics or when erratic or intermittent problems defy traditional diagnosis. The PCM Power and Ground Check (2 of 2) chart lists these grounds and other pertinent information that will allow you to investigate a possible loose or faulty ground connection.
Diagnostic Aids
Check the grounds listed in the Powertrain Ground Check table for the following conditions:
| • | Corrosion or paint between the ring terminal and the grounding surface |
| • | Poor quality crimp of the ring terminal to the ground wire |
| • | Damaged ground wire |
Ground | General Usage | Circuit | Location |
|---|---|---|---|
G307 | Battery to vehicle connection. | 50 Black | Passenger Compartment |
G100 | Heated Oxygen Sensors (HO2S) (All). | 1550 Black | Engine Compartment |
G101 | Cruise Control module. | 150 Black | Engine Compartment |
G103 | MAF Sensor, Oil Level switch, Engine Oil Pressure switch, Cruise Control module, Transaxle Range switch, Ign. relay, PCM, Ignition Control module. | 1551 BLK/WHT | Engine Compartment |
G104 | Cooling Fans. | 250 Black | Engine Compartment |
G301 | Fuel Pump Relay. | 750 Black | Passenger Compartment |
G401 | Fuel Pump. | 1050 Black | Passenger Compartment |
Powertrain Control Power and Ground Check 1 of 2
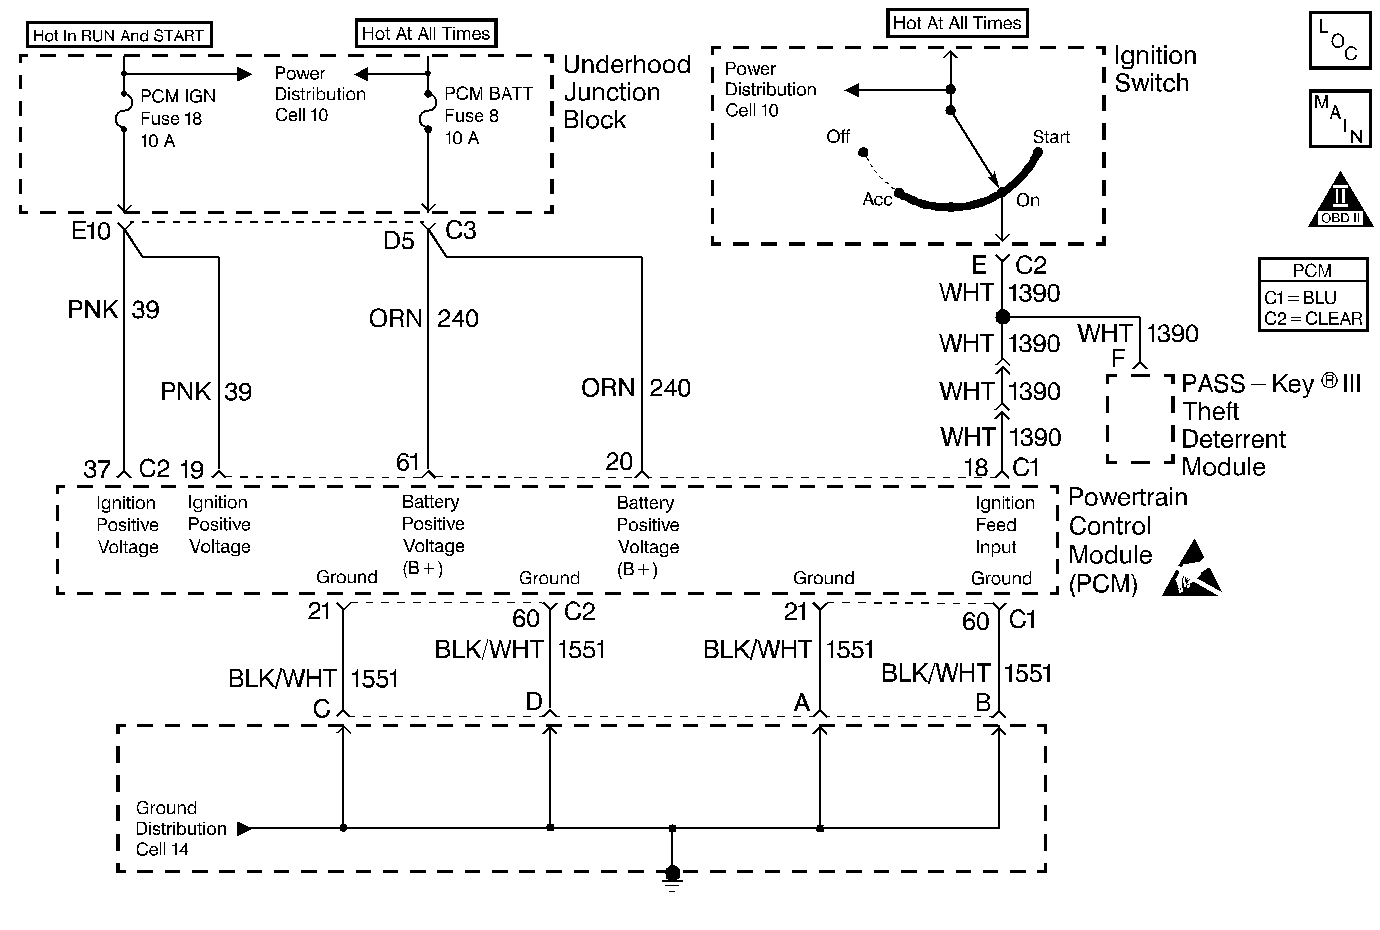
Circuit Description
The PCM is fed battery voltage at all times at PCM connector C1 terminals 20 and 61 through CKT 240 from the Underhood Junction Block, fuse A1. IGN 1 voltage (Hot in Run, Bulb Test or Start) is fed through CKT 39 and the Underhood Junction Block, fuse C7 to PCM connector C1 terminal 19 and C2 terminal 37. IGN 0 voltage (Hot in all positions except LOCK) is fed from the ignition switch CKT 1390 to PCM connector C1 terminal 18. The PCM needs all of these inputs to function properly. Refer to Power Distribution Schematics or to Ground Distribution Schematics in Wiring Systems.
The PCM also has four grounding points: at terminals 21 and 60 of both PCM connectors C1 and C2. These terminals are grounded through CKT 1551 to ground G102.
Diagnostic Aids
Ensure that the battery is fully charged and tested before performing this check.
Test Description
Number(s) below refer to the step number(s) on the Diagnostic Table.
-
Checking battery power supply to the PCM.
-
Checking Ignition 0 voltage to the PCM.
-
Checking Ignition 1 and Ignition Supplement voltage to the PCM.
-
Checking ground supply to the PCM. If PCM grounds are good, perform the Powertrain Ground Check to diagnose other vehicle grounds that may cause driveability complaints.
Step | Action | Value(s) | Yes | No | ||||
|---|---|---|---|---|---|---|---|---|
1 | Was the Powertrain OBD System Check performed? | -- | Go to Powertrain OBD System Check | |||||
Is the voltage more than the value specified on both terminals? | 10.0 volts | |||||||
3 | Does only 1 terminal measure more than the value specified? | 10.0 volts | ||||||
4 | Examine the Underhood Junction Block fuse 8. Is fuse 8 blown? | -- | ||||||
Is the voltage more than the value specified? | 10.0 volts | |||||||
6 | Repair cause of no power to PCM connector C1 terminal 18. Refer to Powertrain Control Module Wiring Harness and Connectors in Automatic Transaxle-4T80-E for diagnosis. | -- | -- | -- | ||||
With the key ON, measure the voltage to ground at PCM connector C1 terminal 19--harness side and C2 terminal 37--harness side. Is the voltage more than the value specified on both terminals? | 10.0 volts | |||||||
8 | Does only 1 terminal measure more than the value specified? | 10.0 volts | ||||||
Is the resistance measured less than the value specified on all terminals? | 5 ohms | |||||||
10 | Did all of the terminals measure more than the value specified? | 5 ohms | ||||||
11 |
Was terminal contact repaired? | -- | Go to Powertrain Control Module Diagnosis to verify repair | PCM Power and Ground Check OK. Go to Powertrain Control Power and Ground Check . | ||||
12 | Repair the open in CKT 240 that measured less than the value specified. Is the repair complete? | -- | Go to Powertrain Control Module Diagnosis for verify repair | -- | ||||
13 | Repair the short to ground in either CKT 240 and replace fuse A1. Is the repair complete? | -- | Go to Powertrain Control Module Diagnosis to verify repair | -- | ||||
14 | Repair the open in both CKT 240s or the cause of no voltage to fuse 8. Is the repair complete? | -- | Go to Powertrain Control Module Diagnosis to verify repair | -- | ||||
15 | Repair the open in the CKT 39 that measured less than the value specified. Is the repair complete? | 10.0 volts | Go to Powertrain Control Module Diagnosis to verify repair | -- | ||||
16 | Repair the short to ground in either CKT 39 and replace fuse 18. Is the repair complete? | -- | Go to Powertrain Control Module Diagnosis to verify repair | -- | ||||
17 | Repair the open in CKT 1551 between the splice and G102 or the G102 connection. Is the repair complete? | -- | Go to Powertrain Control Module Diagnosis to verify repair | -- | ||||
18 | Repair the open in CKT 1551 between the PCM connector and the splice on the circuits that measured more than the resistance specified. Is the repair complete? | 5 ohms | Go to Powertrain Control Module Diagnosis to verify repair | -- |
