ROUGH IDLE ON 1980 DIESEL ENGINE CARS

CONDITION
IDLE ROUGHNESS
A rough idle condition may be caused by a difference in the output between cylinders on diesel engines. By selection of parts it is possible to alter the output between cylinders, therefore smoothing out the idle quality.
COAST DOWN ROUGHNESS
A condition may exist where a roughness is observed on coast down at 50 mph or less with a closed throttle.
Confirm that this condition is engine roughness rather than a tire waddle or bent wheel. Coast down through the roughness period in neutral with the engine RPM at 1500 to 2000 RPM. If roughness still exists during the coast down the condition is not caused by engine roughness. If the roughness condition is gone, follow the idle roughness diagnosis procedure. If not corrected prior to the glow plug resistance procedure, set the engine at 860 RPM and correct the roughness using the glow plug procedures.
CORRECTION
IDLE ROUGHNESS
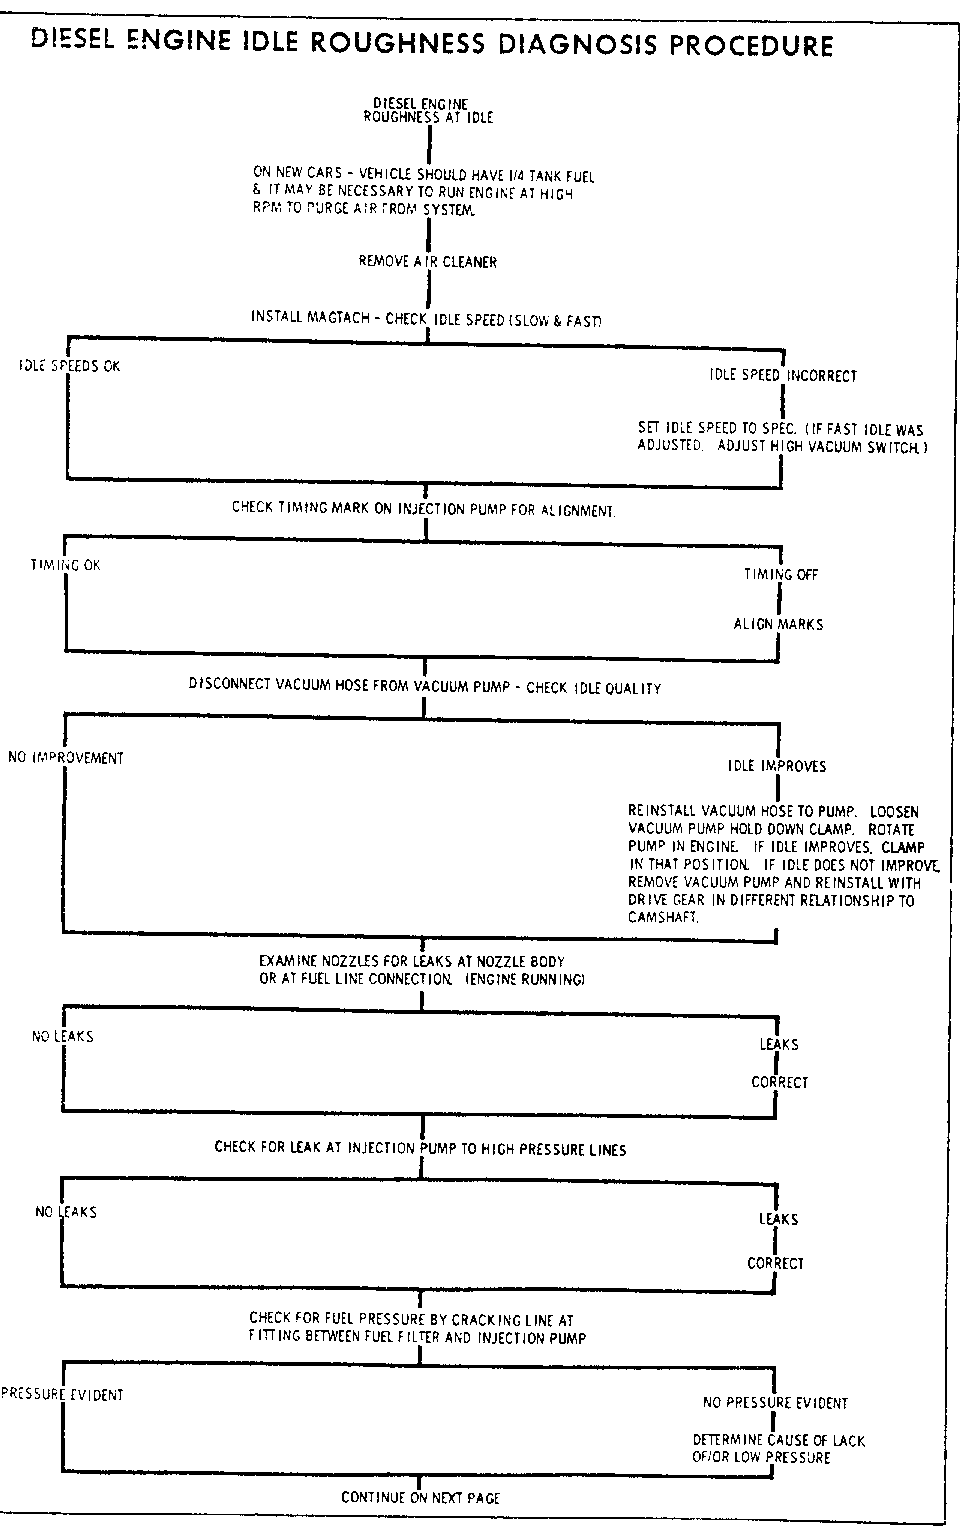
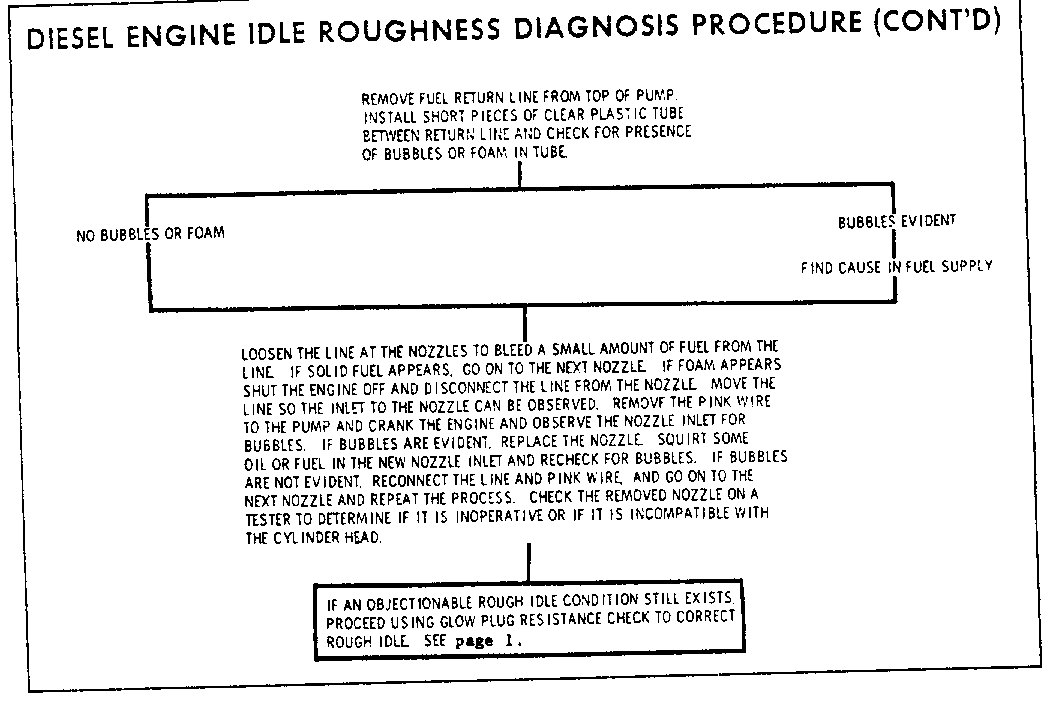
Follow the diesel engine idle roughness diagnosis procedure on page 4 and 5. Make all necessary adjustments and corrections. The idle roughness procedure must be followed step by step prior to performing the last step listed on the chart. The glow plug resistance check is a new procedure and will only be successful after the idle roughness procedure is performed and corrections made. GLOW PLUG RESISTANCE PROCEDURE
1. Use Kent-Moore High Impedence Digital Multimeter (Tool Number J-29125).
2. Select scales as follows: LH Switch to "OHMS," RH Switch to full counter- clockwise, "200 OHM" Center slide to the left "DC. LO."
3. Start engine, turn the heater on and allow engine to warm up. REMOVE all the feed wires from the glow plugs.
4. Adjust engine speed by turning the idle speed screw on the side of the injection pump. Adjust RPM to the worst engine idle roughness, but do not exceed 900 RPM (860 is the most likely speed to get roughest idle).
5. Allow engine to run at worst idle speed for at least one minute. The thermostat must be open and the upper radiator hose hot.
6. Attach an alligator clip to the black test lead of the multimeter. This clip must be grounded to the engine lift strap on the left-hand side of the intake manifold. It must remain grounded to this point until all tests are completed.
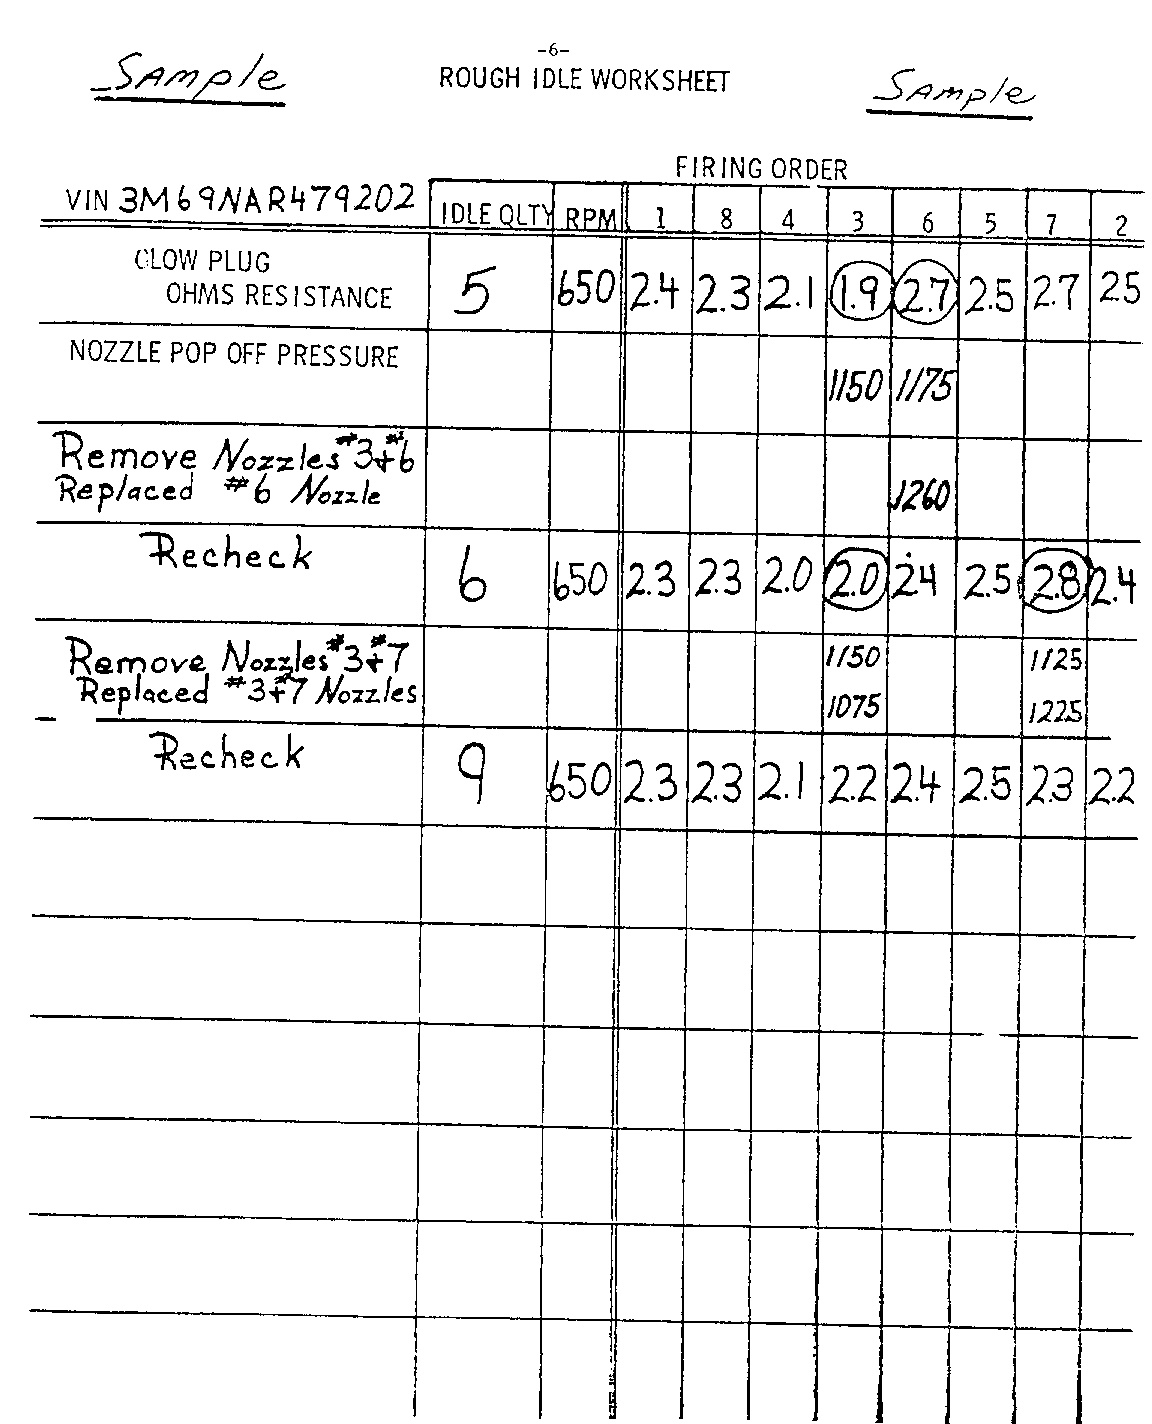
7. With engine still idling, probe each glow plug terminal and record the resistance values on special chart in firing sequence (sample chart attached). Most readings will be between 1.8 and 3.4 OHMS. If these readings are not obtained, turn engine "OFF" for several minutes and check the glow plugs. The resistance should be .7 or .8 OHMS. If this reading is not obtained check meter for correct settings, use the specified battery in the meter and check the ground.
8. The resistance values are proportional to the temperature in each cylinder, and therefore proportional to the output of each cylinder.
9. If resistance reading on any cylinder is about 1.2 or 1.3 ohms, check to see if there is a mechanical condition. Make a compression check of the low cylinder and the cylinders which fire before and after the low cylinder. Correct the cause of the low compression before proceeding to the fuel system.
10. Examine the results, looking for differences between cylinders. Normally, rough engines will have a difference of .3 ohms or more between cylinders in firing order. It will be necessary to raise and lower the reading on one or more cylinders, which can be accomplished by selection of nozzles and/or injection lines.
11. It is more important to check nozzles for seat tightness and for opening nozzle pressure. When a nozzle passes these two tests, the spray pattern with the nozzle in the engine is nearly always satisfactory. Remove the nozzle from the cylinder in which you wish to raise or lower the ohm reading. Determine the pop-off pressure of the nozzles. (Do not check for spray pattern.)
A. Install nozzles with higher pop-off pressure to lower the ohm reading and nozzles with lower pop-off pressure to raise an ohm reading. Normally a change of about 30 psi in pressure will change the reading by .1 ohm.
B. Nozzles normally will drop off in pop-off pressure with miles. Use nozzles from parts stock ON a new car. Use broken-in nozzles on a car with 1500 or more miles.
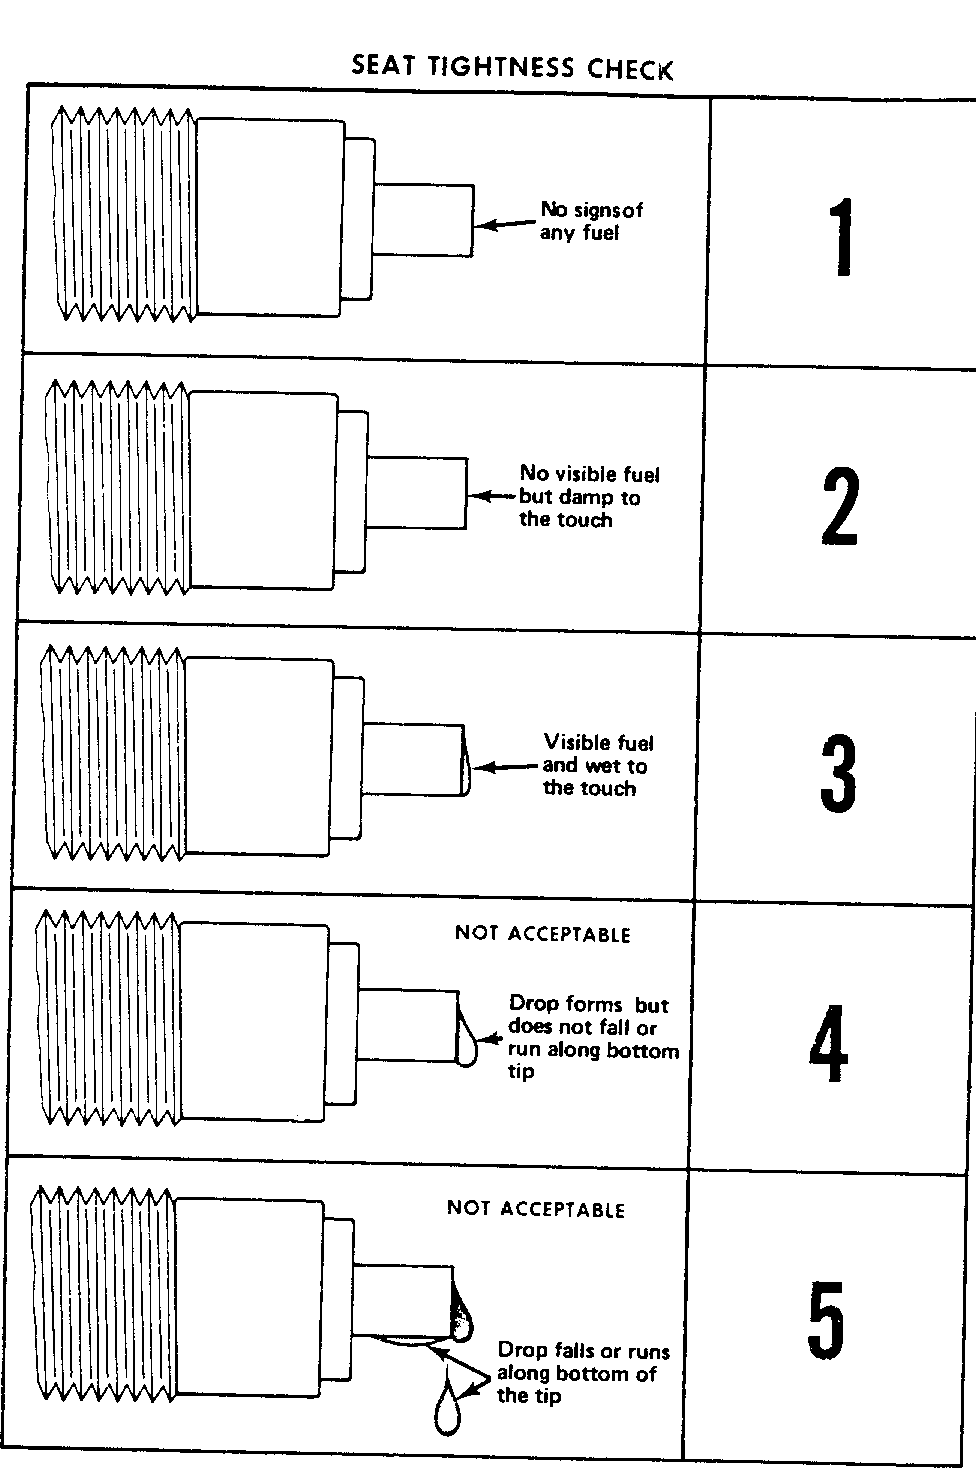
SEAT TIGHTNESS
Slightly open the line pressure gage for this test. The line pressure should first be allowed to fall at least 290 psi (2000 kPa) below the actual opening pressure. Dry the nozzle tip with compressed air, then increase the line pressure to 200 psi (1500 kPa) below the actual opening pressure. Maintain this pressure for 5 seconds. After 5 seconds, patterns 1, 2, and 3 are acceptable, patterns 4 and 5 are not acceptable. See figure on page 8.
SPRAY PATTERNS
Following are major changes and instructions in checking spray patterns:
A. Operate the handle of the test equipment at a rate of 30 strokes per minute.
B. Make sure the pressure gage valve is closed before checking the spray pattern.
C. Disregard the spray patterns shown in ure 6A-122 in the 1980 Service Manual. The spray pattern should be atomized near the tip, and not necessarily identical to the acceptable spray pattern shown in the Manual. Any solid column of fuel or small droplets forming near the tip make the pattern unacceptable.
When checking new nozzles from parts stock, check for opening pressure and record on the nozzle box for future use. Check for seat tightness as outlined. When nozzles pass these two tests, they are satisfactory for installation. It is not necessary to check new nozzles from parts stock for spray pattern.
12. If you are unsuccessful in correcting the rough idle with nozzle changes or the resistance values do not change when different nozzles are installed, the high pressure lines need to be checked. Remove the line(s) and check the volume per Serviceman Bulletin 80-70, Group 6C, Number 13.
A. Low volume lines cause high ohm readings and high volume lines cause low ohm readings.
B. Large lines can cause the nozzles to be ineffective. With large lines, nozzle changes may not change the cylinder readings.
13. An injection pump change may be necessary if the following occurs:
A. If the problem cylinder moves from cylinder to cylinder as changes in nozzles or lines are made.
B. If cylinder ohm readings do not change when nozzles and/or lines are changed.
It important to always recheck the cylinders at the same RPM. Sometimes the cylinder readings do not indicate that an improvement has been made although the engine may in fact idle better.
For warranty purposes, use the labor operation and times as follows:
Operation Number Labor Time
T0011 .6
Add: TO R&R AND TEST 1 or 2 NOZZLES .3 TO R&R AND TEST 3 NOZZLES .4 TO R&R AND TEST 4 NOZZLES .5

General Motors bulletins are intended for use by professional technicians, not a "do-it-yourselfer". They are written to inform those technicians of conditions that may occur on some vehicles, or to provide information that could assist in the proper service of a vehicle. Properly trained technicians have the equipment, tools, safety instructions and know-how to do a job properly and safely. If a condition is described, do not assume that the bulletin applies to your vehicle, or that your vehicle will have that condition. See a General Motors dealer servicing your brand of General Motors vehicle for information on whether your vehicle may benefit from the information.
