A/T OIL COOLER FLUSHING ALL THM A/T MODELS

MODELS AFFECTED: ALL THM TRANSMISSION/TRANSAXLES
This bulletin supersedes transmission oil cooler flushing information published in the THM 440- T4 Service Replacement Transmission Assembly (SRTA) booklet dated August, 1985.
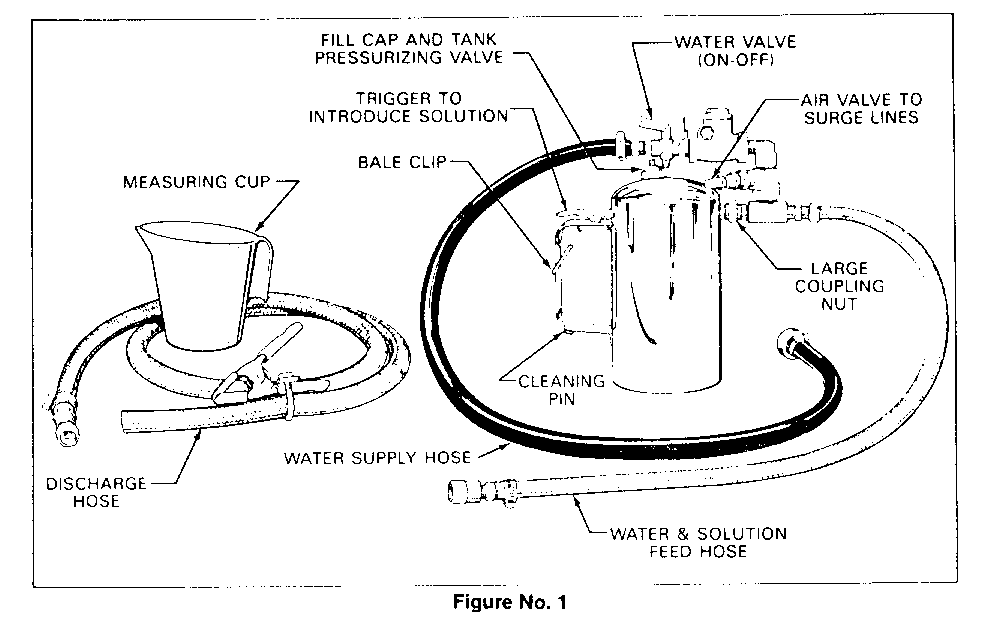
Transmission oil cooler flushing should be performed whenever transmission/transaxle replacement or overhaul service occurs. It is essential to flush the oil cooler after SRTA installation, if fluid contamination is suspected or in any case of pump or torque converter replacement. A new, essential transmission/transaxle oil cooler flushing tool, Kent-Moore number 3 35944 (refer to Figure 1), has been developed to properly flush the oil cooler and will be shipped to GM dealers in September, 1986.
To insure proper transmission/transaxle system service, the following flushing procedure should be performed after the overhauled or replacement assembly has been reinstalled in the vehicle.
Equipment and Materials Needed
Illustration (with call-outs) contained in this bulletin for identification of the various parts of the flushing tool. Kent-Moore Cooler Flushing tool, J 35944 and biodegradable flushing solution* Measuring cup (supplied with tool) Water suppiy (hot water reccommended in all cases if available) Water hose (at least 5/8 inch diameter) Air supply (with water and oil filter) Air chuck (with clip if available) Air pressure gauge Oil drain container Five gallon pail (or larger - with lid) Eye protection Rubber gloves
* Available by the gallon, J 35944-20, or in a case of six, one gallon containers, J 35944-CSE.
Preparation
1. After overhauled or service replacement transmission/transaxle is reinstalled in vehicle, do NOT install oil cooler lines.
2. Remove fill cap on tool and fill can with 0.6 liter (20-21 ounces) of Kent-Moore biodegradable flushing solution. Do not overfill or tool will need to be recharged with air before backflush. Follow manufacturer's suuested procedures for proper handling of solution.
IMPORTANT: DO NOT SUBSTITUTE WITH ANY OTHER SOLUTION. THE FLUSHING TOOL IS DESIGNED TO USE ONLY THIS CONCENTRATE. USE OF ANY OTHER SOLUTION CAN RESULT IN DAMAGE TO THE TOOL, COOLER COMPON- ENTS, OR IMPROPER FLUSHING OF THE COOLER.
3. Secure fill cap and pressurize the flusher can with shop air to 550-700 kPa (80-100 psi).
CAUTION:
Shop air supply must be equipped with a water/oil filter and regulated to 825 kPa (120 psi).
4. Connect the discharge hose to the transmission end of the oil cooler return pipe which is attached to the top fitting of the radiator oli cooler. (See Table 1: for location).
Table 1: Direction of Fluid in Oil Cooler Pipes at Transmission/Transaxle -------------------------------------------------------------------------
Top connector is cooler feed Vertical (top) connector is cooler feed Bottom connector Horizontal (bottom) connector is cooler return is cooler return
200C 440-T4 200-4R
Top connector is cooler return Bottom connector is cooler feed
125C 350C 400 325/325-4L
5. Clip discharge hose onto an oil drain container.
6. Mount the flushing tool to undercarriage of vehicle with the hook provided and connect the feed hose from the flushing tool to the remaining oil cooler pipe.
7. With the tool water valve in the "OFF" position, connect the water hose to the water supply.
8. Turn on the water supply at the faucet.
Initial Flush
9. Switch tool water valve to the "ON" position and allow the water to flow through the oil cooler for 10 seconds to remove the supply of transmission fluid in the system.
NOTICE: If water does not flow through the off cooler (system is completely plugged) do not continue flushing procedure. Turn the water off immediately and inspect the pipes and cooler for restriction. Replace the oil pipe(s) and/or cooler following the procedure in the appropriate Service Information Manual
10. Switch tool water valve to the "OFF"position and clip the discharge hose onto a five gallon pail with a lid or position a shop towel over the end of the discharge hose to prevent splash. Discharge will foam vigorously when solution is introduced into water stream.
11. Switch tool water valve to the "ON" position and depress the trigger to mix flushing solution into the water flow. Use the bale clip provided on the handle to hold the trigger down.
12. Flush oil cooler with water and solution for two minutes. During this flush, attach the air supply to the air valve for 3 to 5 seconds at the end of every 15-20 second interval to create a surging action.
CAUTION:
Shop air supply must be equipped with a water/oil filter and regulated to 825 kPa (120 psi).
13. Release the trigger and switch the tool water valve to the "OFF" position.
14. Disconnect both hoses from the oil cooler pipes.
Backflush
15. Connect hoses to the opposite oil cooler pipes from the initial flush procedures to perform a backflush.
16. Repeat steps 11 and 12.
17. Release the trigger and allow water to rinse the oil cooler for one minute only.
18. Switch tool water valve to the "OFF" position and turn the water supply off at the faucet.
19. Attach air supply to the air valve and dry the system with air for at least two minutes, or longer if moisture is visible exiting from the oil cooler line discharge hose. Use an air chuck clip to secure the air chuck to the air valve for ease of operation.
CAUTION:
Excessive residual moistue can cause corrosion in the oil cooler or cooler pipes and can damage the transmission/transaxle. If steps 20 through 23 cannot be completed at this time, rinse the oil cooler ard cooler pipes with transmission fluid.
20. Connect the cooler feed pipe to the transmission/transaxle (refer to Table 1).
21. Reconnect the discharge hose to the cooler return pipe and place into an appropriate oil drain container.
22. After filling the transminion/transaxle with Dexron (R) II Automatic Transmission Fluid, start the engine and run for 30 seconds. This will remove any residual moisture from the oil cooler and cooler pipes, protect all components from corrosion and check flow rate through the cooler. A minimum of two quarts must be obtained during this 30 second run, if fluid flow is insufficient, check the fluid flow from the transmission/transaxle by disconnecting the oil cooler at the radiator end and restarting the engine. Do the following depending on the flow rate observed:
Insufficient Feed Flow: Inspect transmission/transaxle for cause.
Sufficient Feed Flow: Inspect oil cooler return pipes and fittings for restrictions or leaks. Inspect the transmission/transaxle for cause. If fluid flow from the return line is still inhibited, replace the oil cooler.
23. Remove discharge hose, reconnect cooler return pipe to transmission/transaxle and refill unit to proper fluid level following the appropriate Service information Manual procedure.
Tool Cleaning - Each use.
24. Disconnect the water supply hose from the tool.
25. Bleed air pressure from the can, remove fill cap, return any unused solution to container, and rinse can with water. Do not store tool with solution in tank.
Tooling Cleaning - Every third use.
26. Loosen large coupling nut and remove plumbing from tank (refer to Figure 1).
27. Remove screen from plumbing and wash with water.
28. Use the cleaning pin (refer to Figure 1) to remove any material in the solution orifice. Orifice is located in plumbing below screen.
29. Reconnect plumbing. Fill can half full with water, secure the fill cap, and pressurize the can to 550-700 kPa (80-100 psi).
30. Aim tool into the five pilon pail or floor drain and depress the trigger to allow water from the can to flow through the tool orifice for 30 seconds to insure proper cleaning.
31. Bleed air pressure from can, remove the fill cap, and empty the can.
32. Reconnect fill cap and hose to the flushing tool.
Time allowance for the cooler flushing procedure will be included in specific 1987 Labor Time Guide operations. When using 1986 and prior Time Guides, add 0.6 hours for cooler flushing to the recondition or SRTA replacement time allowance.
General Motors bulletins are intended for use by professional technicians, not a "do-it-yourselfer". They are written to inform those technicians of conditions that may occur on some vehicles, or to provide information that could assist in the proper service of a vehicle. Properly trained technicians have the equipment, tools, safety instructions and know-how to do a job properly and safely. If a condition is described, do not assume that the bulletin applies to your vehicle, or that your vehicle will have that condition. See a General Motors dealer servicing your brand of General Motors vehicle for information on whether your vehicle may benefit from the information.
