Important: Before disabling the SIR, refer to SIR Service Precautions .
SIR is divided into disabling and enabling regions. When performing service on or near the SIR components or the SIR wiring, the SIR system component may have to be disabled. According to the location of the SIR components and position of service, more than one region may have to be disabled. Refer to SIR Region Identification Diagram. Refer to the following figure to determine the specific region to service. When the region is determined, proceed to enable or disable the specific region.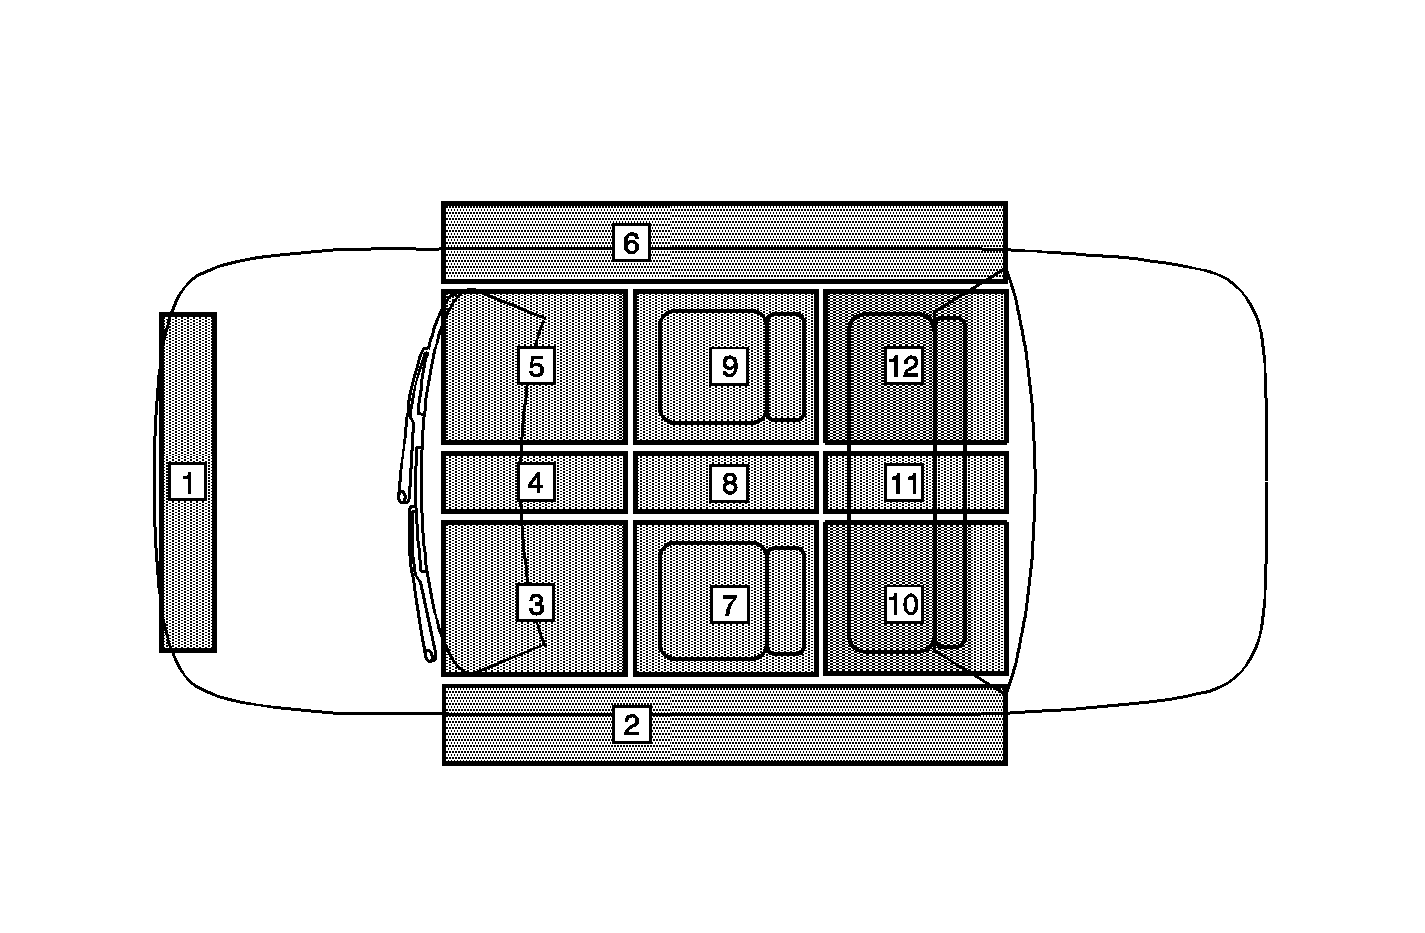
Region | Description |
|---|---|
1 | Left and Right Front End Sensor. Refer to SIR Disabling and Enabling Region 1. |
2 | Driver/Left Roof Rail Module and Side Impact Sensor (SIS). Refer to SIR Disabling and Enabling Region 2. |
3 | SIR Steering Wheel Module and Coil. Refer to SIR Disabling and Enabling Region 3. |
4 | Not Used |
5 | SIR I/P Module. Refer to SIR Disabling and Enabling Region 5. |
6 | Passenger/Right Roof Rail Module and Side Impact Sensor (SIS). Refer to SIR Disabling and Enabling Region 6. |
7 | Driver Seat With Left Front Side Impact Sensor and Seat Belt Pretensioner. Refer to SIR Disabling and Enabling Region 7. |
8 | SIR System Sensing and Diagnostic Module (SDM). Refer to SIR Disabling and Enabling Region 8 . |
9 | Driver Seat With Right Front Side Impact Sensor and Seat Belt Pretensioner. Refer to SIR Disabling and Enabling Region 9. |
10-12 | Not Used |
SIR Disabling and Enabling Region 1
Disabling Procedure
- Rotate the steering wheel so that the wheels are straight forward.
- Turn the ignition switch to OFF position.
- Remove the rear seats. Refer to Rear Seat Cushion Replacement .
- Find and remove the SIR (ignition) fuse in the right rear fusebox (1) and the SIR (battery) fuse in the left rear fusebox (2).
- Open the front engine hood to remove the fasteners and plastic cover of the radiator.
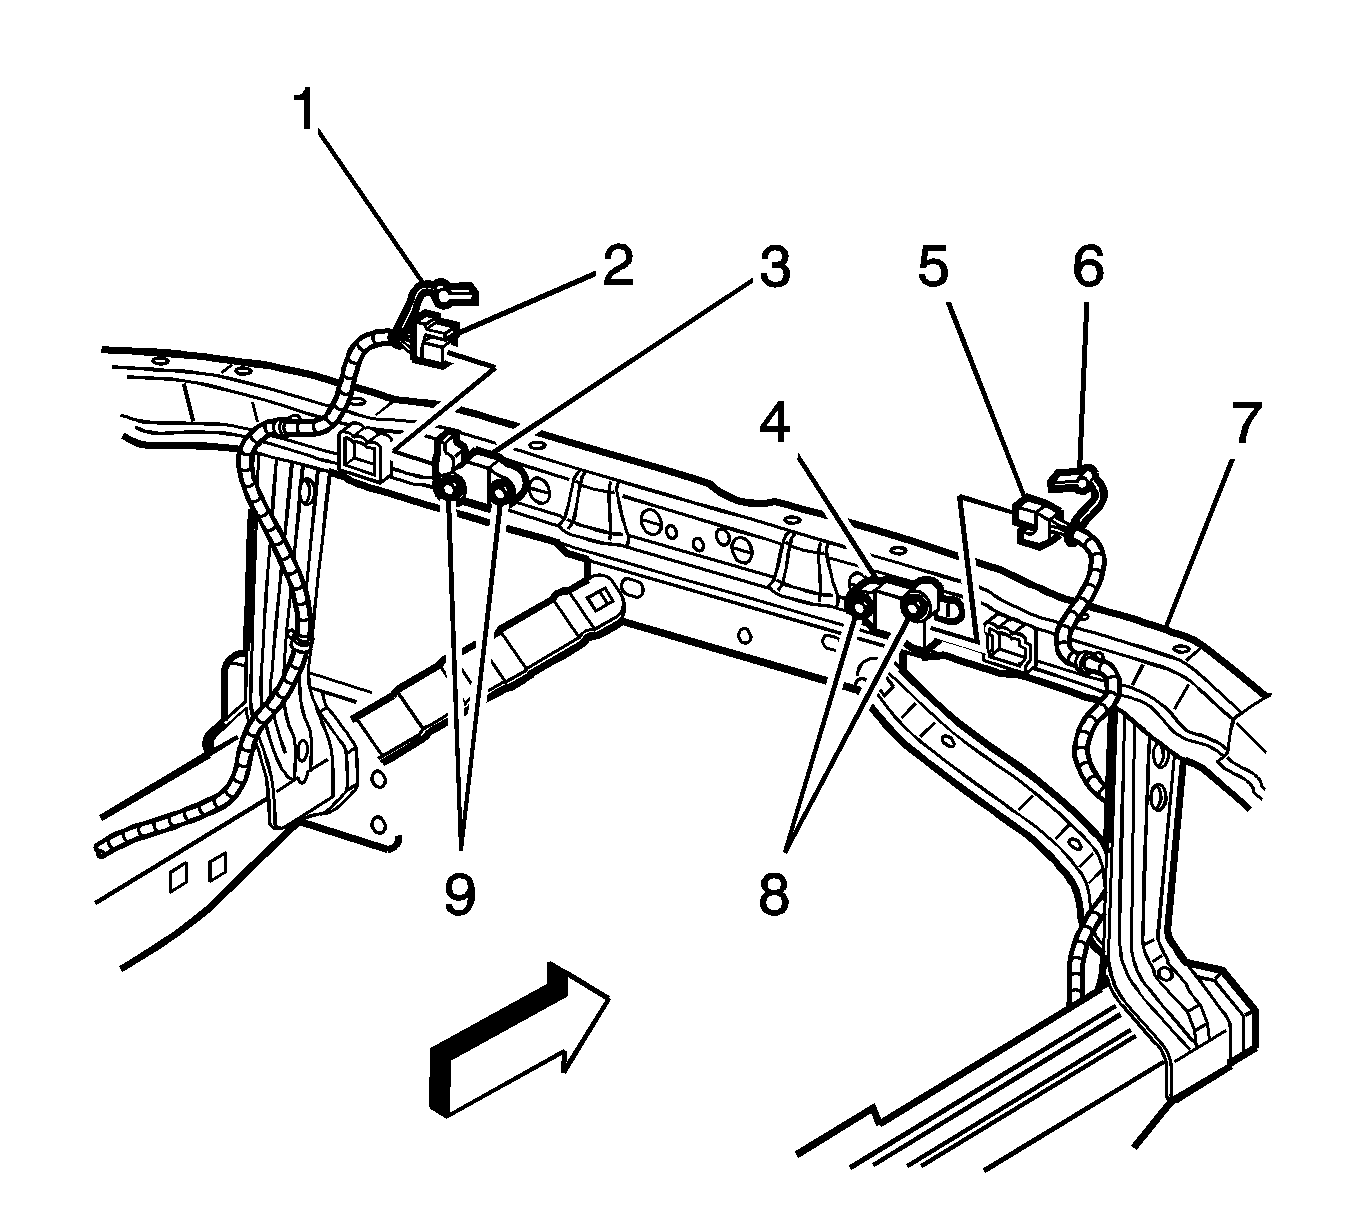
- Remove the upper radiator bracket and push the radiator to the engine to access the two front end sensors (3, 4).
- Remove the 2 connector position assurances (CPA) (1, 6) from the left and right front end sensor connectors (2, 5)
- Remove the two connectors (2, 5) from the left and right front end sensor connectors (3, 4).
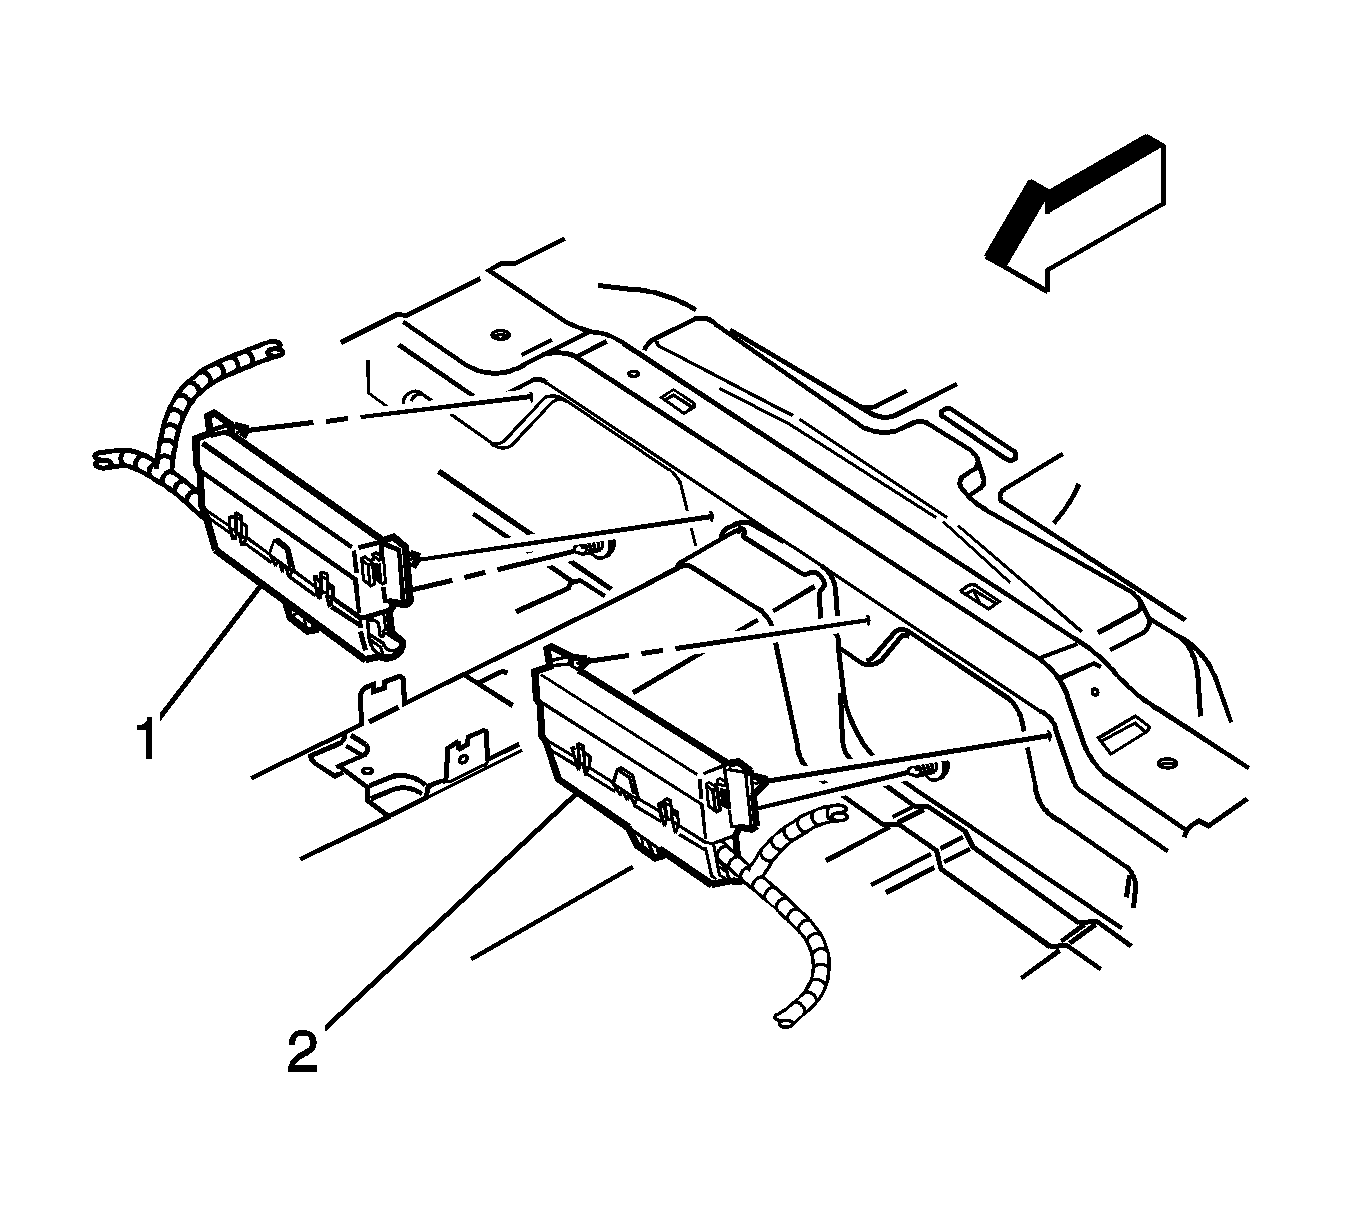
Important: The SDM has 2-way fused power input. To avoid accidental deployment of the SIR system, which may result in personal injury or unnecessary repair to the SIR, remove the SIR (ignition) fuse in right rear fusebox and the SIR (battery) fuse in the left rear fusebox. Remove both the fuses and turn ignition ON, the airbag warning indicator will be ON. This is normal and does not indicate there is SIR malfunction.
Enabling Procedure
- Turn the ignition switch to OFF position.
- Connect the 2 connectors (2, 5) to the left and right front end sensor connectors (3, 4).
- Connect the 2 connector position assurances (CPA) (1, 6) to the left and right front end sensor connectors (2, 5).
- Install the 2 radiator brackets.
- Install the radiator plastic cover.
- Install the SIR (ignition) fuse in the right rear fusebox (1) and the SIR (battery) fuse in the left rear fusebox (2).
- Install the right rear and left rear fuseboxes.
- Install the rear seat. Refer to Rear Seat Cushion Replacement .
- Be careful when installing, turn the ignition switch to ON position. SIR warning indicator will flash and then off.
- If the SIR indicator fails to operate as above mentioned, perform Diagnostic System Check - Vehicle. Refer to Diagnostic System Check - Vehicle .
SIR Disabling and Enabling Region 2
Disabling Procedure
- Rotate the steering wheel so that the wheels are straight forward.
- Turn the ignition switch to OFF position
- Remove the rear seats. Refer to Rear Seat Cushion Replacement .
- Find and remove the SIR (ignition) fuse in the right rear fusebox (1) and the SIR (battery) fuse in the left rear fusebox (2).
- When you intend to disable roof rail module and go to step 6, if the SIS is to be disabled, go to step 10.
- Remove the left floor fixture trim. Refer to Rear Carpet Retainer Replacement
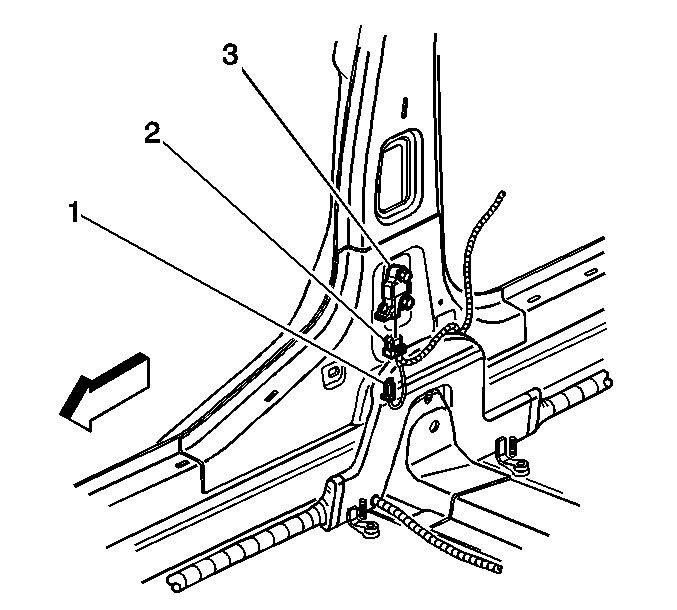
- Push the rear seat back away from the pillar to expose the left/driver side roof rail module connector.
- Remove the connector position assurances (CPA) (3) from the roof rail module yellow connector (2).
- Disconnect the left roof rail module yellow connector (2) from the left roof rail module (1).
- Remove the left central pillar trim panel. Refer to Center Pillar Garnish Molding Replacement .
- Remove the side impact sensor connector position assurance (1) from the left side impact sensor connectors (2).
- Remove the side impact sensor connector (2) from the side impact sensor (3).
Important: The SDM has two-way fused power input. To avoid accidental deployment of the SIR system, which may result in personal injury or unnecessary repair to the SIR, remove the SIR (ignition) fuse in right rear fusebox and the SIR (battery) fuse in the left rear fusebox. Remove both the fuses and turn ignition ON, the airbag warning indicator will be ON. This is normal and does not indicate there is SIR malfunction.
Enabling Procedure
- Turn the ignition switch to OFF position.
- When you intend to enable side impact sensor and go to step 3, if the roof rail module is to be enabled, go to step 6.
- Connect the side impact sensor connector (2) to the side impact sensor (3).
- Connect the connector position assurance (1) to the side impact sensor connectors (2).
- Install the left central pillar trim panel. Refer to Center Pillar Garnish Molding Replacement .
- Connect the left roof rail module yellow connector (2) to the left roof rail module (1).
- Install the connector position assurances (3) to the left roof rail module connector (2).
- Release the rear seat back.
- Install the left floor fixture trim. Refer to Rear Carpet Retainer Replacement
- Install the SIR (ignition) fuse in the right rear fusebox (1) and the SIR (battery) fuse in the left rear fusebox (2).
- Install the right rear and left rear fuseboxes.
- Install the rear seat. Refer to Rear Seat Cushion Replacement .
- Be careful when installing, turn the ignition switch to ON position.
- If the SIR indicator fails to operate as above mentioned, perform Diagnostic System Check - Vehicle. Refer to Diagnostic System Check - Vehicle .
SIR warning indicator will flash and then off.
SIR Disabling and Enabling Region 3
Disabling Procedure
- Rotate the steering wheel so that the wheels are straight forward.
- Turn the ignition switch to OFF position.
- Remove the rear seats. Refer to Rear Seat Cushion Replacement .
- Find and remove the SIR (ignition) fuse in the right rear fusebox (1) and the SIR (battery) fuse in the left rear fusebox (2).
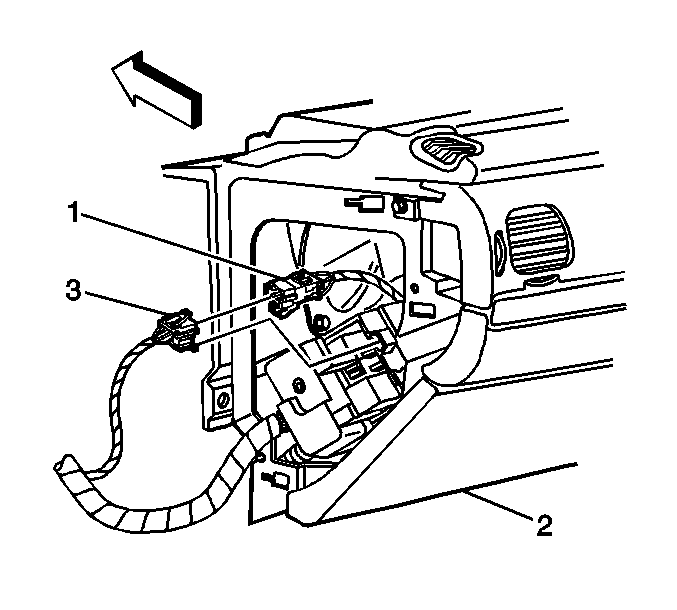
- Remove the left/driver isolation panel from the I/P (2). Refer to Instrument Panel Insulator Replacement - Left Side
- Remove the connector position assurances (CPA) from the steering wheel module coil yellow connector (1).
- Disconnect the steering wheel module coil yellow connector (1) from the vehicle harness yellow connector (3).
Important: The SDM has 2-way fused power input. To avoid accidental deployment of the SIR system, which may result in personal injury or unnecessary repair to the SIR, remove the SIR (ignition) fuse in right rear fusebox and the SIR (battery) fuse in the left rear fusebox. Remove both the fuses and turn ignition ON, the airbag warning indicator will be ON. This is normal and does not indicate there is SIR malfunction.
Enabling Procedure
- Turn the ignition switch to OFF position.
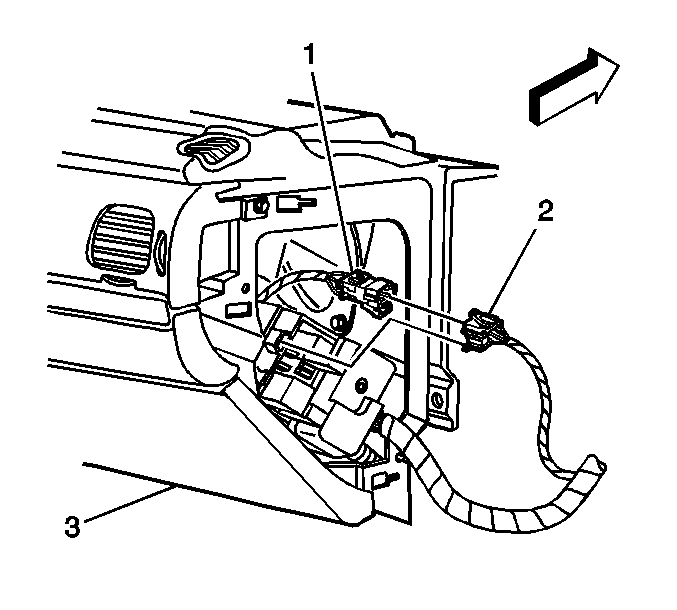
- Connect the steering wheel module coil yellow connector (3) to the vehicle harness yellow connector (1).
- Install the connector position assurances to the steering wheel module coil yellow connector (1)
- Install the left isolation panel to the I/P (2). Refer to Instrument Panel Insulator Replacement - Left Side
- Install the SIR (ignition) fuse in the right rear fusebox (1) and the SIR (battery) fuse in the left rear fusebox (2).
- Install the right rear and left rear fuseboxes.
- Install the rear seat. Refer to Rear Seat Cushion Replacement .
- Be careful when installing, turn the ignition switch to ON position.
- If the SIR indicator fails to operate as above mentioned, perform Diagnostic System Check - Vehicle. Refer to Diagnostic System Check - Vehicle .
SIR warning indicator will flash and then off.
SIR Disabling and Enabling Region 5
Disabling Procedure
- Rotate the steering wheel so that the wheels are straight forward.
- Turn the ignition switch to OFF position.
- Remove the rear seats. Refer to Rear Seat Cushion Replacement .
- Find and remove the SIR (ignition) fuse in the right rear fusebox (1) and the SIR (battery) fuse in the left rear fusebox (2).
- Remove the right/passenger side isolation panel from the I/P (3). Refer to Instrument Cluster Trim Panel Replacement
- Remove the connector position assurances (CPA) from the I/P module yellow connector (1).
- Disconnect the I/P module yellow connector (1) from the vehicle harness yellow connector (2)
Important: The SDM has 2-way fused power input. To avoid accidental deployment of the SIR system, which may result in personal injury or unnecessary repair to the SIR, remove the SIR (ignition) fuse in right rear fusebox and the SIR (battery) fuse in the left rear fusebox. Remove both the fuses and turn ignition ON, the airbag warning indicator will be ON. This is normal and does not indicate there is SIR malfunction.
Enabling Procedure
- Turn the ignition switch to OFF position
- Connect the I/P module yellow connector (1) to the vehicle harness yellow connector (2).
- Connect the connector position assurances from the I/P module yellow connector (2).
- Install the right isolation panel to the I/P (3). Refer to Instrument Panel Insulator Replacement - Right Side
- Install the SIR (ignition) fuse in the right rear fusebox (1) and the SIR (battery) fuse in the left rear fusebox (2).
- Install the right rear and left rear fuseboxes.
- Install the rear seat. Refer to Rear Seat Cushion Replacement .
- Be careful when installing, turn the ignition switch to ON position. SIR warning indicator will flash and then off.
- If the SIR indicator fails to operate as above mentioned, perform Diagnostic System Check - Vehicle. Refer to Diagnostic System Check - Vehicle .
SIR Disabling and Enabling Region 6
Disabling Procedure
- Rotate the steering wheel so that the wheels are straight forward.
- Turn the ignition switch to OFF position.
- Remove the rear seats. Refer to Rear Seat Cushion Replacement .
- Find and remove the SIR (ignition) fuse in the right rear fusebox (1) and the SIR (battery) fuse in the left rear fusebox (2).
- When you intend to disable roof rail module and go to step 6, if the SIS is to be disabled, go to step 10.
- Remove the right floor fixture trim. Refer to Rear Carpet Retainer Replacement
- Push the rear seatback away from the pillar to expose the right/passenger side roof rail module connector
- Remove the connector position assurances (CPA) (3) from the roof rail module yellow connector (2).
- Disconnect the right roof rail module yellow connector (2) from the right roof rail module (1).
- Remove the right central pillar trim panel. Refer to Center Pillar Garnish Molding Replacement .
- Remove the side impact sensor connector position assurance (1) from the right side impact sensor connectors (2).
- Remove the side impact sensor connector (2) from the side impact sensor (3).
Important: The SDM has 2-way fused power input. To avoid accidental deployment of the SIR system, which may result in personal injury or unnecessary repair to the SIR, remove the SIR (ignition) fuse in right rear fusebox and the SIR (battery) fuse in the left rear fusebox. Remove both the fuses and turn ignition ON, the airbag warning indicator will be ON. This is normal and does not indicate there is SIR malfunction.
Enabling Procedure
- Turn the ignition switch to OFF position.
- When you intend to enable side impact sensor and go to step 3, if the roof rail module is to be enabled, go to step 6.
- Connect the side impact sensor connector (2) to the side impact sensor (3).
- Connect the connector position assurance (1) to the side impact sensor connectors (2).
- Install the right central pillar trim panel. Refer to Center Pillar Garnish Molding Replacement .
- Connect the right roof rail module yellow connector (2) to the left roof rail module (1).
- Install the connector position assurances (3) to the right roof rail module connector (2).
- Release the rear seat back.
- Install the right floor fixture trim. Refer to Rear Carpet Retainer Replacement
- Install the SIR (ignition) fuse in the right rear fusebox (1) and the SIR (battery) fuse in the left rear fusebox (2).
- Install the right rear and left rear fuseboxes.
- Install the rear seat. Refer to Rear Seat Cushion Replacement .
- Be careful when installing, turn the ignition switch to ON position. SIR warning indicator will flash and then off.
- If the SIR indicator fails to operate as above mentioned, perform Diagnostic System Check - Vehicle. Refer to Diagnostic System Check - Vehicle .
SIR Disabling and Enabling Region 7
Disabling Procedure
- Rotate the steering wheel so that the wheels are straight forward.
- Turn the ignition switch to OFF position.
- Remove the rear seats. Refer to Rear Seat Cushion Replacement .
- Find and remove the SIR (ignition) fuse in the right rear fusebox (1) and the SIR (battery) fuse in the left rear fusebox (2).
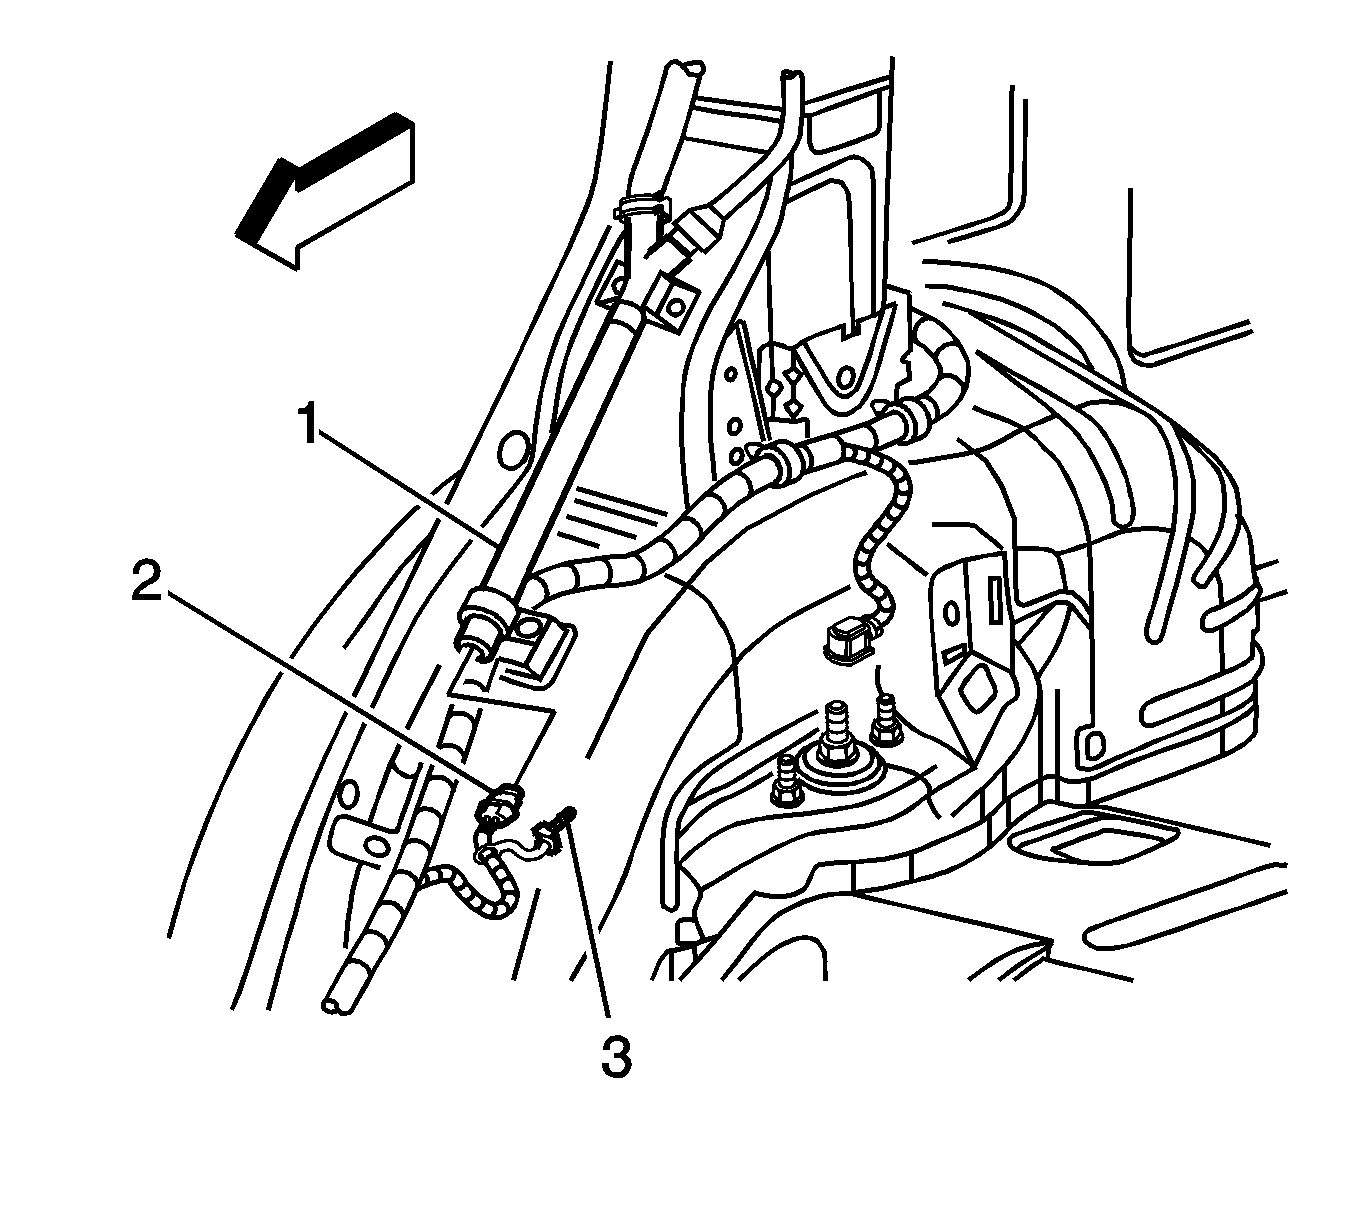
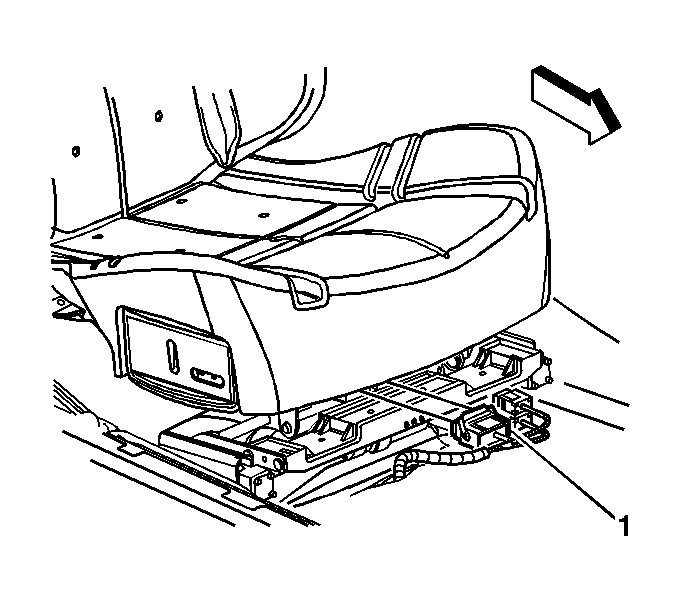
- Remove the 2 connector position assurance from the left front/driver side impact module under the front bottom of the driver seat and seat belt pretensioner yellow connector (1).
- Disconnect the left front side impact module and seat belt pretensioner yellow connector (1) from the vehicle harness yellow connector.
Important: The SDM has 2-way fused power input. To avoid accidental deployment of the SIR system, which may result in personal injury or unnecessary repair to the SIR, remove the SIR (ignition) fuse in right rear fusebox and the SIR (battery) fuse in the left rear fusebox. Remove both the fuses and turn ignition ON, the airbag warning indicator will be ON. This is normal and does not indicate there is SIR malfunction.
Enabling Procedure
- Turn the ignition switch to OFF position.
- Connect the left front side impact module and seat belt pretensioner yellow connector (1) to the vehicle harness yellow connector.
- Install the two connector position assurances to the left front side impact module and seat belt pretensioner yellow connectors (1).
- Install the SIR (ignition) fuse in the right rear fusebox (1) and the SIR (battery) fuse in the left rear fusebox (2).
- Install the right rear and left rear fuseboxes.
- Install the rear seat. Refer to Rear Seat Cushion Replacement .
- Be careful when installing, turn the ignition switch to ON position.
- If the SIR indicator fails to operate as above mentioned, perform Diagnostic System Check - Vehicle. Refer to Diagnostic System Check - Vehicle .
SIR warning indicator will flash and then off.
SIR Disabling and Enabling Region 8
Disabling Procedure
- Rotate the steering wheel so that the wheels are straight forward.
- Turn the ignition switch to OFF position.
- Remove the rear seats. Refer to Rear Seat Cushion Replacement .
- Find and remove the SIR (ignition) fuse in the right rear fusebox (1) and the SIR (battery) fuse in the left rear fusebox (2).
- Remove the right floor fixture trim. Refer to Rear Carpet Retainer Replacement
- Push the rear seatback away from the pillar to expose the right/passenger side roof rail module connector.
- Remove the connector position assurances (CPA) (3) from the roof rail module yellow connector (2).
- Disconnect the right roof rail module yellow connector (2) from the right roof rail module (1).
- Remove the right/passenger isolation panel from the I/P (3). Refer to Instrument Panel Insulator Replacement - Right Side
- Remove the connector position assurances from the I/P module yellow connector (1).
- Disconnect the I/P module yellow connector (1) from the vehicle harness yellow connector (2).
- Remove the two connector position assurances from the passenger/right front side impact module under the front bottom of the passenger seat and seat belt pretensioner yellow connector (1).
- Disconnect the right front side impact module and seat belt pretensioner yellow connector (1) from the vehicle harness yellow connector.
- Remove the left/driver isolation panel from the I/P (2). Refer to Instrument Panel Insulator Replacement - Left Side
- Remove the connector position assurances from the steering wheel module coil yellow connector (1).
- Disconnect the steering wheel module coil yellow connector (1) from the vehicle harness yellow connector (3).
- Remove the two connector position assurances from the left front/driver side impact module under the front bottom of the driver seat and seat belt pretensioner yellow connector (1).
- Disconnect the left front side impact module and seat belt pretensioner yellow connector (1) from the vehicle harness yellow connector.
- Remove the left floor fixture trim. Refer to Rear Carpet Retainer Replacement
- Push the rear seat back away from the pillar to expose the left/driver side roof rail module connector.
- Remove the connector position assurances (3) from the roof rail module yellow connector (2).
- Disconnect the left roof rail module yellow connector (2) from the left roof rail module (1).
Important: The SDM has 2-way fused power input. To avoid accidental deployment of the SIR system, which may result in personal injury or unnecessary repair to the SIR, remove the SIR (ignition) fuse in right rear fusebox and the SIR (battery) fuse in the left rear fusebox. Remove both the fuses and turn ignition ON, the airbag warning indicator will be ON. This is normal and does not indicate there is SIR malfunction.

Enabling Procedure
- Turn the ignition switch to OFF position.
- Connect the steering wheel module coil yellow connector (1) to the vehicle harness yellow connector (3).
- Install the connector position assurances to the steering wheel module coil yellow connector (1).
- Install the driver/left isolation panel to the I/P (2). Refer to Instrument Panel Insulator Replacement - Left Side
- Connect the driver/left front side impact module under the front of the driver seat and seat belt pretensioner yellow connector to the vehicle harness yellow connector (1).
- Install the two connector position assurances to the left front side impact module and seat belt pretensioner yellow connectors (1).
- Connect the left roof rail module yellow connector (2) to the left roof rail module (1).
- Install the connector position assurances (3) to the left roof rail module connector (2).
- Release the rear seat back.
- Install the left floor fixture trim. Refer to Rear Carpet Retainer Replacement
- Connect the passenger/instrument panel module yellow connector (1) to the vehicle harness yellow connector (2).
- Connect the connector position assurances from the I/P module yellow connector (1).
- Install the passenger/right isolation panel to the I/P (3). Refer to Instrument Panel Insulator Replacement - Right Side
- Connect the passenger/right front side impact module under the front of the passenger seat and seat belt pretensioner yellow connector to the vehicle harness yellow connector (1).
- Install the two connector position assurances to the right front side impact module and seat belt pretensioner yellow connectors (1).
- Connect the right roof rail module yellow connector (2) to the left roof rail module (1).
- Install the connector position assurances (3) to the right roof rail module connector (2).
- Release the rear seat back.
- Install the right floor fixture trim. Refer to Rear Carpet Retainer Replacement
- Install the SIR (ignition) fuse in the right rear fusebox (1) and the SIR (battery) fuse in the left rear fusebox (2).
- Install the right rear and left rear fuseboxes.
- Install the rear seat. Refer to Rear Seat Cushion Replacement .
- Be careful when installing, turn the ignition switch to ON position.
- If the SIR indicator fails to operate as above mentioned, perform Diagnostic System Check - Vehicle. Refer to Diagnostic System Check - Vehicle .
SIR warning indicator will flash and then off.
SIR Disabling and Enabling Region 9
Disabling Procedure
- Rotate the steering wheel so that the wheels are straight forward.
- Turn the ignition switch to OFF position.
- Remove the rear seats. Refer to Rear Seat Cushion Replacement .
- Find and remove the SIR (ignition) fuse in the right rear fusebox (1) and the SIR (battery) fuse in the left rear fusebox (2).
- Remove the 2 connector position assurances (CPA) from the passenger/right front side impact module under the front bottom of the passenger seat and seat belt pretensioner yellow connector (1).
- Disconnect the right front side impact module and seat belt pretensioner yellow connector (1) from the vehicle harness yellow connector
Important: The SDM has 2-way fused power input. To avoid accidental deployment of the SIR system, which may result in personal injury or unnecessary repair to the SIR, remove the SIR (ignition) fuse in right rear fusebox and the SIR (battery) fuse in the left rear fusebox. Remove both the fuses and turn ignition ON, the airbag warning indicator will be ON. This is normal and does not indicate there is SIR malfunction.
Enabling System
- Turn the ignition switch to OFF position.
- Connect the right front side impact module and seat belt pretensioner yellow connector (1) to the vehicle harness yellow connector.
- Install the 2 connector position assurances to the right front side impact module and seat belt pretensioner yellow connectors (1).
- Install the SIR (ignition) fuse in the right rear fusebox (1) and the SIR (battery) fuse in the left rear fusebox (2).
- Install the right rear and left rear fuseboxes.
- Install the rear seat. Refer to Rear Seat Cushion Replacement .
- Be careful when installing, turn the ignition switch to ON position.
- If the SIR indicator fails to operate as above mentioned, perform Diagnostic System Check - Vehicle. Refer to Diagnostic System Check - Vehicle .
SIR warning indicator will flash and then off.
