Air Conditioning (A/C) System Performance Test LH2
| Table 1: | A/C Performance Table |
Test Description
This test measures the operating efficiency of the A/C system under the following conditions:
| • | The current ambient air temperature |
| • | The current relative humidity |
| • | The high side pressure of the A/C system |
| • | The low side pressure of the A/C system |
| • | The temperature of the air being discharged into the passenger compartment |
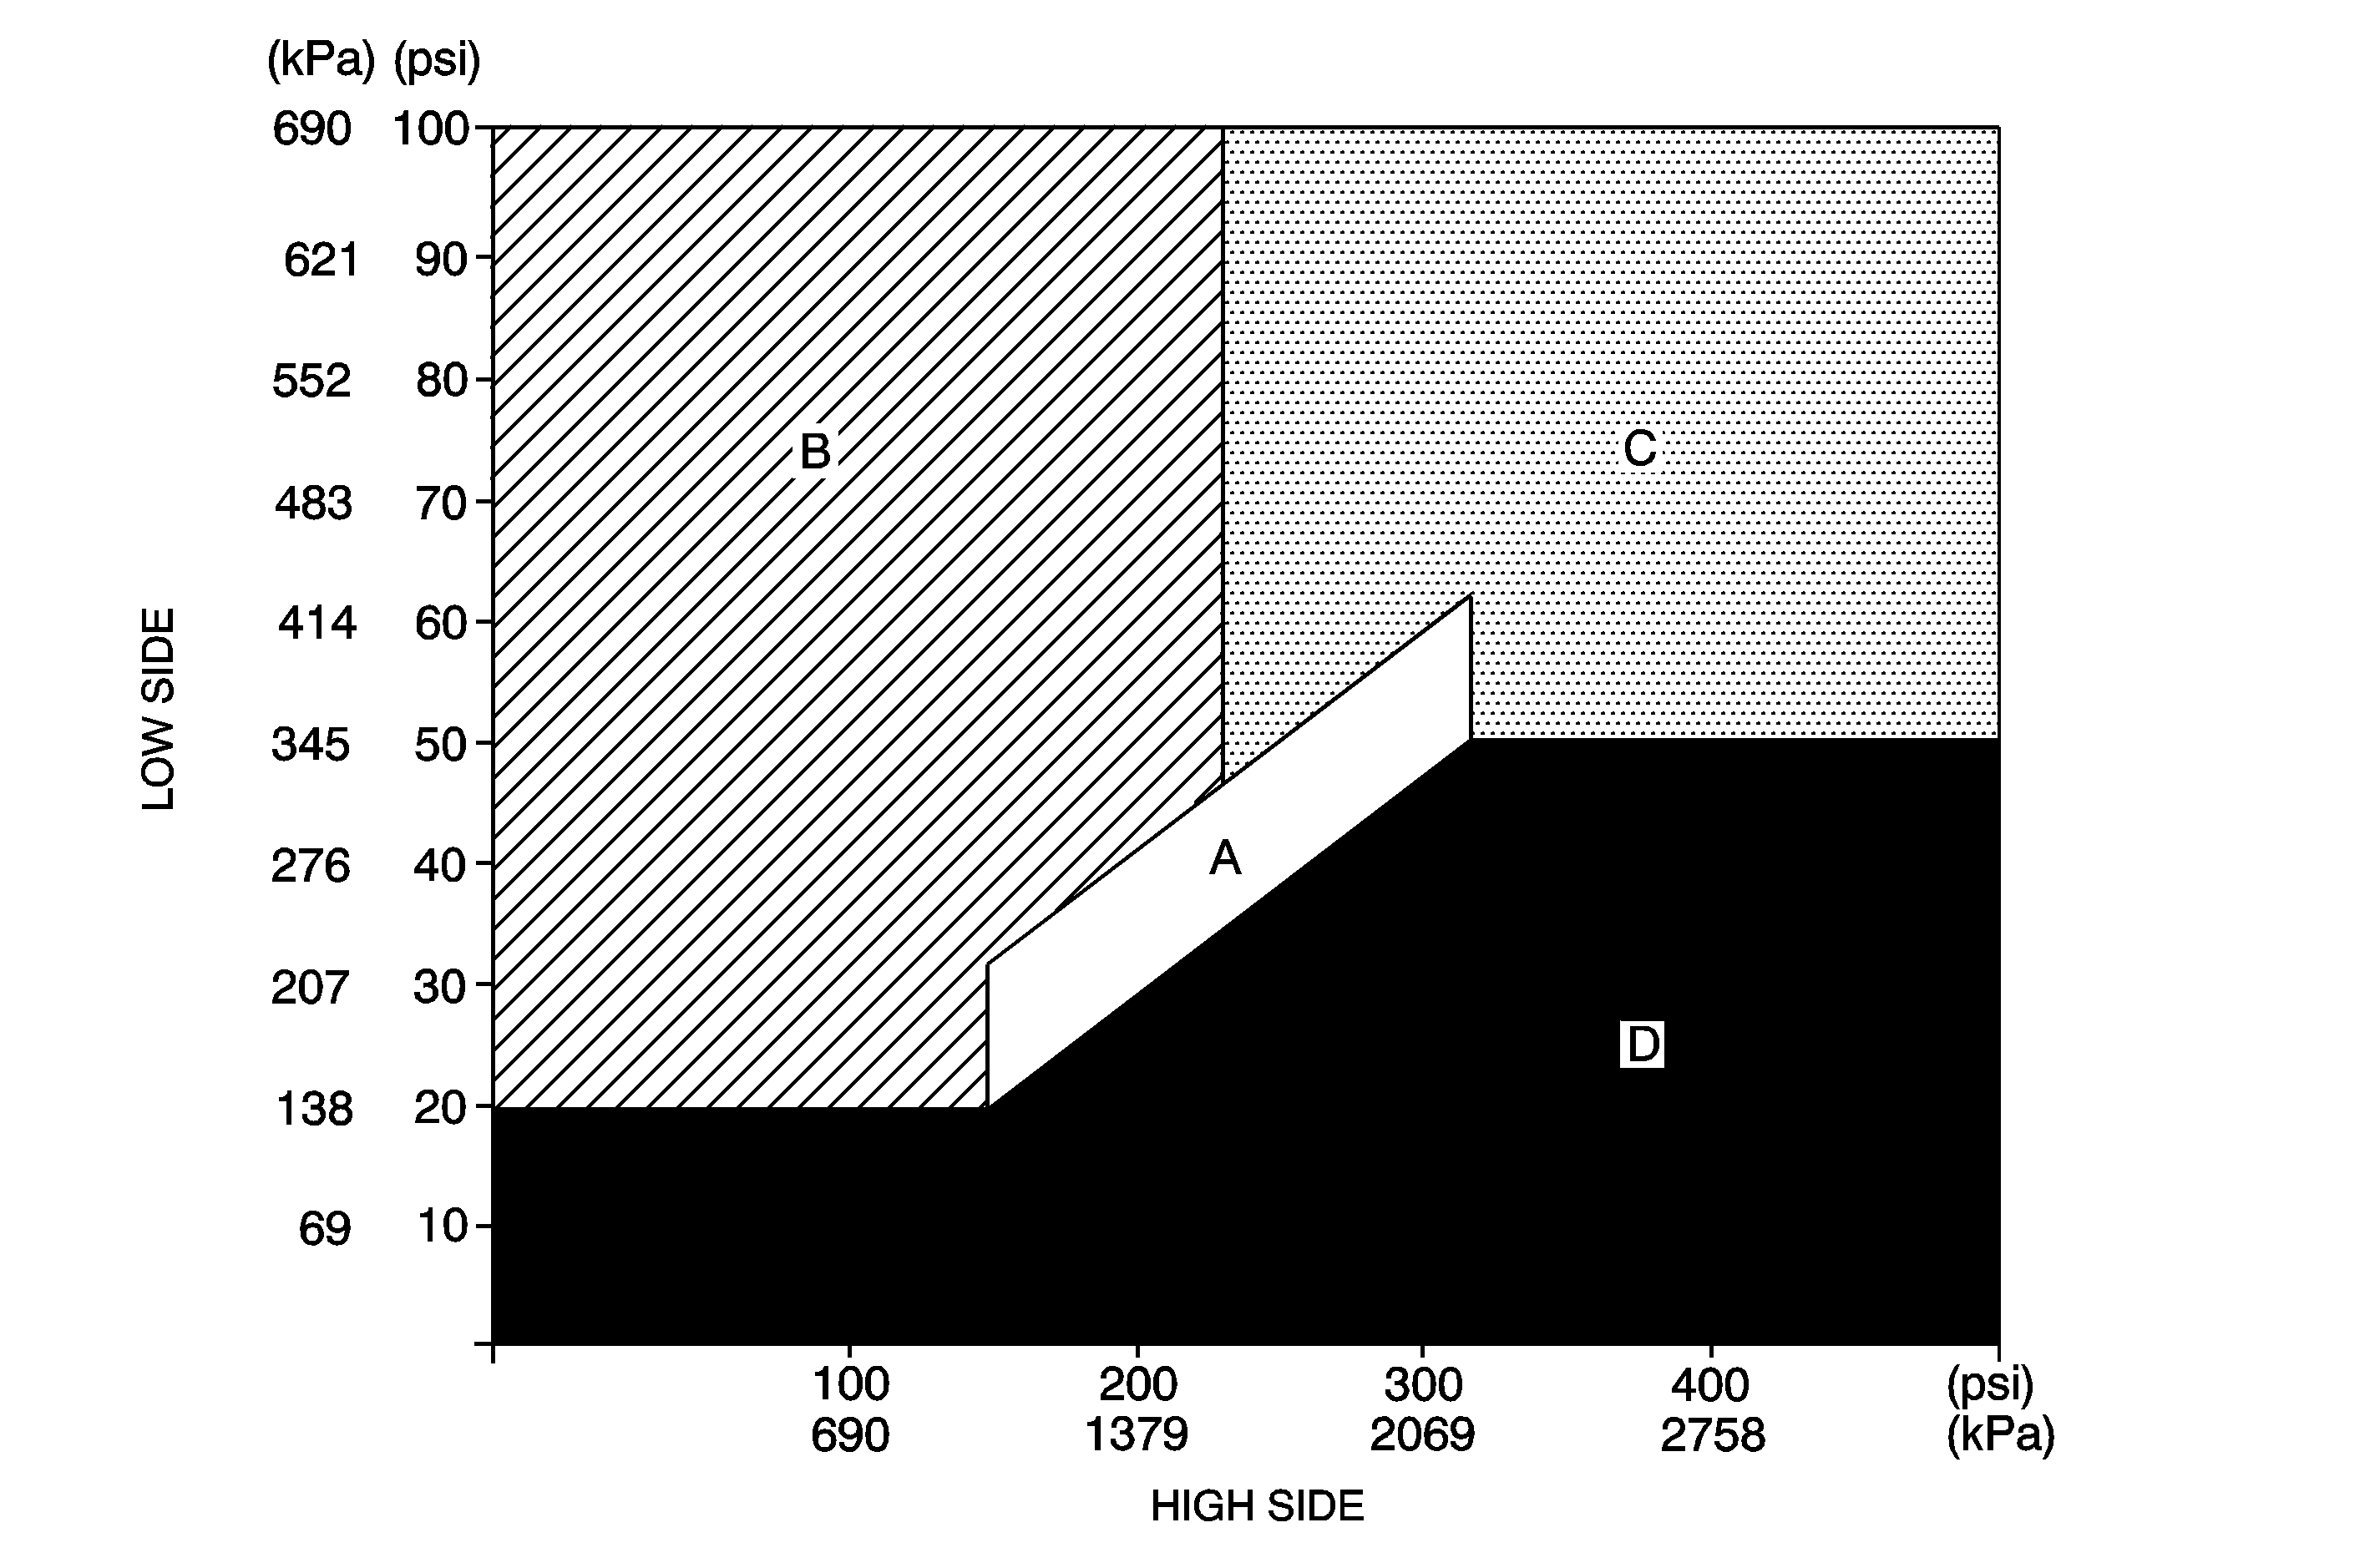
The numbers below refer to the step numbers on the diagnostic table.
-
This step determines if the A/C system has at least the minimum refrigerant charge required to operate the system without damage.
-
This step measures the performance of the A/C system.
-
This step is to allow for vehicle variations as well as high ambient temperatures.
Step | Action | Values | Yes | No | ||||||||||||||||||||||||
|---|---|---|---|---|---|---|---|---|---|---|---|---|---|---|---|---|---|---|---|---|---|---|---|---|---|---|---|---|
|
Important:
| ||||||||||||||||||||||||||||
Are both the low side and high side pressures above the specified value? | More than 16°C (60°F) 345 kPa (50 psi) More than 24°C (75°F) 483 kPa (70 psi) More than 33°C (90°F) 690 kPa (100 psi) | Go to Step 2 | Go to Leak Testing | |||||||||||||||||||||||||
Important: Record the relative humidity and the ambient air temperature at the time of the test.
Important: Make sure that the compressor is engaged when taking the data. Press the RESET button, before using the print function of the J 43600 .
Does all the data recorded fall within the specified ranges? | -- | Go to Step 8 | Go to Step 3 | |||||||||||||||||||||||||
If the pressures and temperature recorded do not fall within the specified ranges of the A/C Performance Table:
Does all the data recorded fall within the specified ranges? | -- | Go to Step 8 | Go to Step 4 | |||||||||||||||||||||||||
4 | Do the high and low side pressures fall within the specified ranges, but the outlet temperatures do not? | -- | Go to Step 5 | |||||||||||||||||||||||||
5 | Is the low side pressure greater than the specified range, but the high side pressure within or less than the specified range? | -- | Go to Step 6 | |||||||||||||||||||||||||
6 | Are the low and high side pressures both greater than the specified ranges? | -- | Go to Step 7 | |||||||||||||||||||||||||
7 | Is the high side pressure greater than or within the specified range, but the low side pressure is less than the specified range? | -- | Go to Step 8 | |||||||||||||||||||||||||
8 | Operate the system in order to verify the test results. Did you find the same results? | -- | System OK | |||||||||||||||||||||||||
Ambient Temperature | Relative Humidity (%) | Low Side Service Port Pressure | High Side Service Port Pressure | Maximum Left Center Discharge Air Temperature | Maximum Left Rear Discharge Air Temperature |
|---|---|---|---|---|---|
13-18°C (55-65°F) | 0-100% | 170-234 kPa (25-34 psi) | 1101-1411 kPa (160-205 psi) | 8°C (46°F) | 11°C (52°F) |
19-24°C (66-75°F) | Less than 40% | 187-263 kPa (27-38 psi) | 1241-1503 kPa (180-218 psi) | 11°C (52°F) | 14°C (57°F) |
Greater than 40% | 194-271 kPa (28-39 psi) | 1231-1551 kPa (179-225 psi) | 12°C (54°F) | 14°C (57°F) | |
25-29°C (76-85°F) | Less than 35% | 218-286 kPa (32-42 psi) | 1341-1591 kPa (194-231 psi) | 13°C (55°F) | 16°C (61°F) |
35-60% | 193-276 kPa (28-40 psi) | 1310-1551 kPa (190-225 psi) | 14°C (57°F) | 16°C (61°F) | |
Greater than 60% | 225-294 kPa (33-43 psi) | 1393-1634 kPa (202-237 psi) | 14°C (57°F) | 17°C (63°F) | |
30-35°C (86-95°F) | Less than 30% | 242-314 kPa (35-46 psi) | 1471-1741 kPa (213-2531 psi) | 16°C (61°F) | 19°C (66°F) |
30-50% | 245-317 kPa (36-46 psi) | 1501-1761 kPa (218-255 psi) | 17°C (63°F) | 19°C (66°F) | |
Greater than 50% | 249-322 kPa (36-47 psi) | 1531-1801 kPa (222-261 psi) | 17°C (63°F) | 20°C (68°F) | |
36-41°C (96-105°F) | Less than 20% | 271-342 kPa (39-50 psi) | 1631-1881 kPa (237-273 psi) | 18°C (64°F) | 21°C (70°F) |
20-40% | 273-345 kPa (40-50 psi) | 1593-1827 kPa (231-265 psi) | 19°C (66°F) | 22°C (72°F) | |
Greater than 40% | 276-359 kPa (40-52 psi) | 1848-2041 kPa (268-296 psi) | 20°C (68°F) | 22°C (72°F) | |
42-46°C (106-115°F) | Less than 20% | 301-367 kPa (44-53 psi) | 1841-2048 kPa (267-297 psi) | 20°C (68°F) | 23°C (73°F) |
Greater than 20% | 302-369 kPa (44-54 psi) | 1801-2031 kPa (261-295 psi) | 21°C (70°F) | 24°C (75°F) | |
47-49°C (116-120°F) | Less than 30% | 296-365 kPa (43-53 psi) | 1868-2075 kPa (271-301 psi) | 22°C (72°F) | 25°C (77°F) |
LH2 With Standard Cooling
Air Conditioning (A/C) System Performance Test LY7
Special Tools
| • | J 39400-A Halogen Leak Detector |
| • | J 41447 Leak Detection Dye |
| • | J 42220 Leak Detection Lamp |
| • | J 43872 Fluorescent Dye Cleaner |
| • | J 46297 A/C Dye Injector Kit |
| • | J 46297-12 Replacement Dye Cartridges |
Refrigerant Leak Testing
Note: General Motors vehicles are now manufactured with fluorescent dye installed directly into the air conditioning (A/C) system.
The fluorescent dye mixes and flows with the polyalkylene glycol (PAG) oil throughout the refrigerant system. Verifying some passive leaks may require using the J 39400-A , even though the A/C system contains fluorescent dye. The only time when adding additional fluorescent dye is required is after flushing the A/C system.
Fluorescent Leak Detector
Fluorescent dye will assist in locating any leaks in the A/C system.
| Note: PAG oil is water soluble. |
| • | Condensation on the evaporator core or the refrigerant lines may wash the PAG oil and fluorescent dye away from the actual leak. Condensation may also carry dye through the HVAC module drain. |
| • | Leaks in the A/C system will be indicated in a light green or yellow color when using the leak detection lamp. |
| Use the leak detection lamp in the following areas: |
| - | All fittings or connections that use seal washers or O-rings |
| - | All of the A/C components |
| - | The A/C compressor shaft seal |
| - | The A/C hoses and pressure switches |
| - | The HVAC module drain tube, if the evaporator core is suspected of leaking |
| - | The service port sealing caps |
| - | The sealing cap is the primary seal for the service ports. |
| • | Follow the instructions supplied with the J 42220 . |
| • | To prevent false diagnosis in the future, thoroughly clean the residual dye from any area where leaks were found. Use a rag and the approved J 43872 . |
Fluorescent Dye Injection
| Note: Use only fluorescent dye approved by General Motors. |
| • | J 41447 can be poured directly into a removed A/C component. |
| • | J 46297-12 is injected into the low side port using J 46297 . |
| • | Not all of the fluorescent dyes are compatible with PAG oil. Some types of dye decrease the oil viscosity or may chemically react with the oil. |
| • | R-134A leak detection dye requires time to work. Depending on the leak rate, a leak may not become visible for between 15 minutes and 7 days. |
| Note: Do NOT overcharge the A/C system with dye. Use only one 7.39 ml (0.25 oz) charge. |
| • | To prevent false diagnosis, thoroughly clean any residual dye from the service port with a rag and the approved fluorescent dye cleaner J 43872 . |
Halogen Leak Detector
Warning: Do not operate the detector in a combustible atmosphere since its sensor operates at high temperatures or personal injury and/or damage to the equipment may result.
Ensure that the vehicle has at least 0.45 kg (1 lb) of refrigerant in the A/C refrigeration system in order to perform a leak test. Refer to Refrigerant Recovery and Recharging for recharging the A/C system.
Note: Halogen leak detectors are sensitive to the following items:
• Windshield washing solutions • Many solvents and cleaners • Some adhesives used in the vehicle
Clean and dry all surfaces in order to prevent a false warning. Liquids will damage the detector.
Note: Conduct test along the continuous routes to ensure no leak is omitted. Test all areas of the system for leaks.
Follow the instructions supplied with the J 39400-A .
