DRIVELINE VIBRATION AND/OR PHASING BOOM

SUBJECT: DRIVELINE VIBRATION AND/OR PHASING BOOM 90 KPH (55 MPH) AND UP (UPDATES SERVICE PROCEDURE)
VEHICLES AFFECTED: 1982-84 "C" AND 1985-92 "D" MODELS
THIS BULLETIN SUPERSEDES AND REPLACES GM OF CANADA BULLETIN 88-4-106 AND CADILLAC BULLETIN T-88-162. THIS BULLETIN IS BEING REVISED TO INCLUDE 1989-92 "D" MODEL YEARS AND INCLUDE 1982-84 "C" MODELS.
CONDITION:
Some 1982-1984 Cadillac RWD DeVilles and Fleetwoods and 1985-1992 Cadillac Broughams may experience a condition of a driveline vibration and/or phasing boom at 90 kph (55 mph) and up.
CAUSE:
This condition may be caused by a resonant vibration of the rear axle assembly.
CORRECTION:
To repair this condition it is important to perform all of the following service procedures, in order, for the specific model year being repaired.
NOTE: The driveline vibration and/or phasing boom may peak at different speeds depending on model year, rear axle ratio, or size.
I. Refer to Section OA of the appropriate year Cadillac Service Information Manual to determine if the vibration is road speed sensitive. If the vibration is road speed sensitive, proceed to step 11; if not, refer to the appropriate section of the Service Information Manual.
II. Check wheels and tires for radial and lateral runout and for proper balance, refer to Section 3E in the appropriate year Service Information Manual.
III. For 1982-1983 models only: On 7-1/2" axle assembly, install a new pinion flange, P/N 7827670.
IV. Check pinion flange runout, refer to Section A for 7-1/2" axle assembly (Figure 1) and Section B for 8-3/4" (Figure 2).
A. Check pinion flange runout on a 7-1/2" axle assembly as follows:
1. Install pinion flange runout gage J-34601 using the same bolts and straps as used to install the propeller shaft, refer to Figure 1.
2. Rotate the pinion flange one complete revolution, and zero indicator at the point of the lowest reading.
3. Rotate the pinion flange until the dial indicator shows maximum reading.
4. If runout exceeds 0.1 5 mm (.006") Total Indicator Runout (TIR), the pinion flange should be indexed 180 degrees in relation to the pinion; and runout should be checked again. If the runout is still in excess of 0.15 mm (.006"), replace the pinion flange (and repeat step A).
5. If the pinion flange was re-indexed in step 4 and the TIR is 0.1 3 mm (.005") or less, remove the compensating weight from the front of the pinion flange slinger, refer to Figure 1. If in step 3 the TIR was 0.1 5 mm (.006") , there should be a compensating weight attached to the front side of the slinger nearest the maximum indicator reading. If there is no weight attached to the slinger, the pinion flange must be indexed until the TIR is 0.1 3 mm (.005") or less. If not 0. 1 3 mm (.005") or less, replace the pinion flange (and repeat step A).
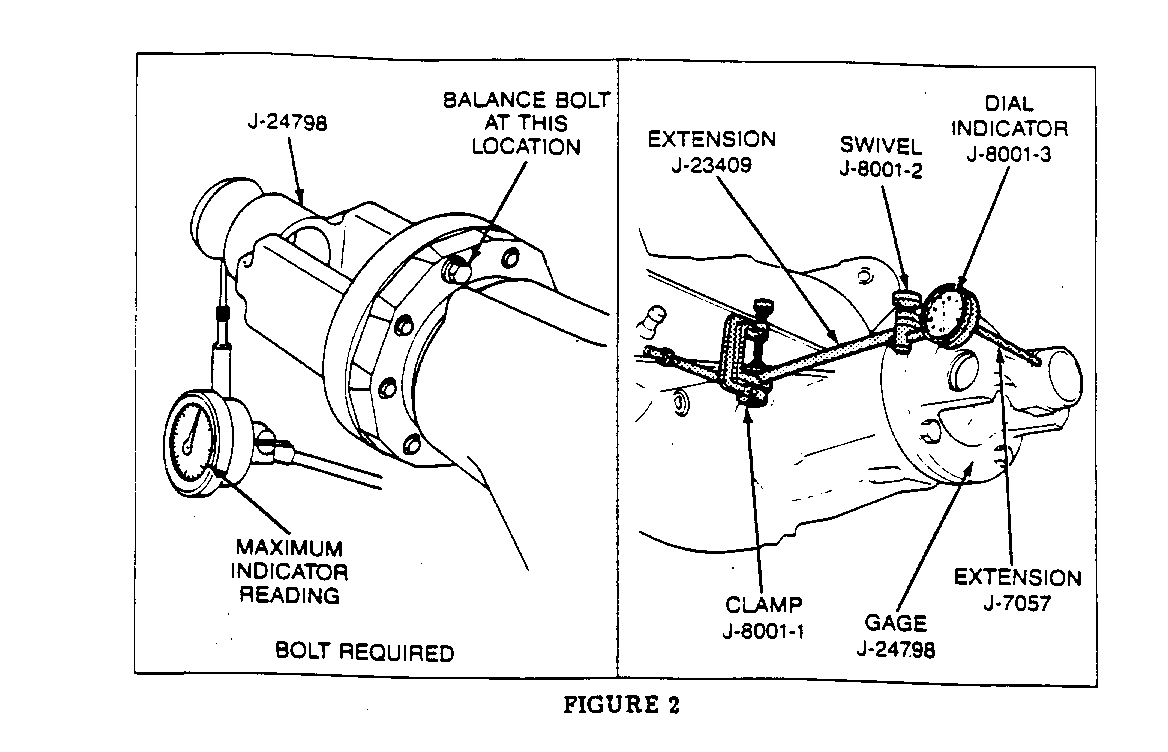
B. Check the pinion flange runout on an 8-3/4" axle assembly as follows:
1. Install pinion flange runout gage J-24798 using the same bolt hole location as the propeller shaft mounting, refer to Figure 2.
2. Rotate the pinion flange one complete revolution, and zero the dial indicator at the point of the lowest reading
3. Rotate the pinion flange until the dial indicator shows maximum reading.
4. If runout exceeds 0.1 8 mm (.007") TIR, the pinion flange should be indexed 180 degrees in relation to the pinion; and runout should be checked again. If the runout still exceeds 0.1 8 mm (.007"), replace the pinion flange (and repeat step B).
5. If the pinion flange was re-indexed in step 4 and the TIR is 0.08 mm (.003") or less, the compensating weight must be removed from the back side of the pinion flange, refer to Figure 2. If in step 3 the TIR was 0.1 to 0.1 8 mm (.004" to. 007"), there should be a compensating balancing bolt attached to the back side of the pinion flange nearest 180 degrees (directly opposite) from the maximum indicator reading, refer to Figure 2.
V. Re-index the propeller shaft to all possible locations on the pinion flange and evaluate. install the propeller shaft in the position of the least amount of vibration.
VI. Check propeller shaft rear universal joint angle as follows:
NOTE: A 1/4 degree change to the rear universal joint angle will change the front universal joint angle by 1/2 degree. Therefore, after changing either the front or rear joint angle it is important to recheck the other joint angle.
A. Place inclinometer on rear propeller shaft bearing cap. Centre bubble in sight glass and record measurement. Bearing cap must be straight up and down and free of dirt or other foreign material to obtain an accurate measurement, refer to Figure 3.
B. Rotate propeller shaft 90 degrees and place inclinometer on rear drive yoke bearing cap. Centre bubble in sight glass and record measurement, refer to Figure 4.
C. Subtract smaller figure from larger figure to obtain the rear universal joint angle. Joint angle should be 2 degrees.
D. If joint angle is not 2 degrees, loosen all eight rear control arm bolts and jack the pinion nose up or pull down as needed to obtain a 2 degrees joint angle.
E. With the pinion nose at desired location and with the rear axle assembly raised to its fully-loaded position, torque the control arm bolts. Using this procedure bring the angle as close to the specification as possible, approximately a 1 degree angle change may be obtained.
VII. Check propeller shaft front universal joint angle.
A. Due to revisions in production tolerances, the inclinometer adapter (J-23498-20) may not fit onto some front cardan joints because of interference with the transmission cross-member. To revise the adapter to make it fit on cars with a single cardan prop-shaft, follow the procedure below:
1. Cut off the thumb screw with a hacksaw, refer to Figure 5. Discard thumbscrew.
2. Using an Allen wrench, refer to Figure 5, loosen the screw from the inside of the tool until the two pieces of the tool separate.
3. Insert a washer approximately 4-1/2mm (3/16") thick between the two pieces of the tool and hold in place by reinstalling the screw, refer to Figure 5.
4. Grind off the end of the screw until it is flush with the tool.
B. Place inclinometer adapter on front propeller shaft bearing cap. Place the inclinometer on the adapter then centre the bubble in sight glass and record measurement, refer to Figure 6.
C. Rotate propeller shaft 90 degrees and place inclinometer adapter in front slip spline yoke bearing cap. Place the inclinometer on the adapter then centre the bubble on sight glass and record measurement, refer to Figure 7.
D. Subtract smaller figure from larger figure to obtain the front universal joint angle. The front joint angle should be 2 degrees.
E. If joint angle is not 2 degrees, add or remove shims between the transmission and the transmission mount to obtain a 2 degree joint angle.
F. Repeat step VI if correction was made in step VII.
VIII. With both rear tire and wheel assemblies removed, reinstall wheel lug nuts with flat side next to drum then check propeller shaft balance as follows:
A. Mark and number propeller shaft at four points 90 degrees apart at rear of shaft just forward of balance weight.
B. Install two hose clamps on the swedged down portion of the propeller shaft. Align both clamps to any one of the four marks made on the shaft in step A. Tighten the clamps. Be sure sufficient clearance is maintained so that clamp heads do not contact floor pan of car.
C. Run the car through the suspect speed range. Note amount of unbalance.
D. Loosen clamps and rotate clamp heads 90 degrees to next mark on shaft. Tighten clamps and repeat step C.
E. Repeat step D until car has been run with clamp heads located at all four marks on the shaft.
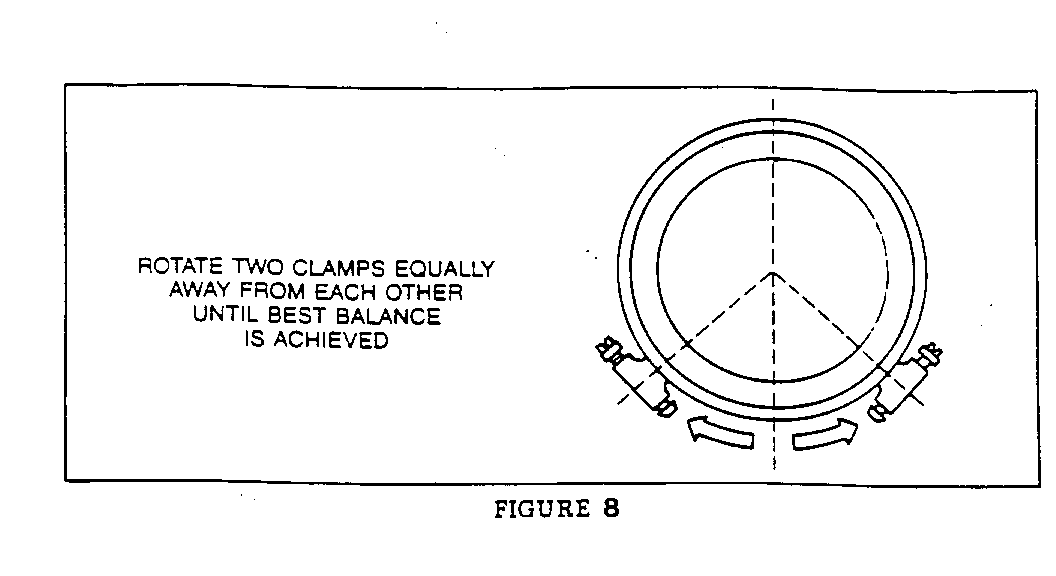
F. Position clamps at point of minimum unbalance. Rotate the clamp heads away from each other 45 degrees, one each way from the point of minimum unbalance, refer to Figure 8. Run the car and note if unbalance has improved.
G. Continue to rotate the clamps apart in smaller angular increments until the feel for unbalance is best.
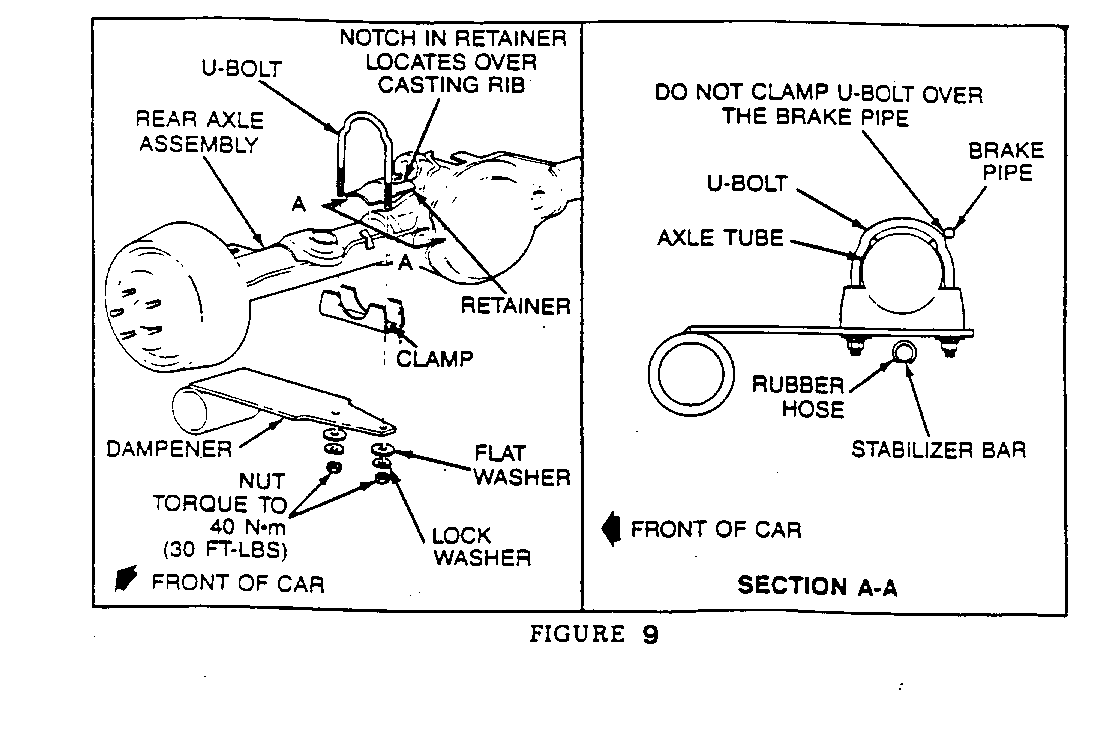
IX. On vehicles without factory-installed dampener, install vibration dampener, P/N 1628581, on the left rear axle tube and torque to 40 N-m (30 lbs. ft.), refer to Figure 9.
A. If there is an interference condition between the dampener and the stabilizer bar, it may be necessary to install a piece of rubber hose over the stabilizer bar, refer to Figure 9.
NOTE: DO NOT CLAMP THE "U" BOLT OVER THE REAR BRAKE PIPE.
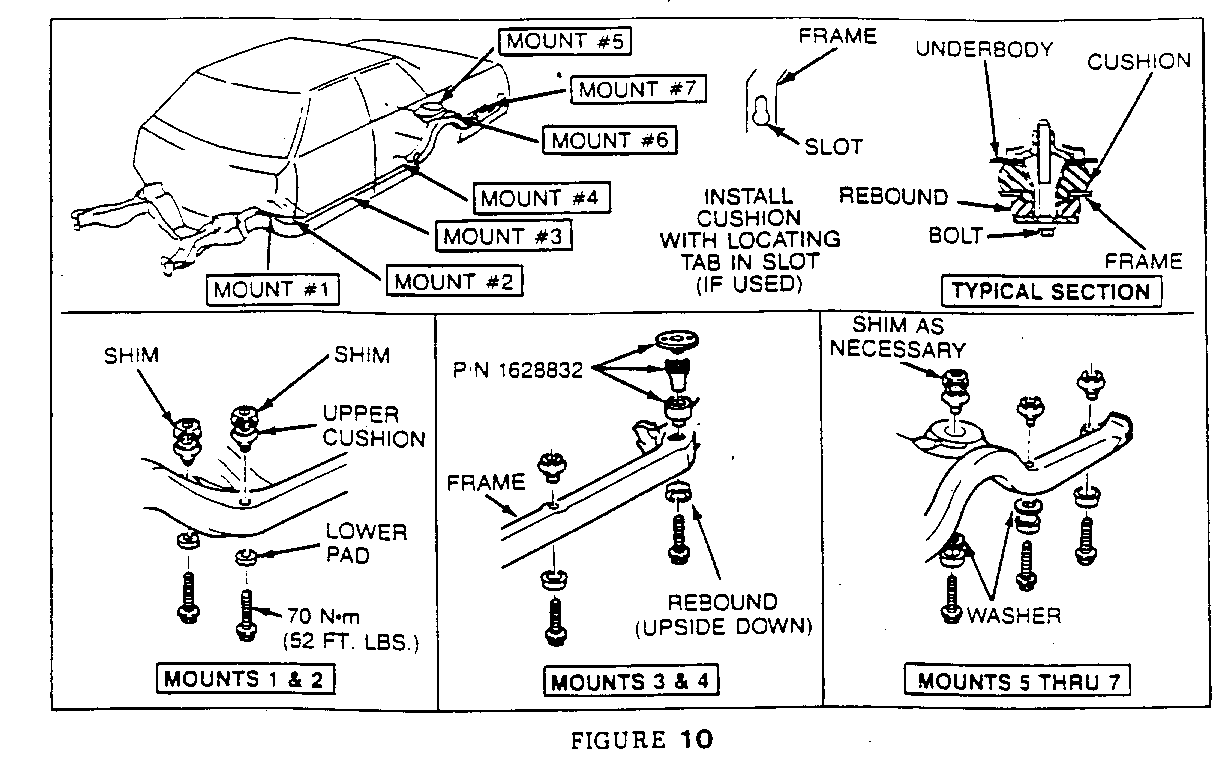
X. For 1982-1983 models only: Install body mount kit, P/N 1628832, in the number four position on both left and right sides with the rebound upside down. Install the original number four mount in the number five position. Shim the number five mounts as necessary to unload the number four mounts until the number four mount cushions can be turned by hand, refer to Figure 1 0.
For 1984-1988 models only: Install body mount kit, P/N 1628832, in the number four position on both left and right sides using the production washers in place of the supplied rebounds. Shim the number five body mounts as necessary to unload the mounts in the number four position. The number four mounts should be unloaded until the cushion can be turned by hand, refer to Figure 1 0.
For vehicles repaired under warranty use:
Labour Time: 4.0 hours. Add: 0.4 hour with locking wheel covers.

General Motors bulletins are intended for use by professional technicians, not a "do-it-yourselfer". They are written to inform those technicians of conditions that may occur on some vehicles, or to provide information that could assist in the proper service of a vehicle. Properly trained technicians have the equipment, tools, safety instructions and know-how to do a job properly and safely. If a condition is described, do not assume that the bulletin applies to your vehicle, or that your vehicle will have that condition. See a General Motors dealer servicing your brand of General Motors vehicle for information on whether your vehicle may benefit from the information.
