INTERMITTENT NO CRANK (REPLACE STARTER ENABLE RELAY)

SUBJECT: INTERMITTENT NO CRANK (REPLACE STARTER ENABLE RELAY)
VEHICLES AFFECTED: 1990-92 "C, E, H" MODELS BUICK PARK AVENUE, LESABRE, RIVIERA, REATTA OLDSMOBILE NINETY-EIGHT, EIGHTY-EIGHT, TORONADO PONTIAC BONNEVILLE
CONDITION:
---------- An intermittent "no crank" condition may be caused by a malfunctioning starter enable relay. The security light comes on for two seconds (five seconds on LeSabre, Eighty-Eight and Bonneville models) and then goes out, when attempting to start the vehicle. The vehicle, however, does not always enable the starter.
SERVICE PROCEDURE:
BUICK
On all Rivieras/Reattas, replace the starter enable relay with Part Number 25609047. Refer to appropriate service manual for starter enable relay location.
On all 1991-92 Park Avenue/Ultras built before VIN N1628377, replace the starter enable relay with Part Number 25609047 (refer to appropriate service manual for starter enable relay location) and change the wiring as per the procedure. On 1992 Park Avenue/Ultras built after (and including) VIN N1628377, diagnose "no crank" condition using the service manual diagnostic procedures together with the enclosed updated diagnostic information where applicable.
On LeSabres built before VIN NH436308, replace the starter enable relay with Part Number 25609047 (refer to service manual for starter enable relay location) and change the wiring as per the procedure). On LeSabres built after (and including) VIN NH436308, diagnose "no crank" condition using the service manual diagnostic procedures together with the enclosed updated diagnostic information where applicable.
OLDSMOBILE
On all 1991-92 Ninety-Eights built before VIN N4325328, replace the starter enable relay with Part Number 25609047 (refer to appropriate service manual for starter enable relay location) and change the wiring as per the procedure. On 1992 Ninety-Eights built after (and including) VIN N4325328, diagnose "no crank" condition using the service manual diagnostic procedures together with the enclosed updated diagnostic information where applicable.
On all Toronados, replace the starter enable relay with Part Number 25609047. Refer to appropriate service manual for starter enable relay location.
On Eighty-Eights built before VIN NH337131 and N1806991, replace the starter enable relay with Part Number 25609047 (refer to service manual for starter enable relay location) and change the wiring as per the procedure. On Eighty-Eights built after (and including) VIN NH337131 and N1806991, diagnose "no crank" condition using the service manual diagnostic procedures together with the enclosed updated diagnostic information where applicable.
PONTIAC
On Bonnevilles built before VIN N1231988, replace the starter enable relay with Part Number 25609047 (refer to service manual for starter enable relay location) and change the wiring as per the procedure. On Bonnevilles built after (and including) VIN N1231988, diagnose "no crank" condition using the service manual diagnostic procedures together with the enclosed updated diagnostic information where applicable.
WIRING PROCEDURE:
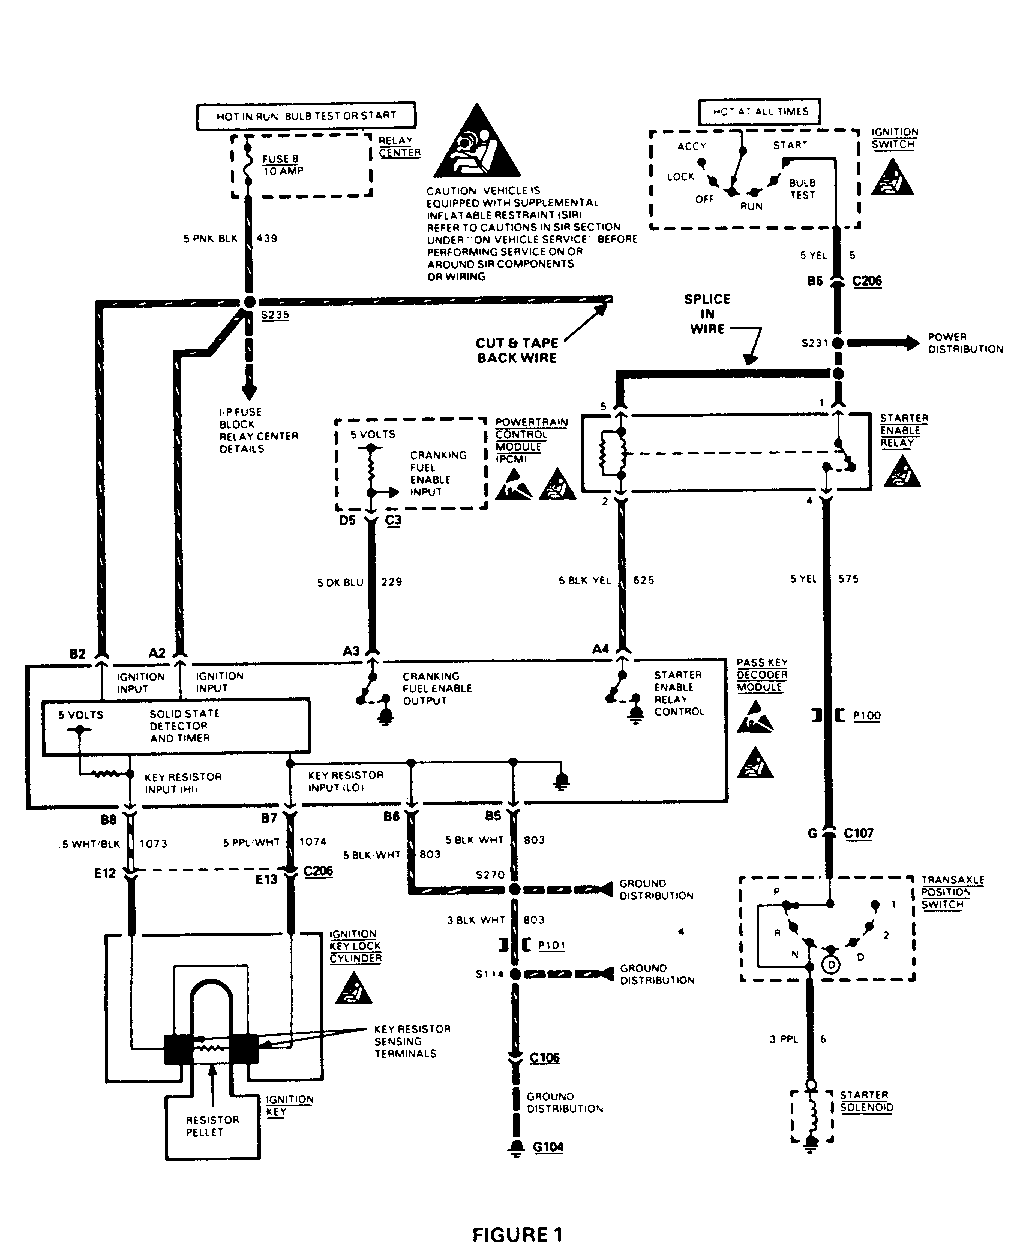
1. Cut circuit 439 (pnk/blk) wire far enough from the relay connector to allow for splicing. Strip the relay side of the wire for splicing. Tape back the harness side of circuit 439. Refer to Figure 1 for wiring modification schematic.
2. Cut circuit 5 (yellow wire) far enough from the relay connector to allow for splicing.
3. Splice the three wires (both circuit 5 wires and the circuit 439 wire to the relay) together with a splice clip, part number 1839906, which can be found in terminal repair kit tool J38125-A. Follow the procedure for "splicing copper wire using splice clips" in the service manual.
FOR VEHICLES REPAIRED UNDER WARRANTY USE:
Replacing the starter enable relay
Labor Operation No.: J4645 Labor Time: 0.4 hr. (Buick/Oldsmobile "E") 1.5 hr. (Buick "C/H") 1.5 hr. (Pontiac "H") 1.6 hr. (Oldsmobile "C/H")
Rewiring the starter enable relay
Labor Time: 0.2 hr. (C & H only)
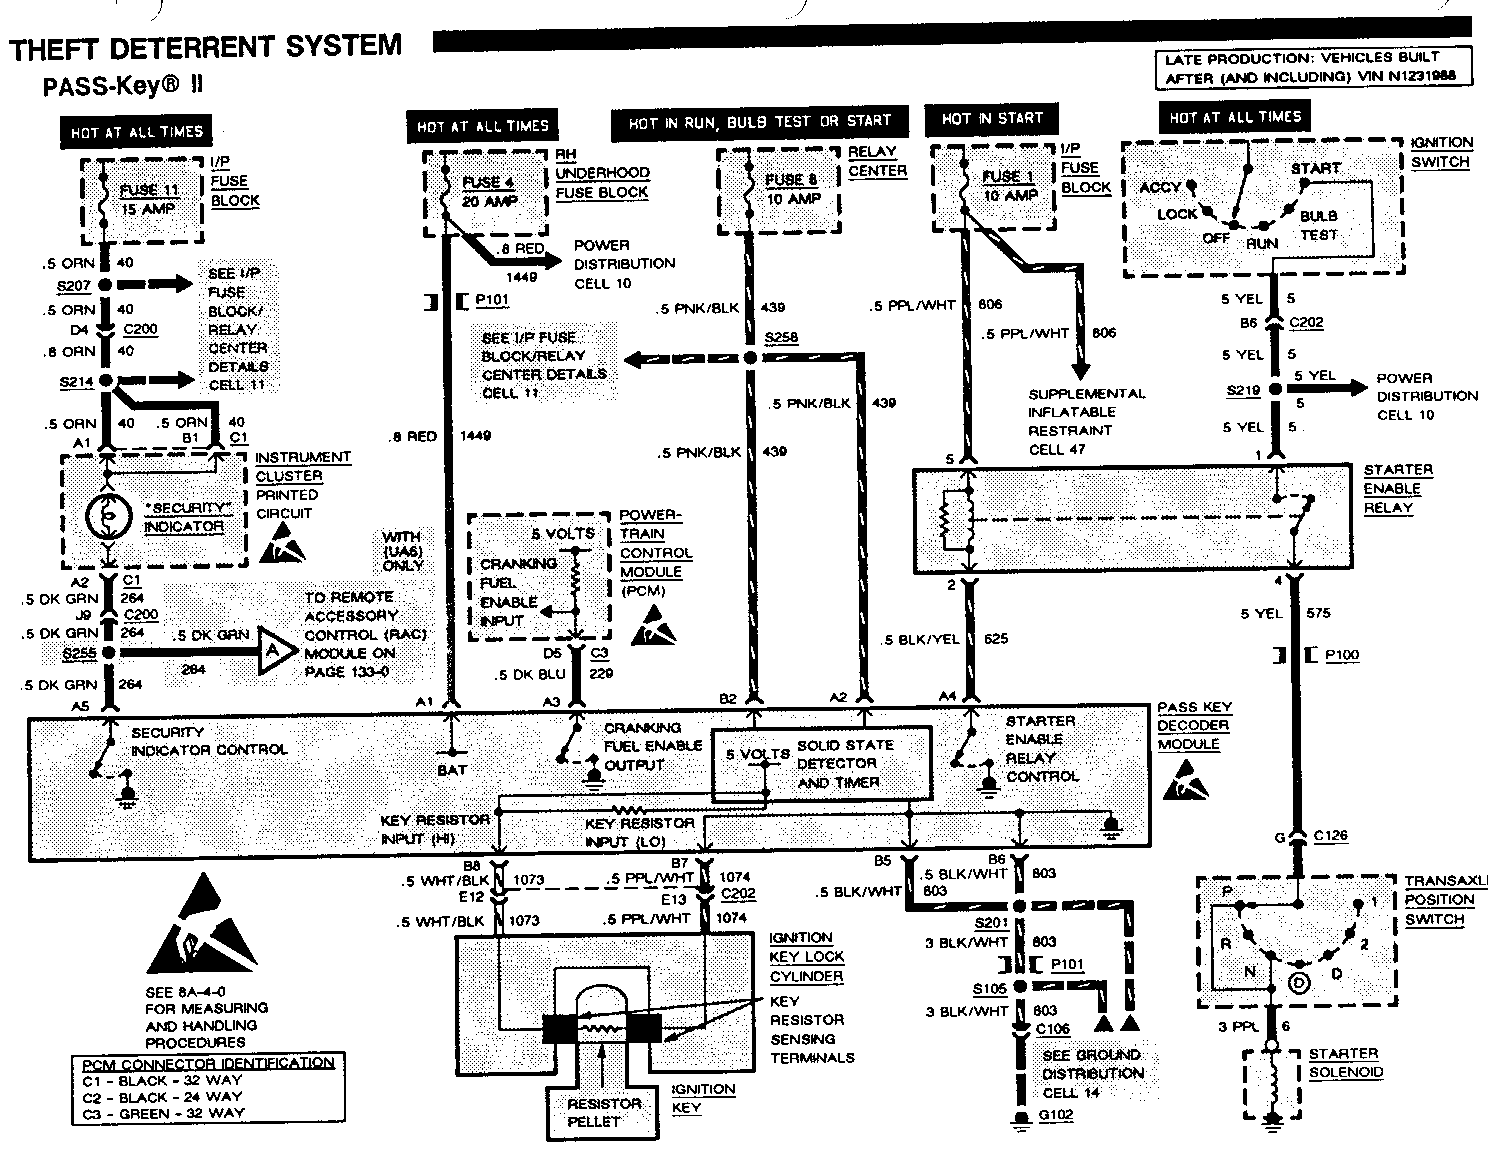
THEFT DETERRENT SYSTEM PASS-Key II
B: PASS-Key II DECODER MODULE TEST (TABLE 1) -------------------------------------------- Measure: VOLTAGE
At: PASS-Key II DECODER MODULE CONNECTOR (Disconnected)
Condition: -Ignition Switch: RUN
Measure Correct For Between Voltage Diagnosis ------- ------- --------- A2 (PNK/ BLK) & Battery See 1 Ground
A2 (PNK/ BLK) & B6 Battery See 2 (BLK/WHT)
A1 (RED) & B6 (BLK/WHT) Battery See 3
A3 (DK BLU) & B6 (BLK/WHT) 5 volts See 4
A4 (BLK/ YEL) & B6 Battery See 5 (BLK/WHT)
- If voltages are correct, go to Table 2.
1. Check the PNK/BLK (439) wire and Relay Center Fuse 8 for an open.
2. Check the BLK/WHT (803) wire for an open.
3. Check RED (1449) wire and RH Under-hood Fuse Block Fuse 4 for an open.
4. Check DK BLU (229) wire for an open or short to ground. If wire is good, replace PCM.
5. Check BLK/YEL (625) wire for an open. If wire is good, do Test C.
B: PASS-Key II DECODER MODULE TEST (TABLE 2) --------------------------------------------- Measure: RESISTANCE
At: PASS-Key II DECODER MODULE CONNECTOR (Disconnected)
Conditions: - Negative Battery Cable: DISCONNECTED - Ignition Switch: KEY OUT - Interrogator: DISCONNECTED
Measure Correct For Between Resistance Diagnosis ------- ---------- --------- B7 (PPL/ WHT) & B8 Open circuit See 1 (WHT/BLK)
- Ignition Switch: KEY IN
B7 (PPL/ In the range WHT) & B8 of 380 to See 2 (WHT/BLK) 12.3K ohms
- Negative Battery Cable: CONNECTED
- If resistances are correct but engine will not crank, replace the PASS-Key II Decoder Module.
Note: When the PASS-Key II Decoder Module is replaced, the new Module will store the key resistance value the first time the vehicle is started. The SECURITY Indicator will remain on for five seconds if the module programs correctly.
1. Check PPL/WHT (1074) and WHT/BLK (1073) for shons to ground or between the two wires. The short may be in the steering column wires.
2. Check PPL/WHT (1074) and WHT/BLK (1073) wires for an open. The open may be in steering column wires.
C: STARTER ENABLE RELAY TEST ----------------------------- Measure: VOLTAGE
At: STARTER ENABLE RELAY CONNECTOR (Disconnected)
Condition: -Ignition Switch: START (Hold)
Measure Correct For Between Voltage Diagnosis ------- -------- ---------- (YEL) & Battery See 1 Ground
5 (PNK/BLK) or(PPL/WHT) & Ground (see Battery See 2 schematic)
- If voltages are correct, go to C2.
1. Check YEL (5) wire for an open. If wire is good, but voltage is not present, go to 8A-30 for diagnosis of Starter And Charging circuits.
2. Check newly spliced PNK/BLK (439) wire (Early Production: vehicles built before VIN N1231988) for an open or poor connection, or PPL/WHT (806) and I/P Fuse Block Fuse 1 (Late Production) for an open.
C2. Connect a fused jumper between terminals 1 (YEL) and 4 (YEL) of the Starter Enable Relay connector. Turn Ignition Switch to START.
- If engine cranks, proceed to C3.
- If engine does not crank, check YEL (575) wire for an open. When wire is OK, go to 8A-30 for diagnosis of Starter And Charging circuits.
THEFT DETERRENT SYSTEM PASS-Key II TROUBLESHOOTING HINTS
- Try the following checks before doing the System Check.
1. Check the key pellet sensing contacts in the Ignition Key Lock Cylinder by looking into the key opening. If the contacts are damaged, or not silver in color, replace the Ignition Key Lock Cylinder (see Section 3F5).
2. Check I/P Fuse block Fuse I (Late Production: vehicles built after [and including] VIN N1231988), and RH Underhood Fuse Block Fuse 4 by visual inspection.
3. Check the ignition key for a cracked resistor pellet or a pellet that is dirty or coated. Also check that the ignition key is free from excess plastic around the resistor pellet contacts.
4. If the PASS-Key II System is intermittent, check that the connector to the PASS-Key II Decoder Module is tight and the terminals are clean.
- Go to System Check for a guide to normal operation.
- Go to System Diagnosis for diagnostic tests.
SYSTEM CHECK TABLE
ACTION NORMAL RESULT -------- ------------- Insert each ignition key into Key code window of J 35628 J35628 Interrogator and observe Interrogator should show a key the key code window code number between 1 and 15. If key code window shows E or display is erratic, replace suspect key, see G
Insert each ignition key into the Ignition SECURITY Indicator lights for Switch. Put Ignition Switch in RUN approximately five seconds then goes out
Turn Ignition Switch to START If engine starts,proceed to next step. If engine does not start, go to Symptom Table
-Do the following to check that pass key will detect use of an incorrect key
With Ignition Switch at OFF, remove Engine does not crank, and hush panel under steering column SECURITY Indicator remains lit, C206. Insert J 35628-90 Interrogator indicating an incorrect key Adapter between C206 connector halves code. If engine cranks, do and and disconnect connector connect Starter Enable Relay Test C it to the two 2-pin connectors of J35628 Interrogator to an incorrect resistance value (any code but the one noted when checking suspect keys). Attempt to start engine
Disconnect J 35628 Interrogator. Engine does not crank. If engine Connect the two 2-pin connectors on the cranks, replace PASS-Key II J 35628-90 Interrogator Adapter together Decoder Module and attempt to start engine again (must be done within three minutes of first attempt)
Turn Ignition Switch to OFF. Wait until SECURITY Indicator goes out (approximately Engine starts normally three minutes) then turn Ignition Switch to START
- Refer to System Diagnosis when a result is not normal.
SYSTEM DIAGNOSIS
Use the following table to determine the procedure to use.
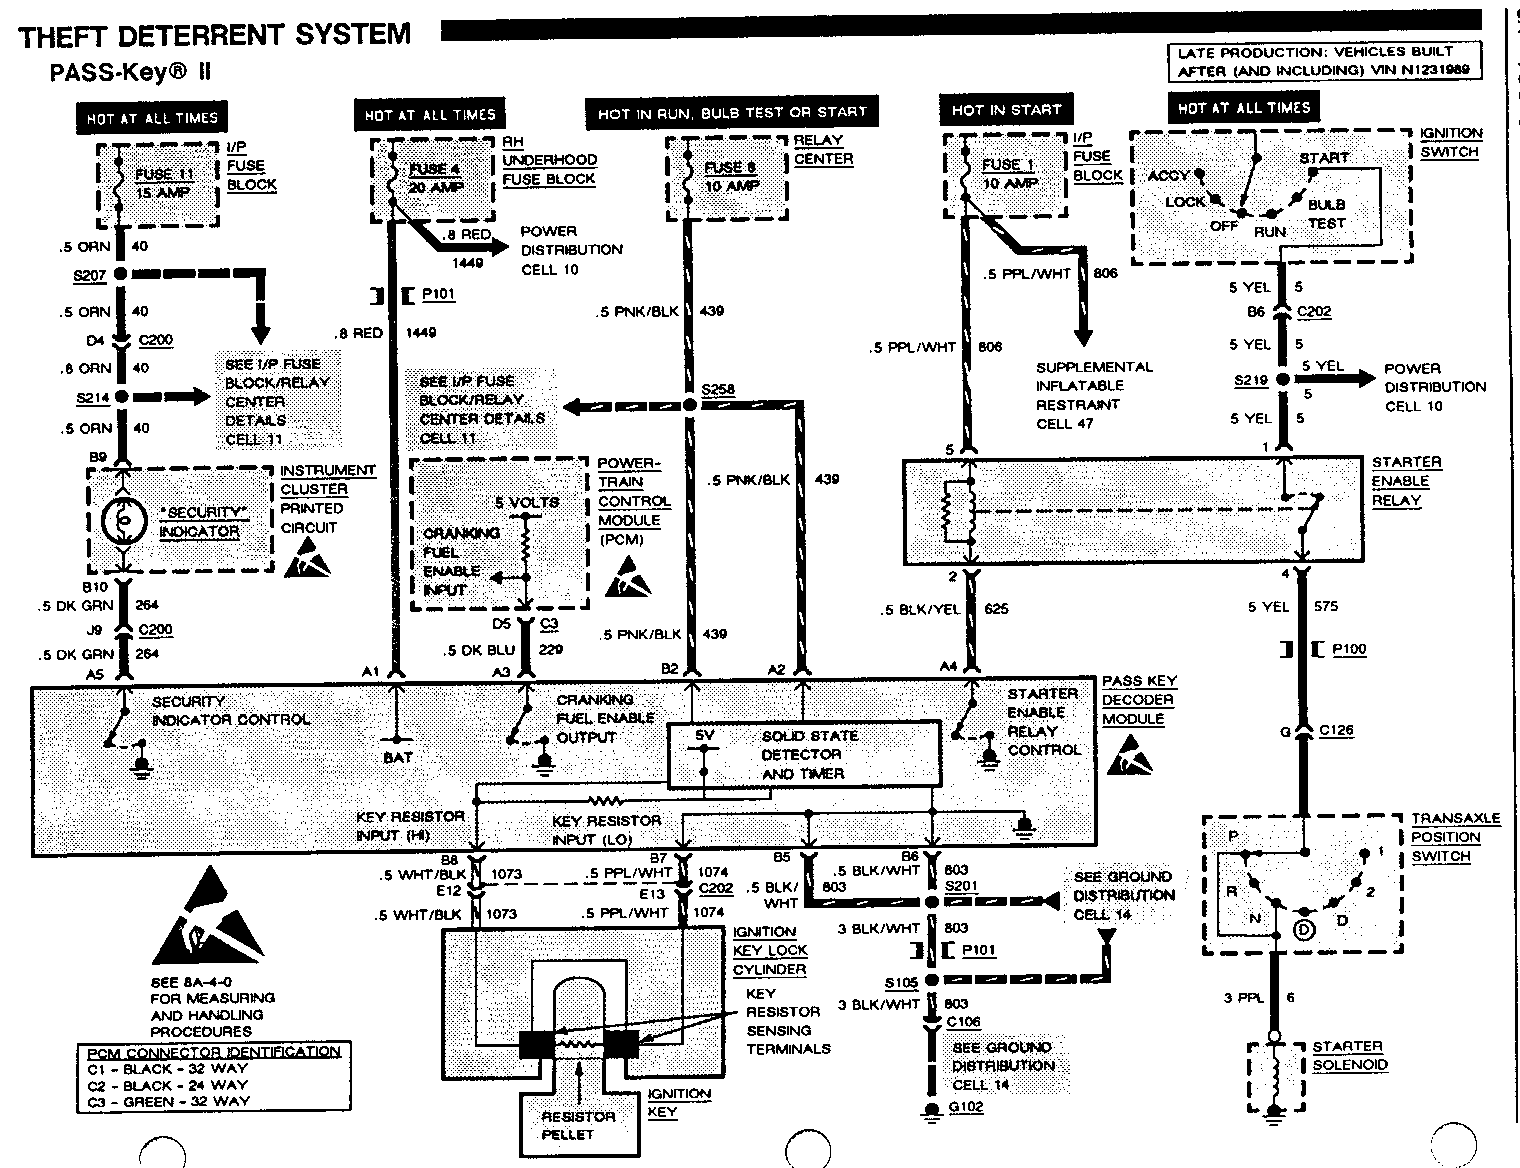
THEFT DETERRENT SYSTEM PASS-Key II
B: PASS-Key II DECODER MODULE TEST (TABLE 2) -------------------------------------------- Measure: RESISTANCE
At: PASS-Key II DECODER MODULE CONNECTOR (Disconnected)
Conditions: - Negative Battery Cable: DISCONNECTED - Ignition Switch: KEY OUT - Interrogator: DISCONNECTED
Measure Correct For Between Resistance Diagnosis ------- ---------- --------- B7 (PPL/ WHT) & B8 Open circuit See 1 (WHT/BLK)
- Ignition Switch: KEY IN
B7 (PPL/ In the range WHT) & B8 of 380 to See 2 (WHT/BLK) 12.3K ohms
- Negative Battery Cable: CONNECTED
- If resistances are correct but engine will not crank, replace the PASS-Key II Decoder Module.
Note: When the PASS-Key II Decoder Module is replaced, the new Module will store the key resistance value the first time the vehicle is started. The SECURITY Indicator will remain on for five seconds if the module programs correctly.
1. Check PPL/WHT (1074) and WHT/BLK (1073) for shorts to ground or between the two wires. The short may be in the steering column wires.
2. Check PPL/WHT (1074) and WHT/BLK (1073) wires for an open. The open may be in steering column wires.
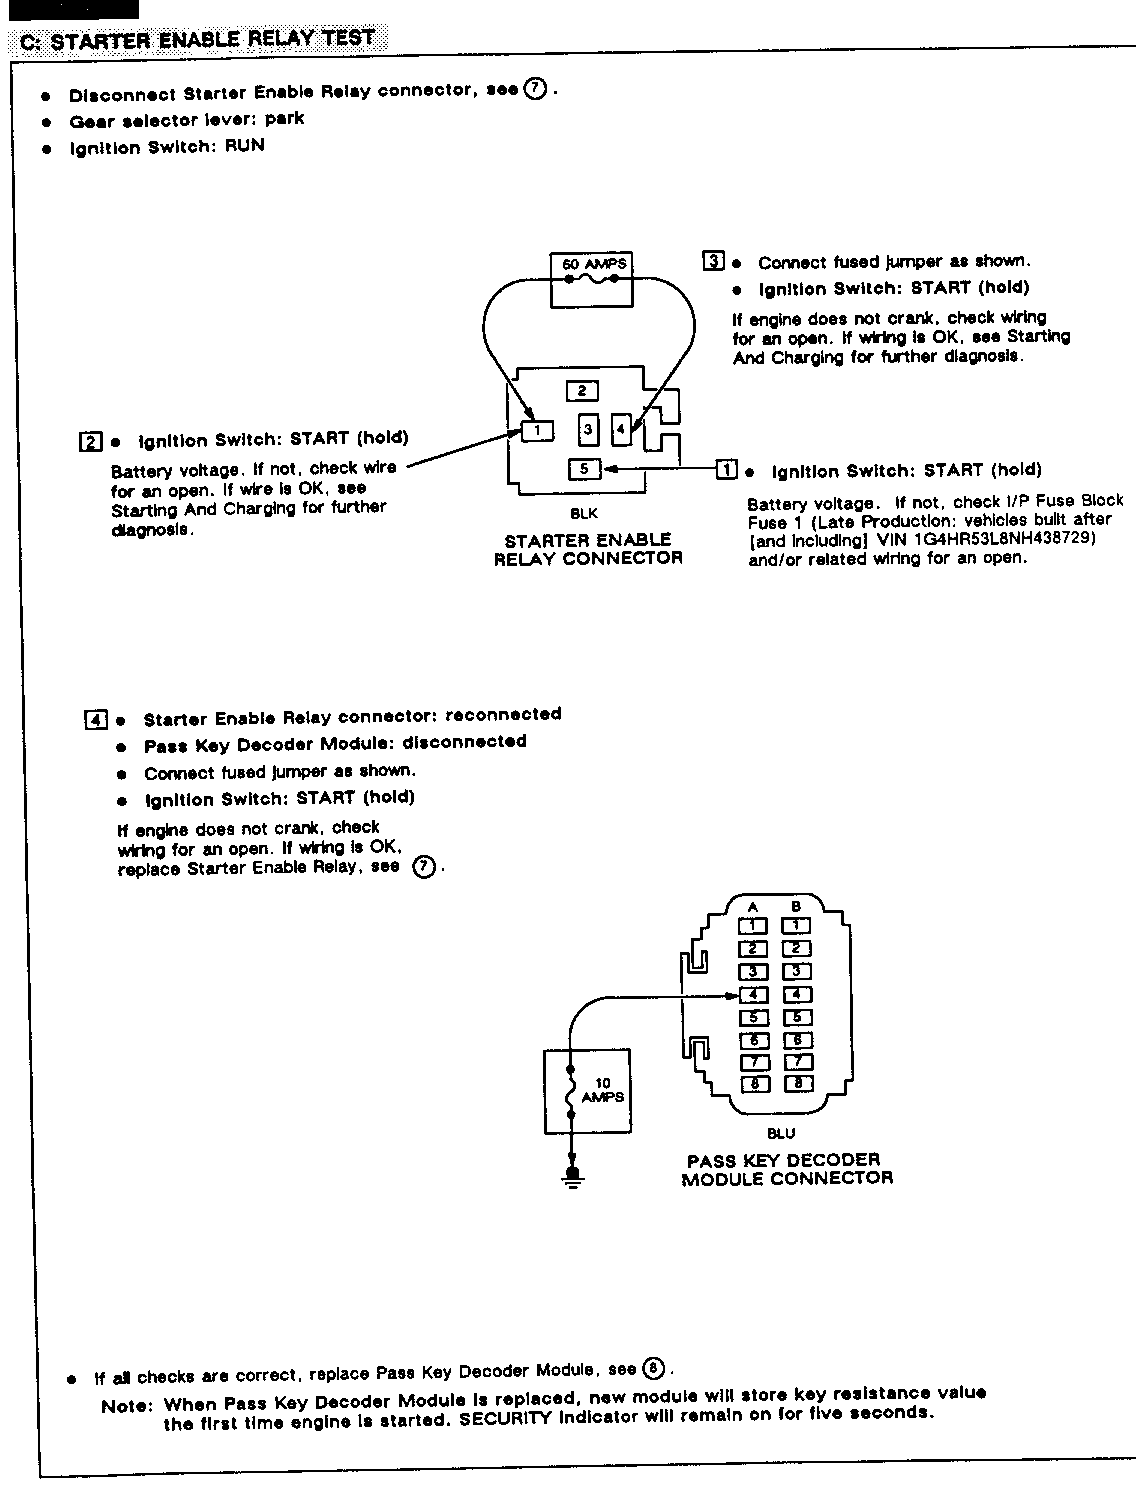
C: STARTER ENABLE RELAY TEST ---------------------------- Measure: VOLTAGE
At: STARTER ENABLE RELAY CONNECTOR (Disconnected)
Condition: - Ignition Switch: START (Hold)
Measure Correct For Between Voltage Diagnosis ------- ------- --------- 1 (YEL) & Battery See 1 Ground
5 (PNK/BLK) or (PPL/ WHT) & Battery See 2 Ground (see schematic)
- If voltages are correct, go to C2.
1. Check YEL (5) wire for an open. If wire is good, but voltage is not present, go to 8A-30 for diagnosis of Starter And Charging circuits.
2. Check newly spliced PNK/BLK (439) wire (Early Production: vehicles built before VIN N1231989) for an open or poor connection, or PPL/WHT (806) wire and I/P Fuse Block Fuse 1 (Late Production) for an open.
C2. Connect a fused jumper between terminals 1 (YEL) and 4 (YEL) of the Starter Enable Relay connector. Turn Ignition Switch to START.
- If engine cranks, proceed to C3.
- If engine does not crank, check YEL (575) wire for an open. When wire is OK, go to 8A-30 for diagnosis of Starter And Charging circuits.
C3. Reconnect the Starter Enable Relay and connect a fused jumper from terminal A4 (BLK/ YEL) wire of the PASS-Key II Decoder Module to ground. Turn Ignition Switch to START.
- If engine cranks, replace the PASS-Key II Decoder Module.
- If engine does not crank, check the BLK/YEL (625) wire for an open. If wire is OK, replace the Starter Enable Relay.
D: PCM ENABLE SIGNAL TEST (TABLE 1) ----------------------------------- Connect: SELF-POWERED TEST LAMP
At: PCM CONNECTOR C3 (Disconnected)
Conditions: - RH Underhood Fuse Block Fuse 4: REMOVED - Iignition Switch: RUN
Connect Correct For Between Result Diagnosis ------- ------- --------- D5 (DK Test Lamp BLU) & does not light See 1 Ground
- If result is correct, go to Table 2.
1. Check DK BLU (229) wire for a short to ground. If OK, replace PASS-KeyII Decoder Module,
THEFT DETERRENT SYSTEM PASS-Key II TROUBLESHOOTING HINTS
- Try the following checks before doing the System Check.
1. Check the key pellet sensing contacts in the Ignition Key Lock Cylinder by looking into the key opening. If the contacts are damaged, or not silver in color, replace the Ignition Key Lock Cylinder (see Section 3F5).
2. Check I/P Fuse Block Fuse 1 (Late Production: vehicles built after [and including] VIN N1231989), and RH Underhood Fuse Block Fuse 4 by visual inspection.
3. Check the ignition key for a cracked resistor pellet or a pellet that is dirty or coated. Also check that the ignition key is free from excess plastic around the resistor pellet contacts.
4. If the PASS-Key II System is intermittent, check that the connector to the PASS-Key II Decoder Module is tight and the terminals are clean.
- Go to System Check for a guide to normal operation.
- Go to System Diagnosis for diagnostic tests.
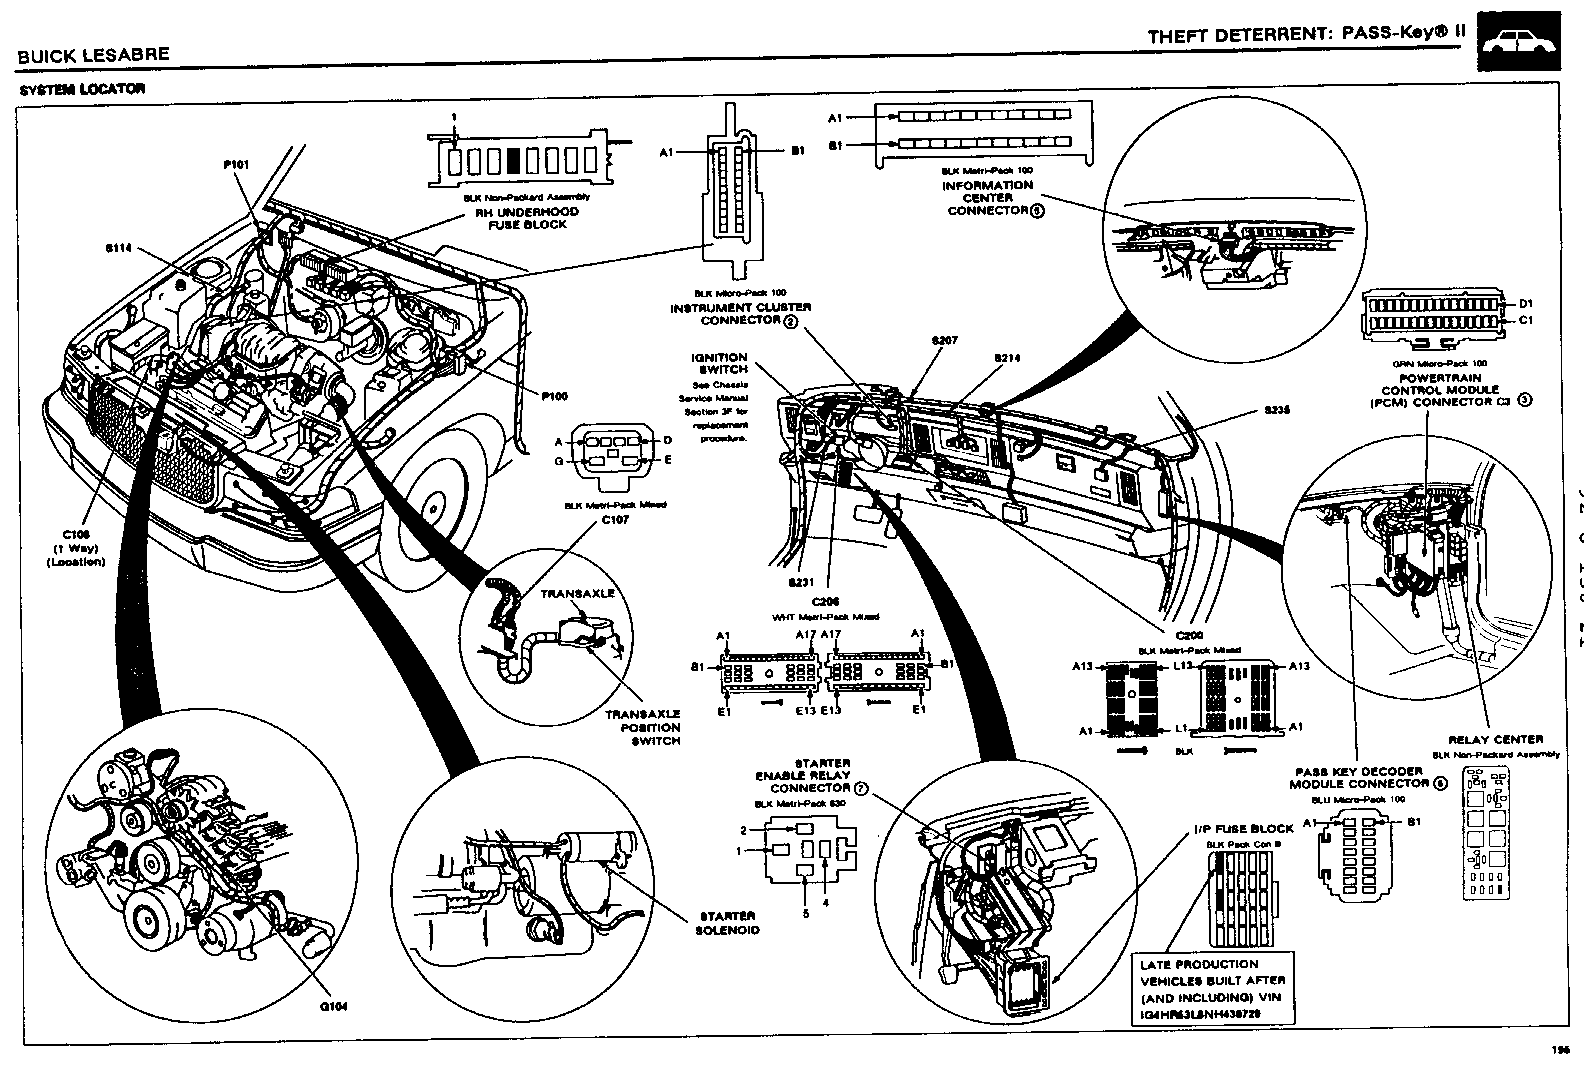
COMPONENT LOCATION Page-Figure ------------------ ----------- I/P Fuse Block............. Behind LH side of I/P, left of steering column, behind trim panel................201- 9-A Ignition Switch.............LH middle of steering column.............201- 7-A PASS-Key II Decoder Module. Behind top RH side of I/P................201-10-A Powertrain Control Module (PCM).Behind RH side of I/P, near shroud...201-10-A Relay Center................Behind RH side of I/P, top of RH shroud..201-10-A RH Underhood Fuse Block.....Center rear of engine compartment........201- 5-A Starter Enable Relay...Behind LH side of I/P, above I/P Fuse Block...201- 9-A Starter Solenoid......Lower LH front of engine, above Starter Motor..201- 2-C Transaxle Position Switch.. LH rear of engine, LH side of transaxle..201- 1-C C106 (1 cavity) ........... Lower RH front of engine compartment.....201- 4-A C126 (7 cavities).......... Top LH rear of engine, beside transaxle..201- 1-C C200 (60 cavities)......... Behind center of I/P, right of steering column...................................201- 6-A C202 (48 cavities)..........Behind LH side of I/P, at base of steering column...................................201- 7-A G102......................RH side of engine, under Computer Controlled Coil Ignition (CCCI) Module................201- 0-A P100........................LH rear of engine compartment, below Wiper Motor Module.............................201- 3-E P101.......................RH rear of engine compartment, behind strut tower.....................................201- 5-A S105....................... Composite harness, lower RH side of engine compartment, beside wheelhouse...........201- 4-A S201........................Composite harness, behind RH side of I/P, near top of shroud.......................201-10-A S207........................Composite harness, behind center of I/P..201- 5-B S214........................I/P harness, behind center of I/P, right of Radio...........................201- 6-B S219........................Composite harness, behind LH side of I/P, top of shroud................................201- 9-E S258........................Composite harness, behind RH side of I/P 201-10-A
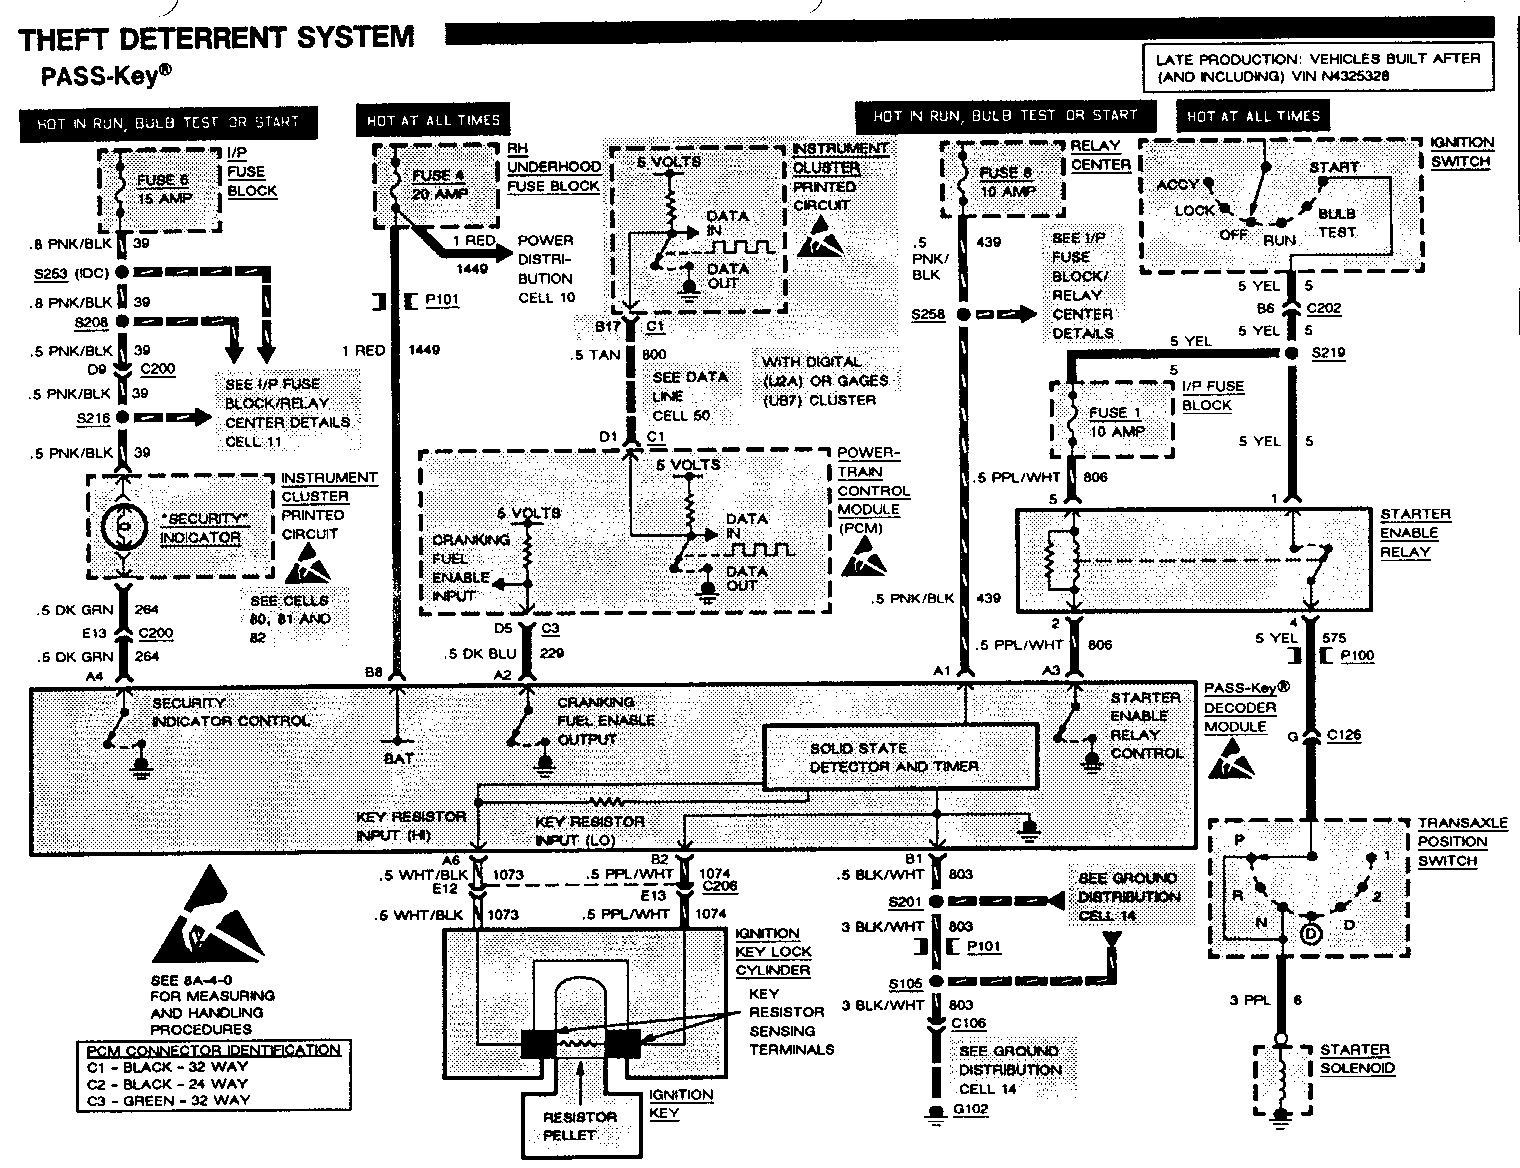
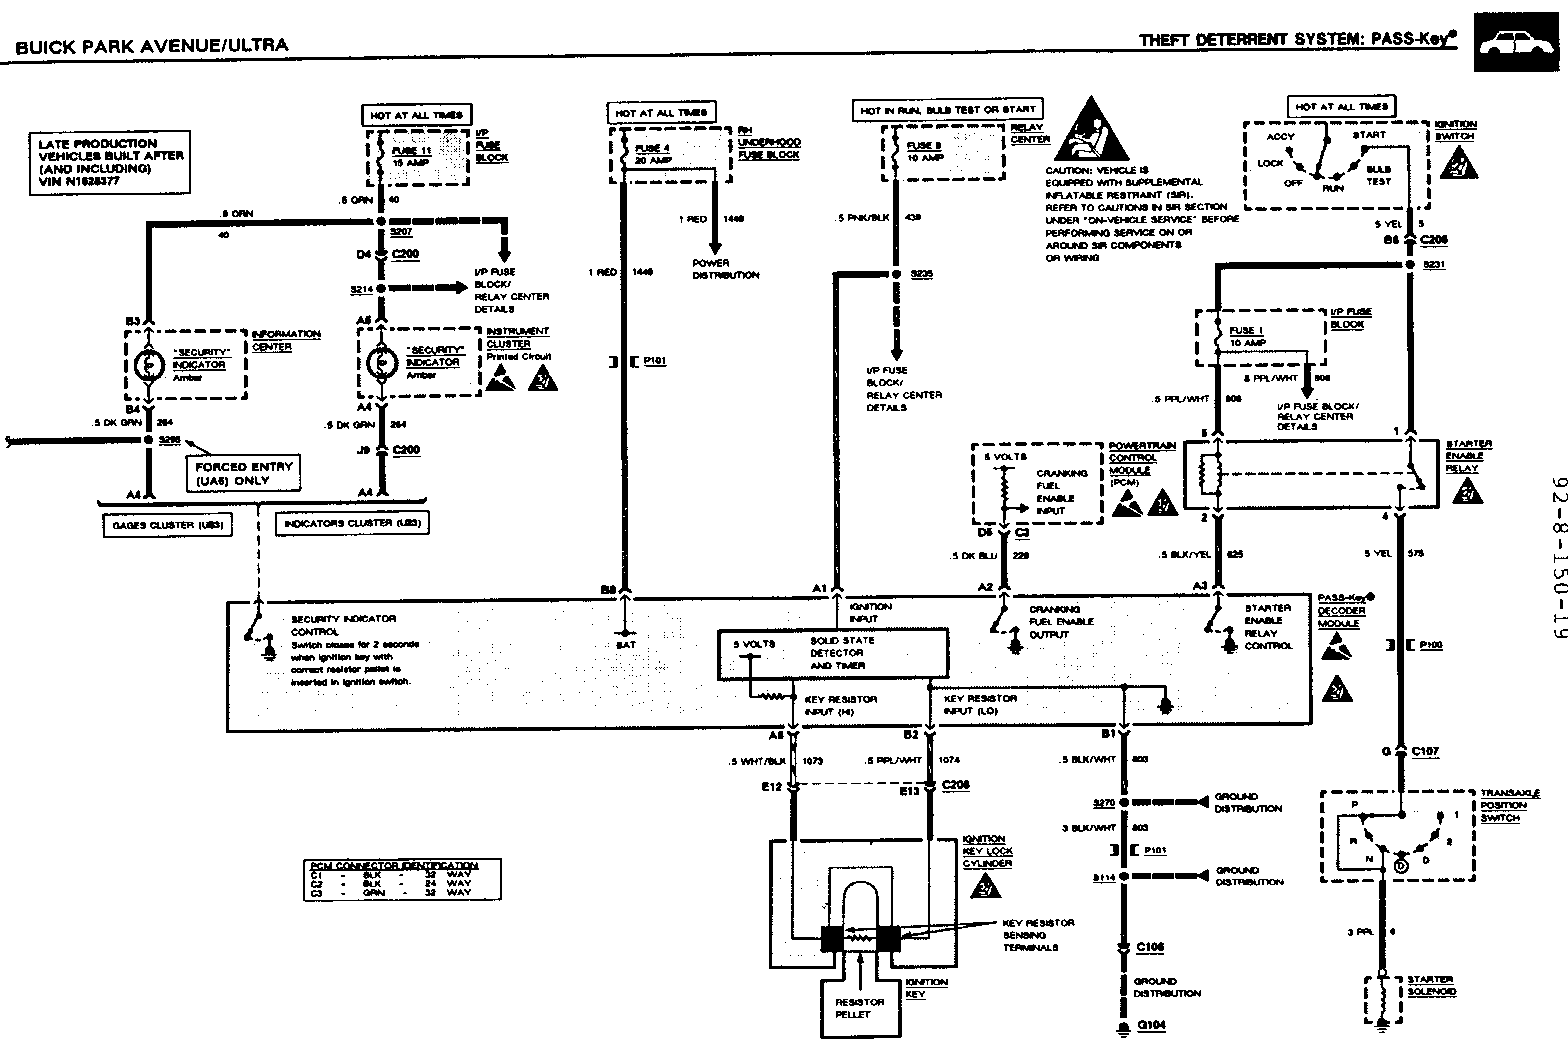
THEFT DETERRENT SYSTEM PASS-Key
B: PASS-Key DECODER MODULE TEST (TABLE 2) ----------------------------------------- Measure: RESISTANCE
At: PASS-Key DECODER MODULE CONNECTOR (Disconnected)
Conditions: - Negative Battery Cable: DISCONNECTED - Ignition Switch: KEY OUT
Measure Correct For Between Resistance Diagnosis ------- ----------- --------- B2 (PPL/ WHT) & A6 Open circuit See 1 (WHT/BLK)
- Ignition Switch: KEY IN
B2 (PPL/ In the range WHT) & A6 of 380 to See 2 (WHT/BLK) 12.3K ohms
- If resistances are correct but engine will not crank, replace the PASS-Key Decoder Module.
Note: When the PASS-Key Decoder Module is replaced, the new Module will store the key resistance value the first time the vehicle is started. The SECURITY Indicator will remain on for five seconds if the module program is corrected.
1. Check PPL/WHT (1074) and WHT/BLK (1073) for shorts to ground or between the two wires. The short may be in the steering column wires.
2. Check PPL/WHT (1074) and WHT/BLK (1073) wires for an open. The open may be in steering column wires.
C: STARTER ENABLE RELAY TEST ------------------------------ Measure: VOLTAGE
At: STARTER ENABLE RELAY CONNECTOR (Disconnected)
Condition: - Ignition Switch: START (hold)
Measure Correct For Between Voltage Diagnosis ------- ------- --------- (YEL) & Battery See 1 Ground
5 (PNK/BLK) or (PPL/ WHT) & Battery See 2 Ground (see schematic)
- If voltages are correct, go to C2.
1. Check YEL (5) wire for an open. If wire is good, but voltage is not present, go to 8A-30 for diagnosis of Starter and Charging circuits.
2. Check newly spliced PNK/BLK (439) wire (Early Production: vehicles built before VIN N4325328) for an open or poor connection, or I/P Fuse Block Fuse and PPL/WHT (806) wire (Late Production) for an open.
C2. Connect a fused jumper between terminals (YEL) and 4 (YEL) of the Starter Enable Relay connector. Turn Ignition Switch to START.
- If engine cranks, proceed to C3.
- If engine does not crank, check YEL (575) wire for an open. If OK, go to 8A-30 for diagnosis of Starter and Charging circuits.
C3. Reconnect the Starter Enable Relay and connect a fused jumper from terminal A3 (BLK/ YEL) wire of the PASS-Key Decoder Module to ground. Turn Ignition Switch to START.
- If engine cranks, replace the PASS-Key Decoder Module.
- If engine does not crank, check the BLK/YEL (625) wire for an open. If wire is OK, replace the Starter Enable Relay.
D: PCM ENABLE SIGNAL TEST (TABLE 1) ------------------------------------ Connect: TEST LAMP
At: PCM CONNECTOR C3 (Disconnected)
Conditions: - RH Underhood Fuse Block Fuse 4: REMOVED - Ignition Switch: RUN
Connect Correct For Between Result Diagnosis ------- ------- --------- D5(DK Test Lamp BLU) & C1 does not light See 1 (BRN/WHT)
- If result is correct, go to Table 2.
1. Check DK BLU (229) wire for a short to ground. If OK, replace PASS-Key De coder Module.
THEFT DETERRENT SYSTEM PASS-Key
COMPONENT LOCATION
Item Description Figure Connector ---- ----------- ------ -------- I/P Fuse Block................Behind LH side of I/P, behind trim panel.............201-11-A Ignition Switch...............LH middle of steering column..201-10-C Pass Key Decoder Module.......Behind top RH side of I/P.....201-13-A...202-28 Powertrain Control Module (PCM).........................Behind RH side of I/P, near shroud.................. 201-13-A Relay Center..................Behind RH side of I/P, top of RH shroud..........201-13-A...202-31 RH Underhood Fuse Block.......Center rear of engine compartment ..................201- 8-A Starter Enable Relay..........Behind LH side of I/P, above I/P Fuse Block................201-11-A...202-34 Starter Solenoid..............Lower LH front of engine, above Starter Motor...........201- 2-C Transaxle Position Switch.....LH rear of engine, LH side of transaxle..................201- 1-C C106 (1 cavity)...............Lower RH front of engine compartment...................201- 6-A C126 (7 cavities).............Top LH rear of engine, beside transaxle.....................201- 1-C....202-0 C200 (60 cavities)............Behind center of I/P, right of steering column............201- 9-A....202-1 C202 (48 cavities)............Behind LH side of I/P, at base of steering column....201-10-A....202-3 G102..........................RH front of engine, under Computer Controlled Coil Ignition (CCCI) Module........201- 0-A P100..........................LH rear of engine compartment, behind strut tower............201- 8-C P101..........................RH rear of engine compartment, behind strut tower............201- 6-B S105..........................Composite harness, lower RH side of engine compartment, beside wheelhouse.............201- 6-A S201..........................Composite harness, behind RH side of I/P................201-14-A S208..........................Composite harness, behind RH side of I/P................201- 8-B S216..........................I/P harness, behind LH side of I/P, above steering column.201- 9-A
S219..........................Composite harness, behind LH side of I/P, top of shroud....201-11-A S253(IDC......................Composite harness, behind LH side of I/P, behind I/P Fuse Block....................201-11-A S258..........................Composite harness, behind RH side ofI/P....................201-14-A
TROUBLESHOOTING HINTS
- Try the following checks before doing the System Check.
1. Check the key pellet sensing contacts in the Ignition Key Lock Cylinder by looking into the key opening. If the contacts are damaged, or not silver in color, replace the Ignition Key Lock Cylinder (see Section 3F5).
2. Check RH Underhood Fuse Block Fuse 4 and I/P Fuse Block Fuse 1 (Late Production: vehicles built after [and including] VIN N4325328) by visual inspection.
3. Check the ignition key for a cracked resistor pellet or a pellet that is dirty or coated. Also check that the ignition key is free from excess plastic around the resistor pellet contacts.
THEFT DETERRENT SYSTEM PASS-Key II
B: PASS-Key II DECODER MODULE TEST (TABLE 2) ------------------------------------------- Measure: RESISTANCE
At: PASS-Key II DECODER MODULE CONNECTOR (Disconnected)
Conditions: - Negative Battery Cable: DISCONNECTED - Ignition Switch: KEY OUT - Interrogator: DISCONNECTED
Measure Correct For Between Resistance Diagnosis ------- ---------- --------- B7 (PPL/ WHT) & B8 Open circuit See 1 (WHTIBLK)
- Ignition Switch: KEY IN
B7 (PPL/ In the range WHT) & B8 of 380 to See 2 (WHT/BLK) 12.3K ohms
- Negative Battery Cable: CONNECTED
- If resistances are correct but engine will not crank, replace the PASS-Key II Decoder Module.
Note: When the PASS-Key II Decoder Module is replaced, the new Module will store the key resistance value the first time the vehicle is started. The SECURITY Indicator will remain on for five seconds if the module programs correctly.
1. Check PPL/WHT (1074) and WHT/BLK (1073) for shorts to ground or between the two wires. The short may be in the steering column wires.
2. Check PPL/WHT (1074) and WHT/BLK (1073) wires for an open. The open may be in steering column wires.
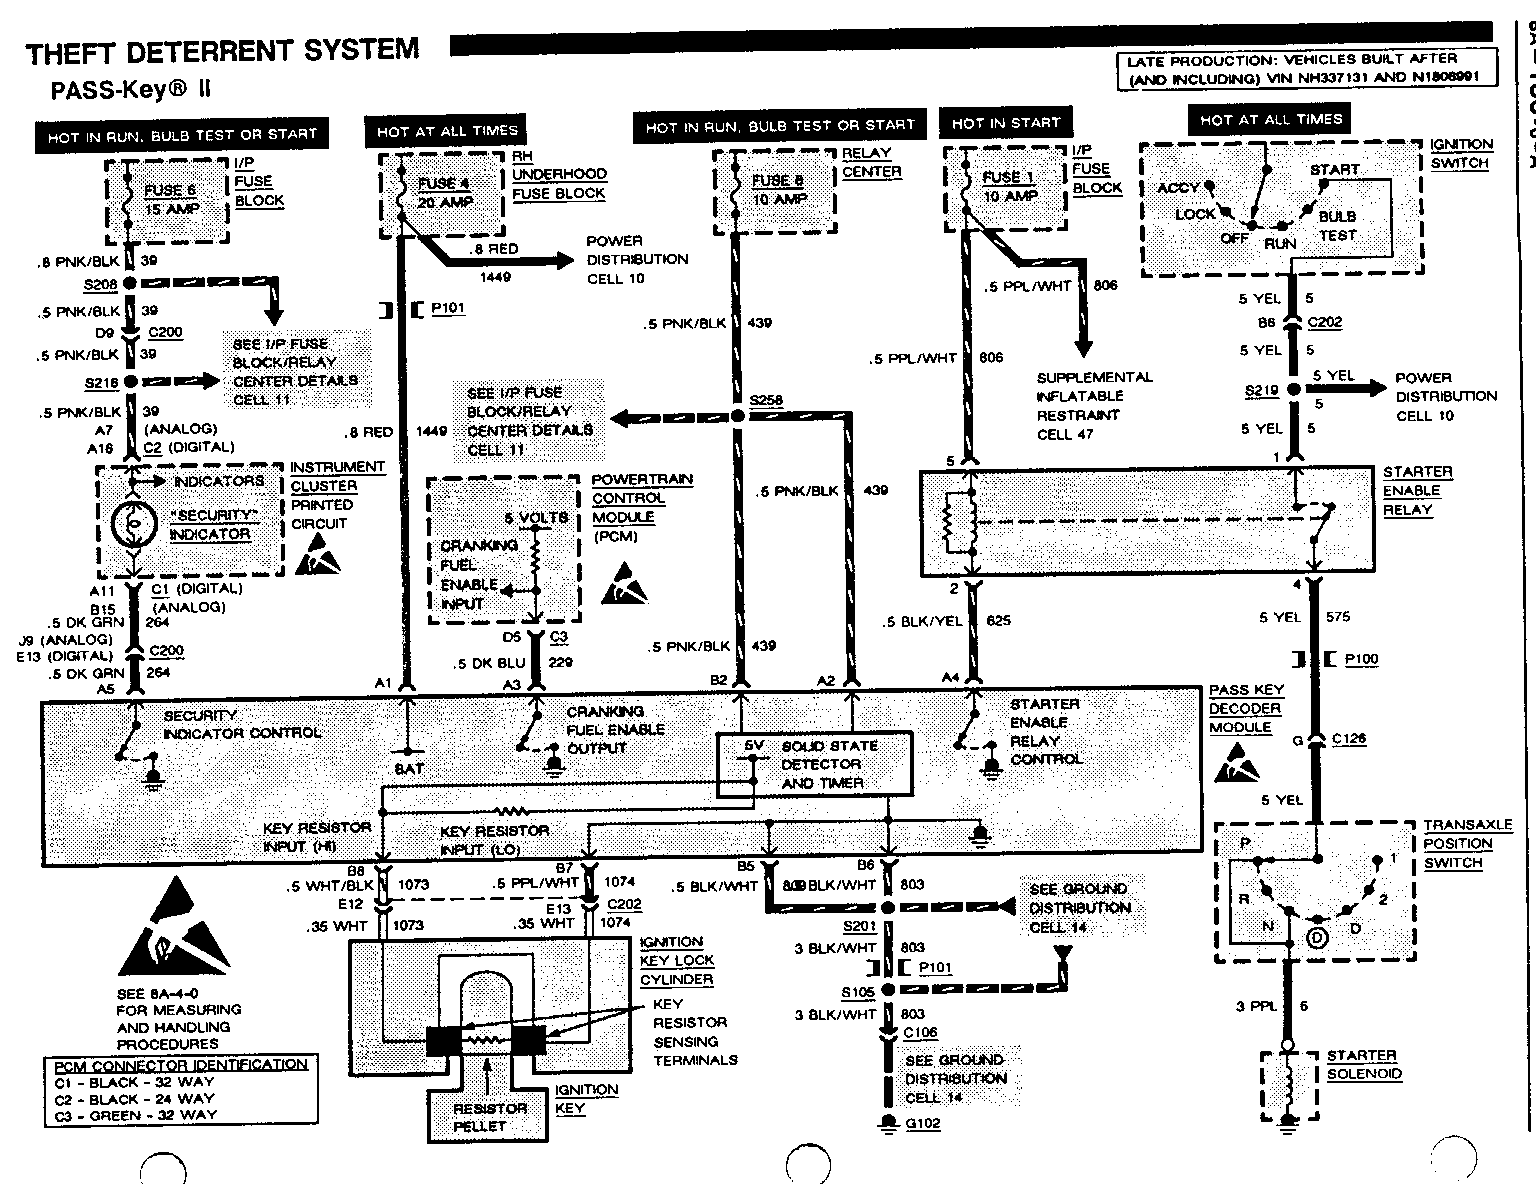
C: STARTER ENABLE RELAY TEST ---------------------------- Measure: VOLTAGE
At: STARTER ENABLE RELAY CONNECTOR (Disconnected)
Condition: - Ignition Switch: START (Hold)
Measure Correct For Between Voltage Diagnosis ------- ------- ---------- 1 (YEL) & Battery See 1 Ground
5 (PNK/BLK) or (PPL/WHT) & Ground (see Battery See 2 schematic)
- If voltages are correct, go to C2.
1. Check YEL (5) wire for an open. If wire is good, but voltage is not present, go to 8A-30 for diagnosis of Starter And Charging circuits.
2. Check newly spliced PNK/BLK (439) wire (Early Production: vehices built before VIN NH337131 and N1806991) for an open or poor connection, or PPL/ WHT (806) wire and I/P Fuse Block Fuse 1 (Late Production) for an open.
C2. Connect a fused jumper between terminals 1 (YEL) and 4 (YEL) of the Starter Enable Relay connector. Turn Ignition Switch to START.
- If engine cranks, proceed to C3.
- If engine does not crank, check YEL (575) wire for an open. When wire is OK, go to 8A-30 for diagnosis of Starter And Charging circuits.
C3. Reconnect the Starter Enable Re!ay and connect a fused jumper from terminal A4 (BLK/ YEL) wire of the PASS-Key II Decoder Module to ground. Turn Ignition Switch to START.
- If engine cranks, replace the PASS-Key II Decoder Module.
- If engine does not crank, check the BLK/ YEL (625) wire for an open. If wire is OK, replace the Starter Enable Relay.
D: PCM ENABLE SIGNAL TEST (TABLE 1) ----------------------------------- Connect: SELF-POWERED TEST LAMP
At: PCM CONNECTOR C3 (Disconnected)
Conditions: - RH Underhood Fuse Block Fuse 4: REMOVED - Ignition Switch: RUN
Connect Correct For Between Result Diagnosis ------- ------ --------- D5 (DK Test Lamp BLU) & does not light See 1 Ground
- If result is correct, go to Table 2.
1. Check DK BLU (229) wire for a short to ground. If OK, replace PASS-Key II Decoder Module.
THEFT DETERRENT SYSTEM PASS-Key II
COMPONENT LOCATION
Item Description Figure Connector ---- ----------- ------ --------- I/P Fuse Block..............Behind LH side of I/P, behind trim panel.............201- 9-A Ignition Switch.............LH middle of steering column..201- 8-C Pass Key Decoder Module.....Behind top RH side of I/P.....201-11-A....202-25 Powertrain Control Module (PCM)................Behind RH side of I/P, near shroud...................201-11-A Relay Center................Behind RH side of I/P, top of s..................... 201-11-A....202-28 RH Underhood Fuse Block.....Center rear of engine compartment...................201- 6-A Starter Enable Relay........Behind LH side of I/P above I/P Fuse Block..........201- 9-A....202-31 Starter Solenoid........... Lower LH front of engine, above Starter Motor...........201- 2-C Transaxle Position Switch.. LH rear of engine, LH side of transaxle..................201- 1-C C106 (1 cavity)............ Lower RH front of engine compartment...................201- 4-A C126 (7 cavities).......... Top LH rear of engine, beside transaxle............. 201- 1-C....202-0 C200 (60 cavities)......... Behind center of I/P. right of steering column......201- 7-A....202-1 C202 (48 cavities) ........ Behind LH side of I/P. at base of steering column....201- 8-A....202-3 G102....................... RH side of engine, under Computer Controlled Coil Ignition (CCCI) Module .......201- 0-A P100....................... LH rear of engine compartment, behind strut tower........... 201- 6-C P101....................... RH rear of engine compartment, behind strut tower....... 201- 6-A S105....................... Composite harness, lower RH side of engine compartment, beside wheelhouse.............201- 4-A S201....................... Composite harness, behind RH side of I/P............... 201-12-A S208........................Composite harness, behind center of I/P................ 201- 6-B S216....................... Composite harness, behind I/P, above steering column........ 201- 7-A S219....................... Composite harness, behind LH side of I/P, top of shroud.201- 9-A S258....................... Composite harness, behind RH side of I/P............... 201-12-A
TROUBLESHOOTING HINTS
- Try the following checks before doing the System Check.
1. Check the key pellet sensing contacts in the Ignition Key Lock Cylinder by looking into the key opening. If the contacts are damaged, or not silver in color, replace the Ignition Key Lock Cylinder (see Section 3F5).
2. Check I/P Fuse Block Fuse 1 (Late Production: vehicles built after [and including] VIN NH337131 and N1806991) and RH Underhood Fuse Block Fuse 4 by visual inspection.
3. Check the ignition key for a cracked resistor pellet or a pellet that is dirty or coated. Also check that the ignition key is free from excess plastic around the resistor pellet contacts.
4. If the PASS-Key II System is intermittent, check that the connector to the PASS-Key II Decoder Module is tight and the terminals are clean.
- Go to System Check for a guide to normal operation.
- Go to System Diagnosis for diagnostic tests.

General Motors bulletins are intended for use by professional technicians, not a "do-it-yourselfer". They are written to inform those technicians of conditions that may occur on some vehicles, or to provide information that could assist in the proper service of a vehicle. Properly trained technicians have the equipment, tools, safety instructions and know-how to do a job properly and safely. If a condition is described, do not assume that the bulletin applies to your vehicle, or that your vehicle will have that condition. See a General Motors dealer servicing your brand of General Motors vehicle for information on whether your vehicle may benefit from the information.
