CONDENSATION DRIPPING FROM HEATER DUCT-NEW PROCEDURE

SUBJECT: CONDENSATION DRIPPING FROM HEATER DUCT (INSTALL WATERTIGHT DAM)
VEHICLES AFFECTED: 1991 C MODELS
CONDITION:
---------- Some 1991 C Model vehicles in high ambient, high humidity areas may experience a condition where condensation drips from the HVAC air distribution duct when the blower is on high speed.
CAUSE:
------- High speed air picks up water in the temperature door area that normally drains out of the HVAC case blowing it past the joint between the Air Distribution duct and the HVAC module where it then leaks out onto the floor.
CORRECTION:
----------- Install a watertight dam on the floor of the HVAC case overlapping the air distribution duct joint. Part Number 52460676.
CAUTION:
This vehicle is equipped with the Supplemental Inflatable Restraint (SIR) System. Refer to cautions in Section 9J under on-vehicle service before performing service on or around SIR components or wiring. Failure to follow cautions could result in possible air bag deployment, personal injury or unneeded SIR system repairs.
CAUTION:
Before removing or installing any electrical components, disconnect the negative battery cable to help prevent personal injury and/or damage to the vehicle or its components.
PROCEDURE:
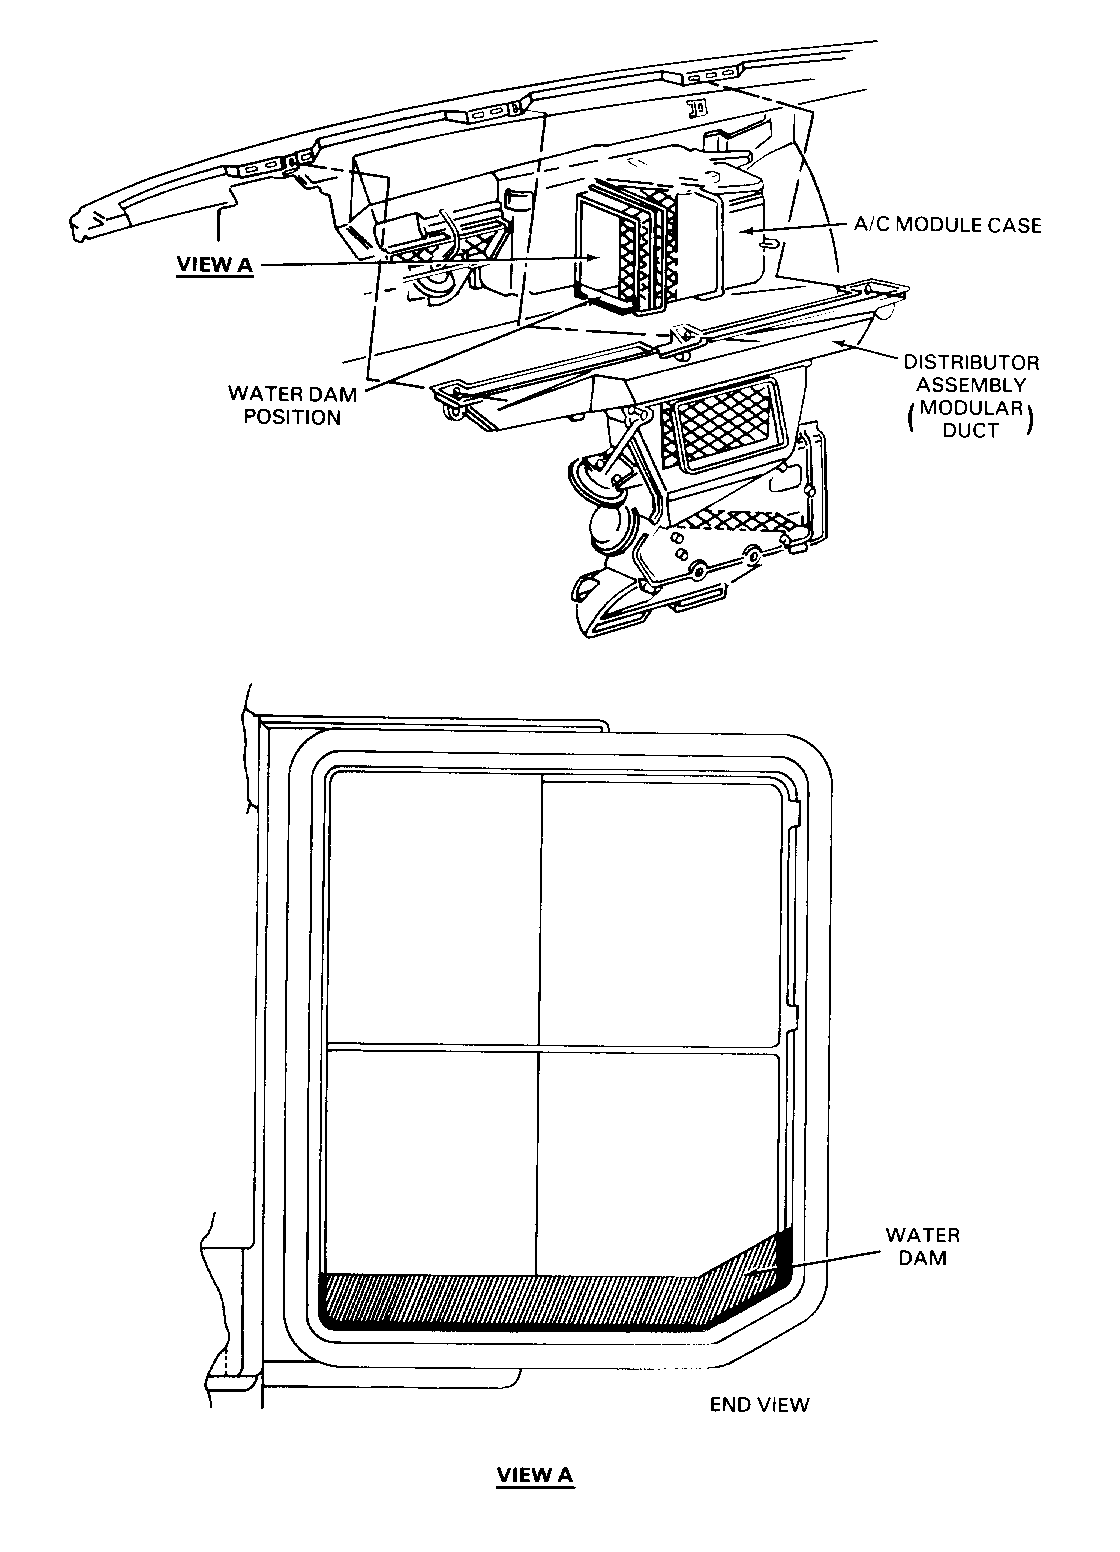
---------- 1. Follow Sections 1C/8C Cadillac, 8C/lB Olds or ESM (Buick) to remove the air distribution duct assembly from the dash. See the attached illustration.
2. Scuff the mounting surface of the dam and the HVAC case with 220 grit sandpaper. This is the outside lip of the module case that fits inside the modular duct. Be sure both surfaces are clean and dry when finished.
3. Wipe the case and the dam clean with 3m No. 08984, general purpose cleaner or equivalent, to remove any traces of contamination that may prevent a good bond between the pieces.
4. Apply adhesive 3M No. 08641 or equivalent to the mounting surfaces of the dam and the HVAC case. Place the dam in the illustrated position. Make sure that the mounting tab is facing the heater core.
5. Temporarily tape the dam in position for 30 minutes to allow the sealer to set.
In order for this repair to be effective, it is important that the dam be completely watertight. If necessary, run a second bead of sealer around the adjoining surfaces.
6. Reassemble the HVAC and dash assembly as per the service manual.
Use the most applicable Labour Operation and Time from the Canadian Labour Time Guide.
General Motors bulletins are intended for use by professional technicians, not a "do-it-yourselfer". They are written to inform those technicians of conditions that may occur on some vehicles, or to provide information that could assist in the proper service of a vehicle. Properly trained technicians have the equipment, tools, safety instructions and know-how to do a job properly and safely. If a condition is described, do not assume that the bulletin applies to your vehicle, or that your vehicle will have that condition. See a General Motors dealer servicing your brand of General Motors vehicle for information on whether your vehicle may benefit from the information.
