CAMPAIGN: PARKING BRAKE LEVER ASSY. (CABLE ADJUSTMENT)

Subject: PARKING BRAKE LEVER ASSEMBLY
Models: 1991 Oldsmobile Ninety Eight 1991 Buick Park Avenue/Ultra 1992 Oldsmobile Eighty Eight 1992 Buick LeSabre
General Motors of Canada has determined that certain 1991 Oldsmobile Ninety Eight, Buick Park Avenue/Ultra and 1992 Oldsmobile Eighty Eight, Buick LeSabre model vehicles fail to conform to Canada Motor Vehicle Safety Standard (CMVSS) 105, "Hydraulic Brake Systems" which, in part, covers parking brake performance.
Some of these vehicles have parking brake lever assemblies which when applied can release one or more teeth. If release occurs, the cable load applying the rear brakes will be reduced, and depending upon the extent of lever release, the parking brake may not hold the vehicle as required.
To prevent this condition from occurring, dealers are to inspect and, if required, replace the parking brake lever assembly.
VEHICLES INVOLVED:
Involved are certain 1991 Oldsmobile Ninety Eight, Buick Park Avenue/Ultra and 1992 Oldsmobile Eighty Eight , Buick LeSabre model vehicles equipped with Parking Brake Lever Assemblies with date codes A1091, A1121, A1221, A1231 1231, A1261, A1271, A1281, A1291, and A1301, within the following VIN breakpoints: PLANT YEAR MODEL PLANT CODE FROM THROUGH ---- ------------ ------ ---- -------- -------- 1991 Ninety Eight Orion 4 M4336852 M4340347 1991 Park Avenue/Ultra Wentzville 1 M1682941 M1696285 1992 Eight Eight Flint H NH300107 NH305101 1992 LeSabre Buick City H NH400026 NH401426
All affected vehicles have been identified by the VIN listing provided to involved dealers with this bulletin. Any dealer not receiving a listing was not shipped any of the affected vehicles.
DEALER CAMPAIGN RESPONSIBILITY:
Dealers are to perform this campaign on all involved vehicles at no charge to owners, regardless of kilometres traveled, age of vehicle, or ownership, from this time forward.
Whenever a vehicle subject to this campaign is taken into your new or used vehicle inventory, or it is in your dealership for service, you are to ensure the campaign correction has been made before selling or releasing the vehicle.
Owners of vehicles recently sold from your new vehicle inventory are to be contacted by the dealer, and arrangements made to make the required modification according to instructions contained in this bulletin.
CAMPAIGN PROCEDURE:
Refer to Section 4 of the Service Policies and Procedures Manual for the detailed procedure on handling Product Campaigns. Dealers are requested to complete the campaign on all transfers as soon as possible.
OWNER NOTIFICATION:
All owners of record at the time of campaign release are shown on the attached computer listing and have been notified by first class mail from General Motors. The listings provided are for campaign activity only and should not be used for any other purpose.
PARTS INFORMATION:
Parts required to complete this campaign should be ordered through regular channels, as follows:
Part Number Description Quantity/Vehicle ----------- ---------------------------- ---------------- 25601809 Parking Brake Lever Assembly 1 as required
PARTS AND LABOUR CLAIM INFORMATION:
Credit for the campaign work performed will be paid upon receipt of a properly completed campaign claim card or DCS transmission in accordance with the following:
Repair Code Description Time Allowance ----------- ---------------------------------- -------------- 1A Inspect Parking Brake Lever Assembly Date Code 3 2A Inspect and Replace Parking Brake Lever Assembly 1.7
Time allowance includes 0.1 hour for dealer administrative detail associated with this campaign. Parts credit will be based on dealer net plus 30% to cover parts handling.
SERVICE PROCEDURE:
Inspection:
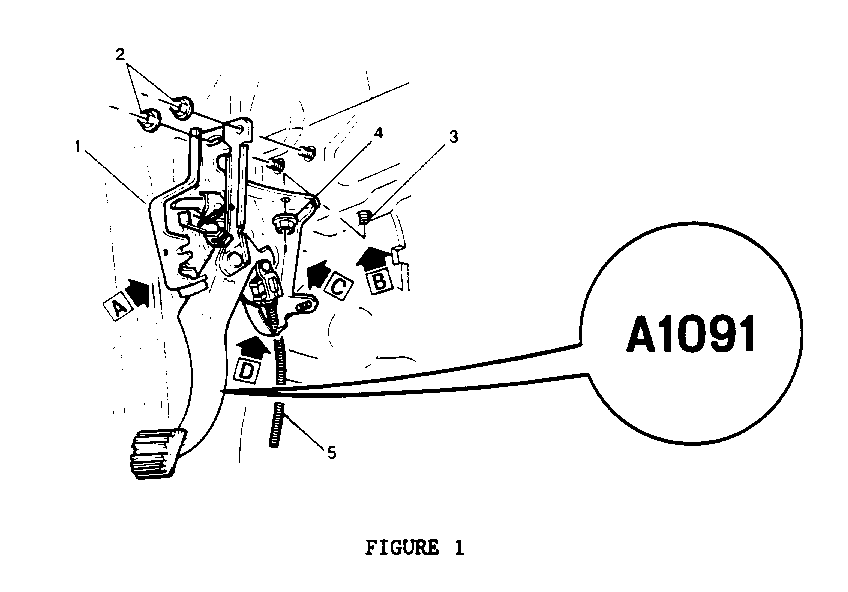
1. Using a flashlight, inspect parking brake lever assembly for suspect date codes A1091, A1121, A1221, A1231, A1261, A1271, A1281, A1291 or A1301. These date codes are stamped into the inboard side of the parking brake pedal assembly approximately three (3) inches above the pedal pad (see Figure 1).
- If one of the suspect date codes listed above is found, proceed to Replacement. If the date code cannot be easily identified, also proceed to Replacement.
- If the date code is not one of those listed above, proceed to step 22 under Parking Brake Cable Adjustment.
Replacement:
1. Loosen parking brake cable under car.
2. Write down the owner's preset memory settings which will be lost when the battery is disconnected for reference later when resetting the memory functions. If a memory retention device is plugged into the cigarette lighter socket (such as "Memor-Eze," Snap-On Tool YA960, or Kent-Moore Tools KS295A or BT9027), this step can be omitted. With the ignition in the "off" position, disconnect the negative battery cable from the battery.
3. Remove left lower I/P sound insulation.
4. Disable the Inflatable Restraint System (SIR). Refer to SUPPLEMENTAL INFLATABLE RESTRAINT, page 9J-A-3 of the 1991 Oldsmobile Ninety Eight or 1992 Oldsmobile Eighty Eight Service Manual. For Buick refer to appropriate Electrical Systems Manual. Disconnect the SIR inflator module circuit by disconnecting the YELLOW connector at the base of the steering column. Failure to disconnect the yellow connector may result in air bag deployment with personal injury.
5. Remove fuse block cover, set aside fuse block and light control module (if equipped).
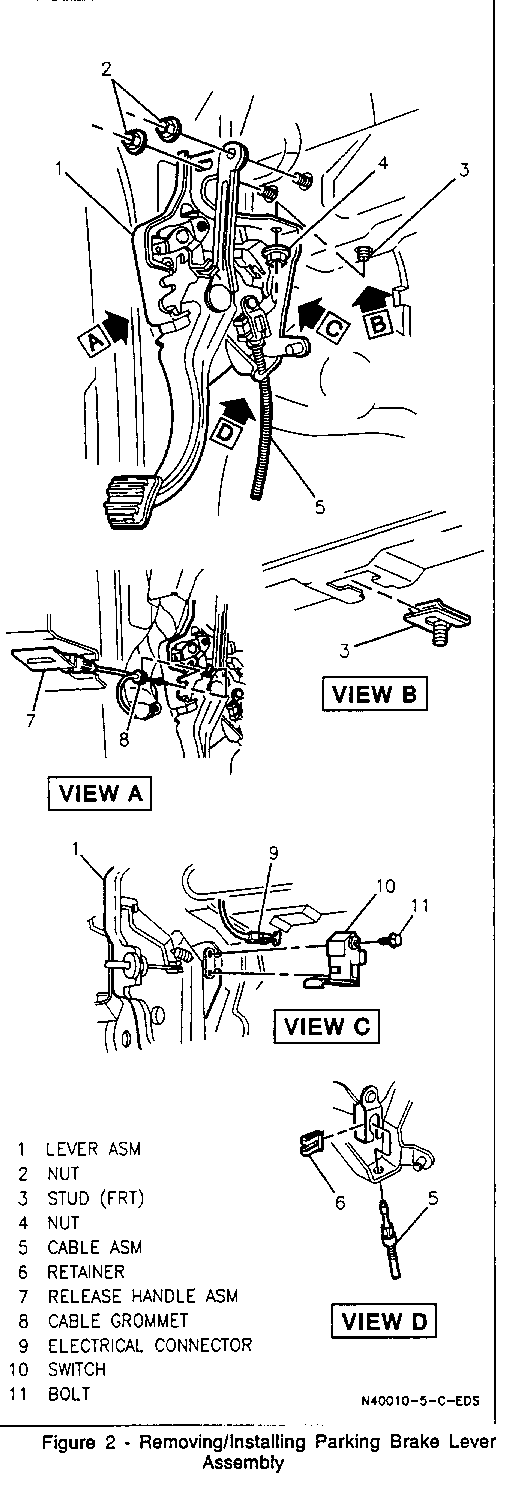
6. Disconnect release handle cable (8) from lever assembly (1) (see Figure 2, view A).
7. Disconnect parking brake cable (5) from lever assembly (see Figure 2, view D) after removing retaining clip (6) (if so equipped).
8. Disconnect electrical connector (9) from parking brake switch (10) (see Figure 2, view C).
9. Remove lever assembly attaching nuts (2 & 4) (see Figure 2).
10. Remove parking brake lever assembly.
11. Transfer switch (10) and plastic shield (if so equipped) to new parking brake lever assembly.
12. Reverse Steps 5 through 10 to install new lever assembly.
CAUTION:
Parking brake cable and lever assembly are to be routed left of transmission shift cable. Do not place brake cable or lever assembly over shift cable. Torque two nuts at upper rear locations (2) and nut at lower front location (4) to 18 N.m (13 lb. ft.).
13. Enable the SIR system. Refer to SUPPLEMENTAL INFLATABLE RESTRAINT, Page 9J-A-3 of the 1991 Oldsmobile Ninety Eight or 1992 Oldsmobile Eighty Eight Service Manual, for Buick refer to appropriate Electrical Systems Manual. Reconnect the SIR inflator module circuit by connecting the W connector at the base of the steering column.
14. Reinstall left lower IP sound insulator.
15. With the ignition in the off position, reconnect the negative battery cable and remove memory retention device if used. In the interest of customer satisfaction, please advise customer that the battery was disconnected (not required if a memory retention tool was used) and memory in the radio, clock, or other memory options may need resetting.
Parking Brake Cable Adjustment:
1. Raise vehicle and suitably support (Refer to Service Manual, Section 0A).
2. Mark relationship of rear wheel to wheel studs in bearing flange.
3. Remove rear wheel and tire assemblies.
4. Mark relationship of rear drum to wheel studs in bearing flange.
5. Remove brake drums.
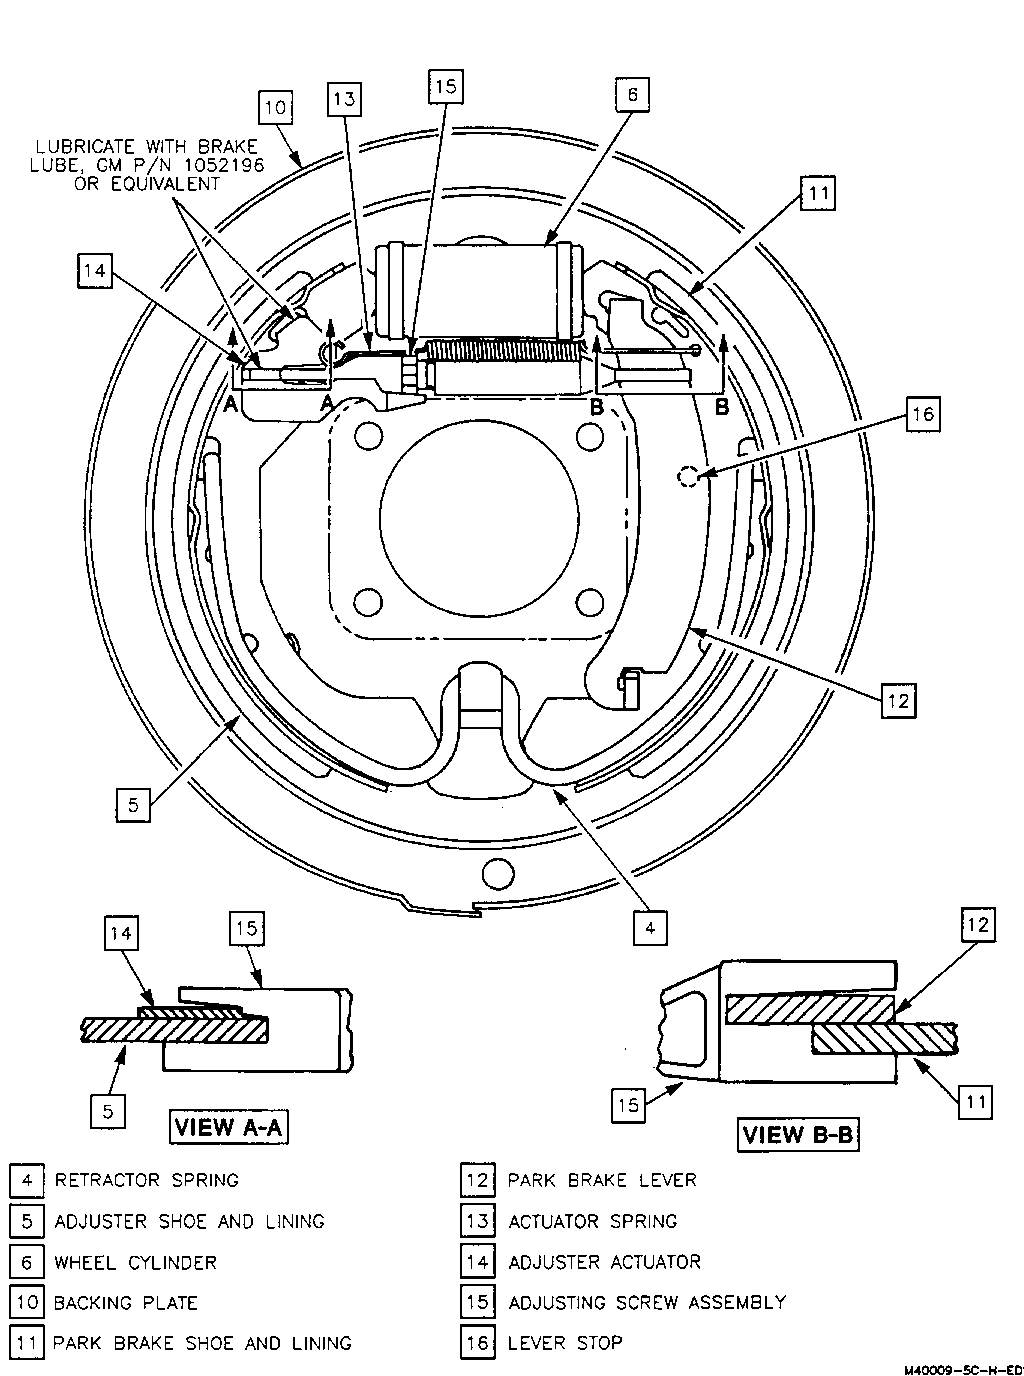
6. Make sure lever stops (16) (Refer to Figure 3) on both park brake levers (12) are against edges of shoe webs on park brake shoes (I 1). If park brake cable is holding stops off edge of shoe web, loosen park brake cable adjustment.
7. Measure the inside diameter (ID) of the drum using J21177-A or J22364-01.
8. Turning star wheel on adjusting screw assembly (15), adjust shoe and lining diameter to be 1.27 mm (0.050 in.) less than inside drum diameter for each rear wheel.
9. Install drums and wheel and tire assemblies, aligning marks made at removal. Install lug nuts finger tight.
10. Lower vehicle.
11. Torque wheel nuts to 140 N.m (100 lb. ft.).
12. Apply and release service brake pedal 30 to 35 times with normal pedal force. Pause about one (1) second between pedal applies.
13. Apply and release parking brake five (5) times to 10 clicks. Release park brake pedal.
14. Check park brake pedal for full release by turning ignition to "ON" and checking the "BRAKE" indicator light. The light should be off. If the light is on and the brake appears to be released, operate pedal release lever and pull downward on the front parking brake cable to remove slack.
15. Apply park brake to four clicks.
16. Raise vehicle and suitably support.
17. Remove access hole plug in rear brake backing plates.
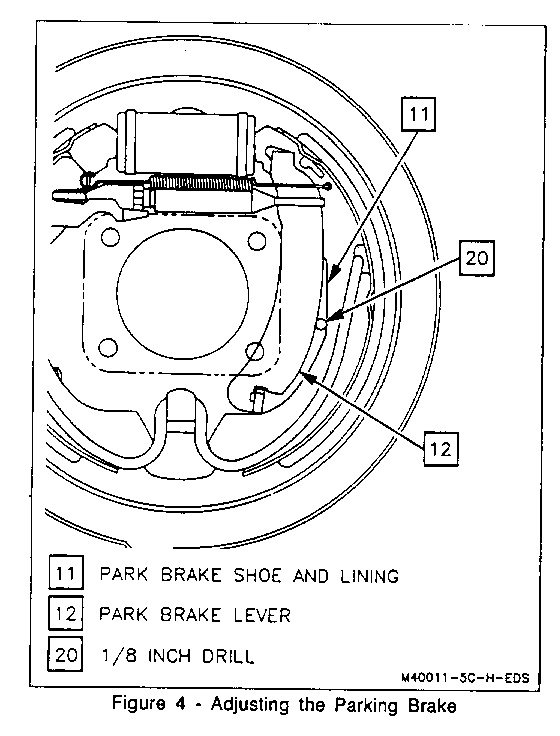
18. Adjust parking brake cable until a 1/8 inch drill bit can be inserted through access hole in space between shoe web (11) and park brake lever (12) (Refer to Figure 4). Satisfactory cable adjustment is achieved when a 1/8 inch bit will fit into the space, but a 1/4 inch bit will not.
19. Release park brake and check for free wheel rotation.
20. Reinstall access hole plugs.
21. Lower vehicle.
22. Install Campaign Identification Label.
INSTALLATION OF CAMPAIGN IDENTIFICATION LABEL
Clean surface of radiator upper mounting panel and apply a Campaign Identification Label. Make sure the correct campaign number is inserted on the label. This will indicate that the campaign has been completed.
Dear General Motors Customer:
General Motors of Canada has determined that certain 1991 Oldsmobile Ninety Eight, Buick Park Avenue/Ultra and 1992 Oldsmobile Eighty Eight, Buick LeSabre model vehicles fail to conform to Canada Motor Vehicle Safety Standard (CMVSS) 105, "Hydraulic Brake Systems" which, in part, covers parking brake performance.
Some of these vehicles have parking brake lever assemblies which when applied can release one or more teeth. If release occurs, the cable load applying the rear brakes will be reduced, and depending upon the extent of lever release, the parking brake may not hold the vehicle as required.
To prevent this condition from occurring, your GM dealer will inspect and, if required, replace the parking brake lever assembly. This service will be performed for you at no charge.
Please contact your GM dealer as soon as possible to arrange a service date.
This letter identifies your vehicle. Presentation of this letter to your dealer will assist their Service personnel in completing the necessary correction to your vehicle in the shortest possible time.
Subsequent to contacting your dealer, further assistance, if required, may be obtained from our Customer Assistance Centre, toll free, by calling 1-800-263-3777 (English), or 1-800-263-7-854 (French).
We are sorry to cause you this inconvenience; however, we have taken this action in the interest of your continued satisfaction with our products.


General Motors bulletins are intended for use by professional technicians, not a "do-it-yourselfer". They are written to inform those technicians of conditions that may occur on some vehicles, or to provide information that could assist in the proper service of a vehicle. Properly trained technicians have the equipment, tools, safety instructions and know-how to do a job properly and safely. If a condition is described, do not assume that the bulletin applies to your vehicle, or that your vehicle will have that condition. See a General Motors dealer servicing your brand of General Motors vehicle for information on whether your vehicle may benefit from the information.
