SERVICE MANUAL UPDATE-SEC. 8A SUNROOF (REVISED DIAGNOSTICS)

SUBJECT: SERVICE MANUAL UPDATE - SECTION 8A - SUNROOF (REVISED DIAGNOSTICS) FOR 1991-92 DEVILLES AND FLEETWOODS
The sunroof diagnostics found in the following Service Information Manuals have been revised. The revised pages should replace the following pages for proper sunroof system diagnosis:
1991 Cadillac DeVille/Fleetwood - Pages 8A-122-0 through 8A-122-4 (insert four pages of art).
Please update your Service Information Manual accordingly.
ASTRO ROOF
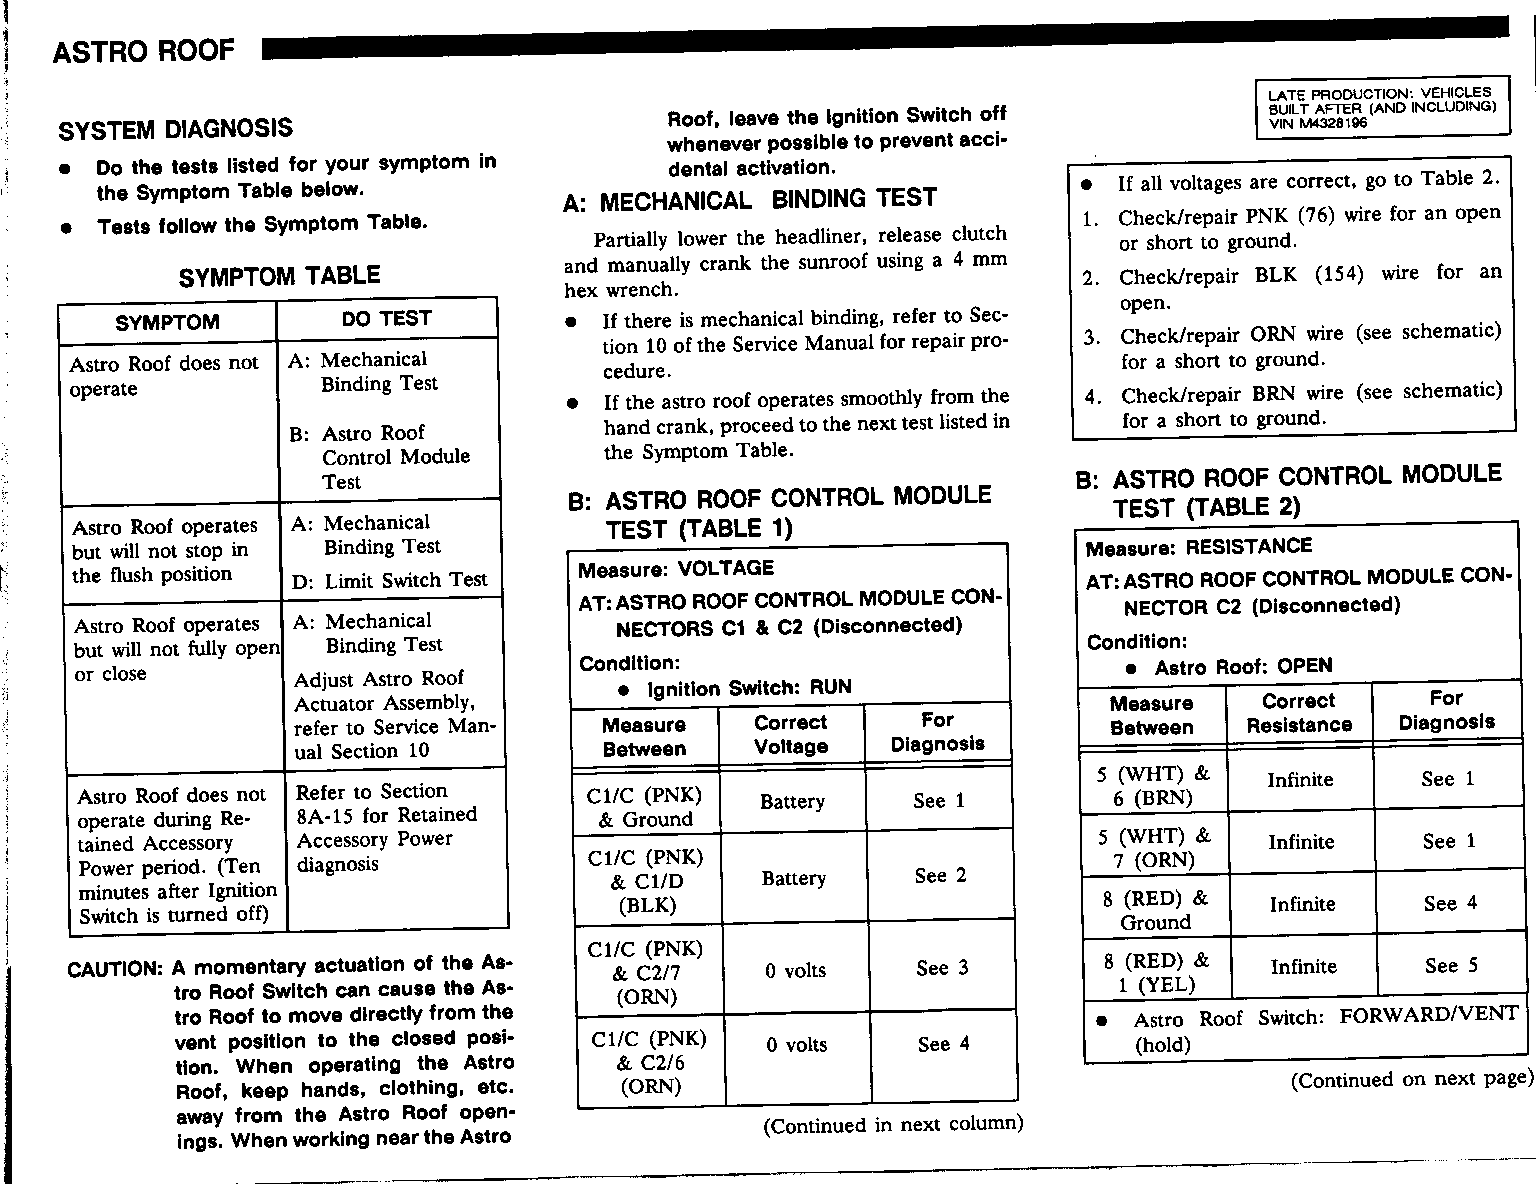
SYSTEM DIAGNOSIS
o Do the tests listed for your symptom in the Symptom Table below.
o Tests follow the Symptom Table.
SYMPTOM TABLE
SYMPTOM DO TEST ------- ------- Astro Roof does not A: Mechanical operate Binding Test
B: Astro Roof Control Module Test
Astro Roof operates A: Mechanical but will not stop in Binding Test the flush position D: Limit Switch Test
Astro Roof operates A: Mechanical but will not fully open Binding Test or close Adjust Astro Roof Actuator Assembly, refer to Service Manual Section 10
Astro Roof does not Refer to Section operate during Re- 8A-15 for Retained tained Accessory Accessory Power Power period. (Ten diagnosis minutes after Ignition Switch is turned off)
CAUTION:
A momentary actuation of the Astro Roof Switch can cause the Astro Roof to move directly from the vent position to the closed position. When operating the Astro Roof, keep hands, clothing, etc. away from the Astro Roof openings. When working near the Astro Roof, leave the Ignition Switch off whenever possible to prevent accidental activation.
A: MECHANICAL BINDING TEST -------------------------- Partially lower the headliner, release clutch and manually crank the sunroof using a 4 mm hex wrench.
0 If there is mechanical binding, refer to Section 10 of the Service Manual for repair procedure.
0 If the astro roof operates smoothly from the and crank, proceed to the next test listed in the Symptom Table.
B: ASTRO ROOF CONTROL MODULE TEST (TABLE 1) ------------------------------------------- Measure: VOLTAGE ---------------- AT: ASTRO ROOF CONTROL MODULE CONNECTORS C1 & C2 (Disconnected) --------------------------------------------------------------- Condition: --------- 0 ignition Switch: RUN
Measure Correct For Between Voltage Diagnosis ------- ------- --------- C1/C (PNK) Battery See 1 & Ground
C1/C (PNK) & C1/D Battery See 2 (BLK)
C1/C (PNK) & C2/7 0 volts See 3 (ORN)
C1/C (PNK) 0 volts See 4 & C2/6 (ORN)
*LATE PRODUCTION: VEHICLES BUILT AFTER (AND INCLUDING) VIN M4328196
0 If all voltages are correct, go to Table 2.
1. Check/repair PNK (76) wire for an open or short to ground.
2. Check/repair BLK (154) wire for an open.
3. Check/repair ORN wire (see schematic) for a short to ground.
4. Check/repair BRN wire (see schematic) for a short to ground.
B: ASTRO ROOF CONTROL MODULE TEST (TABLE 2) ------------------------------------------- Measure: RESISTANCE ------------------- AT: ASTRO ROOF CONTROL MODULE CONNECTOR C2 (Disconnected) --------------------------------------------------------- Condition: --------- 0 Astro Roof: OPEN
Measure Correct For Between Resistance Diagnosis ------- ---------- --------- 5 (WHT) & Infinite See 1 6 (BRN)
5 (WHT) & Infinite See 1 7 (ORN)
8 (RED) & Infinite See 4 Ground
8 (RED) & Infinite See 5 1 (YEL)
0 Astro Roof Switch: FORWARD/VENT (hold)
ASTRO ROOF
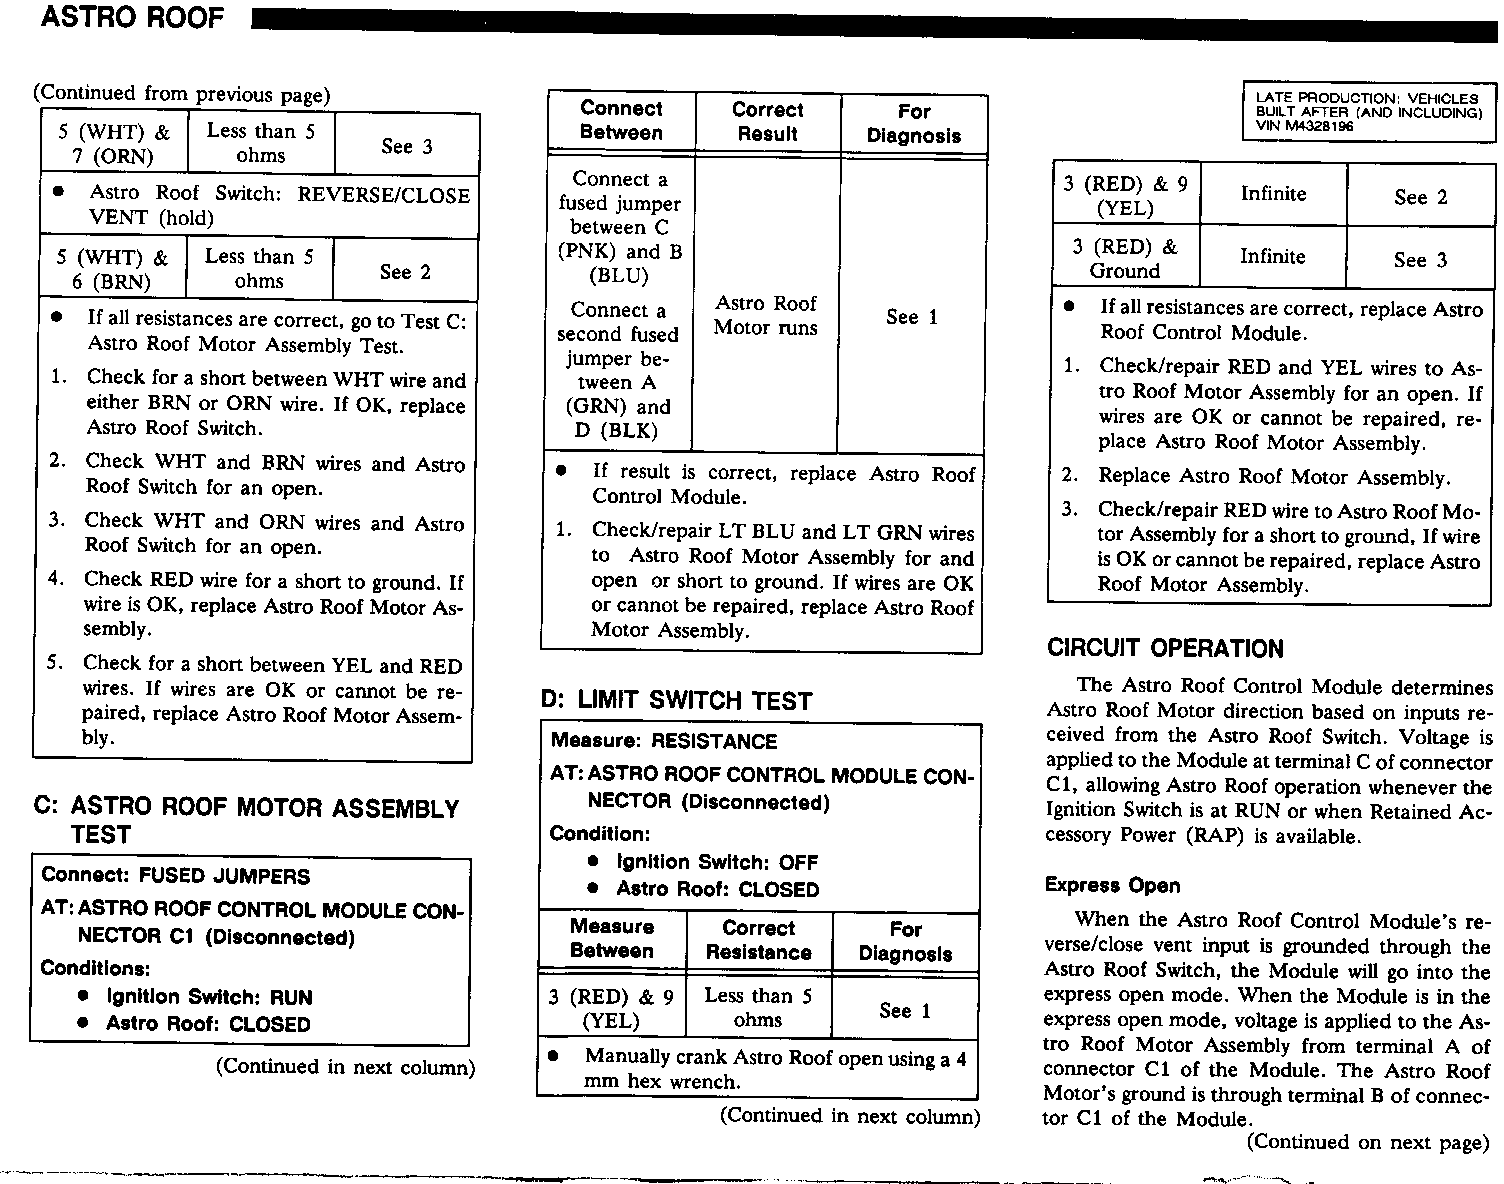
5 (WHT) & Less than 5 See 3 7 (ORN) ohms
0 Astro Roof Switch: REVERSE/CLOSE VENT (hold)
5 (WHT) & Less than 5 See 2 6 (BRN) ohms
0 If all resistances are correct, go to Test C: Astro Roof Motor Assembly Test.
1. Check for a short between WHT wire and either BRN or ORN wire. If OK, replace Astro Roof Switch.
2. Check WHT and BRN wires and Astro Roof Switch for an open.
3. Check WHT and ORN wires and Astro Roof Switch for an open.
4. Check RED wire for a short to ground. If wire is OK, replace Astro Roof Motor Assembly.
5. Check for a short between YEL and RED wires. If wires are OK or cannot be repaired, replace Astro Roof Motor Assembly.
C: ASTRO ROOF MOTOR ASSEMBLY TEST ----------------------------------- Connect: FUSED JUMPERS ---------------------- AT: ASTRO ROOF CONTROL MODULE CONNECTOR C1 (Disconnected) --------------------------------------------------------- Conditions: ---------- 0 ignition Switch: RUN
0 Astro Roof: CLOSED
Connect Correct For Between Result Diagnosis -------- ------- --------- Connect a fused jumper between C (PNK) and B (BLU)
Connect a Astro Roof See 1 second fused Motor runs jumper between A (GRN) and D (BLK)
0 If result is correct, replace Astro Roof Control Module.
1. Check/repair LT BLU and LT GRN wires to Astro Roof Motor Assembly for and open or short to ground. If wires are OK or cannot be repaired, replace Astro Roof Motor Assembly.
D: LIMIT SWITCH TEST --------------------- Measure: RESISTANCE ------------------- AT: ASTRO ROOF CONTROL MODULE CONNECTOR (Disconnected) ------------------------------------------------------ Condition: --------- 0 ignition Switch: OFF
0 Astro Roof: CLOSED
Measure Correct For Between Resistance Diagnosis ------- ---------- --------- 3 (RED) & 9 Less than 5 See 1 (YEL) ohms
0 Manually crank Astro Roof open using a 4 mm hex wrench.
*LATE PRODUCTION: VEHICLE BUILT AFTER (AND INCLUDING) VIN M4328196
3 (RED) & 9 Infinite See 2 (YEL)
3 (RED) & infinite See 3 Ground
0 If all resistances are correct, replace Astro Roof Control Module.
1. Check/repair RED and YEL wires to Astro Roof Motor Assembly for an open. If wires are OK or cannot be repaired, replace Astro Roof Motor Assembly.
2. Replace Astro Roof Motor Assembly.
3. Check/repair RED wire to Astro Roof Motor Assembly for a short to ground, If wire is OK or cannot be repaired, replace Astro Roof Motor Assembly.
CIRCUIT OPERATION
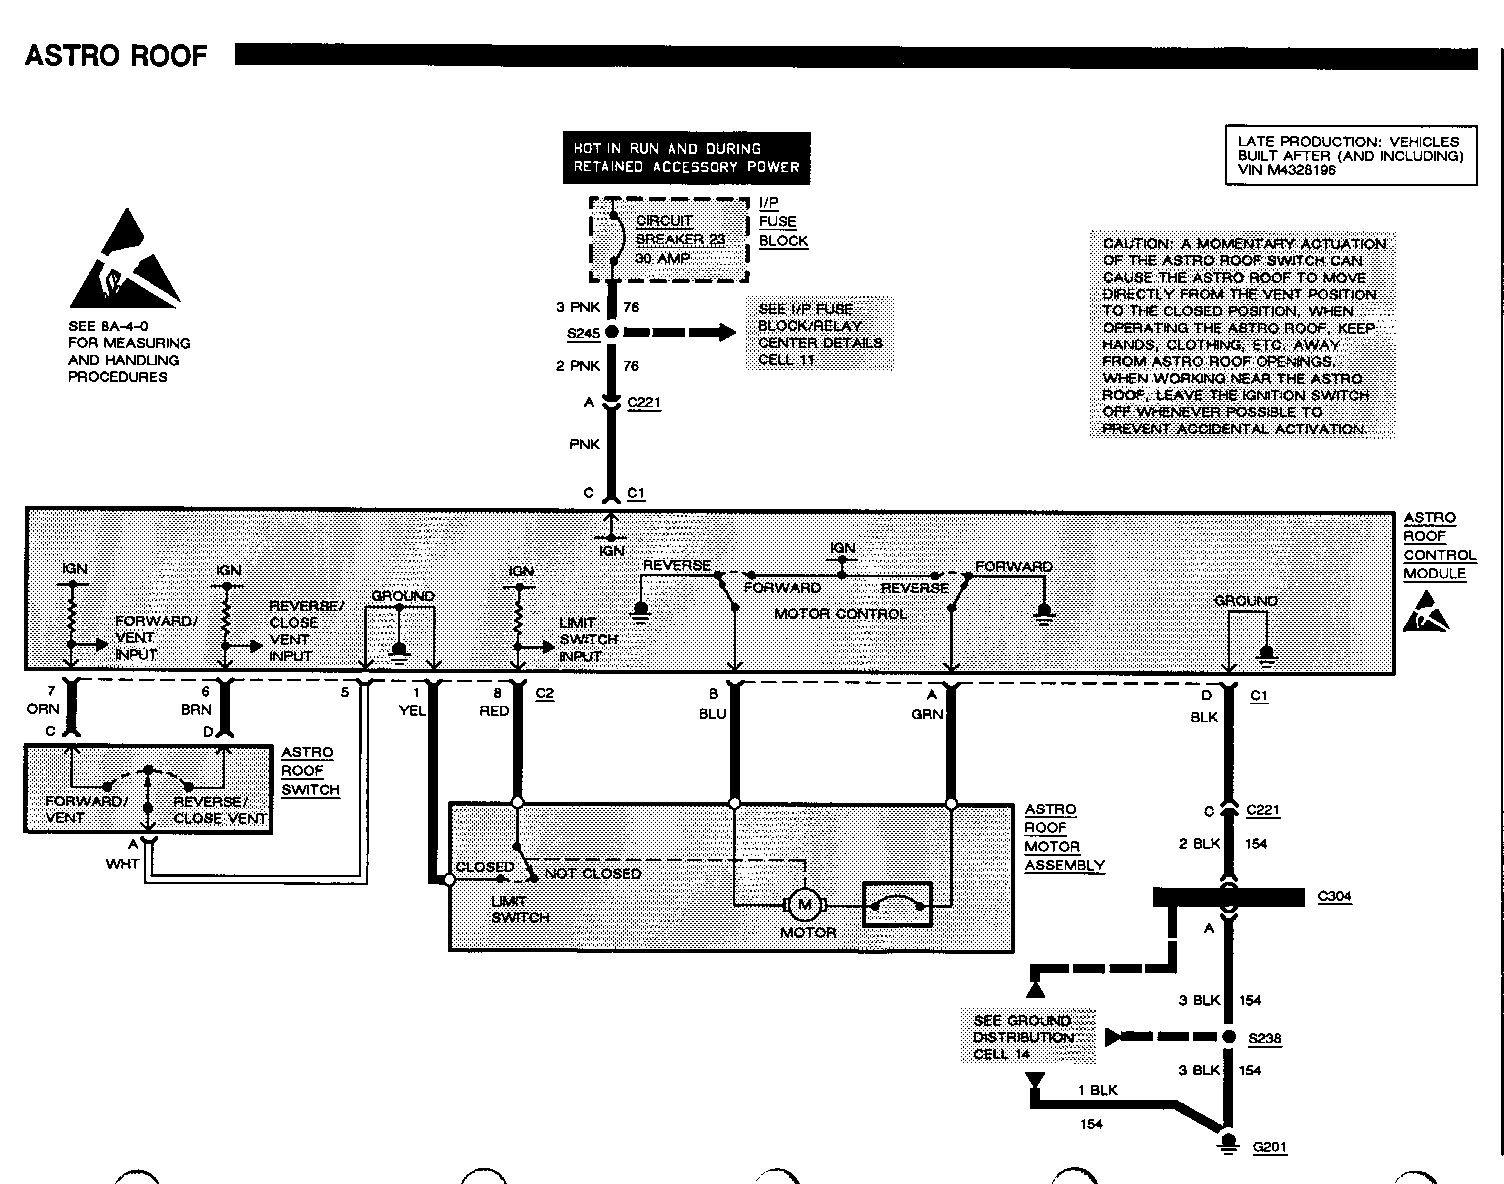
The Astro Roof Control Module determines Astro Roof Motor direction based on inputs received from the Astro Roof Switch. Voltage is applied to the Module at terminal C of connector C1, allowing Astro Roof operation whenever the Ignition Switch is at RUN or when Retained Accessory Power (RAP) is available.
Express Open
When the Astro Roof Control Module's reverse/close vent input is grounded through the Astro Roof Switch, the Module will go into the express open mode. When the Module is in the express open mode, voltage is applied to the Astro Roof Motor Assembly from terminal A of connector C1 of the Module. The Astro Roof Motor's ground is through terminal B of connector C1 of the Module.
ASTRO ROOF
TROUBLESHOOTING HINTS
0 Try the following checks before doing the system check.
1. Check Circuit Breaker 23 by operating the Power Windows.
2. If Astro Roof does not operate during Retained Accessory Power (RAP), See Section 8A-15.
0 Go to System Check for a guide to normal operation.
0 Go to System Diagnosis fo diagnostic tests.
SYSTEM CHECK
0 Use the System Check Table as a guide to normal operation.
0 Refer to System Diagnosis for list of symptoms and diagnostic stops.
COMPONENT LOCATION PAGE FIGURE ------------------ ----------- Astro Roof Control Module ... Along RH roof rail, above RH front door............. 201- 16-C
Astro Roof Motor Assembly.....Center of windshield header..201- 16-C I/P Fuse Block............... LH side of I/P, behind access door..................201- 9-A C221 (4 cavities)............ RH side of windshield header, at windshield pillar.........201- 16-C C304 (10 cavities)........... Bottom of RH shroud, at door sill ............... 201- 18-A G201......................... Behind RH side of I/P, to... 201- 14-B S238......................... Body main harness, top of RH shroud ....... 201- 14-B S245......................... Body main hamess, behind I/P. left of steering column..201- 21-A
SYSTEM CHECK TABLE
ACTION
Turn the Ignition Switch to RUN. Momentarily press the Astro Roof Switch to REVERSE/CLOSE Vent position and release before roof is fully open
Press the Astro Roof Switch to the FORWARD/VENT position and release before Astro Roof is fully closed
Press and hold the Astro Roof Switch to the FORWARD/VENT position
Release the Astro Roof Switch and then press the switch again to the FORWARD/VENT position
Momentarily press the Astro Roof to the REVERSE/CLOSE VENT position and release before Astro Roof is closed
With all doors closed, start the engine. Turn engine off and remove key from the ignition Switch. Operate Astro Roof.
NORMAL RESULT
Astro Roof moves smoothly to the fully open position
NOTE: To abort the express open mode, press the Astro Roof Switch once in any direction
Astro Roof moves toward the closed position and stops when Astro Roof Switch is released
Astro Roof moves smoothly to the closed position and stops
Astro Roof moves to the vent position
Astro Roof moves to the closed position then stops
Astro Roof operates for approximately 10 minutes or until any door is opened
ASTRO ROOF
The Astro Roof Motor will run until one of three conditions occurs: 1) the Motor stalls when the Astro Roof reaches its fully open position: 2) the Astro Roof Switch is pushed to the FORWARD/VENT position; or 3) the Astro Roof Switch is released from the REVERES/CLOSE VENT position and then pressed again.
Vent
The Astro Roof will move to the vent position when the Astro Roof Control Module's forward/vent input (terminal 2) is grounded when the Astro Roof is in the flush closed position.
Closing
When the Astro Roof Control Module's forward/vent input is grounded through the Astro Roof Switch, the Module will apply voltage to the Astro Roof Motor Assembly from terminal B of connector C1. The Astro Roof Motor's ground is through terminal A of connector C1 of the Module.
The Astro Roof Control Module will run the Motor until the Astro Roof Switch is released or the Limit Switch closes, grounding the Module's limit switch input. The Limit Switch will close when the sunroof is in the flush closed position.
Express Close Vent
The Astro Roof will move to the flush closed position when the Astro Roof Control Module's reverse/close vent input is grounded when the Astro Roof is in the vent position. The Module will stop motor operation under the same conditions as outlined in express open.
*LATE PRODUCTION: VEHICLES BUILT AFTER (AND INCLUDING) VIN M4328196


General Motors bulletins are intended for use by professional technicians, not a "do-it-yourselfer". They are written to inform those technicians of conditions that may occur on some vehicles, or to provide information that could assist in the proper service of a vehicle. Properly trained technicians have the equipment, tools, safety instructions and know-how to do a job properly and safely. If a condition is described, do not assume that the bulletin applies to your vehicle, or that your vehicle will have that condition. See a General Motors dealer servicing your brand of General Motors vehicle for information on whether your vehicle may benefit from the information.
