AIR NOISE/ WIND NOISE DIAGNOSE AND REPAIR

MODELS AFFECTED: 1989-92 DE VILLES AND FLEETWOODS
Some 1989 DeVilles and Fleetwoods may experience an objectionable windnoise or wind buffeting at the A-Pillars, windshield header, or door locations. For proper diagnosis and repair of these conditions, use the procedures in this bulletin.
This bulletin is divided into the following three sections:
I. Windnoise diagnosis and testing.
II. Repair of windshield and cowl locations.
III. Repair of door, door glass, and mirror locations.
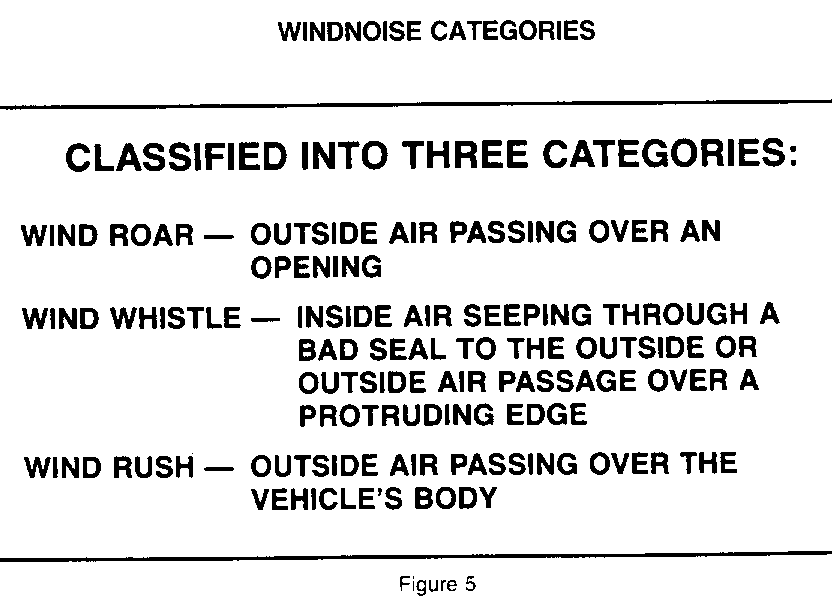
I. WINDNOISE DIAGNOSIS ------------------------ THE WINDNOISE CONDITION ----------------------- The first step of the repair process in correcting windnoise is to identify the cause(s) of the noise. A determination must be made as to whether the cause of the noise is air escaping from the vehicle or outside air turbulence.
To assist in diagnosing the cause of a windnoise complaint, answers to the following questions should be obtained:
1. What specific noise is objectionable? A. Whistle B. Flutter C. Rush of air 2. At what speed does the noise occur? 3. Does the noise appear to be: A. Air leaving the body? (internal windnoise) B. Air passing over the body's exterior surface? (external windnoise) 4. In what general area does the noise appear to originate? A. Front of the vehicle B. Side of the vehicle 5. Is the heater/AC blower motor ON or OFF?
ANALYZING WINDNOISE
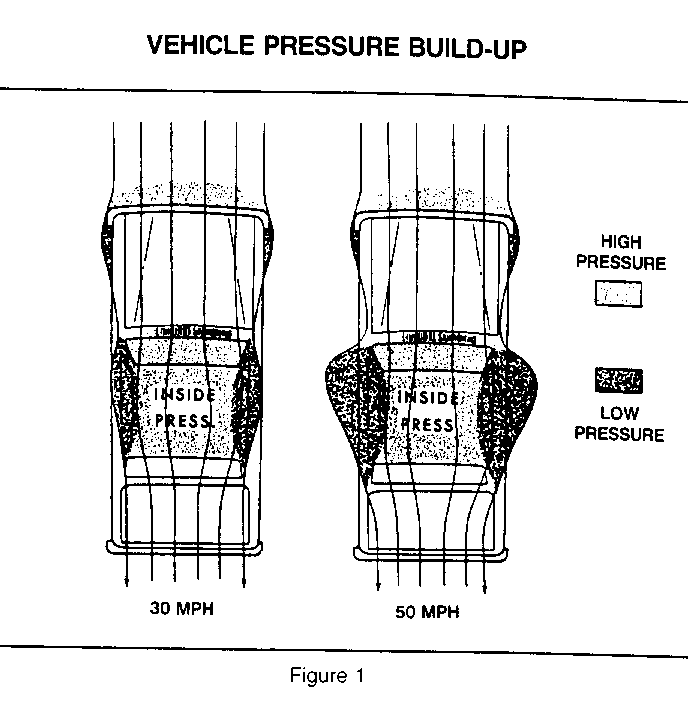
When analyzing windnoise it is important to understand the forces that act upon the vehicle that can create this condition. As air strikes and bends around the front of a vehicle in motion it causes a low pressure area to develop around the front pillars and side window locations of the body. At the same time air flow that is filtered through the vehicle's vents and/or AC system will cause a high pressure to build up inside the passenger compartment. The faster the vehicle is traveling, the greater the pressure difference between the inside and outside of the vehicle becomes, refer to Figure 1.
This high inside pressure and low outside pressure is separated only by the vehicle's sheet metal panels, glass, weatherstrips, and body seals. When an opening is created at a body seam or weak weatherstrip contact, the high inside pressure will move towards the low outside pressure and create an internal windnoise. Wind rush or external windnoise is created by the air passing over and around misaligned body components such as vinyl top and windshield moldings, mirrors, and door moldings.
THE ROAD TEST
A road test is required to determine if the windnoise condition is external, internal, or a combination of the two.
NOTE: Often there is one primary leak source and one or more secondary leaks that contribute to the noise condition.
Repairing only one of these sources may not completely repair the total condition, but only reduce it.
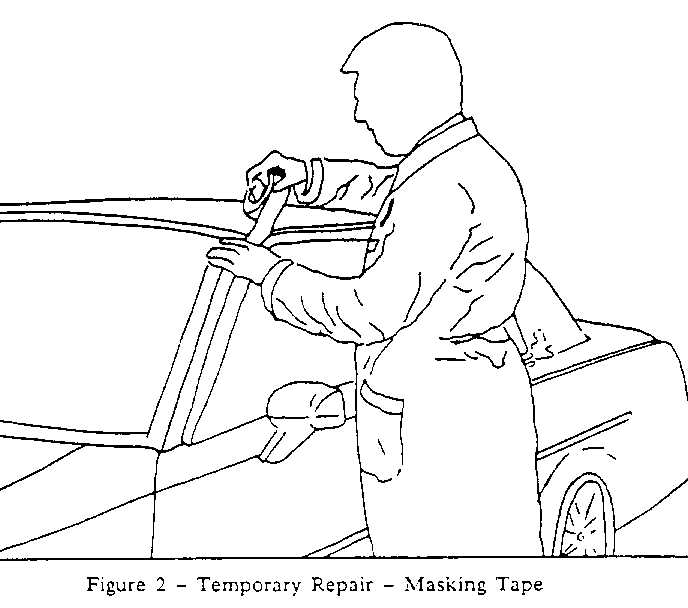
The following items should be used by the technician during the test drive to aid in locating the leak area:
1. Mechanic's stethoscope or vacuum hose. 2. Masking tape (2" in width). 3. Strip caulk. 4. China marking pencil.
The vehicle should be driven at the speed in which the noise was noticed by the customer or until it is heard. Safe legal speeds should never be exceeded.
If the noise can be heard with the door glass lowered and the vehicle driven, it is EXTERNAL WINDNOISE.
Locating an external windnoise is accomplished by taping off various moldings and gaps until the noise is eliminated to pinpoint the exact cause of the noise, refer to Figure 2.
If the noise can only be heard with the windows in a full up position while the car is driven it is INTERNAL WINDNOISE caused by an open body seam or poor glass/door weatherstrip sealing surface.
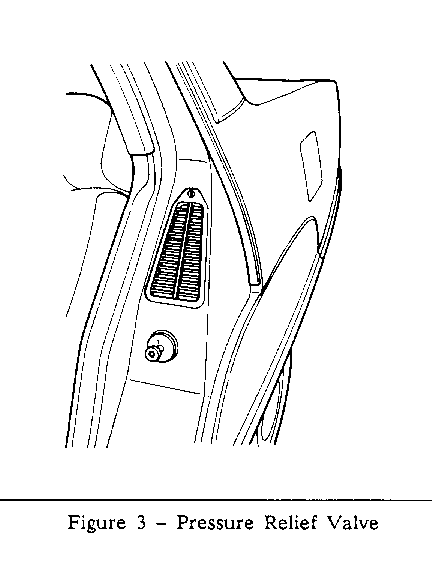
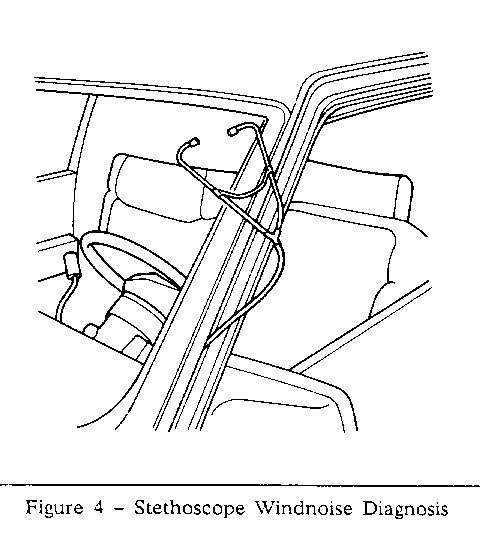
The first step in locating the source of internal windnoise is to tape off the pressure relief valves, refer to Figure 3. This will cause the air pressure to build up inside the vehicle and enhance the windnoise while driving. Trace the suspected area with the stethoscope or section of vacuum hose to locate the leak area.
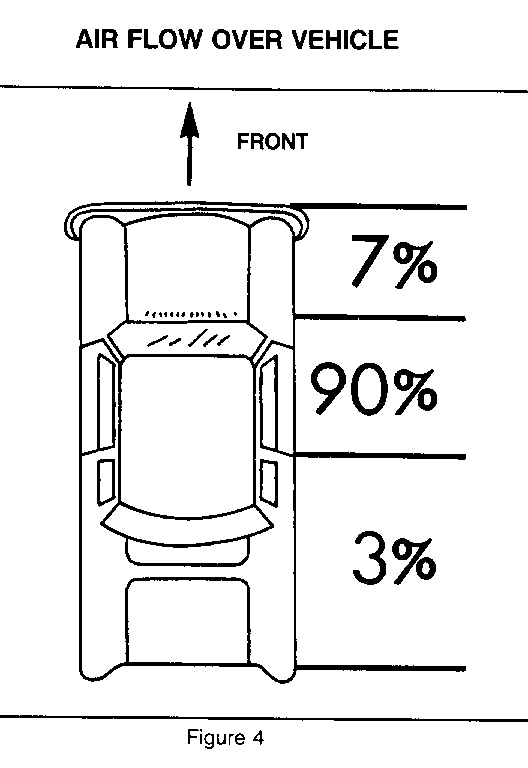
NOTE: Poor seals that cause internal windnoise can also be located in the shop by taping off the pressure relief valves and turning the blower motor on high to pressurize the vehicle. Next, trace the suspected areas with a stethoscope from the outside of the vehicle as shown in Figure 4.
With the suspected windnoise locations diagnosed, refer to the sections of this bulletin for the proper repair procedure of that area.
II. REPAIR OF WINDSHIELD AND COWL LOCATIONS -------------------------------------------- Possible areas of concern covered in this section are:
INTERNAL WINDNOISE 1. Base of the A-Pillar. 2. Windshield sealer voids.
EXTERNAL WINDNOISE 1. Windshield lace. 2. Vinyl top moldings.
Some DeVilles or Fleetwoods may exhibit excessive internal windnoise at the base of the windshield pillars and door area. First, check the door weatherstrip primary and secondary seal to the body, refer to Section III of this bulletin. If these seals are OK, use the following procedures to seal the base of the A-Pillar and check for voids in the windshield sealer.
1. Remove the windshield lower reveal molding.
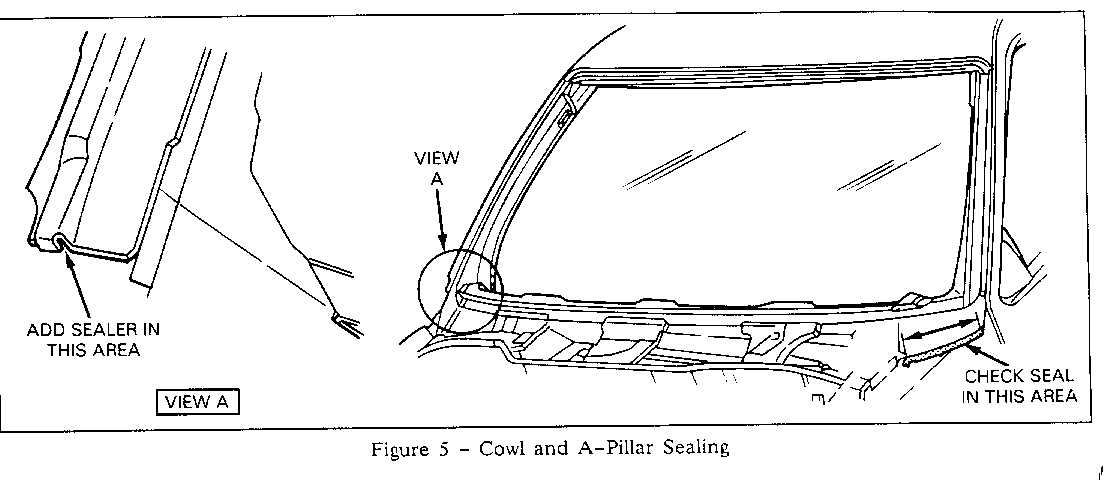
2. Apply 3M strip-caulk, P/N 08578 or equivalent, thumb-grade sealer to the open seams at the base of the A-Pillar as shown in Figure 5.
3. Remove the A-Pillar weatherstrip and inspect the pinch weld flange it mounts to, also inspect the seam at the base of the cowl area as shown in Figure 5. Apply thumb-grade sealer to these areas if these seams appear to be open.
4. Repeat the above operations on the opposite side of the vehicle.
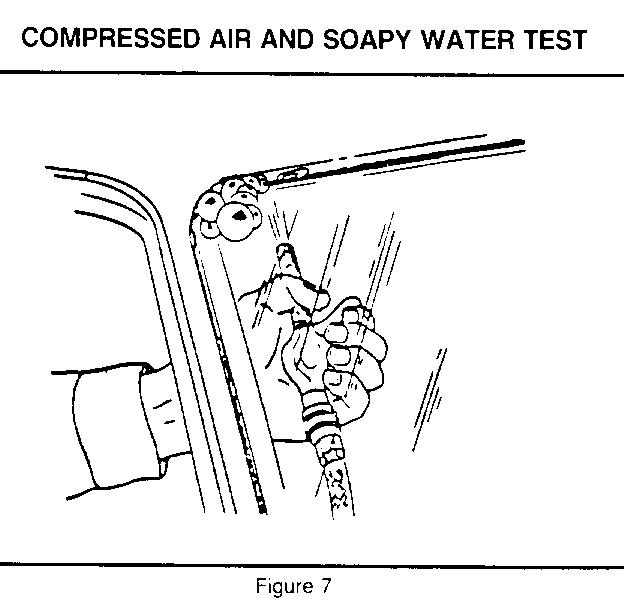
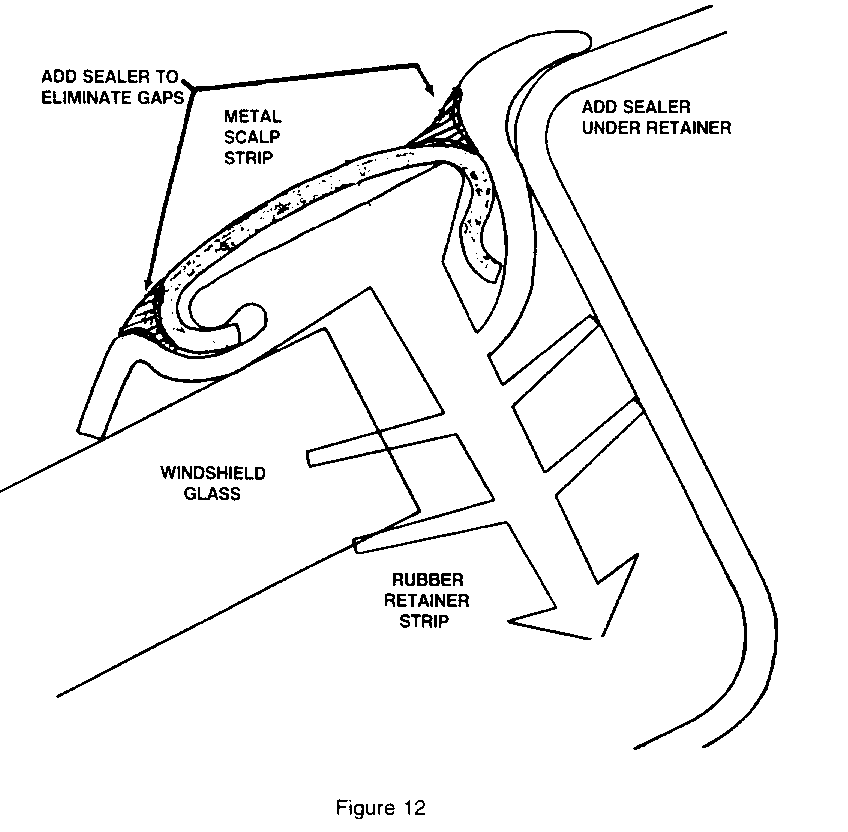
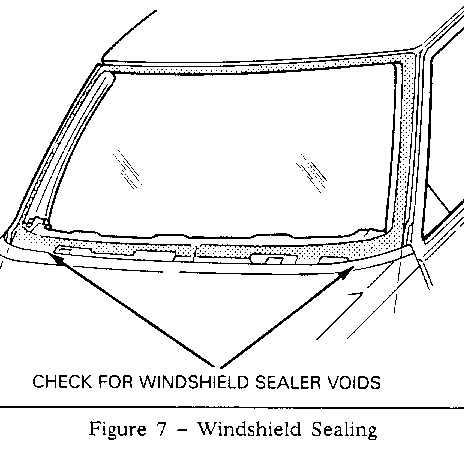
5. Check the seal at the base of the windshield as shown in Figure 6 with compressed air and soapy water test. Apply compressed air at no more than 30 psi (205 KPa) to the base of the windshield from the inside of the vehicle towards the outside as shown in Figure 7.
6. If voids in the windshield are located, reseal with Urethane adhesive kit, GM P/N 9636067 or equivalent.
7. Reinstall lower reveal molding.
To seal the base of the pillar and windshield use Labor Operation T6352 at 1.0 hour to seal both sides.
Some vehicles may exhibit excessive external windnoise in the windshield and windshield pillar areas, which can be caused by poor seal of the windshield lace to the body or a mispositioned vinyl top molding.
First, proper diagnosis must be made by taping off the suspected areas to eliminate the windnoise and isolate the cause. With the suspected area identified, use the following procedures to correct the condition:
VINYL TOP MOLDING
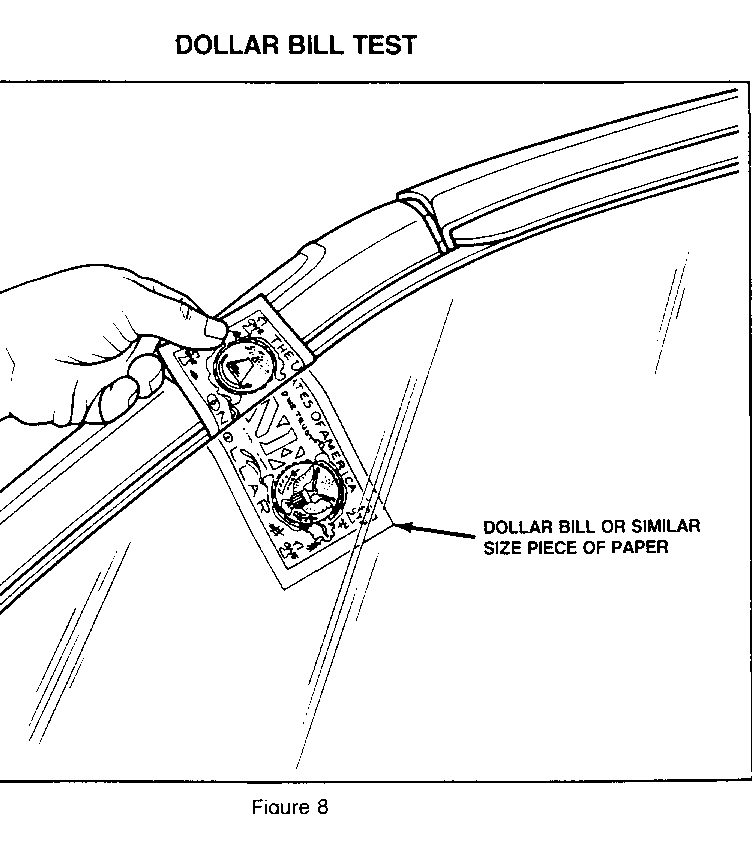
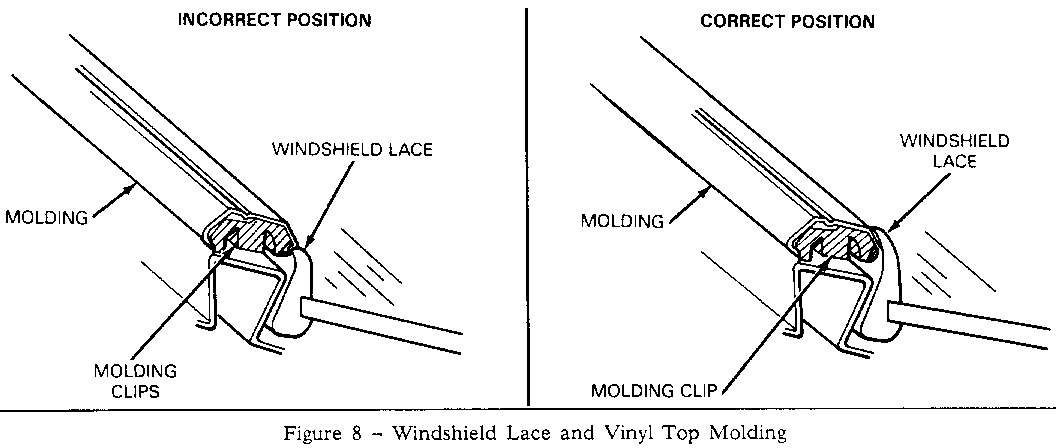
1. Check the position of the vinyl top molding to the windshield lace in the windshield pillar area. The correct position of the vinyl top molding is tucked under the windshield lace as shown in Figure 8.
2. If the vinyl top molding does not tuck under the windshield lace, then remove the molding and replace the molding clip with P/N 20199675.
NOTE: It may be necessary to apply heat to the windshield lace using a heat gun to increase the flexibility of the lace and aid in positioning the lace and molding correctly.
Use Labor Operation T6353 at .5 hour to replace molding clips for both sides.
It may be necessary to relocate the molding inboard on one or both sides of the vehicle to obtain a correct relationship of the vinyl top molding to the windshield lace. Use the following procedure to relocate the vinyl top molding:
1. Remove the molding and molding clips from the vehicle.
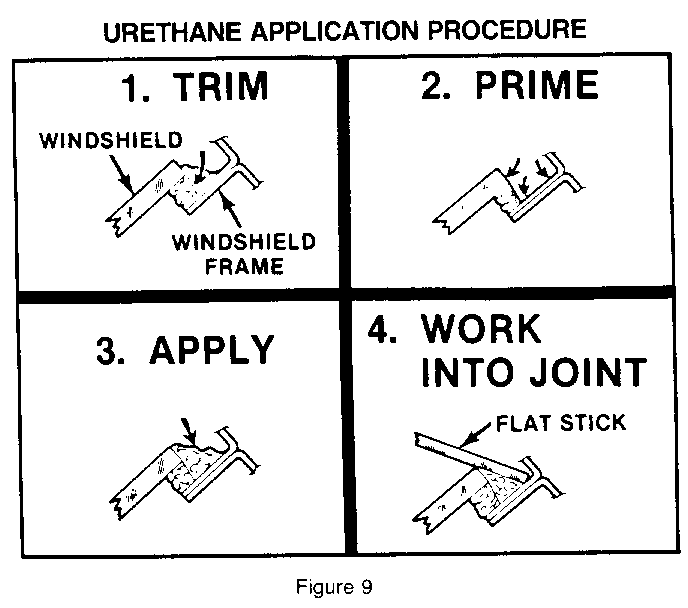
2. For the center and top clip, drill a 3/32" hole 15mm below and 2mm inboard of the existing clip rivet as shown in Figure 9.
NOTE: Do not remove the old rivets.
3. Remove the lower rivet and apply sealer to exposed hole. Drill a 3/32" hole 4mm below and 2mm inboard of the existing rivet location.
4. Prime all exposed rivet holes with a zinc-rich primer.
5. Rivet molding clip in the new locations.
6. Reinstall vinyl top molding.
Use Labor Operation T6357 at 1.0 hour to relocate molding clips for both sides.
NOTE:It may be necessary to apply heat to the windshield lace using a heat gun to increase the flexibility of the lace and aid in positioning the lace and molding correctly.
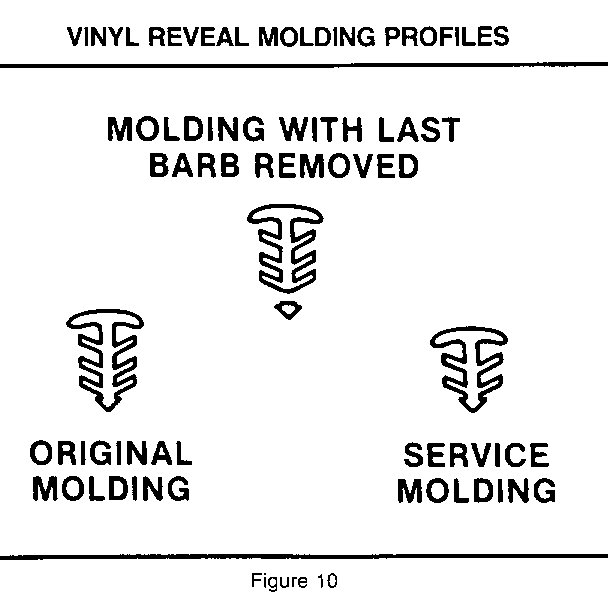
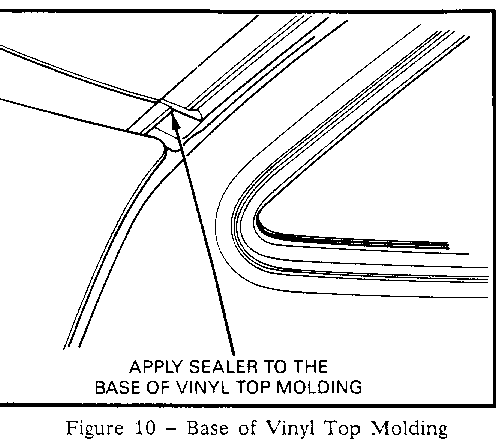
7. Apply 3M strip-caulk, P/N 08578 or equivalent, thumb-grade to the base of the molding as shown in Figure 10.
8. Apply sealer to the windshield lace as explained in the following steps:
WINDSHIELD LACE
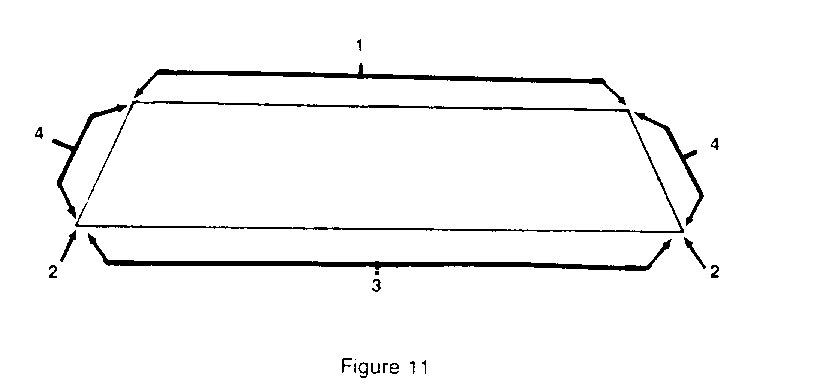
1. Apply 3M Windo-weld resealant, P/N 08633 or equivalent, flow-grade sealer under the windshield lace as shown in Figure 11.
2. Clean off excessive sealer and road test vehicle.
Use Labor Operation T6354 at .5 hour to seal windshield lace.
III. REPAIR OF DOOR LOCATIONS ------------------------------ Possible areas of concern in this section are:
1. Door alignment. 2. Door weatherstrips. 3. Door glass. 4. Mirrors.
DOOR ALIGNMENT AND DOOR WEATHERSTRIPS
If an internal windnoise is diagnosed in the front or rear door locations, use the following procedures to correct this condition.
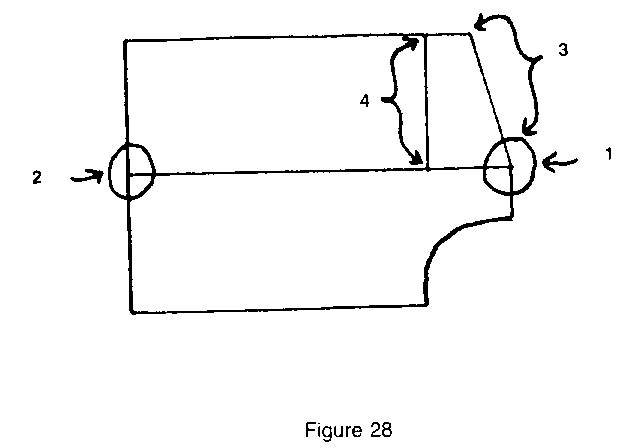
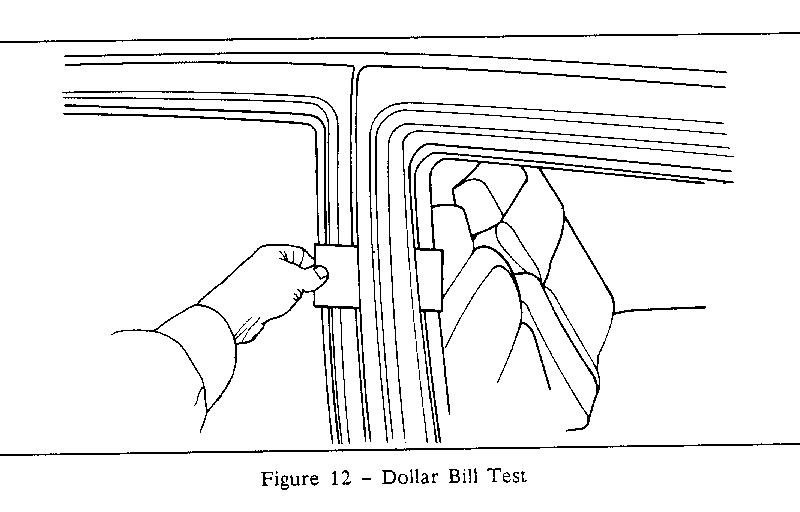
1. Check door weatherstrip contact at both primary and secondary weatherstrips around the entire door perimeter with a dollar bill as shown in Figure 12.
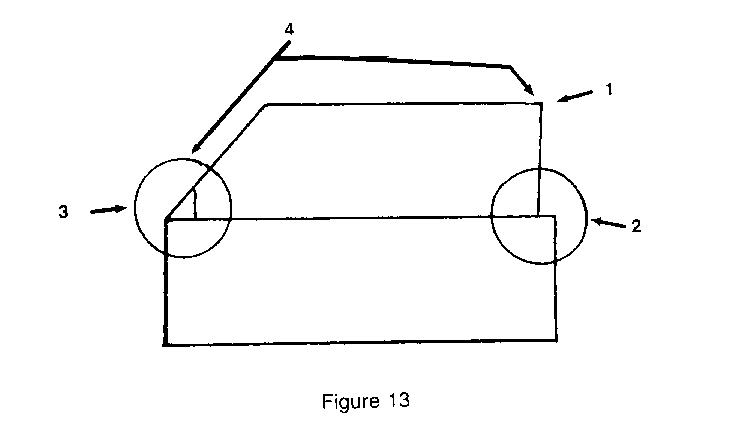
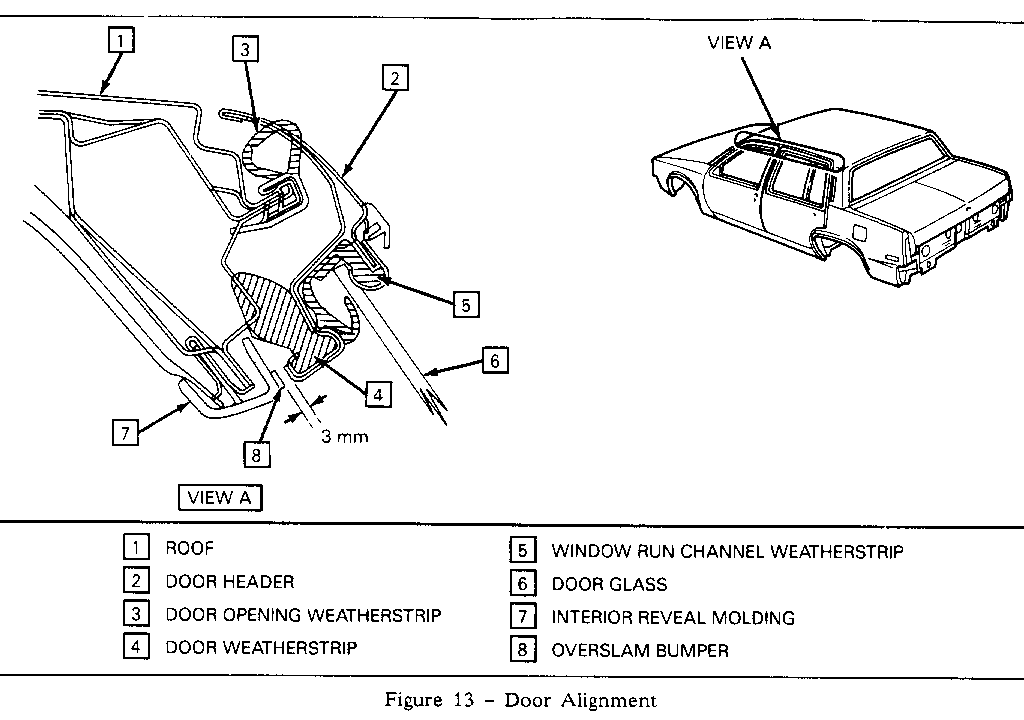
The door opening weatherstrip should have uniform contact along its entire length to both front and rear doors and the door weatherstrip should have a uniform contact to the body as shown in Figure 13. Also, the gap between the door over-slam bumper (located on the interior reveal molding in the B-Pillar area) and the door should be 3mm with the door in a full closed position, refer to item number 8 in Figure 13.
2. If door weatherstrip contacts are poor or the gap to the over-slam bumper is wide, adjust the door(s) inboard.
NOTE: Door adjustments may require moving both upper and lower half of the door inboard.
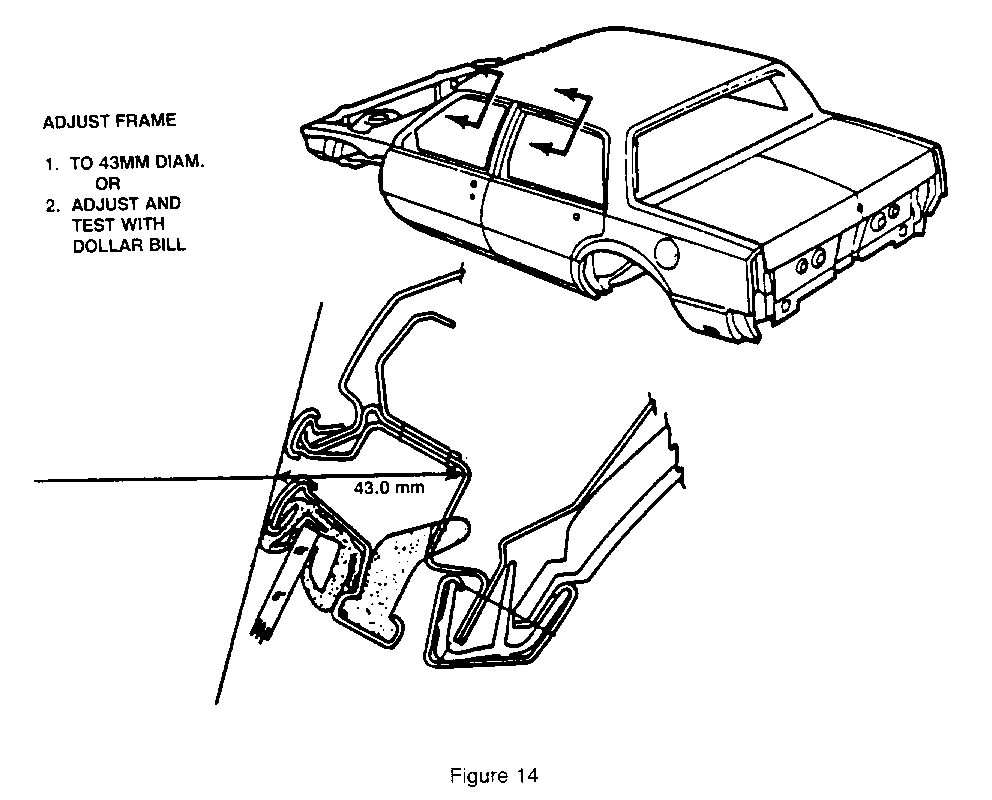
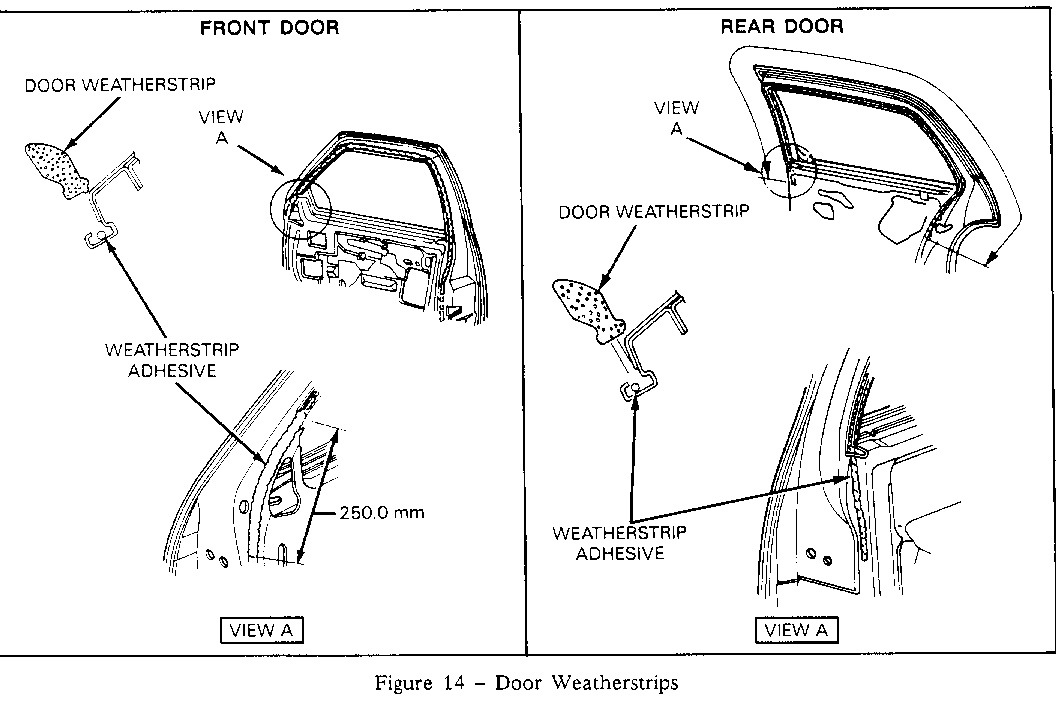
3. Inspect the door weatherstrip for proper alignment and installation to the door. The weatherstrips should be secured with both push-type fasteners and adhesive from the base of the header to the upper door hinge in the front and to the door lock in the rear of the door as shown in Figure 14. If required, apply weatherstrip adhesive, GM P/N 12345096 or 3M P/N 08011, to these areas.
Use Labor Operations B4000 (RH) and B4001 (LH) at .3 hour to align front doors and B4400 (RH) and B4401 (LH) at .3 hour to align rear doors.
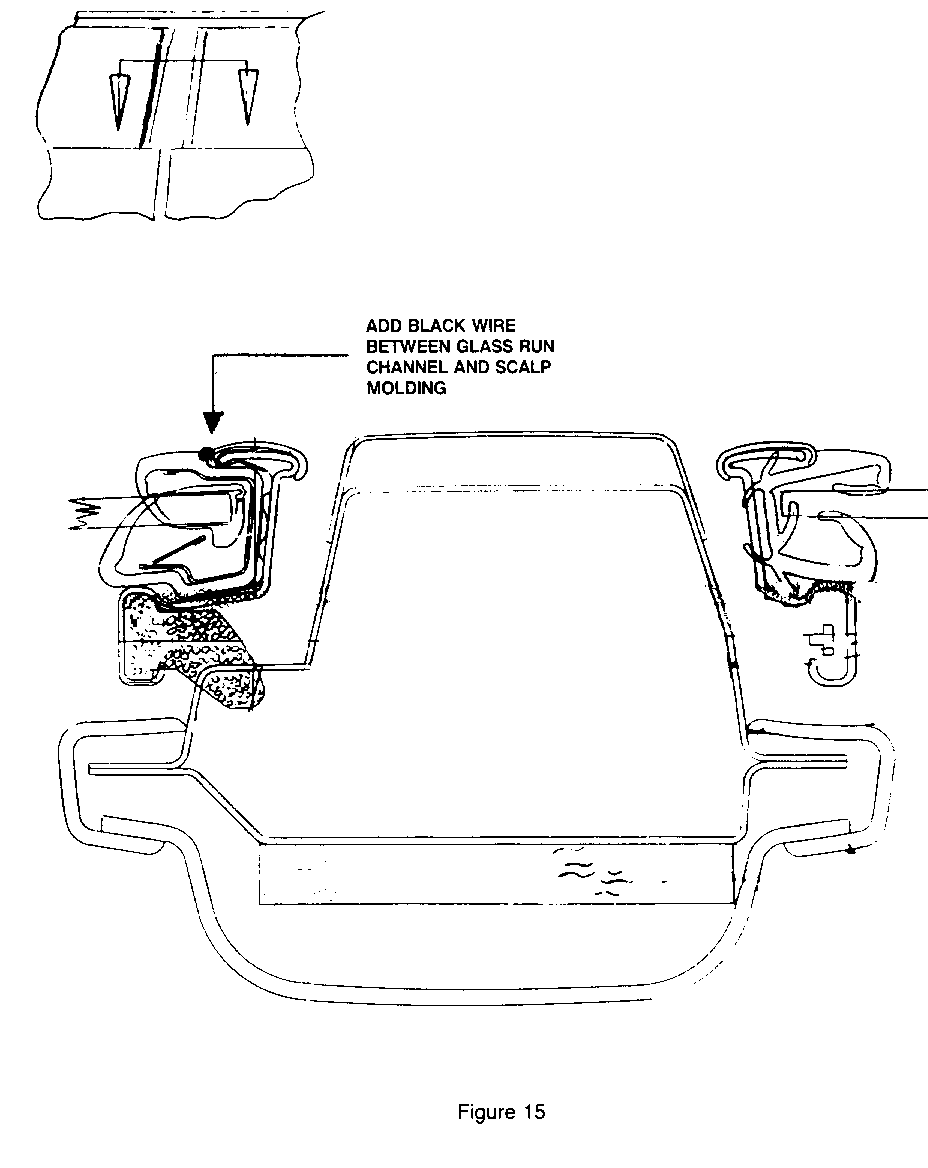
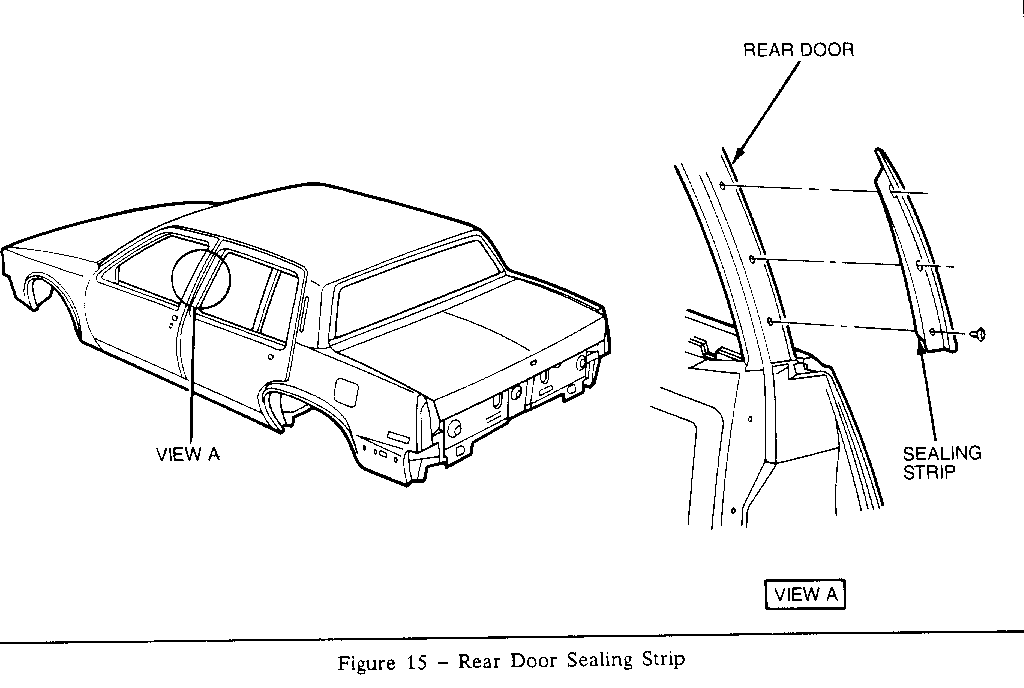
4. Inspect the sealing strip between front and rear doors for proper contact to the front door as shown in Figure 15. Adjust seal as required.
DOOR GLASS
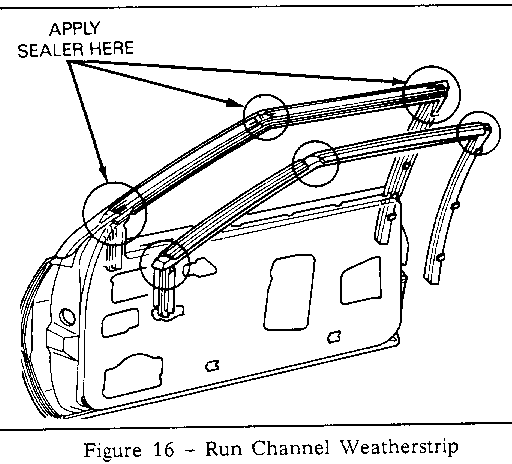
If an internal windnoise is diagnosed in the front door glass area, use the following procedure to correct this condition:
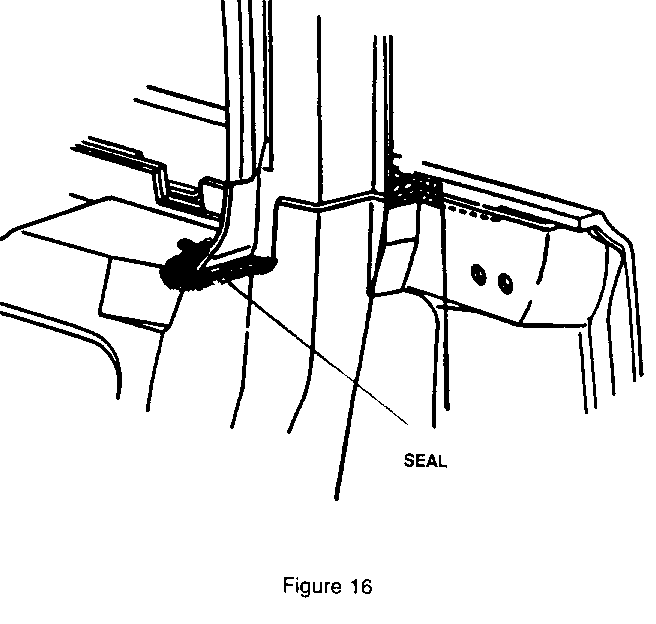
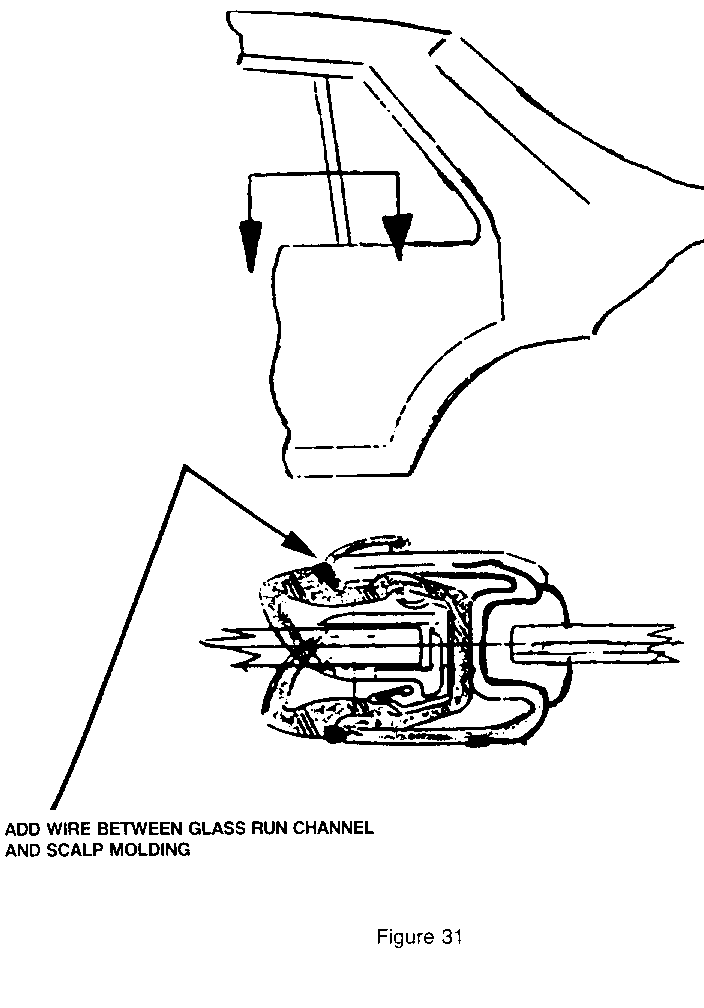
1. Remove the door glass run channel weatherstrip and apply a bead of 3M strip-caulk, P/N 08578, to the areas shown in Figure 16.
2. Reinstall the run channel weatherstrip and clean off any excess sealer.
Use Labor Operation T6355 at .6 hour to seal door glass run channel for each front door.
MIRRORS
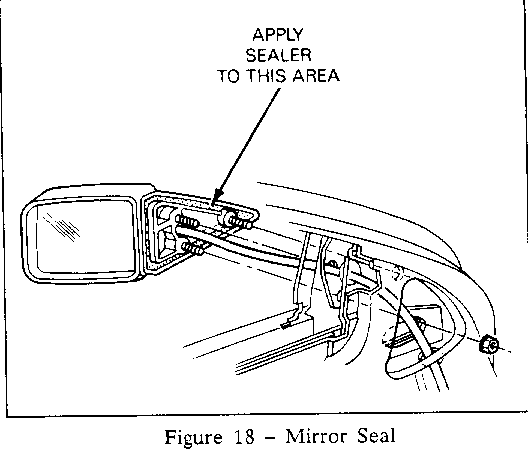
If an internal or external windnoise condition is diagnosed in the outside mirror location, use the following procedures to correct this condition.
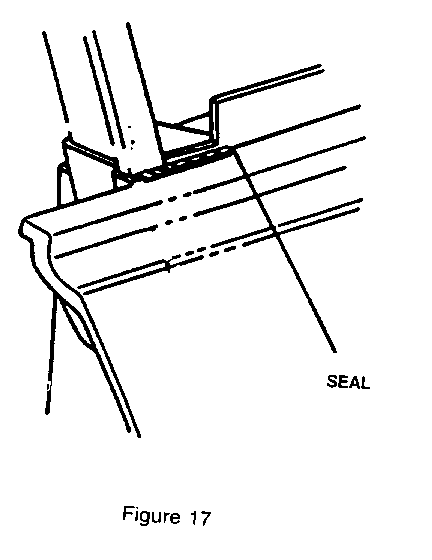
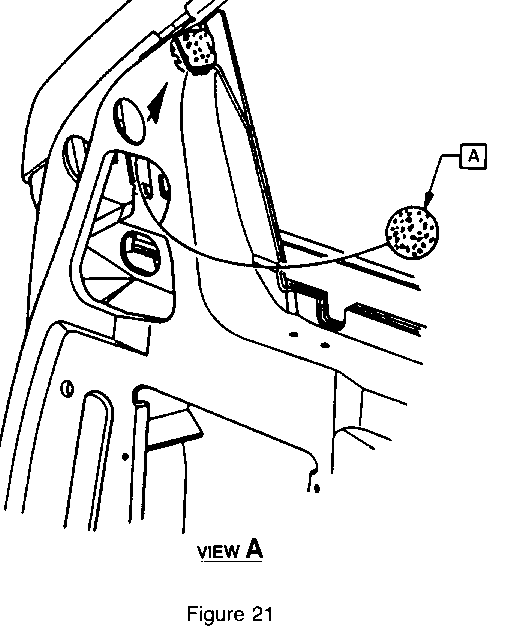
1. Inspect for gaps or misalignment between the mirror and the door as shown in Figure 17.
2. If the mirror is gapped or misaligned to the door, remove the interior trim and the three 10mm nuts retaining the mirror to the door.
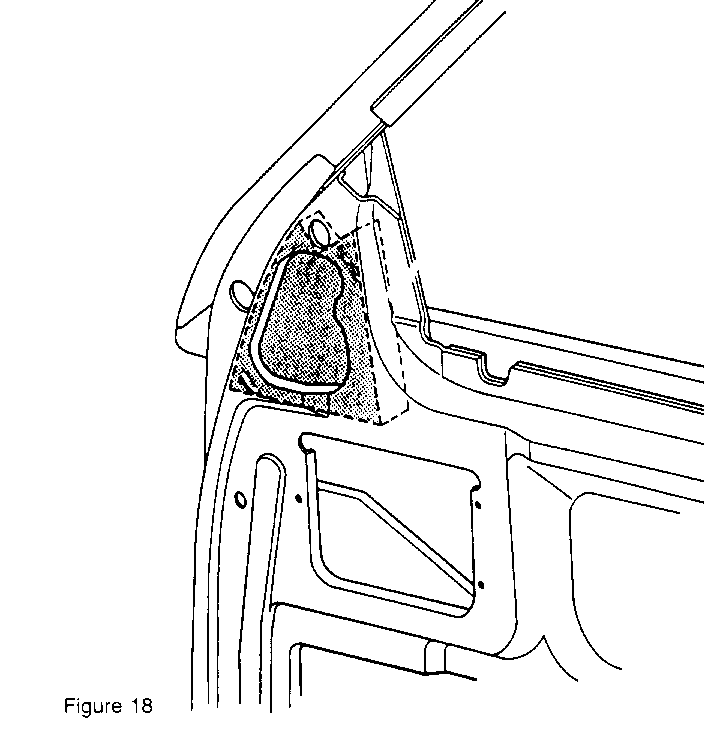
3. Apply a sealing strip of Kent Products 1/4" x 5/32" adhesive-back foam, shim stock P/N 40105, to the surface of the mirror as shown in Figure 18.
4. Apply strip-caulk, P/N 08578, over three mirror retaining studs to seal to seal studs to door.
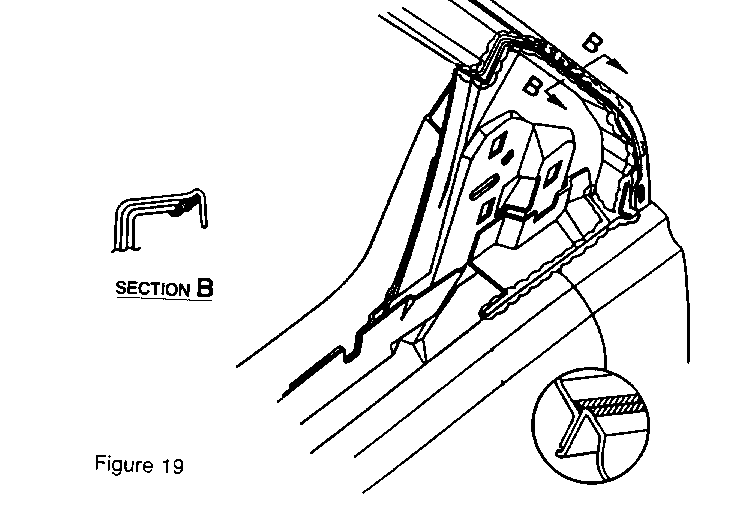
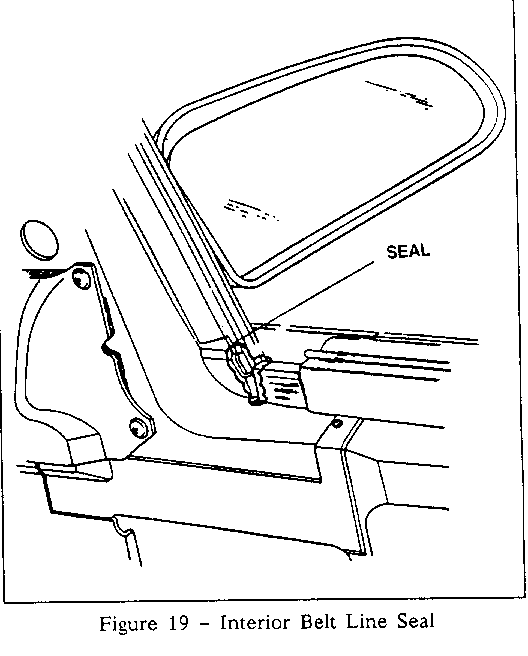
5. Inspect the locations shown in Figure 19 and apply 3M strip-caulk if needed.
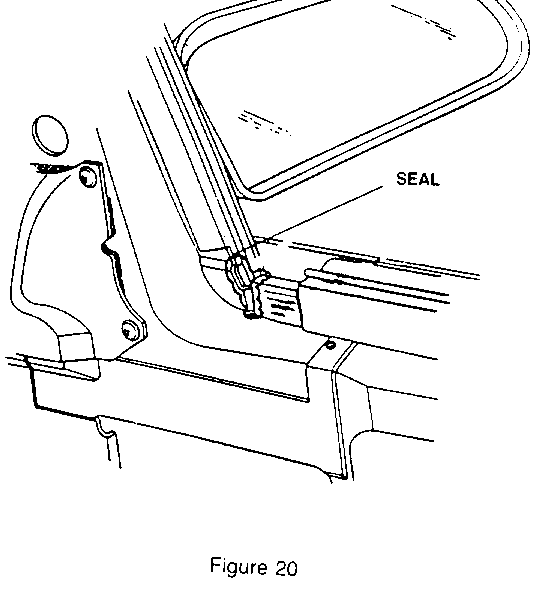
6. Correctly install the foam filler plug shown in Figure 20.
7. Install interior trim.
Use Labor Operation T6356 at .6 hour per side to seal mirror locations.


General Motors bulletins are intended for use by professional technicians, not a "do-it-yourselfer". They are written to inform those technicians of conditions that may occur on some vehicles, or to provide information that could assist in the proper service of a vehicle. Properly trained technicians have the equipment, tools, safety instructions and know-how to do a job properly and safely. If a condition is described, do not assume that the bulletin applies to your vehicle, or that your vehicle will have that condition. See a General Motors dealer servicing your brand of General Motors vehicle for information on whether your vehicle may benefit from the information.
