Intake Manifold Replacement RPOs LY2/LY6
Removal Procedure
- Remove the air cleaner outlet duct. Refer to Air Cleaner Resonator Outlet Duct Replacement .
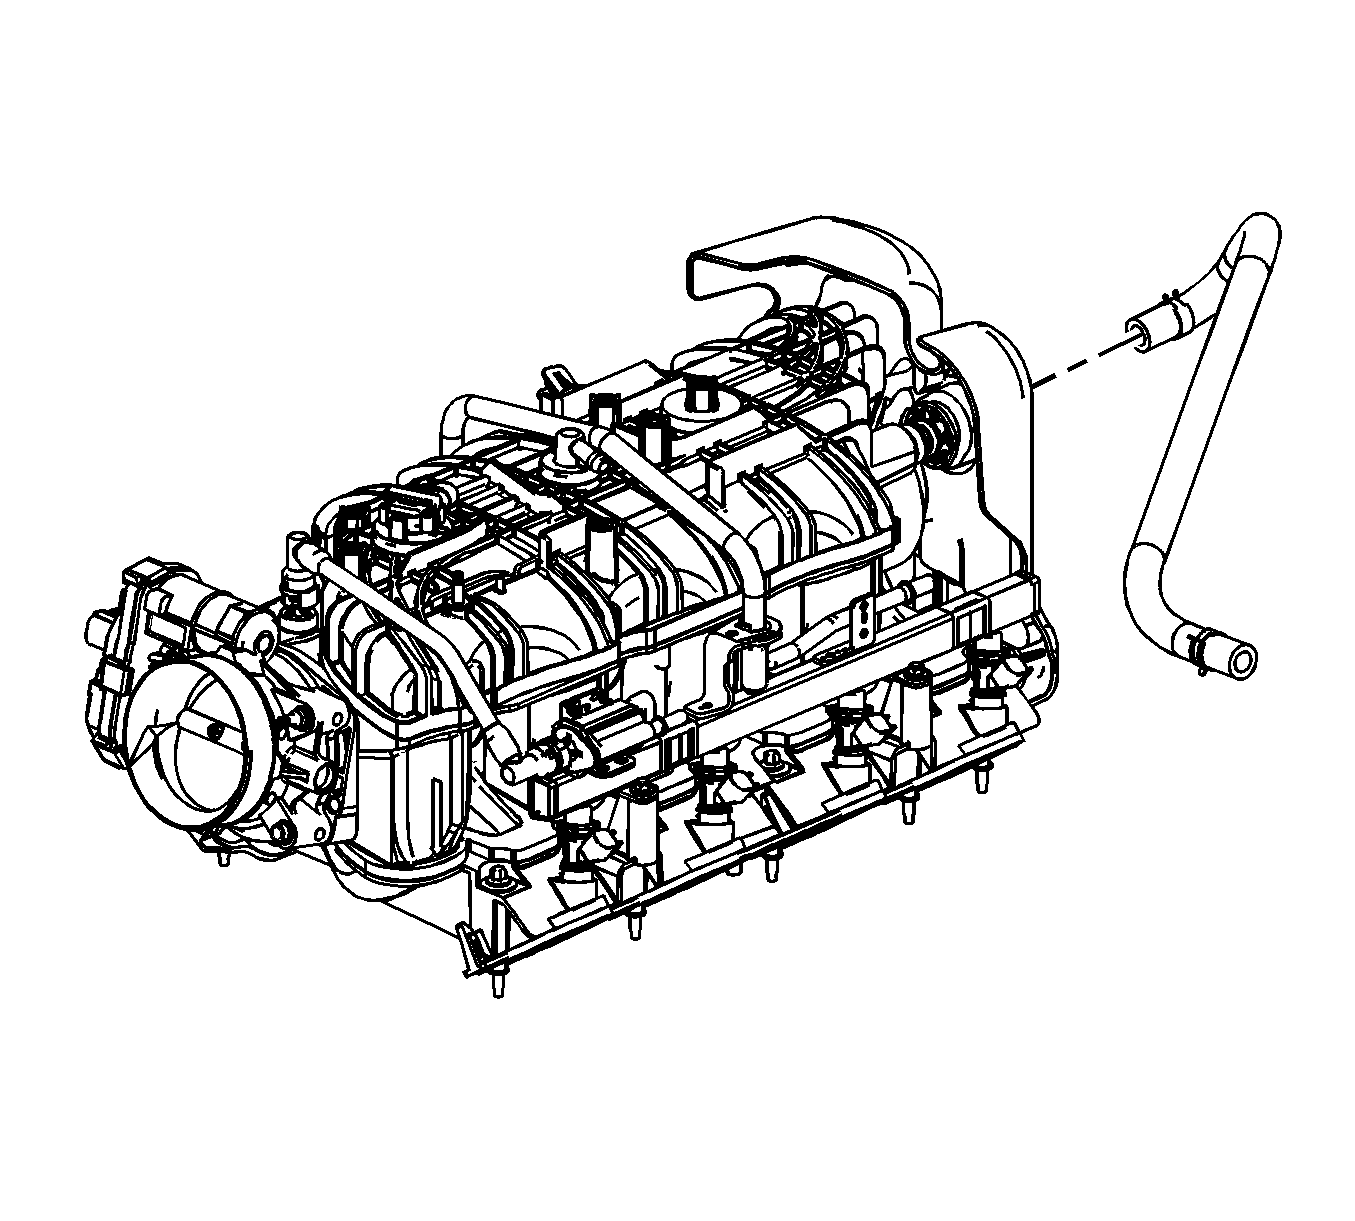
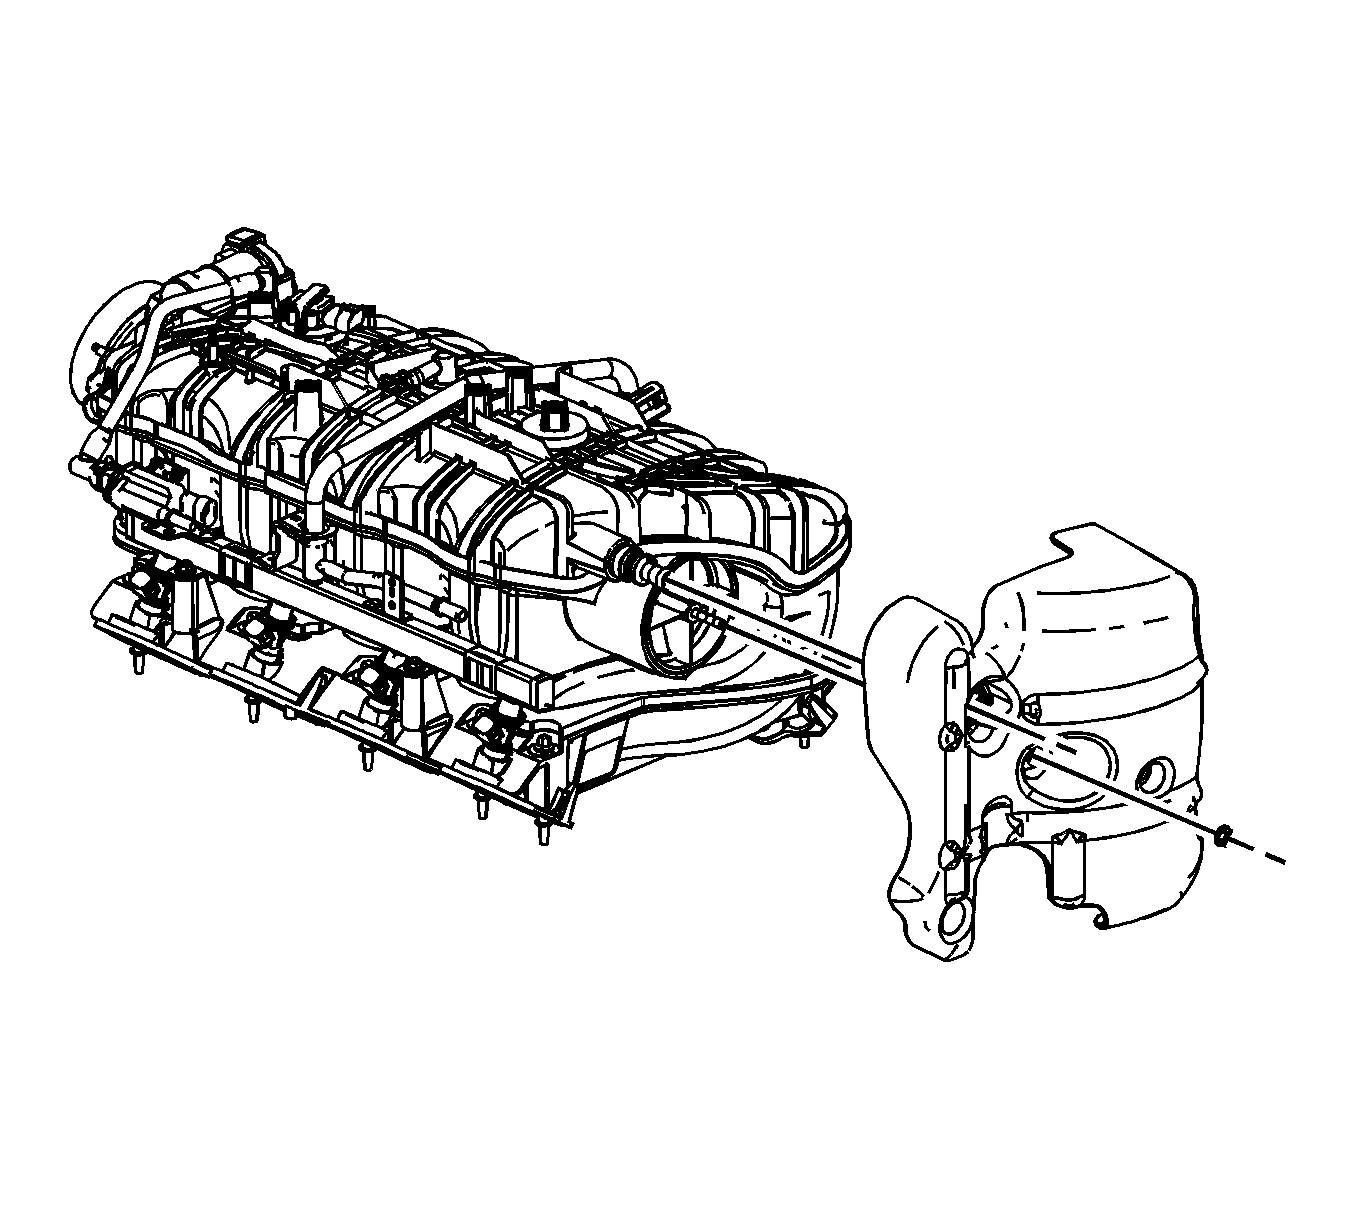
- Remove the generator. Refer to Generator Replacement .
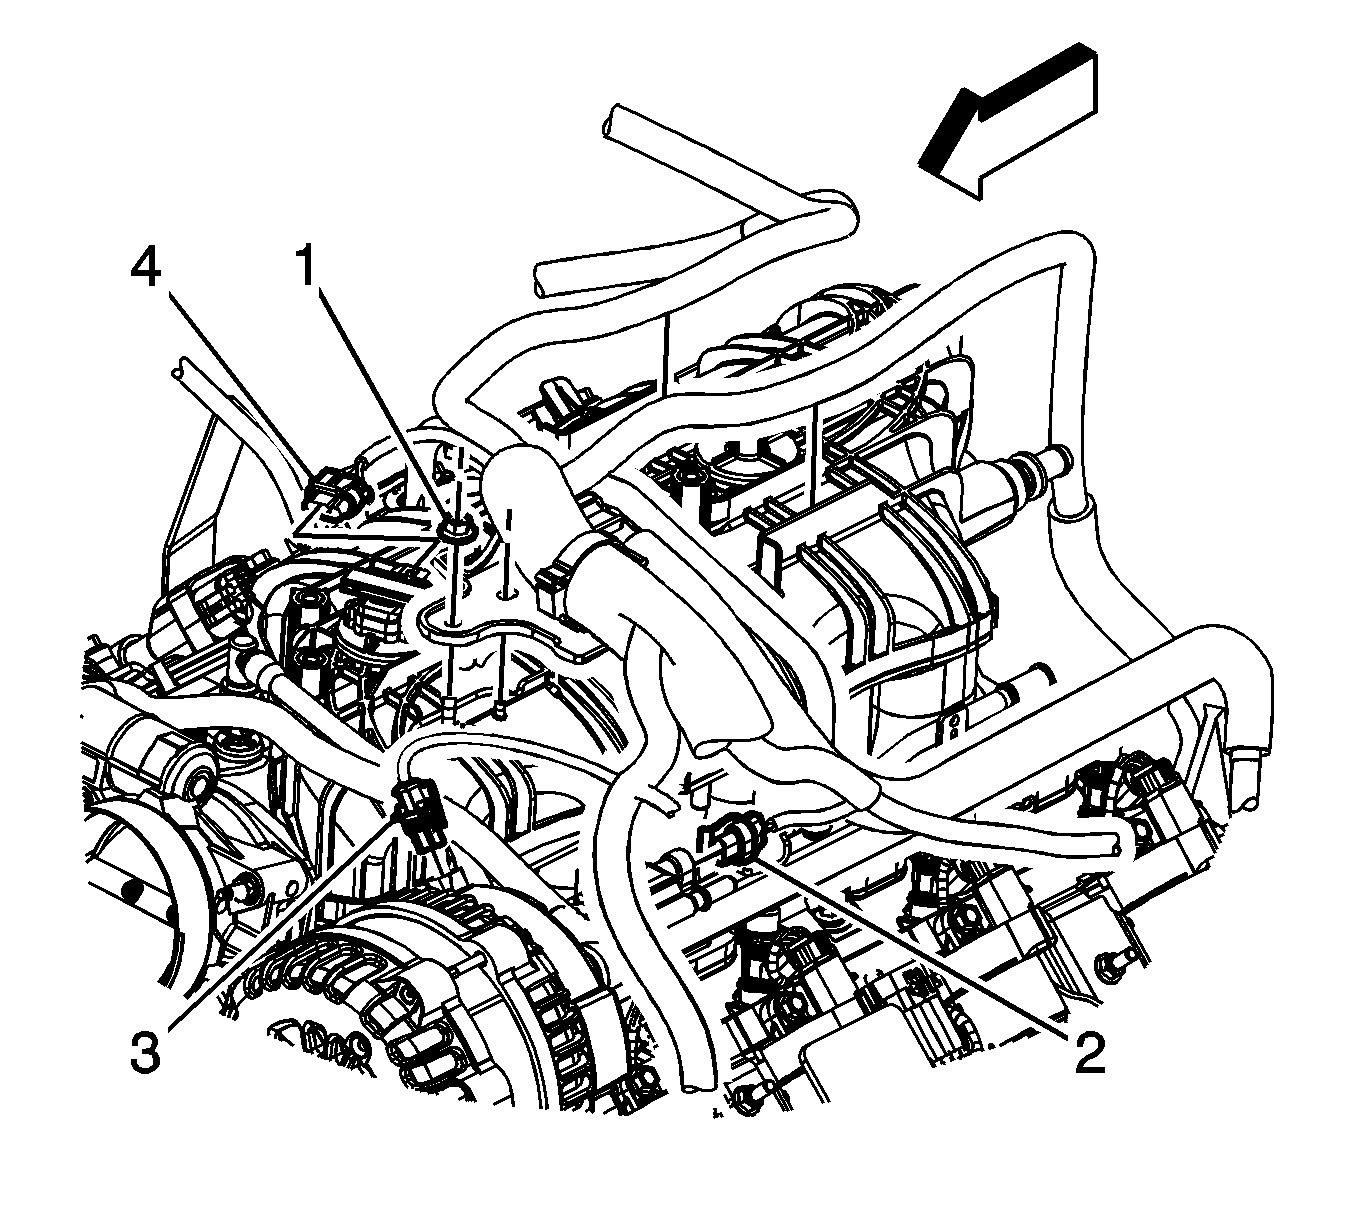
- Remove the engine harness retainer nut (1).
- Remove the engine harness retainer from the stud and locator pin.
- Disconnect the engine harness electrical connector (2) from the evaporative emission (EVAP) canister purge solenoid.
- Disconnect the engine wiring harness electrical connector (4) from the manifold absolute pressure (MAP) sensor.
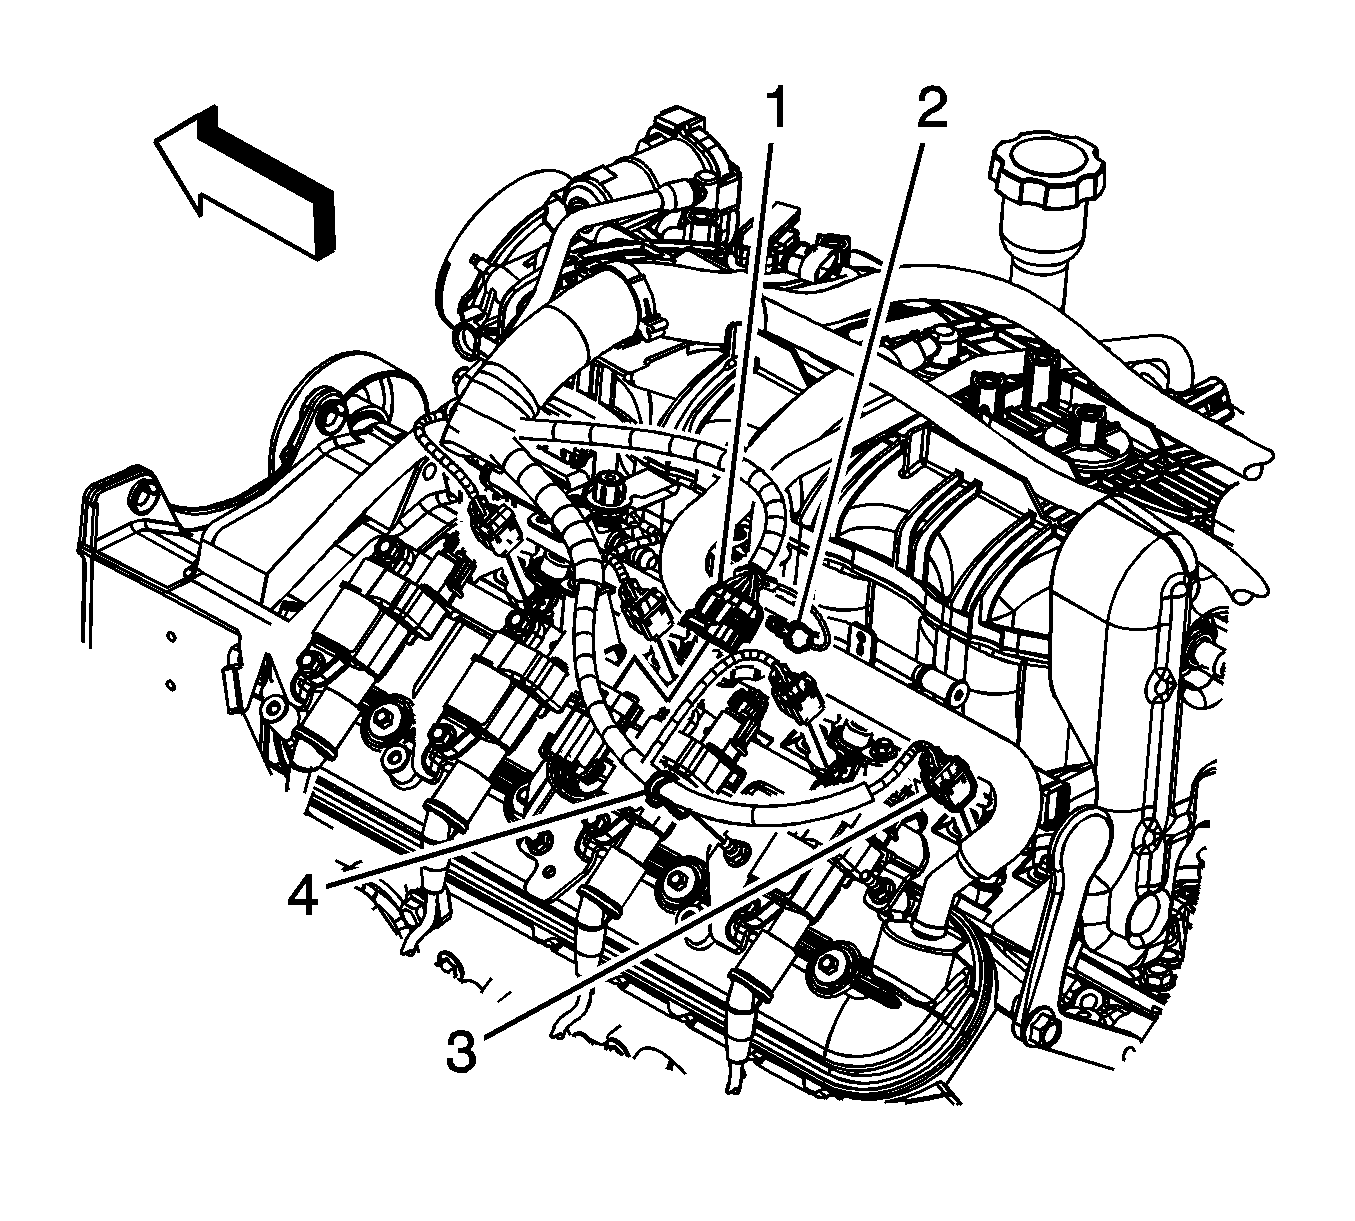
- Remove the connector position assurance (CPA) retainer (1).
- Disconnect the engine harness electrical connector (1) from the ignition coil harness electrical connector.
- Disconnect the engine harness electrical connectors (3) from the left side fuel injectors.
- Remove the engine harness clip (4) from the ignition coil bracket stud.
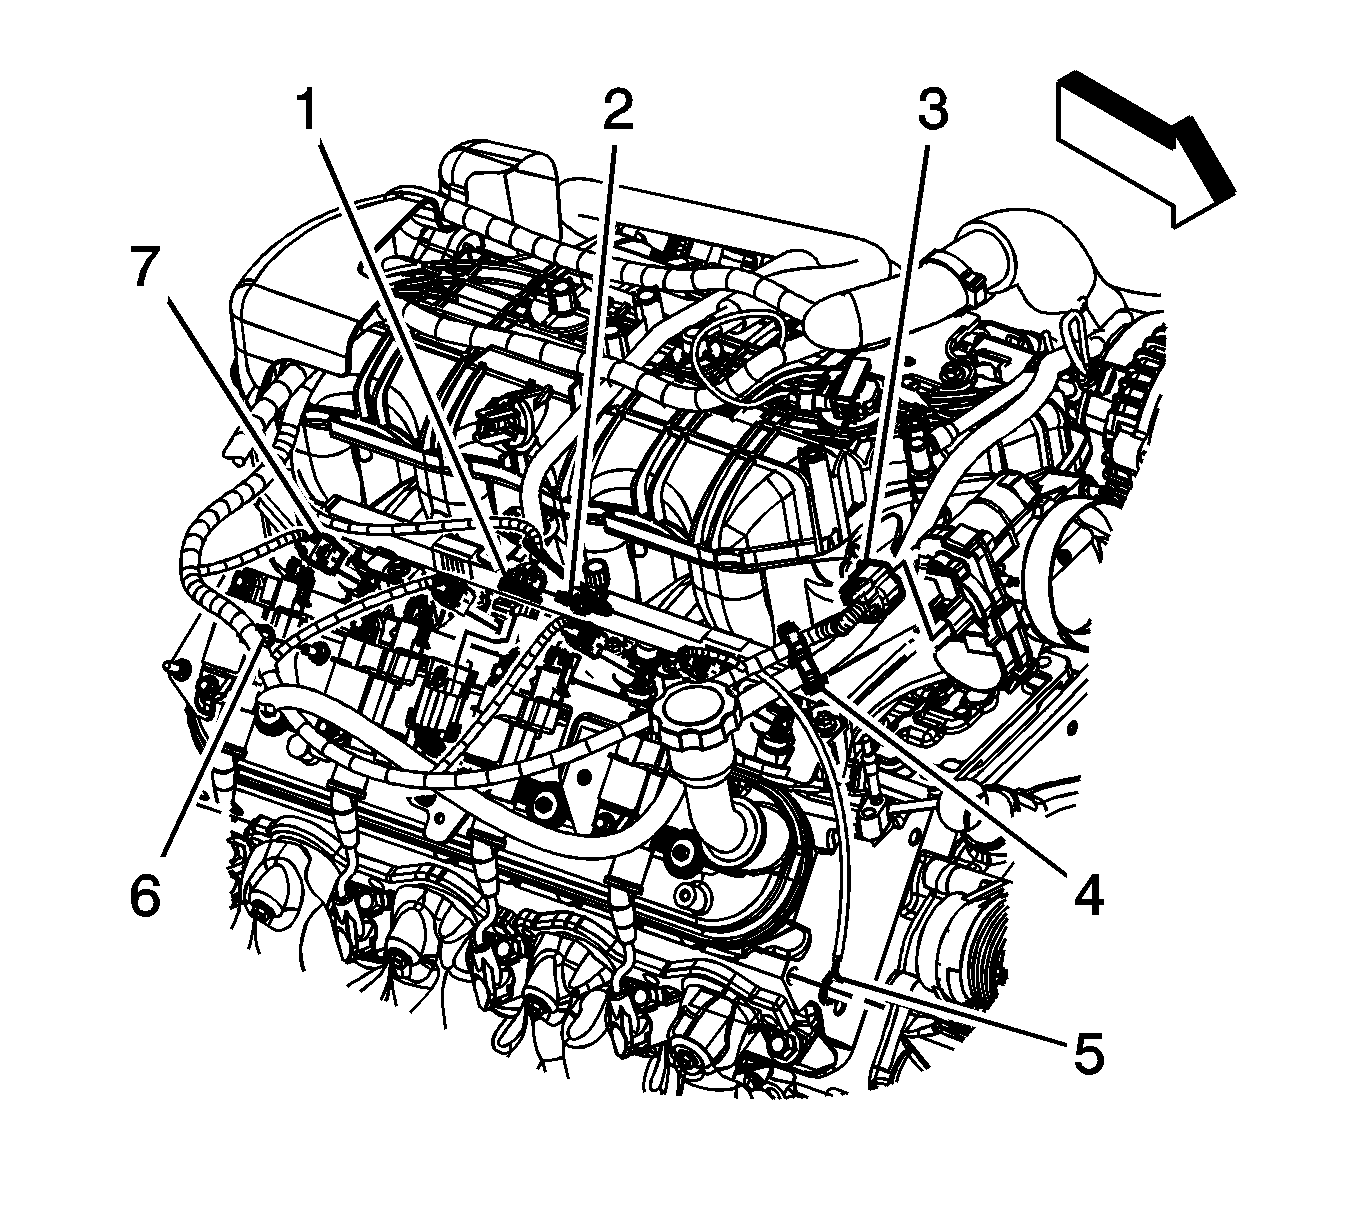
- Remove the CPA retainer (2).
- Disconnect the engine harness electrical connector (1) from the ignition coil harness electrical connector.
- Disconnect the engine harness electrical connector (3) from the throttle actuator.
- Remove the engine harness clip (4) from the generator battery jumper cable.
- Remove the engine harness clip (6) from the ignition coil bracket stud.
- Disconnect the engine harness electrical connectors (7) from the right side fuel injectors.
- Remove the engine harness clip (1) bolt (3).
- Disconnect the engine harness electrical connector (2) from the engine coolant temperature (ECT) sensor.
- Gather the engine harness branches and tie the harness up out of the way to the cowl panel.
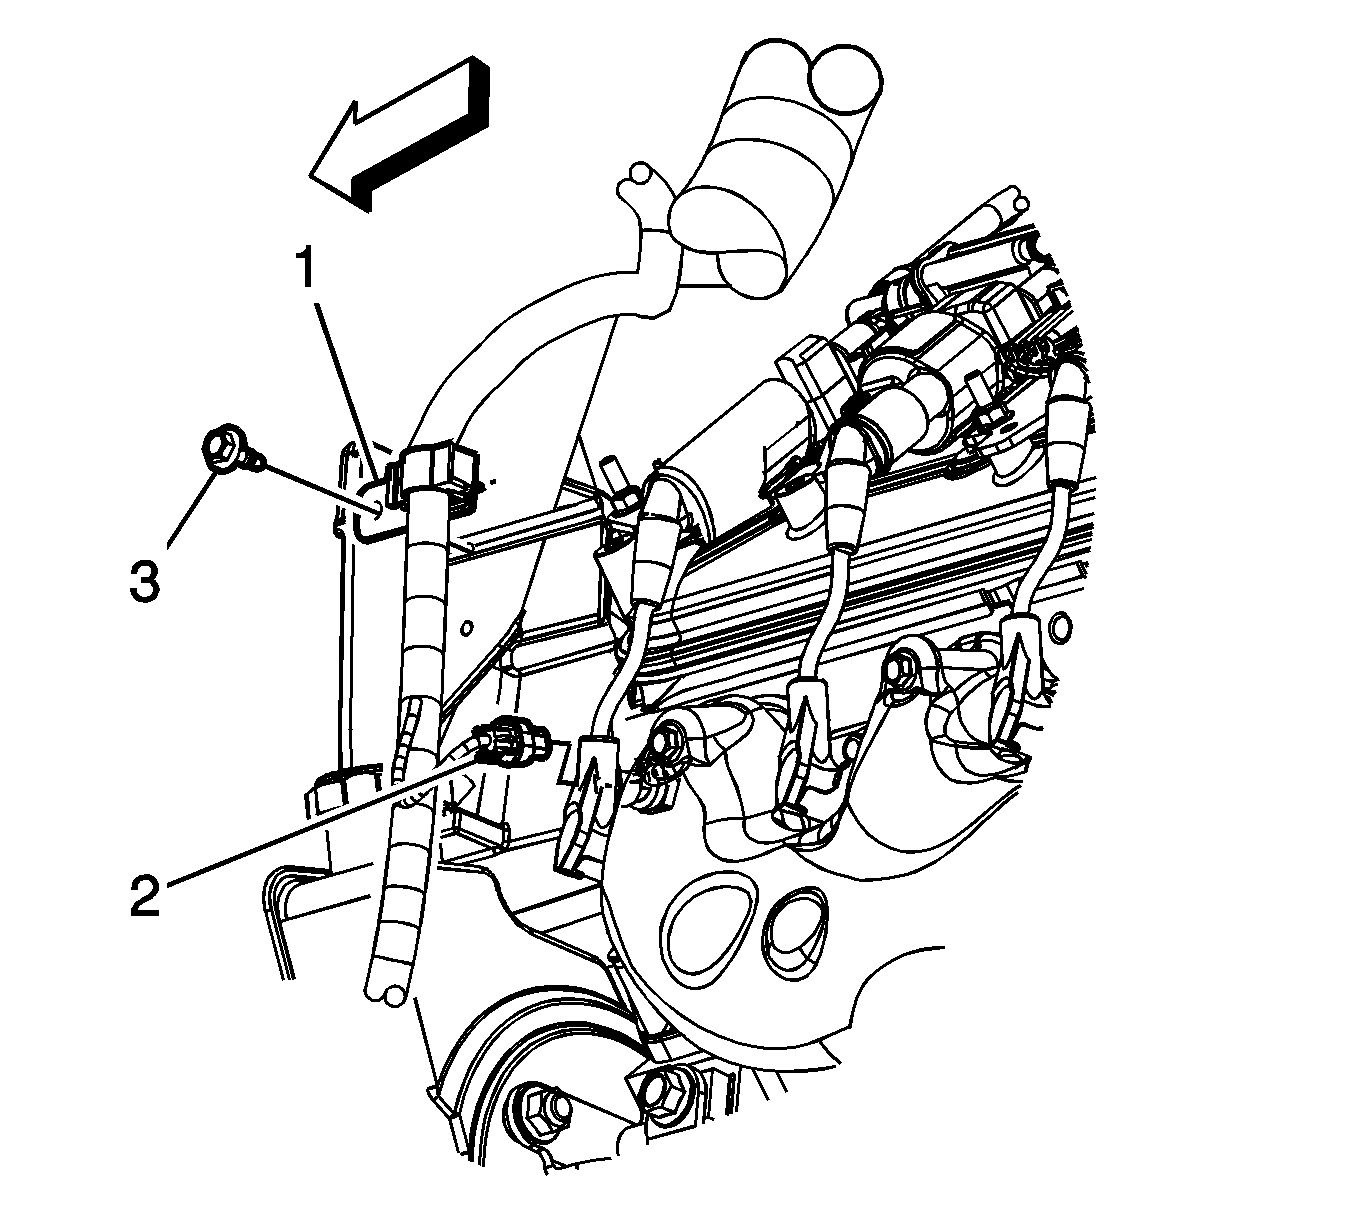
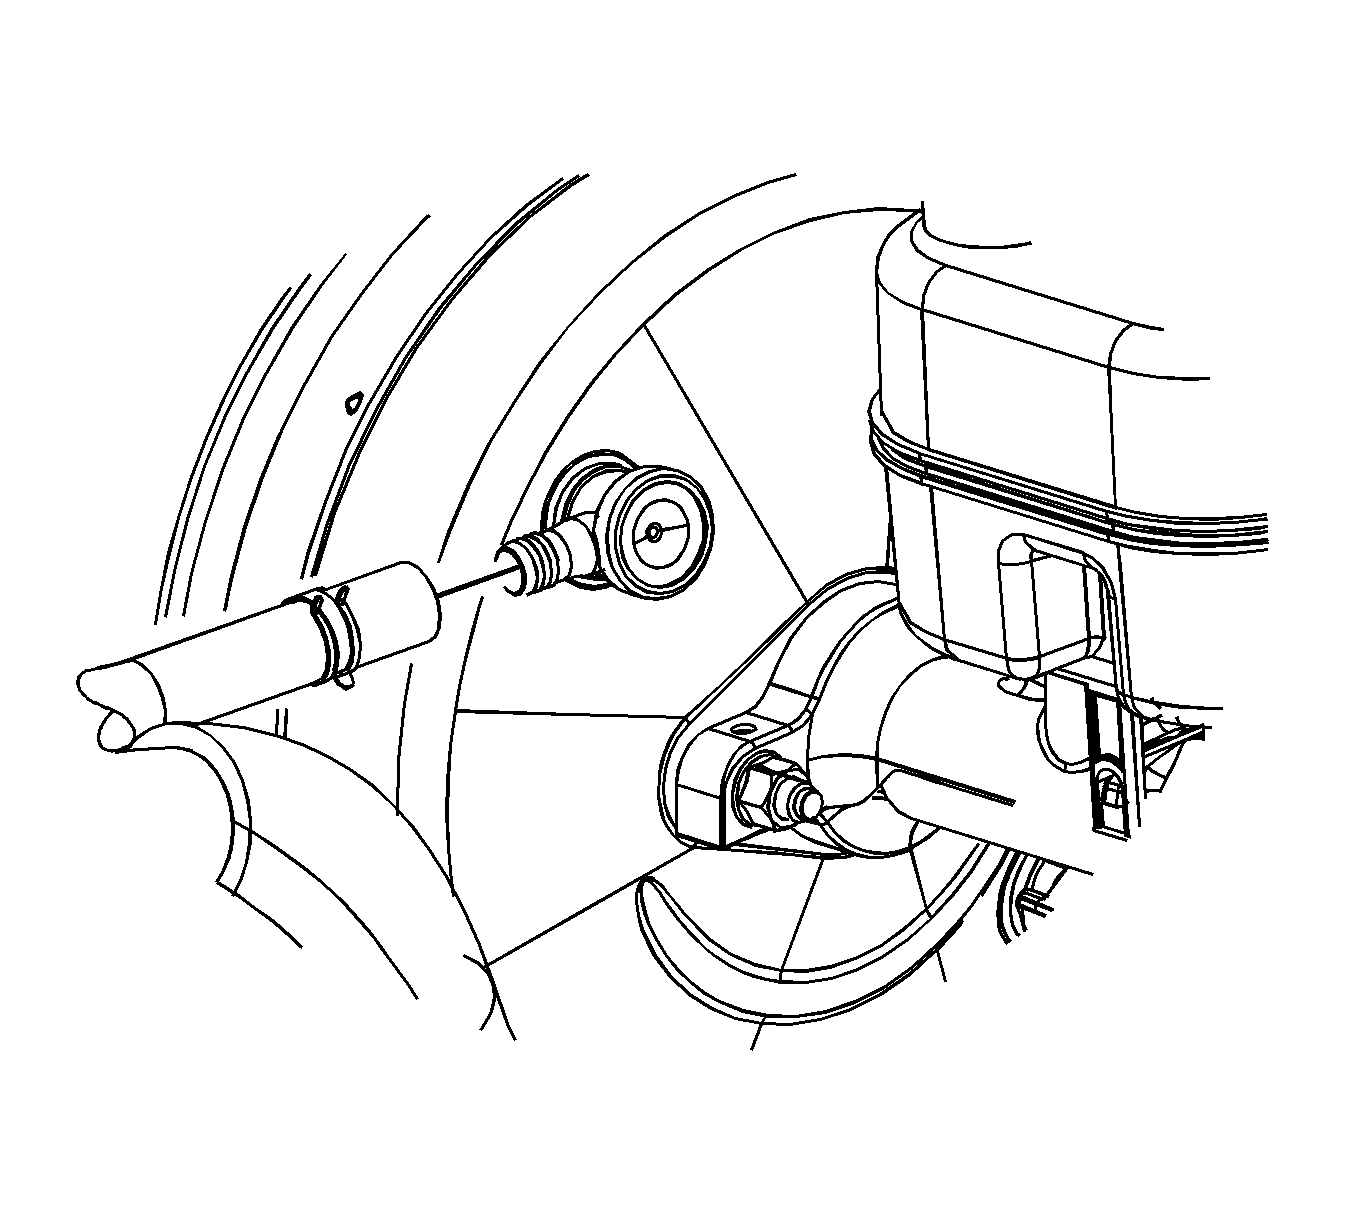
- Reposition the brake booster vacuum hose clamp at the booster.
- Remove the brake booster vacuum hose from the booster fitting.
- Secure the brake booster vacuum hose to the intake manifold.
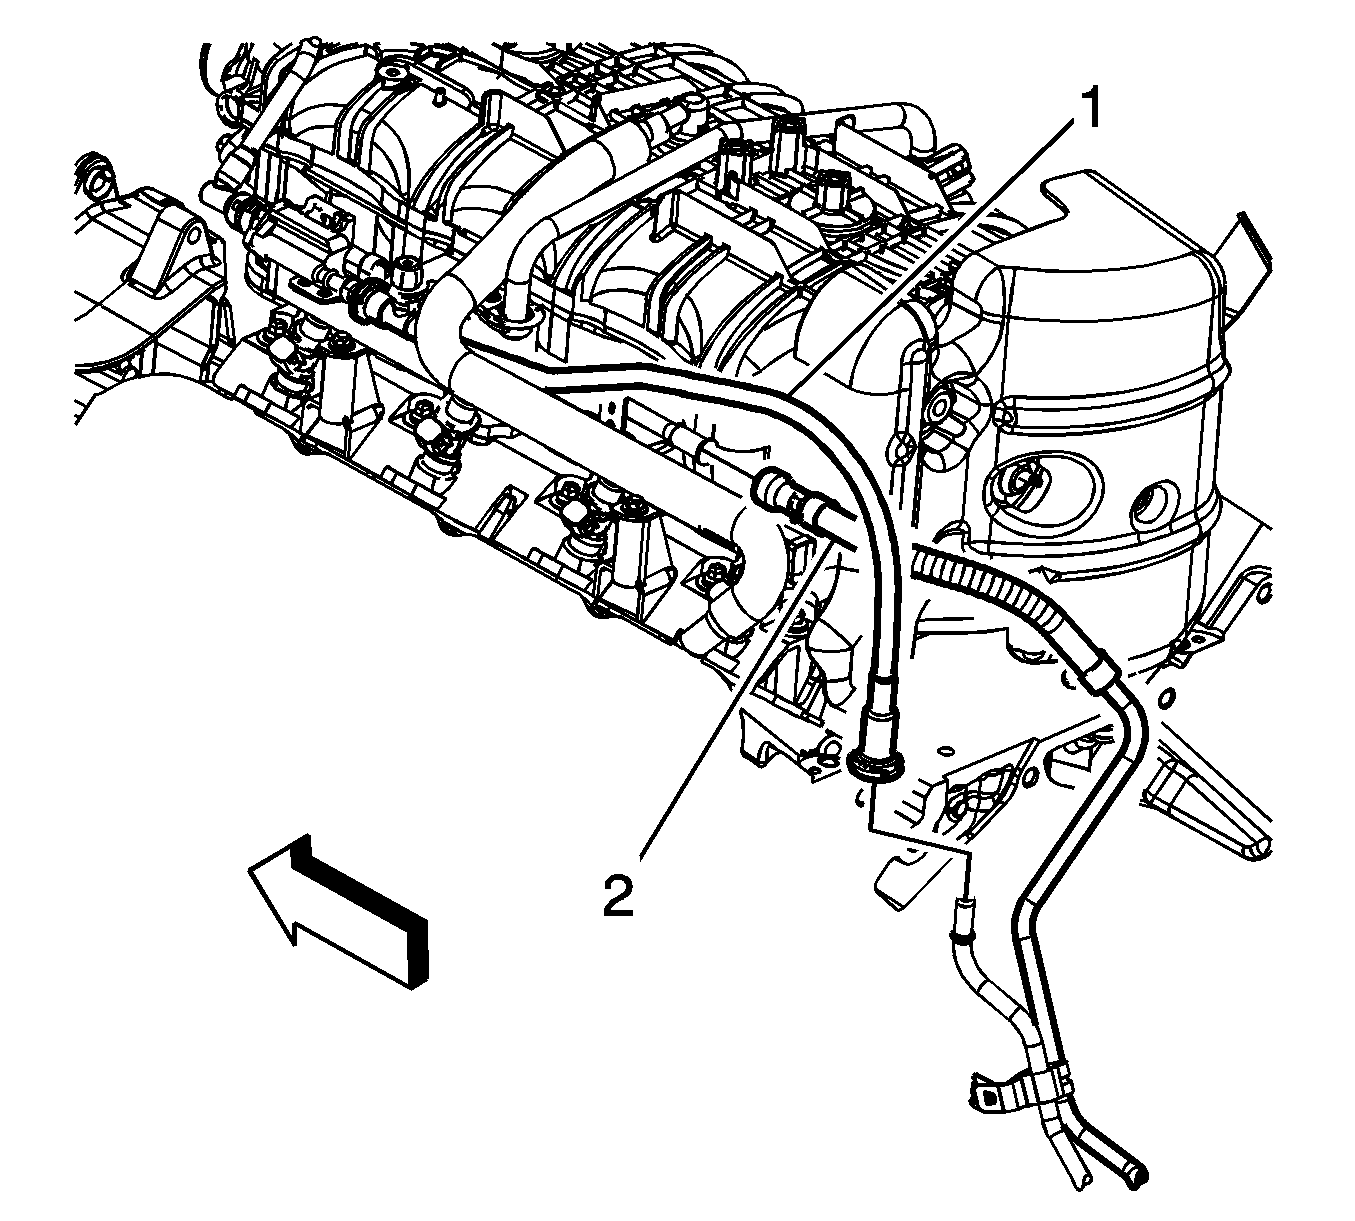
- Disconnect the EVAP canister purge tube (1) quick connect fitting from the EVAP canister purge solenoid. Refer to Plastic Collar Quick Connect Fitting Service .
- Disconnect the fuel feed line quick connect fitting (2) from the fuel rail. Refer to Metal Collar Quick Connect Fitting Service .
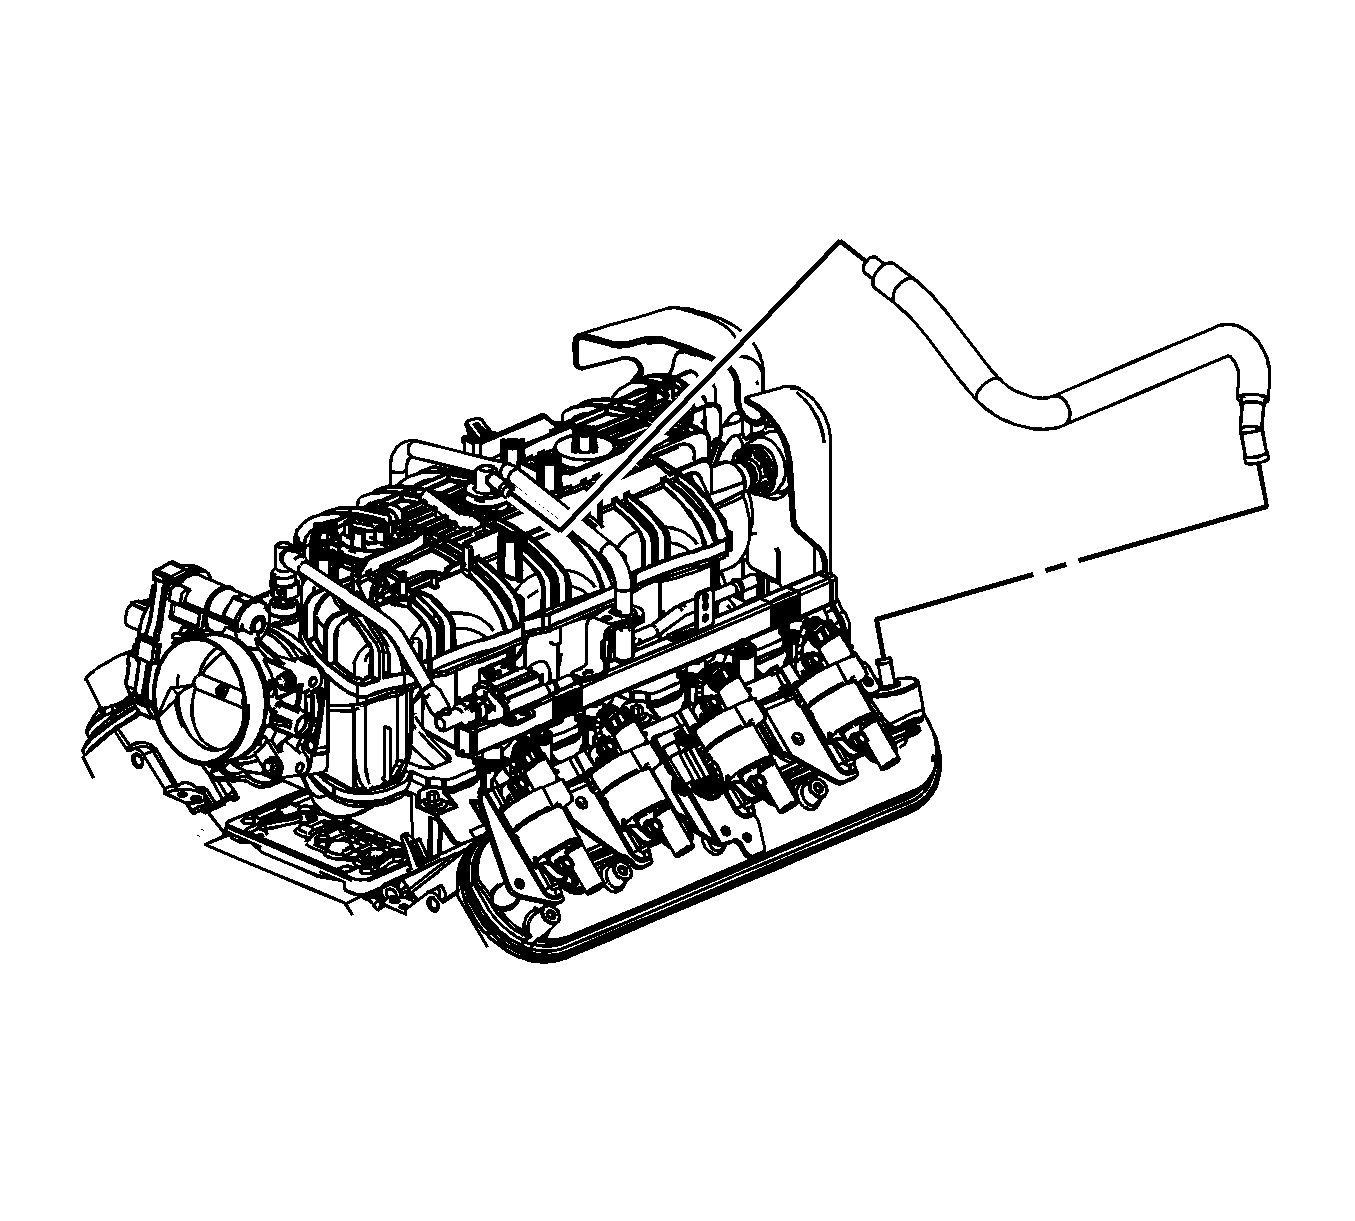
- Remove the positive crankcase ventilation (PCV) hose from the intake manifold fitting.
- Position the hose out of the way.
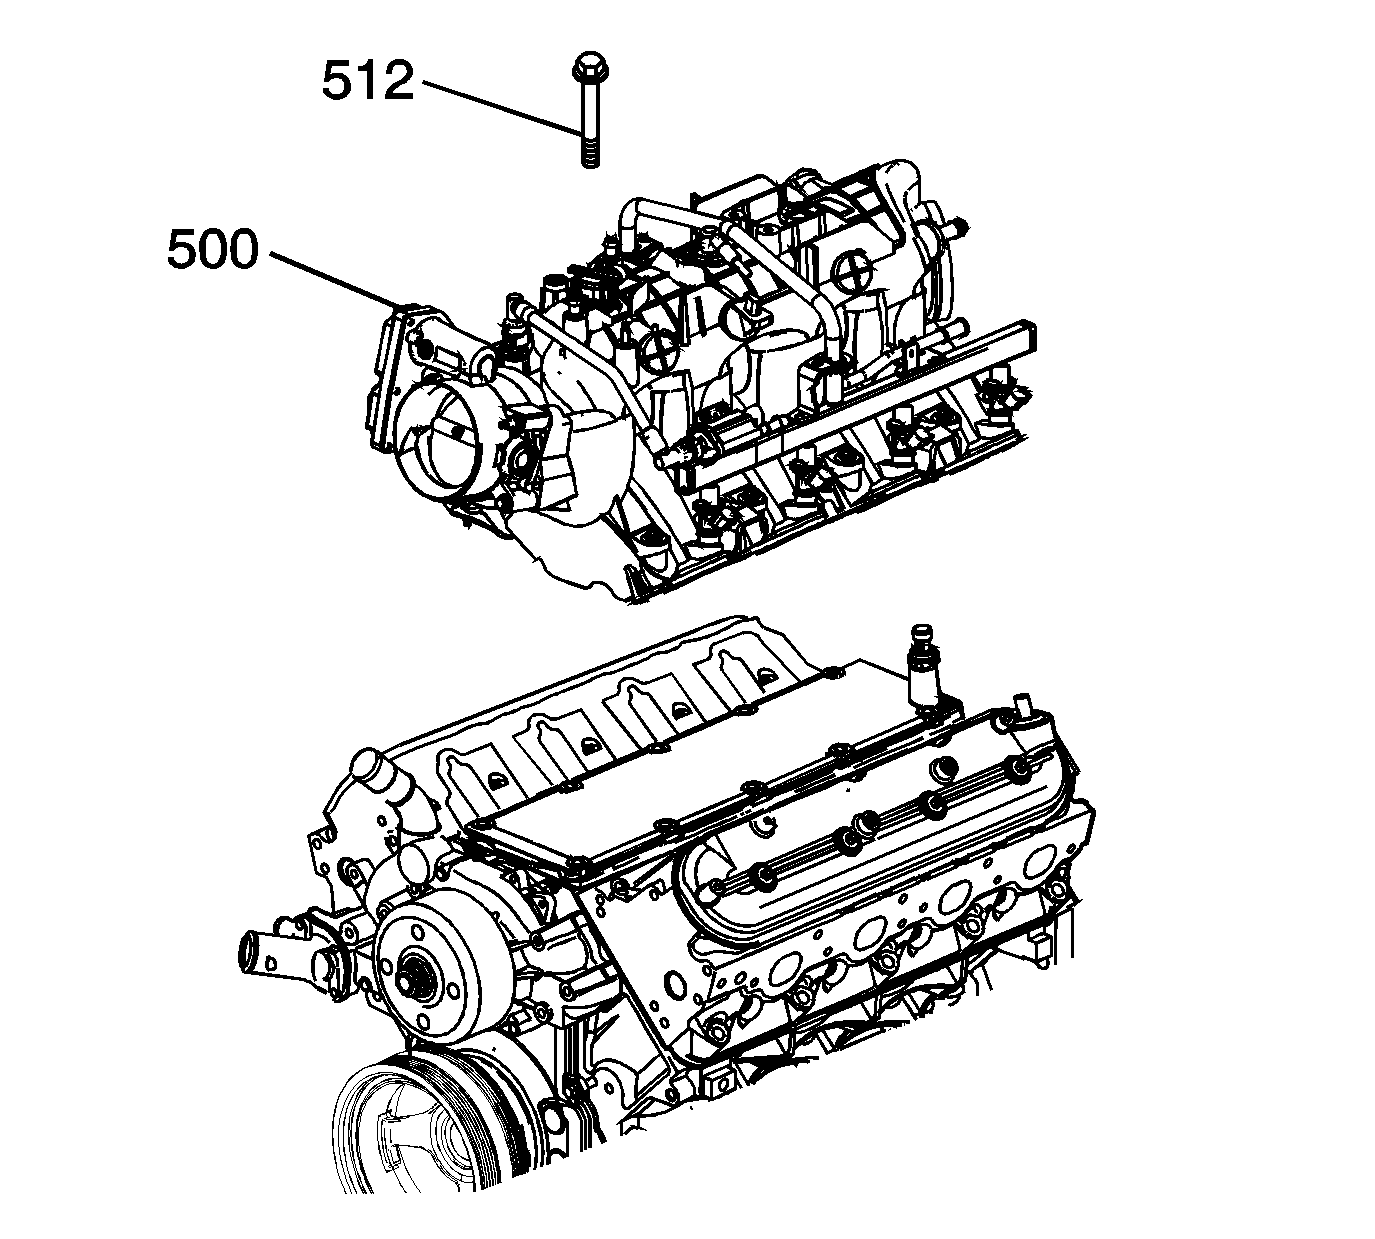
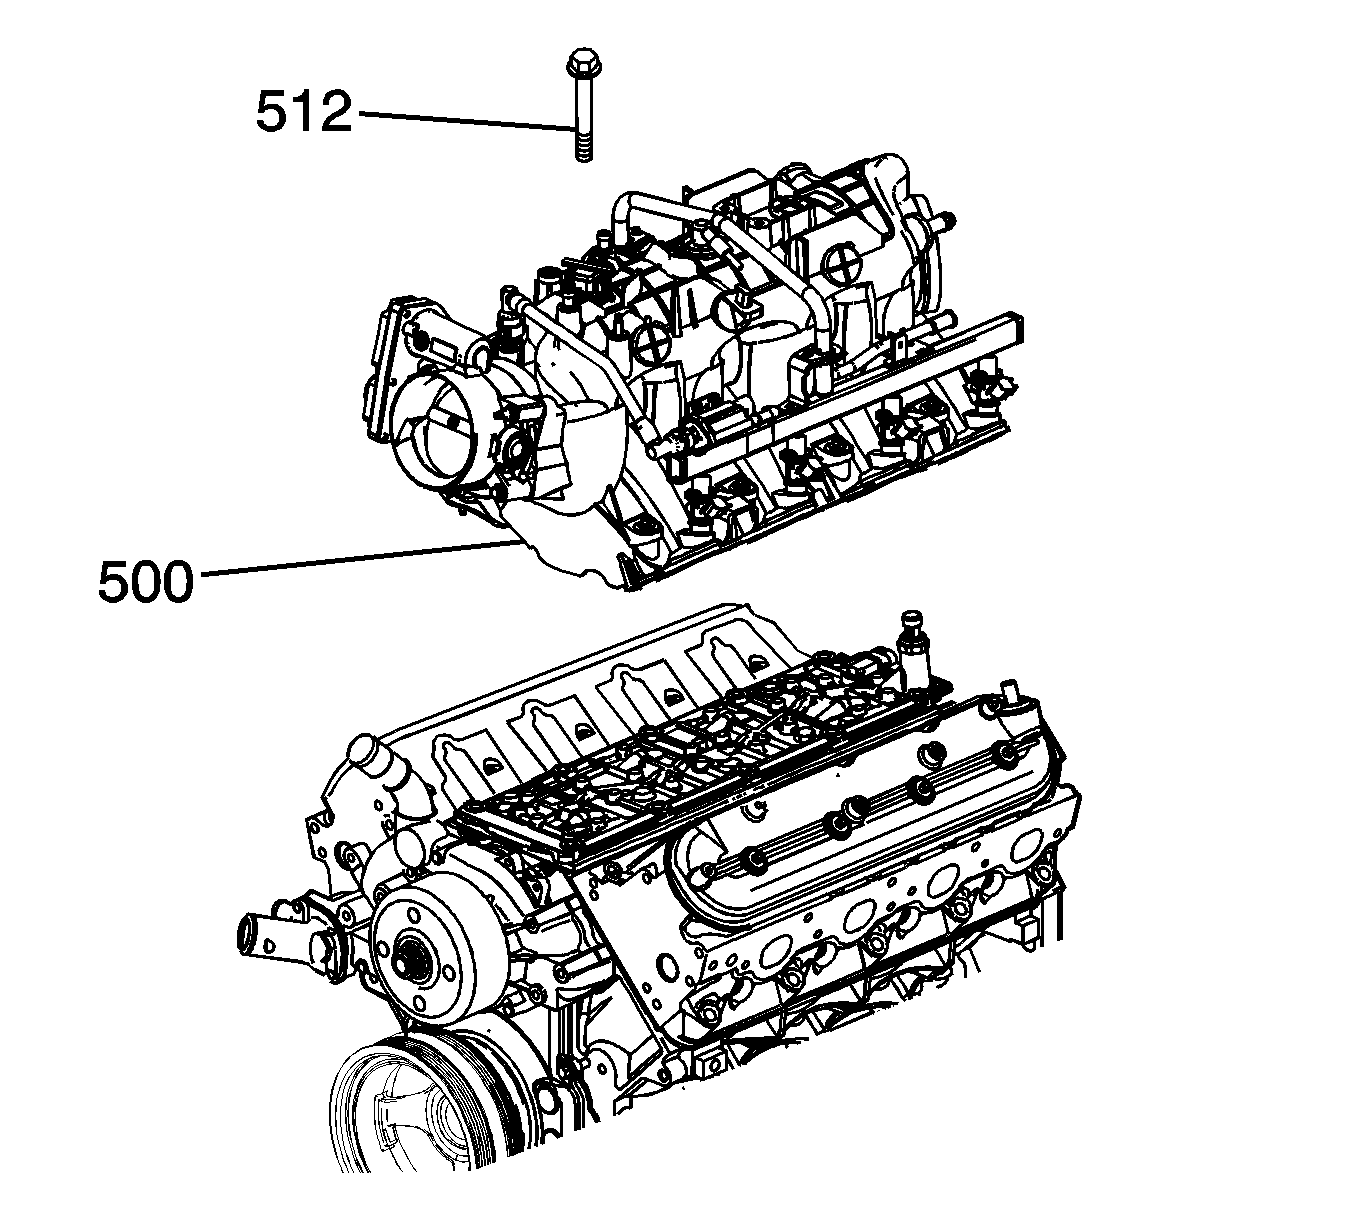
- Loosen the intake manifold bolts (512).
- Remove the intake manifold (500).
- Cover the cylinder head passages in order to prevent dirt or debris from entering the passages.
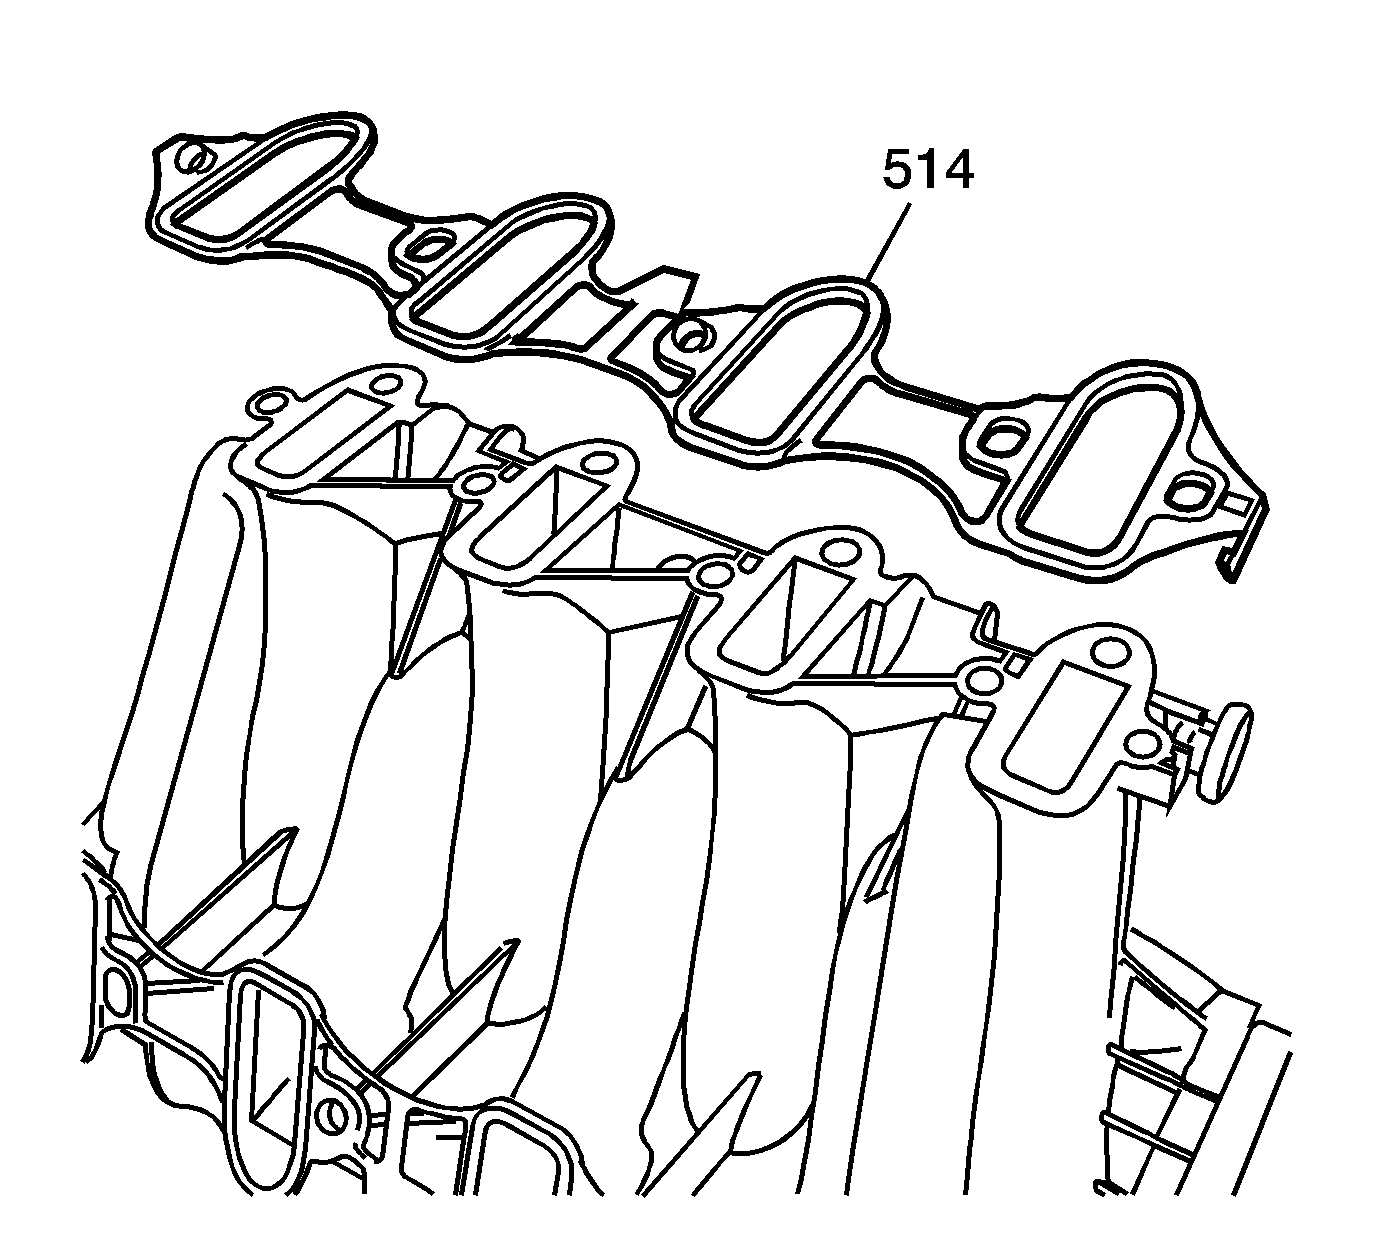
- Remove and discard the intake manifold gaskets (514).
- If replacing the intake manifold, perform the following steps, otherwise proceed to step 21 of the installation procedure.
- Place the intake manifold on a clean work surface.
- Reposition the brake booster vacuum hose clamp at the intake manifold.
- Remove the brake booster vacuum hose from the intake manifold nipple.
- Remove the upper intake manifold cover nut.
- Remove the upper intake manifold cover.
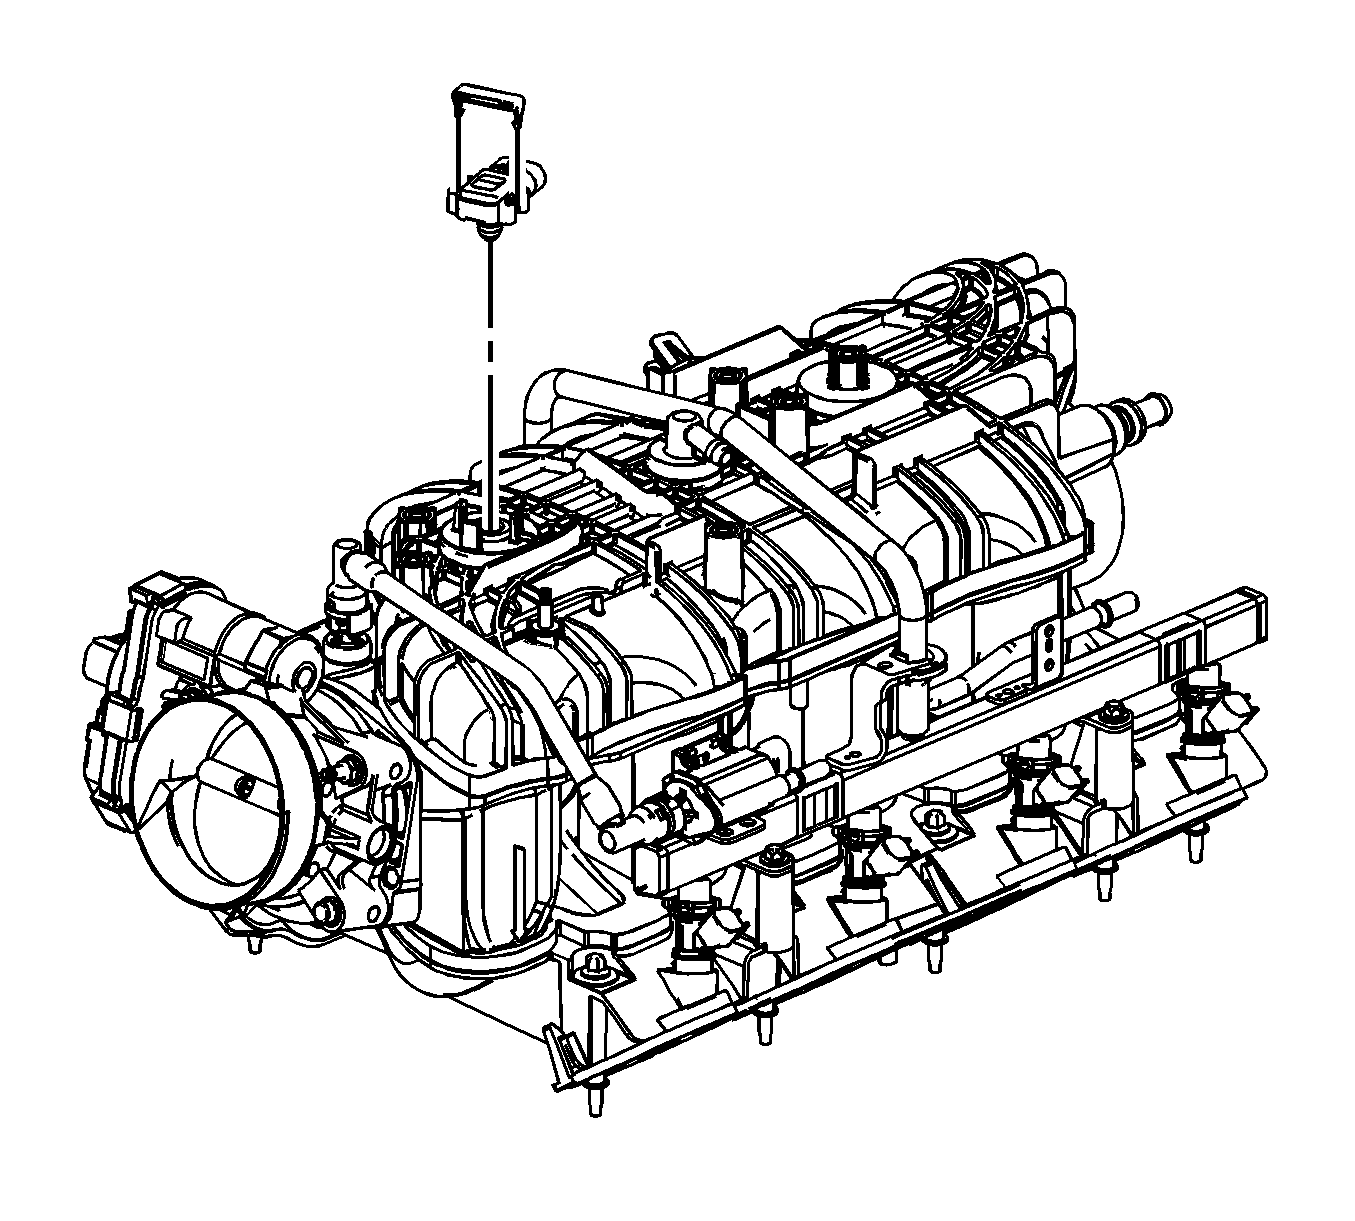
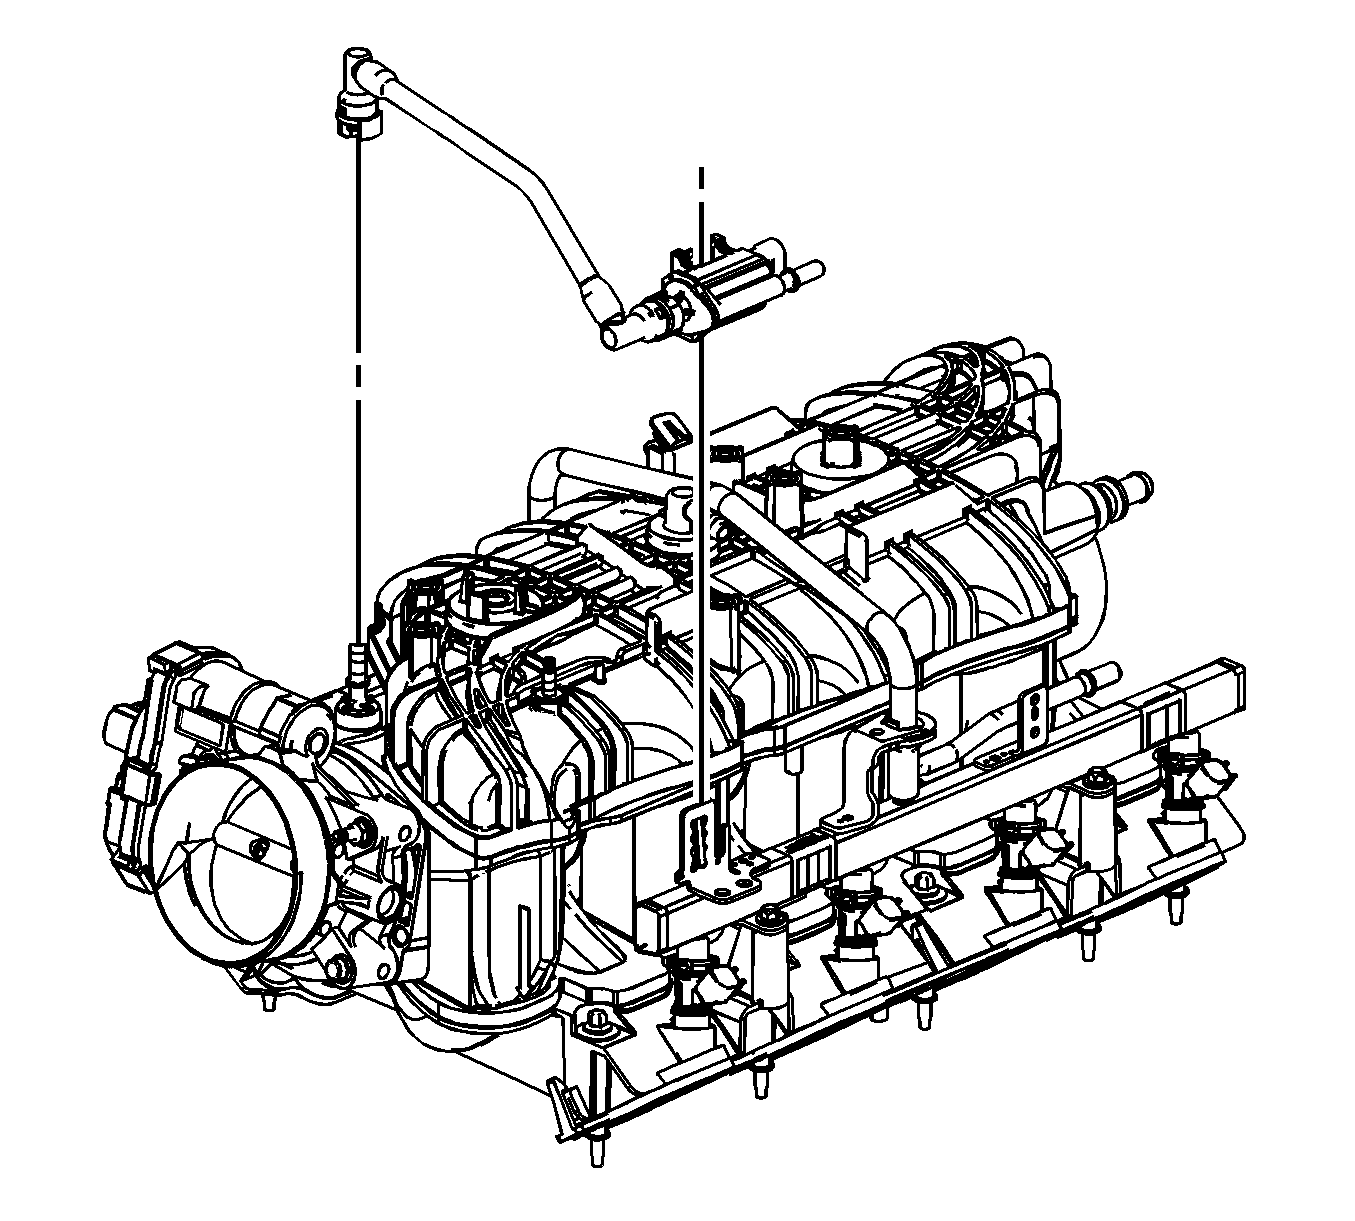
- Remove the manifold absolute pressure (MAP) sensor retainer.
- Remove the MAP sensor.
- Disconnect the EVAP tube quick connect fitting at the intake manifold. Refer to Plastic Collar Quick Connect Fitting Service .
- Disengage the retainer securing the EVAP canister purge solenoid to the fuel rail.
- Remove the EVAP tube and purge solenoid.
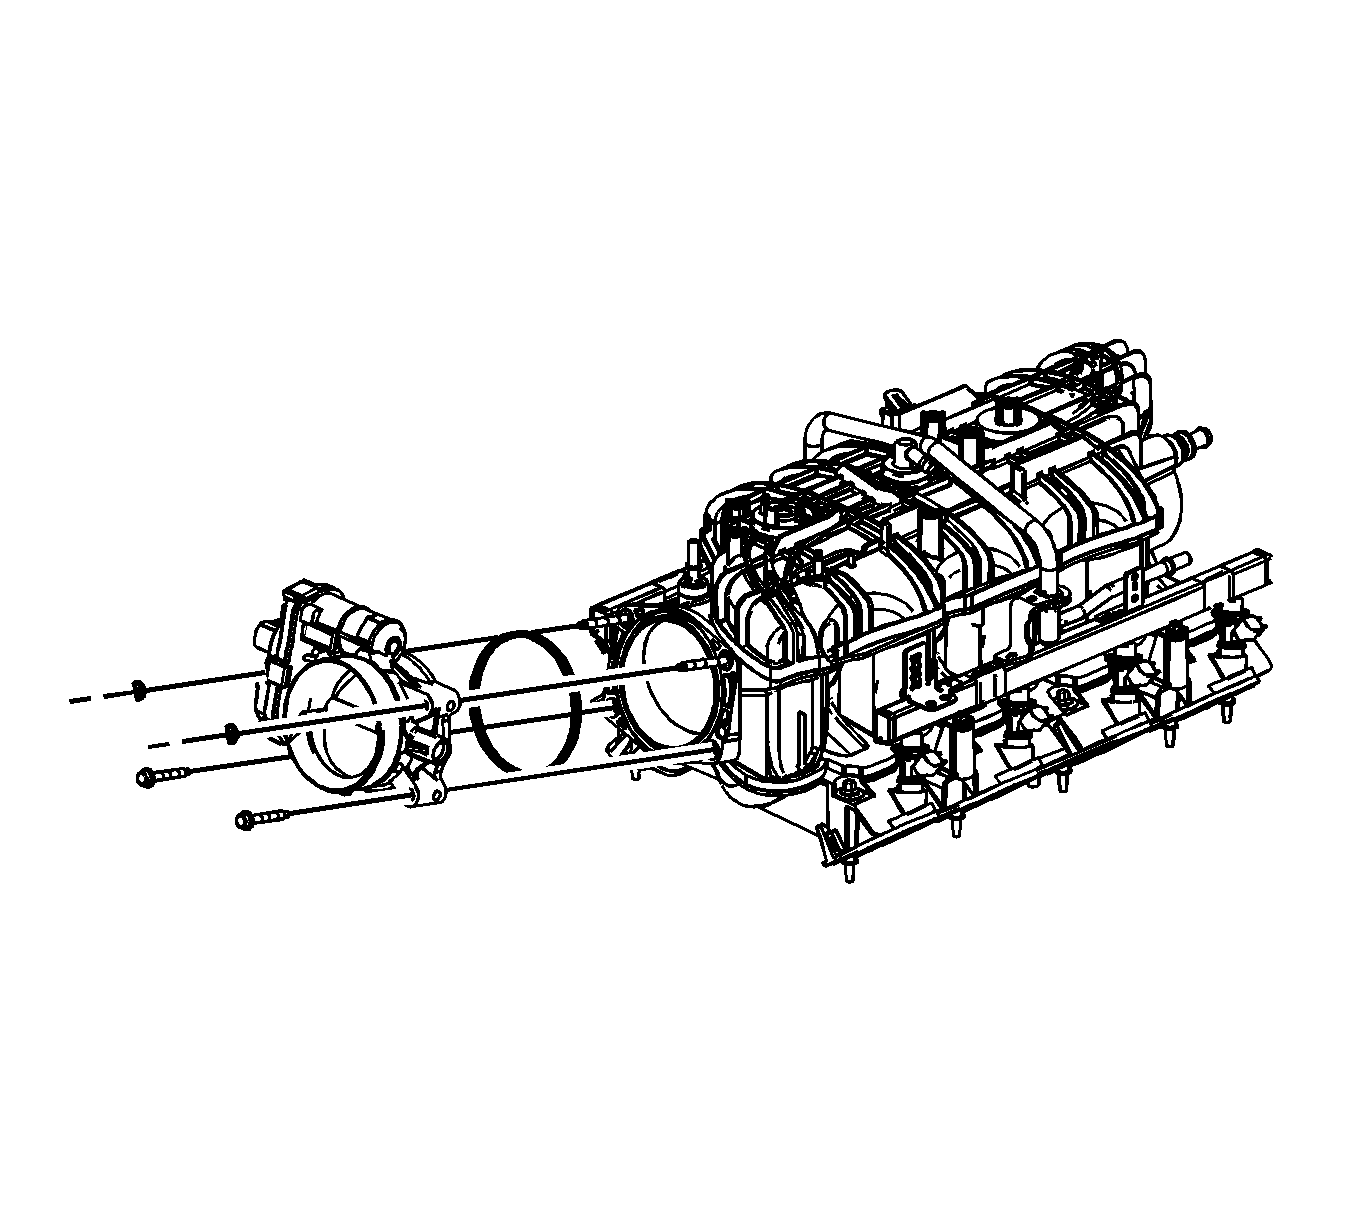
- Remove the throttle body bolts/nuts.
- Remove the throttle body.
- Remove and discard the throttle body gasket.
- Remove the fuel rail bolts.
- Remove the fuel rail.
- Remove and discard the fuel injector lower O-ring seals.
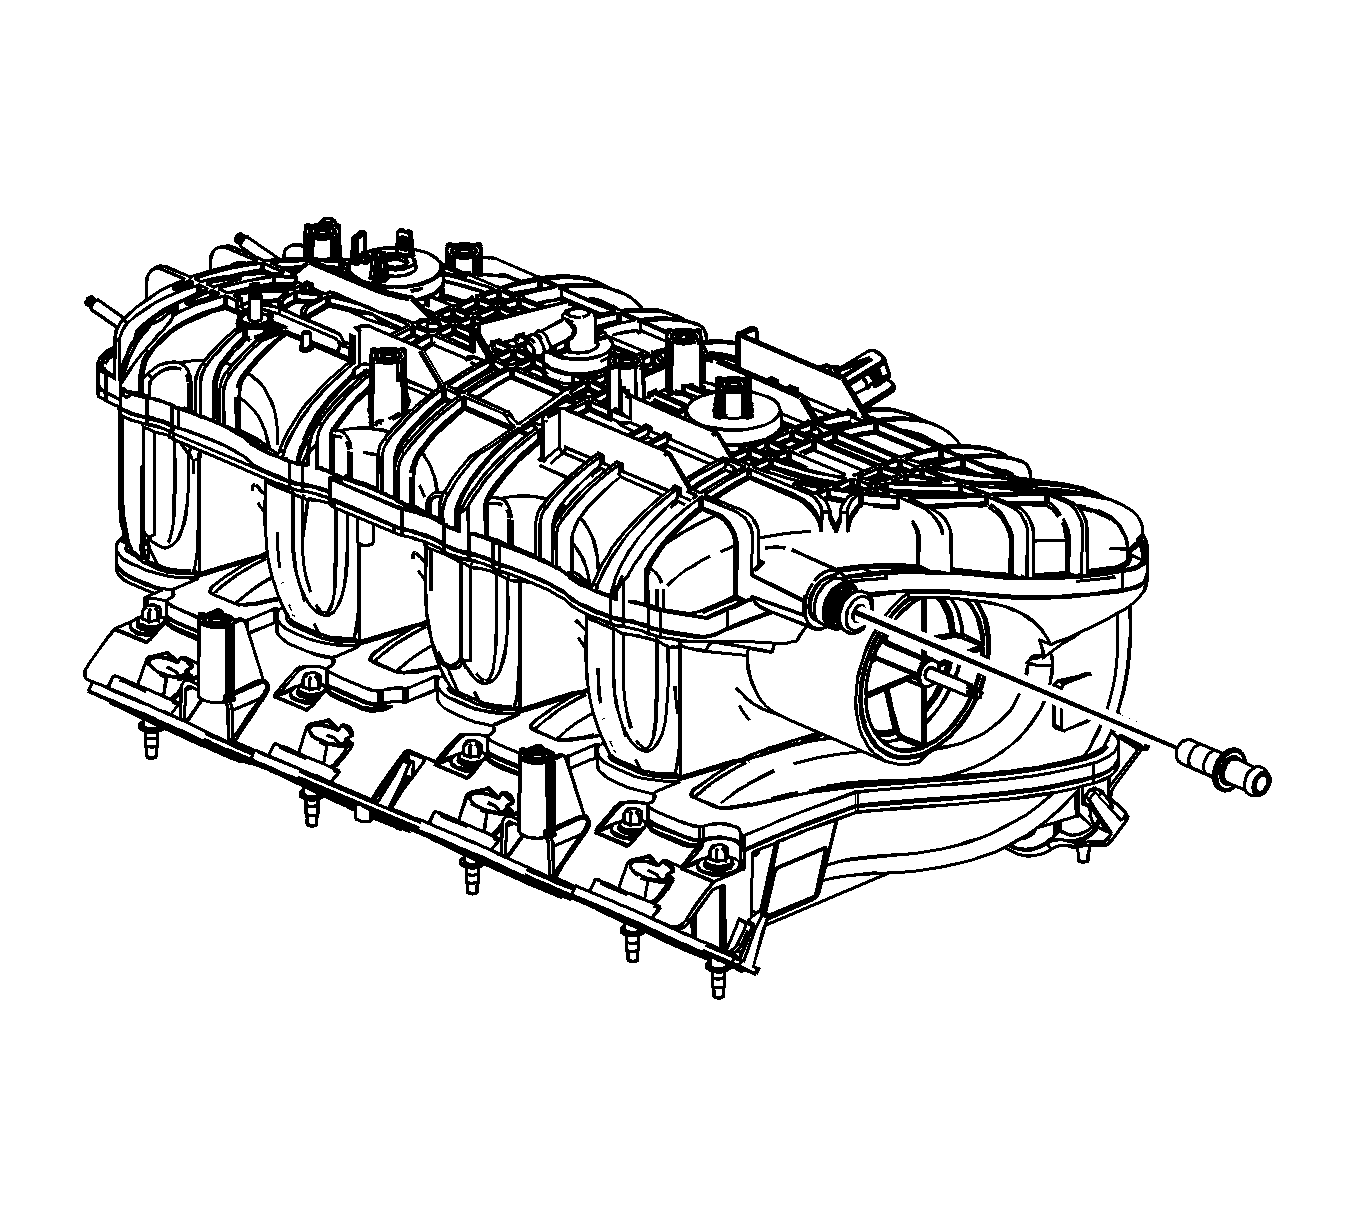
- Remove the brake booster vacuum hose nipple.
Important: The aid of an assistant may be helpful in holding the engine harness up out of the way so the upper intake manifold cover does not get caught against the engine harness.
Important: Lift evenly on both sides of the fuel rail until all injectors are removed from their bores.
Important: Evenly push in the RED collar in order to remove the nipple.
Installation Procedure
- If the intake manifold was replaced perform the following steps, otherwise proceed to step 21.
- Install the brake booster vacuum hose nipple to the NEW intake manifold.
- Install NEW fuel injector lower O-ring seals onto the injectors.
- Lubricate the NEW O-ring seals with clean engine oil.
- Install the fuel rail.
- Install the fuel rail bolts.
- Install a NEW throttle body gasket to the intake manifold.
- Install the throttle body.
- Install the throttle body bolts/nuts.
- Install the EVAP tube and purge solenoid.
- Install the EVAP canister purge solenoid to the fuel rail bracket and engage the retainer.
- Connect the EVAP tube quick connect fitting at the intake manifold. Refer to Plastic Collar Quick Connect Fitting Service .
- Lubricate the MAP sensor seal with clean engine oil.
- Install the MAP sensor.
- Install the MAP sensor retainer.
- Install the upper intake manifold cover.
- Install the upper intake manifold cover nut until snug
- Install the brake booster vacuum hose to the intake manifold nipple.
- Position the brake booster vacuum hose clamp at the intake manifold.
- Secure the brake booster vacuum hose to the intake manifold.
- Install NEW intake manifold gaskets (514) to the intake manifold.
- Remove the covers from the cylinder head passages.
- Install the intake manifold (500).
- Tighten the intake manifold bolts (512) until snug.
- Tighten the intake manifold bolts to specifications.
- Position and install the PCV hose to the intake manifold fitting.
- Connect the fuel feed line quick connect fitting (2) to the fuel rail. Refer to Metal Collar Quick Connect Fitting Service .
- Connect the EVAP canister purge tube (1) quick connect fitting to the EVAP canister purge solenoid. Refer to Plastic Collar Quick Connect Fitting Service .
- Unsecure the brake booster vacuum hose from the intake manifold.
- Install the brake booster vacuum hose to the booster fitting.
- Position the brake booster vacuum hose clamp at the booster.
- Untie the engine harness branches from the cowl panel and position over the engine.
- Connect the engine harness electrical connector (2) to the ECT sensor.
- Position the engine harness clip (1) to the generator bracket and install the bolt (3).
- Connect the engine harness electrical connectors (7) to the right side fuel injectors.
- Install the engine harness clip (6) to the ignition coil bracket stud.
- Install the engine harness clip (4) to the generator battery jumper cable.
- Connect the engine harness electrical connector (3) to the throttle actuator.
- Connect the engine harness electrical connector (1) to the ignition coil harness electrical connector.
- Install the CPA retainer (2).
- Install the engine harness clip (4) to the ignition coil bracket stud.
- Connect the engine harness electrical connectors (3) to the left side fuel injectors.
- Connect the engine harness electrical connector (1) to the ignition coil harness electrical connector.
- Install the CPA retainer (1).
- Connect the engine wiring harness electrical connector (4) to the MAP sensor.
- Connect the engine harness electrical connector (2) to the EVAP canister purge solenoid.
- Install the engine harness retainer to the stud and locator pin.
- Install the engine harness retainer nut (1).
- Install the generator. Refer to Generator Replacement .
- Install the air cleaner outlet duct. Refer to Air Cleaner Resonator Outlet Duct Replacement .
Important: Evenly push in the RED collar in order to install the nipple.
Important: Push down firmly on both sides of the rail until all the injectors have been seated into their bores.
Notice: Refer to Fastener Notice in the Preface section.
Tighten
Tighten the bolts to 10 N·m (89 lb in).
Tighten
Tighten the bolts/nuts to 10 N·m (89 lb in).
Important: The aid of an assistant may be helpful in holding the engine harness up out of the way so the upper intake manifold cover does not get caught against the engine harness.
Tighten
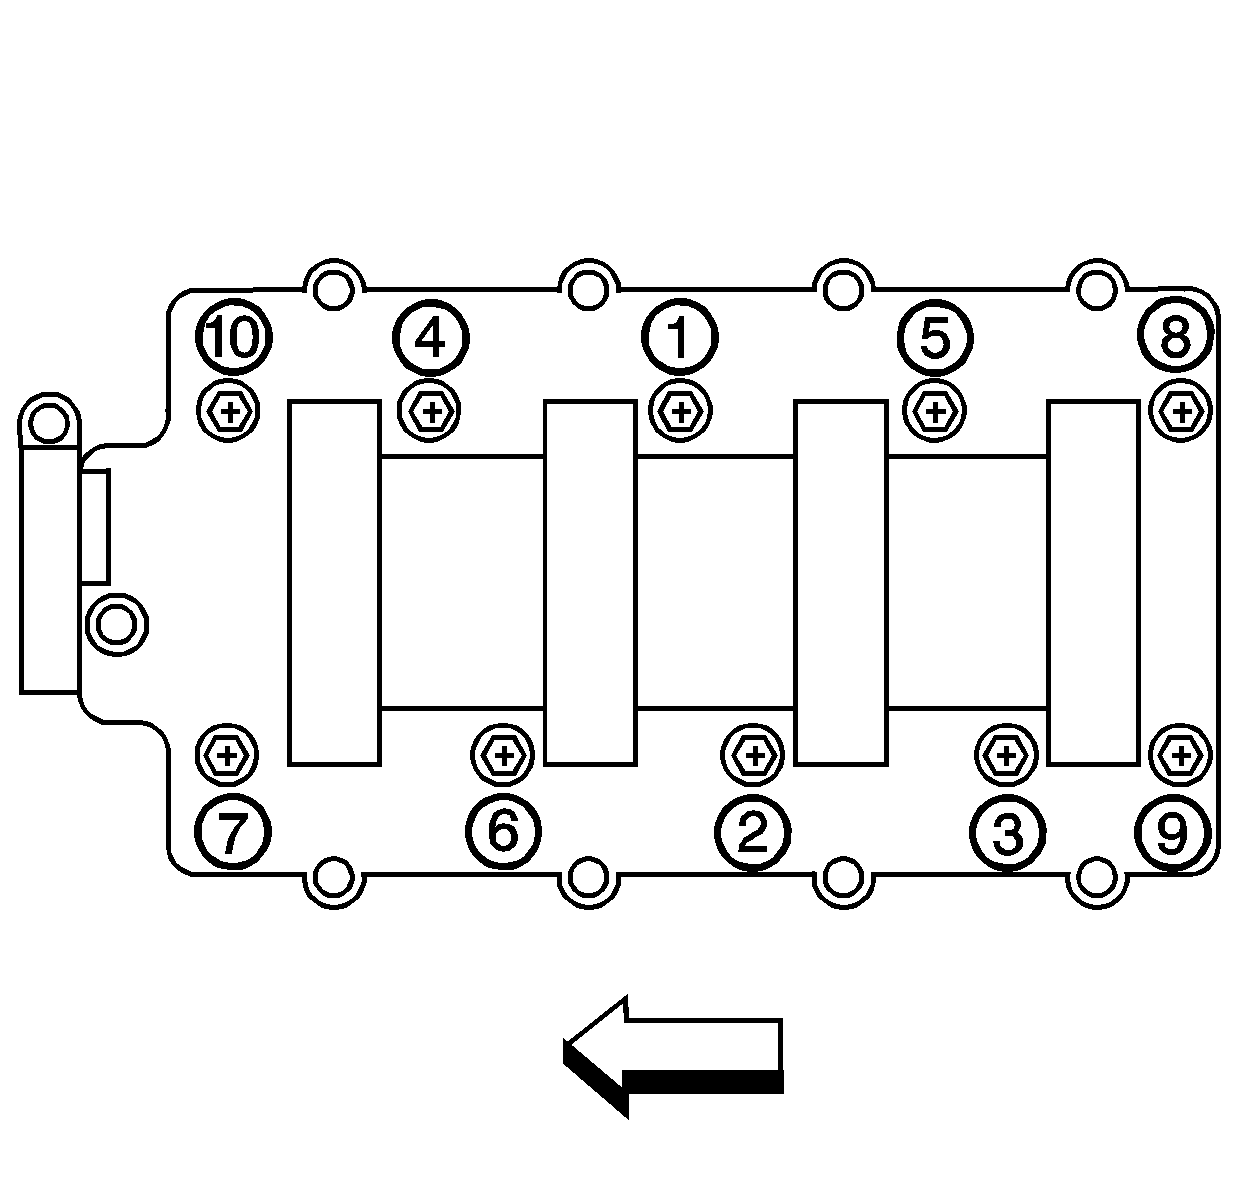
| • | Tighten the bolts a first pass in the sequence shown to 5 N·m (44 lb in). |
| • | Tighten the bolts a final pass in the sequence shown to 10 N·m (89 lb in). |
Tighten
Tighten the bolt to 9 N·m (80 lb in).
Tighten
Tighten the nut to 5 N·m (44 lb in).
Intake Manifold Replacement RPOs LC9/LMG/LY5/L76
Removal Procedure
- Remove the air cleaner outlet duct. Refer to Air Cleaner Resonator Outlet Duct Replacement .
- Remove the generator. Refer to Generator Replacement .
- Remove the engine harness retainer nut (1).
- Remove the engine harness retainer from the stud and locator.
- Disconnect the engine harness electrical connector (2) from the evaporative emission (EVAP) canister purge solenoid.
- Disconnect the engine wiring harness electrical connector (4) from the manifold absolute pressure (MAP) sensor.
- Remove the connector position assurance (CPA) retainer (1).
- Disconnect the engine harness electrical connector (1) from the ignition coil harness electrical connector.
- Disconnect the engine harness electrical connectors (3) from the left side fuel injectors.
- Remove the engine harness clip (4) from the ignition coil bracket stud.
- Remove the CPA retainer (2).
- Disconnect the engine harness electrical connector (1) from the ignition coil harness electrical connector.
- Disconnect the engine harness electrical connector (3) from the throttle actuator.
- Remove the engine harness clip (4) from the generator battery jumper cable.
- Remove the engine harness clip (6) from the ignition coil bracket stud.
- Disconnect the engine harness electrical connectors (7) from the right side fuel injectors.
- Remove the engine harness clip (1) bolt (3).
- Disconnect the engine harness electrical connector (2) from the engine coolant temperature (ECT) sensor.
- Gather the engine harness branches and tie the harness up out of the way to the cowl panel.
- Reposition the brake booster vacuum hose clamp at the booster.
- Remove the brake booster vacuum hose from the booster fitting.
- Secure the brake booster vacuum hose to the intake manifold.
- Disconnect the EVAP canister purge tube (1) quick connect fitting from the EVAP canister purge solenoid. Refer to Plastic Collar Quick Connect Fitting Service .
- Disconnect the fuel feed line quick connect fitting (2) from the fuel rail. Refer to Metal Collar Quick Connect Fitting Service .
- Remove the positive crankcase ventilation (PCV) hose from the intake manifold fitting.
- Loosen the intake manifold bolts.
- Remove the intake manifold (500).
- Remove and discard the intake manifold gaskets (514).
- Cover the cylinder head passages in order to prevent dirt or debris from entering the passages.
- If replacing the intake manifold, perform the following steps, otherwise proceed to step 21 of the installation procedure.
- Place the intake manifold on a clean work surface.
- Reposition the brake booster vacuum hose clamp at the intake manifold.
- Remove the brake booster vacuum hose from the intake manifold nipple.
- Remove the upper intake manifold cover nut.
- Remove the upper intake manifold cover.
- Remove the manifold absolute pressure (MAP) sensor retainer.
- Remove the MAP sensor.
- Disconnect the EVAP tube quick connect fitting at the intake manifold. Refer to Plastic Collar Quick Connect Fitting Service .
- Disengage the retainer securing the EVAP canister purge solenoid to the fuel rail.
- Remove the EVAP tube and purge solenoid.
- Remove the throttle body bolts/nuts.
- Remove the throttle body.
- Remove and discard the throttle body gasket.
- Remove the fuel rail bolts.
- Remove the fuel rail.
- Remove and discard the fuel injector lower O-ring seals.
- Remove the brake booster vacuum hose nipple.
Important: Lift evenly on both sides of the fuel rail until all injectors are removed from their bores.
Important: Evenly push in the RED collar in order to remove the nipple.
Installation Procedure
- If the intake manifold was replaced perform the following steps, otherwise proceed to step 21.
- Install the brake booster vacuum hose nipple to the NEW intake manifold.
- Install NEW fuel injector lower O-ring seals onto the injectors.
- Lubricate the NEW O-ring seals with clean engine oil.
- Install the fuel rail.
- Install the fuel rail bolts.
- Install a NEW throttle body gasket to the intake manifold.
- Install the throttle body.
- Install the throttle body bolts/nuts.
- Install the EVAP tube and purge solenoid.
- Install the EVAP canister purge solenoid to the fuel rail bracket and engage the retainer.
- Connect the EVAP tube quick connect fitting at the intake manifold. Refer to Plastic Collar Quick Connect Fitting Service .
- Lubricate the MAP sensor seal with clean engine oil.
- Install the MAP sensor.
- Install the MAP sensor retainer.
- Install the upper intake manifold cover.
- Install the upper intake manifold cover nut until snug
- Install the brake booster vacuum hose to the intake manifold nipple.
- Position the brake booster vacuum hose clamp at the intake manifold.
- Secure the brake booster vacuum hose to the intake manifold.
- Install NEW intake manifold gaskets (514) to the intake manifold.
- Remove the covers from the cylinder head passages.
- Install the intake manifold (500).
- Tighten the intake manifold bolts (512) until snug.
- Tighten the intake manifold bolts to specifications.
- Position and install the PCV hose to the intake manifold fitting.
- Connect the fuel feed line quick connect fitting (2) to the fuel rail. Refer to Metal Collar Quick Connect Fitting Service .
- Connect the EVAP canister purge tube (1) quick connect fitting to the EVAP canister purge solenoid. Refer to Plastic Collar Quick Connect Fitting Service .
- Unsecure the brake booster vacuum hose from the intake manifold.
- Install the brake booster vacuum hose to the booster fitting.
- Position the brake booster vacuum hose clamp at the booster.
- Untie the engine harness branches from the cowl panel and position over the engine.
- Connect the engine harness electrical connector (2) to the ECT sensor.
- Position the engine harness clip (1) to the generator bracket and install the bolt (3).
- Connect the engine harness electrical connectors (7) to the right side fuel injectors.
- Install the engine harness clip (6) to the ignition coil bracket stud.
- Install the engine harness clip (4) to the generator battery jumper cable.
- Connect the engine harness electrical connector (3) to the throttle actuator.
- Connect the engine harness electrical connector (1) to the ignition coil harness electrical connector.
- Install the CPA retainer (2).
- Install the engine harness clip (4) to the ignition coil bracket stud.
- Connect the engine harness electrical connectors (3) to the left side fuel injectors.
- Connect the engine harness electrical connector (1) to the ignition coil harness electrical connector.
- Install the CPA retainer (1).
- Connect the engine wiring harness electrical connector (4) to the MAP sensor.
- Connect the engine harness electrical connector (2) to the EVAP canister purge solenoid.
- Install the engine harness retainer to the stud and locator pin.
- Install the engine harness retainer nut (1).
- Install the generator. Refer to Generator Replacement .
- Install the air cleaner outlet duct. Refer to Air Cleaner Resonator Outlet Duct Replacement .
Important: Evenly push in the RED collar in order to install the nipple.
Important: Push down firmly on both sides of the rail until all the injectors have been seated into their bores.
Notice: Refer to Fastener Notice in the Preface section.
Tighten
Tighten the bolts to 10 N·m (89 lb in).
Tighten
Tighten the bolts/nuts to 10 N·m (89 lb in).
Important: The aid of an assistant may be helpful in holding the engine harness up out of the way so the upper intake manifold cover does not get caught against the engine harness.
Tighten
| • | Tighten the bolts a first pass in the sequence shown to 5 N·m (44 lb in). |
| • | Tighten the bolts a final pass in the sequence shown to 10 N·m (89 lb in). |
Tighten
Tighten the bolt to 9 N·m (80 lb in).
Tighten
Tighten the nut to 5 N·m (44 lb in).
Intake Manifold Replacement RPO L92 - First Design
Removal Procedure
- Remove the air cleaner outlet duct. Refer to Air Cleaner Resonator Outlet Duct Replacement .
- Remove the generator. Refer to Generator Replacement .
- Remove the engine harness retainer nut (1).
- Remove the engine harness retainer from the stud and locator.
- Disconnect the engine harness electrical connector (2) from the evaporative emission (EVAP) canister purge solenoid.
- Disconnect the engine wiring harness electrical connector (4) from the manifold absolute pressure (MAP) sensor.
- Remove the connector position assurance (CPA) retainer (1).
- Disconnect the engine harness electrical connector (1) from the ignition coil harness electrical connector.
- Disconnect the engine harness electrical connectors (3) from the left side fuel injectors.
- Remove the engine harness clip (4) from the ignition coil bracket stud.
- Remove the CPA retainer (2).
- Disconnect the engine harness electrical connector (1) from the ignition coil harness electrical connector.
- Disconnect the engine harness electrical connector (3) from the throttle actuator.
- Remove the engine harness clip (4) from the generator battery jumper cable.
- Remove the engine harness clip (6) from the ignition coil bracket stud.
- Disconnect the engine harness electrical connectors (7) from the right side fuel injectors.
- Remove the engine harness clip (1) bolt (3).
- Disconnect the engine harness electrical connector (2) from the engine coolant temperature (ECT) sensor.
- Gather the engine harness branches and tie the harness up out of the way to the cowl panel.
- Reposition the brake booster vacuum hose clamp at the booster.
- Remove the brake booster vacuum hose from the booster fitting.
- Secure the brake booster vacuum hose to the intake manifold.
- Disconnect the EVAP canister purge tube (1) quick connect fitting from the EVAP canister purge solenoid. Refer to Plastic Collar Quick Connect Fitting Service .
- Disconnect the fuel feed line quick connect fitting (2) from the fuel rail. Refer to Metal Collar Quick Connect Fitting Service .
- Remove the positive crankcase ventilation (PCV) hose from the intake manifold fitting.
- Loosen the intake manifold bolts.
- Remove the intake manifold (500).
- Remove and discard the intake manifold gaskets (514).
- Cover the cylinder head passages in order to prevent dirt or debris from entering the passages.
- If replacing the intake manifold, perform the following steps, otherwise proceed to step 21 of the installation procedure.
- Place the intake manifold on a clean work surface.
- Reposition the brake booster vacuum hose clamp at the intake manifold.
- Remove the brake booster vacuum hose from the intake manifold nipple.
- Remove the upper intake manifold cover nut.
- Remove the upper intake manifold cover.
- Remove the manifold absolute pressure (MAP) sensor retainer.
- Remove the MAP sensor.
- Disconnect the EVAP tube quick connect fitting at the intake manifold. Refer to Plastic Collar Quick Connect Fitting Service .
- Disengage the retainer securing the EVAP canister purge solenoid to the fuel rail.
- Remove the EVAP tube and purge solenoid.
- Remove the throttle body bolts/nuts.
- Remove the throttle body.
- Remove and discard the throttle body gasket.
- Remove the fuel rail bolts.
- Remove the fuel rail.
- Remove and discard the fuel injector lower O-ring seals.
- Remove the brake booster vacuum hose nipple.
Important: Lift evenly on both sides of the fuel rail until all injectors are removed from their bores.
Important: Evenly push in the RED collar in order to remove the nipple.
Installation Procedure
- If the intake manifold was replaced perform the following steps, otherwise proceed to step 21.
- Install the brake booster vacuum hose nipple to the NEW intake manifold.
- Install NEW fuel injector lower O-ring seals onto the injectors.
- Lubricate the NEW O-ring seals with clean engine oil.
- Install the fuel rail.
- Install the fuel rail bolts.
- Install a NEW throttle body gasket to the intake manifold.
- Install the throttle body.
- Install the throttle body bolts/nuts.
- Install the EVAP tube and purge solenoid.
- Install the EVAP canister purge solenoid to the fuel rail bracket and engage the retainer.
- Connect the EVAP tube quick connect fitting at the intake manifold. Refer to Plastic Collar Quick Connect Fitting Service .
- Lubricate the MAP sensor seal with clean engine oil.
- Install the MAP sensor.
- Install the MAP sensor retainer.
- Install the upper intake manifold cover.
- Install the upper intake manifold cover nut until snug
- Install the brake booster vacuum hose to the intake manifold nipple.
- Position the brake booster vacuum hose clamp at the intake manifold.
- Secure the brake booster vacuum hose to the intake manifold.
- Install NEW intake manifold gaskets (514) to the intake manifold.
- Remove the covers from the cylinder head passages.
- Install the intake manifold (500).
- Tighten the intake manifold bolts (512) until snug.
- Tighten the intake manifold bolts to specifications.
- Position and install the PCV hose to the intake manifold fitting.
- Connect the fuel feed line quick connect fitting (2) to the fuel rail. Refer to Metal Collar Quick Connect Fitting Service .
- Connect the EVAP canister purge tube (1) quick connect fitting to the EVAP canister purge solenoid. Refer to Plastic Collar Quick Connect Fitting Service .
- Unsecure the brake booster vacuum hose from the intake manifold.
- Install the brake booster vacuum hose to the booster fitting.
- Position the brake booster vacuum hose clamp at the booster.
- Untie the engine harness branches from the cowl panel and position over the engine.
- Connect the engine harness electrical connector (2) to the ECT sensor.
- Position the engine harness clip (1) to the generator bracket and install the bolt (3).
- Connect the engine harness electrical connectors (7) to the right side fuel injectors.
- Install the engine harness clip (6) to the ignition coil bracket stud.
- Install the engine harness clip (4) to the generator battery jumper cable.
- Connect the engine harness electrical connector (3) to the throttle actuator.
- Connect the engine harness electrical connector (1) to the ignition coil harness electrical connector.
- Install the CPA retainer (2).
- Install the engine harness clip (4) to the ignition coil bracket stud.
- Connect the engine harness electrical connectors (3) to the left side fuel injectors.
- Connect the engine harness electrical connector (1) to the ignition coil harness electrical connector.
- Install the CPA retainer (1).
- Connect the engine wiring harness electrical connector (4) to the MAP sensor.
- Connect the engine harness electrical connector (2) to the EVAP canister purge solenoid.
- Install the engine harness retainer to the stud and locator pin.
- Install the engine harness retainer nut (1).
- Install the generator. Refer to Generator Replacement .
- Install the air cleaner outlet duct. Refer to Air Cleaner Resonator Outlet Duct Replacement .
Important: Evenly push in the RED collar in order to install the nipple.
Important: Push down firmly on both sides of the rail until all the injectors have been seated into their bores.
Notice: Refer to Fastener Notice in the Preface section.
Tighten
Tighten the bolts to 10 N·m (89 lb in).
Tighten
Tighten the bolts/nuts to 10 N·m (89 lb in).
Important: The aid of an assistant may be helpful in holding the engine harness up out of the way so the upper intake manifold cover does not get caught against the engine harness.
Tighten
| • | Tighten the bolts a first pass in the sequence shown to 5 N·m (44 lb in). |
| • | Tighten the bolts a final pass in the sequence shown to 10 N·m (89 lb in). |
Tighten
Tighten the bolt to 9 N·m (80 lb in).
Tighten
Tighten the nut to 5 N·m (44 lb in).
Intake Manifold Replacement RPO L92 - Second Design
Removal Procedure
- Remove the air cleaner outlet duct. Refer to Air Cleaner Resonator Outlet Duct Replacement .
- Remove the generator. Refer to Generator Replacement .
- Remove the engine harness retainer nut (1).
- Remove the engine harness retainer from the stud and locator pin.
- Disconnect the engine harness electrical connector (2) from the evaporative emission (EVAP) canister purge solenoid.
- Disconnect the engine wiring harness electrical connector (4) from the manifold absolute pressure (MAP) sensor.
- Remove the connector position assurance (CPA) retainer (1).
- Disconnect the engine harness electrical connector (1) from the ignition coil harness electrical connector.
- Disconnect the engine harness electrical connectors (3) from the left side fuel injectors.
- Remove the engine harness clip (4) from the ignition coil bracket stud.
- Remove the CPA retainer (2).
- Disconnect the engine harness electrical connector (1) from the ignition coil harness electrical connector.
- Disconnect the engine harness electrical connector (3) from the throttle actuator.
- Remove the engine harness clip (4) from the generator battery jumper cable.
- Remove the engine harness clip (6) from the ignition coil bracket stud.
- Disconnect the engine harness electrical connectors (7) from the right side fuel injectors.
- Remove the engine harness clip (1) bolt (3).
- Disconnect the engine harness electrical connector (2) from the engine coolant temperature (ECT) sensor.
- Gather the engine harness branches and tie the harness up out of the way to the cowl panel.
- Reposition the brake booster vacuum hose clamp at the booster.
- Remove the brake booster vacuum hose from the booster fitting.
- Secure the brake booster vacuum hose to the intake manifold.
- Disconnect the EVAP canister purge tube (1) quick connect fitting from the EVAP canister purge solenoid. Refer to Plastic Collar Quick Connect Fitting Service .
- Disconnect the fuel feed line quick connect fitting (2) from the fuel rail. Refer to Metal Collar Quick Connect Fitting Service .
- Remove the positive crankcase ventilation (PCV) hose from the intake manifold fitting.
- Position the hose out of the way.
- Loosen the intake manifold bolts (512).
- Remove the intake manifold (500).
- Cover the cylinder head passages in order to prevent dirt or debris from entering the passages.
- Remove and discard the intake manifold gaskets (514).
- If replacing the intake manifold, perform the following steps, otherwise proceed to step 21 of the installation procedure.
- Place the intake manifold on a clean work surface.
- Reposition the brake booster vacuum hose clamp at the intake manifold.
- Remove the brake booster vacuum hose from the intake manifold nipple.
- Remove the upper intake manifold cover nut.
- Remove the upper intake manifold cover.
- Remove the manifold absolute pressure (MAP) sensor retainer.
- Remove the MAP sensor.
- Disconnect the EVAP tube quick connect fitting at the intake manifold. Refer to Plastic Collar Quick Connect Fitting Service .
- Disengage the retainer securing the EVAP canister purge solenoid to the fuel rail.
- Remove the EVAP tube and purge solenoid.
- Remove the throttle body bolts/nuts.
- Remove the throttle body.
- Remove and discard the throttle body gasket.
- Remove the fuel rail bolts.
- Remove the fuel rail.
- Remove and discard the fuel injector lower O-ring seals.
- Remove the brake booster vacuum hose nipple.
Important: The aid of an assistant may be helpful in holding the engine harness up out of the way so the upper intake manifold cover does not get caught against the engine harness.
Important: Lift evenly on both sides of the fuel rail until all injectors are removed from their bores.
Important: Evenly push in the RED collar in order to remove the nipple.
Installation Procedure
- If the intake manifold was replaced perform the following steps, otherwise proceed to step 21.
- Install the brake booster vacuum hose nipple to the NEW intake manifold.
- Install NEW fuel injector lower O-ring seals onto the injectors.
- Lubricate the NEW O-ring seals with clean engine oil.
- Install the fuel rail.
- Install the fuel rail bolts.
- Install a NEW throttle body gasket to the intake manifold.
- Install the throttle body.
- Install the throttle body bolts/nuts.
- Install the EVAP tube and purge solenoid.
- Install the EVAP canister purge solenoid to the fuel rail bracket and engage the retainer.
- Connect the EVAP tube quick connect fitting at the intake manifold. Refer to Plastic Collar Quick Connect Fitting Service .
- Lubricate the MAP sensor seal with clean engine oil.
- Install the MAP sensor.
- Install the MAP sensor retainer.
- Install the upper intake manifold cover.
- Install the upper intake manifold cover nut until snug
- Install the brake booster vacuum hose to the intake manifold nipple.
- Position the brake booster vacuum hose clamp at the intake manifold.
- Secure the brake booster vacuum hose to the intake manifold.
- Install NEW intake manifold gaskets (514) to the intake manifold.
- Remove the covers from the cylinder head passages.
- Install the intake manifold (500).
- Tighten the intake manifold bolts (512) until snug.
- Tighten the intake manifold bolts to specifications.
- Position and install the PCV hose to the intake manifold fitting.
- Connect the fuel feed line quick connect fitting (2) to the fuel rail. Refer to Metal Collar Quick Connect Fitting Service .
- Connect the EVAP canister purge tube (1) quick connect fitting to the EVAP canister purge solenoid. Refer to Plastic Collar Quick Connect Fitting Service .
- Unsecure the brake booster vacuum hose from the intake manifold.
- Install the brake booster vacuum hose to the booster fitting.
- Position the brake booster vacuum hose clamp at the booster.
- Untie the engine harness branches from the cowl panel and position over the engine.
- Connect the engine harness electrical connector (2) to the ECT sensor.
- Position the engine harness clip (1) to the generator bracket and install the bolt (3).
- Connect the engine harness electrical connectors (7) to the right side fuel injectors.
- Install the engine harness clip (6) to the ignition coil bracket stud.
- Install the engine harness clip (4) to the generator battery jumper cable.
- Connect the engine harness electrical connector (3) to the throttle actuator.
- Connect the engine harness electrical connector (1) to the ignition coil harness electrical connector.
- Install the CPA retainer (2).
- Install the engine harness clip (4) to the ignition coil bracket stud.
- Connect the engine harness electrical connectors (3) to the left side fuel injectors.
- Connect the engine harness electrical connector (1) to the ignition coil harness electrical connector.
- Install the CPA retainer (1).
- Connect the engine wiring harness electrical connector (4) to the MAP sensor.
- Connect the engine harness electrical connector (2) to the EVAP canister purge solenoid.
- Install the engine harness retainer to the stud and locator pin.
- Install the engine harness retainer nut (1).
- Install the generator. Refer to Generator Replacement .
- Install the air cleaner outlet duct. Refer to Air Cleaner Resonator Outlet Duct Replacement .
Important: Evenly push in the RED collar in order to install the nipple.
Important: Push down firmly on both sides of the rail until all the injectors have been seated into their bores.
Notice: Refer to Fastener Notice in the Preface section.
Tighten
Tighten the bolts to 10 N·m (89 lb in).
Tighten
Tighten the bolts/nuts to 10 N·m (89 lb in).
Important: The aid of an assistant may be helpful in holding the engine harness up out of the way so the upper intake manifold cover does not get caught against the engine harness.
Tighten
| • | Tighten the bolts a first pass in the sequence shown to 5 N·m (44 lb in). |
| • | Tighten the bolts a final pass in the sequence shown to 10 N·m (89 lb in). |
Tighten
Tighten the bolt to 9 N·m (80 lb in).
Tighten
Tighten the nut to 5 N·m (44 lb in).
