Third Row Passenger Seat Will Not Fold Down Flat and/or High Effort to Release Seat Back (Install Nylon Tie Strap to Seat Back Cushion Latch Cable and Replace Inboard Latch Assembly, If Necessary)

| Subject: | Third Row Passenger Seat Will Not Fold Down Flat and/or High Effort to Release Seat Back (Install Nylon Tie Strap to Seat Back Cushion Latch Cable and Replace Inboard Latch Assembly, If Necessary) |
| Models: | 2007-2008 Cadillac Escalade, Escalade ESV |
| 2007-2008 Chevrolet Suburban, Tahoe |
| 2007-2008 GMC Yukon, Yukon XL, Yukon Denali, Yukon Denali XL |
| with Rear Seat (RPO AS3) |
This bulletin is being revised to add the 2008 model year, include latch part number, add latch replacement procedures, update information and labor operation time. Please discard Corporate Bulletin Number 07-08-50-002 (Section 08 - Body and Accessories).
Do This | Don't Do This |
|---|---|
Install a nylon tie strap to the seat back cushion latch cable and replace inboard latch assembly, if necessary. | DO NOT replace the rear seat outboard latch, cable or lubricate latches. |
Condition
Some customers may comment that the third row passenger seat has high effort to release the seat back and/or the seat back will not fold down flat when using the release handle.
Cause
The cause may be one or both of the following:
| • | The seat back cushion latch cable may have too much slack in the cable. |
| • | Excessive friction between the pawl and sector inside the inboard seat back latch assembly. |
Correction
Remove the third row passenger seat assembly, install a nylon tie strap to the excessive slack in the seat back cushion latch cable and replace the inboard latch assembly, if necessary using the steps below.
- Open the liftgate to access the rear of the vehicle.
- Remove the third row driver seat assembly from the vehicle.
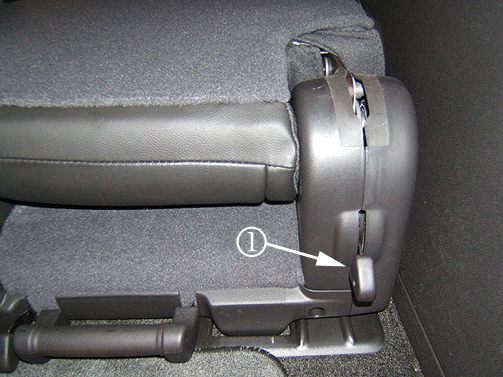
- Try to release the passenger seat assembly by pushing on the seat back from the front and back while pulling on the release handle (1). If you're able to release the seat latch and fold the seat back down, then refer to step 13.
- If you're unable to fold the seat back down, then unsnap the bottom J-Channel of the seat trim cover.
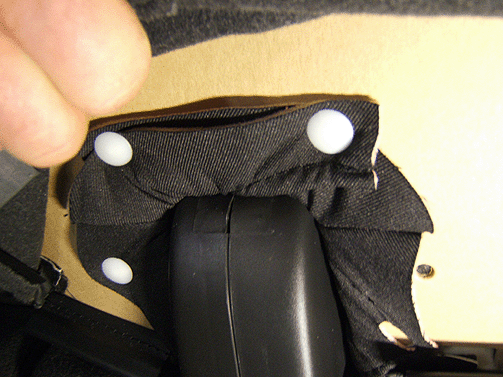
- Lift up on the seat trim cover to gain access to the push trim retainers as shown in the above graphic.
- Remove the push trim retainers with a door trim tool or equivalent.
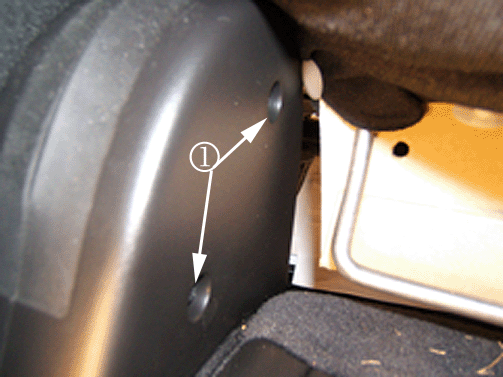
- From the front of the seat assembly, pull upward and forward on the front seat foam cushion to gain access to the two TORX screws (1) holding the left side inner inboard seat trim cover.
- Remove the two 30 mm TORX screws from the left side inner inboard seat trim cover.
- From the back of the seat assembly, gently pry the snaps open on the left side inner inboard seat trim cover apart with a screwdriver.
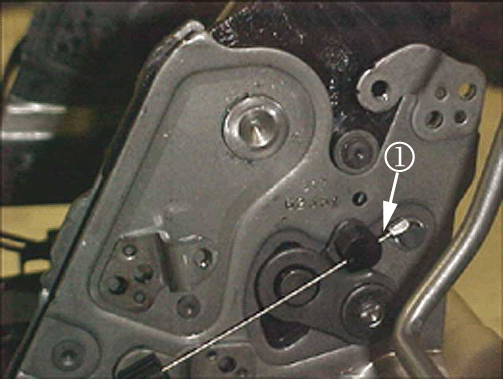
- Place a screwdriver on the cam pin as shown in the graphic above.
- Push forward on the cam pin to release the cam from the sector arm.
- Pull the release handle knob to fold down the seat back.
- Pull the center handle on the seat to release the seat latches from the floor.
- Remove the seat assembly from the vehicle.
- Place the seat assembly on a clean workbench.
- Gain access to the seat back cushion latch cable. Refer to Rear Seat Back Cushion Latch Cable Replacement in SI.
- Pull back on the seat back cushion latch cable end fitting to expose the excessive slack in the cable (1).
- Install a 3 mm (1/8 in) nylon tie strap (1) around the excessive cable slack.
- Manually release the rear position seat latches, if locked.
- Install the third row passenger seat back into the vehicle.
- Slide the front outboard seat wheels into the track on the floor. Roll the seat forward and the front latches should lock into place. If the latches do not lock, try tilting the rear of the seat upward slightly.
- Lower the rear of the seat and push down on the seat assembly to engage the seat latches into the floor.
- Forcefully "slam" the seat back to the upright position and then to the fold down flat position twenty times to wear in the sector and pawl.
- If the seat back latch functions properly, remove the seat from the vehicle and proceed to Step 26.
- If the seat back does not lock into position or high effort is required to release the seat back to the fold down position after installing the nylon tie strap and cycling the seat twenty times, then the inboard seat back latch will need to be replaced using the procedure below:
- Install the left and right inboard seat trim covers.
- Install the 30 mm TORX screws for the inboard plastic trim covers and tighten.
- Install the push pin retainers that secure the seat foam.
- Install the seat trim J-Channel.
- Install the seat cushion panels. Refer to Rear Seat Number 2 Cushion Panel Replacement (AS3) in SI.
- Install the third row passenger seat assembly back into the vehicle.
- Install the third row driver seat assembly back into the vehicle.
- Verify that the condition has been fixed.
Important: The left inboard trim cover may not be removed at this point. Do Not place the screwdriver on the cable end. Use a flashlight to help see inside the trim cover to find the cam.
Important: Manually locking the rear position seat latches will allow the seat back to be folded up and down during repair.
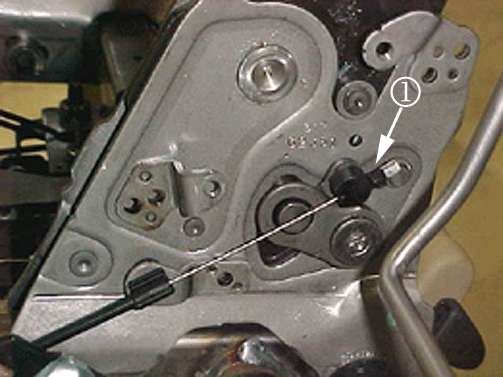
Important: If a rubber washer is found on the cable, it must be removed. The nylon tie strap is not to exceed 3 mm (1/8 in) in width and cut off excessive tie strap material.
Tip
The seat back cannot be raised or folded unless properly secured to the floor first. Push and pull on the seat assembly to make sure it is locked into place.
Important: While cycling the seat back to the upright position, be sure to pull on the seat back with "slamming" force to fully engage the pawl into the sector and verify that the seat back locks into place.
| 25.1. | Remove the seat from the vehicle and place on a clean workbench. |
| 25.2. | Remove the side and bottom seat trim covers. Refer to Rear Seat Number 2 Cushion Panel Replacement (AS3) in SI. |
| Important: Do Not remove the right inner inboard trim cover. |
| 25.3. | Remove the right outer inboard seat trim cover. |
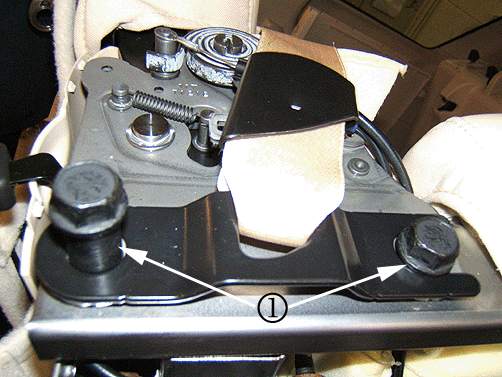
| 25.4. | Remove the two bottom right side latch bolts (1) and seat belt bracket. |
| 25.5. | Remove the center rear seat latch release handle by removing the two nuts. Refer to Seat Latch Release Handle Replacement in SI. |
| 25.6. | Remove the left rear seat latch release knob by removing the two 30 mm TORX screws. |
| 25.7. | Remove the four left side latch assembly bolts. |
| 25.8. | Disconnect the left rear seat back cushion latch cable clip and retainer from the latch assembly. |
| 25.9. | Remove the left inboard latch assembly. |
| 25.10. | Install the new left inboard latch assembly and four bolts. |
| 25.11. | Install the right side seat belt bracket and the two bottom right side latch bolts. |
| 25.12. | Tighten all the latch assembly bolts. |
Tighten
Tighten the latch bolts to 50 N·m (37 lb ft).
| 25.13. | Attach the left rear seat back cushion latch cable clip and retainer to the latch assembly. |
| 25.14. | Install the left rear seat latch release knob and the two 30 mm TORX screws. |
Tighten
Tighten the screws to 2 N·m (18 lb in).
| Important: The seat back must be in the fold down position before pulling out the center rear seat latch release handle. |
| 25.15. | Install the center rear seat latch release handle and the two nuts. Refer to Seat Latch Release Handle Replacement in SI. |
Tighten
Tighten the screws to 2 N·m (18 lb in).
Parts Information
Nylon tie strap 3 mm (1/8 in) width can be purchased locally from a hardware or automotive supplier.
Part Number | Description | Qty | Material Allowance |
|---|---|---|---|
25869980 | Latch, Rear Seat #2 Back Cushion-LHAS3 (Inboard Latch) | If Necessary | -- |
-- | Strap, Nylon | 1 | 56 cents per vehicle (59 cents in Canada) |
Warranty Information
For vehicles repaired under warranty, use:
Labor Operation | Description | Labor Time |
|---|---|---|
C9784* | Install Nylon Tie Strap to Seat Back Cushion Latch Cable-Third Row Passenger Seat (AS3) | 0.6 hr |
Add | Latch, Rear Seat #2 Back Cushion- LH-AS3 - Replace (Inboard) | 0.9 hr |
*This labor operation number is for bulletin use only. This number will not be published in the Labor Time Guide. | ||
