Engine Oil Cooler Hose/Pipe Replacement 2WD
Removal Procedure
The optional oil cooler is either an integral part of the radiator or a separate
unit placed in front of the radiator. The cooler lines and hoses are serviceable.
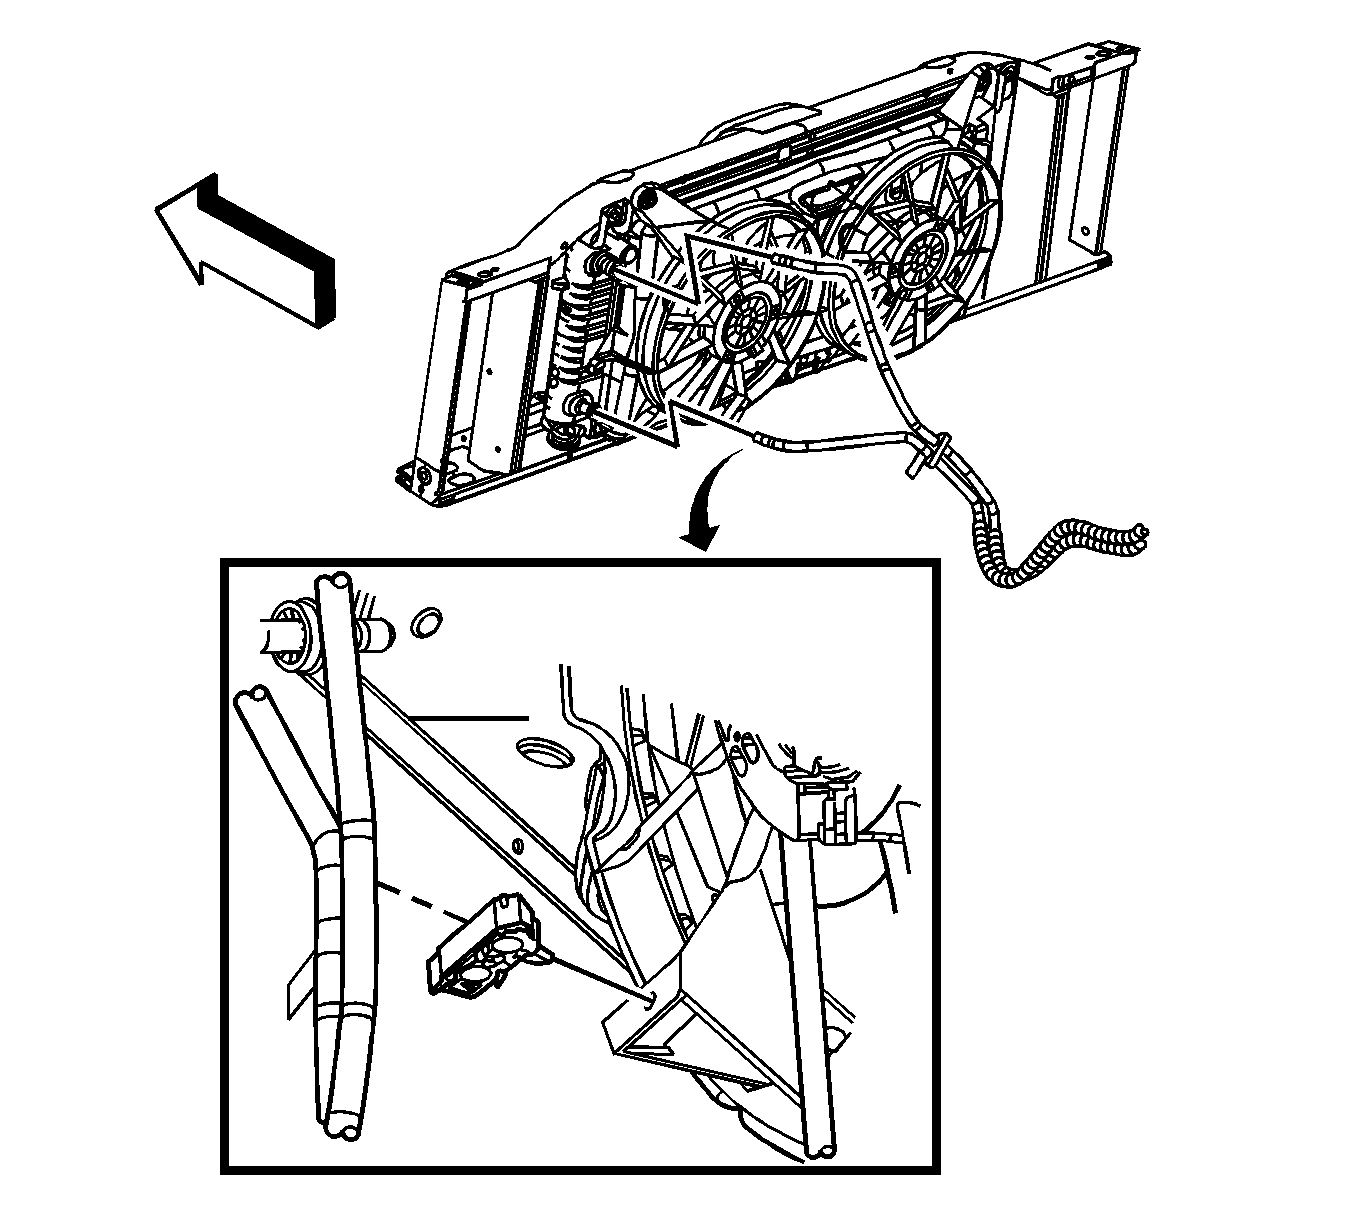
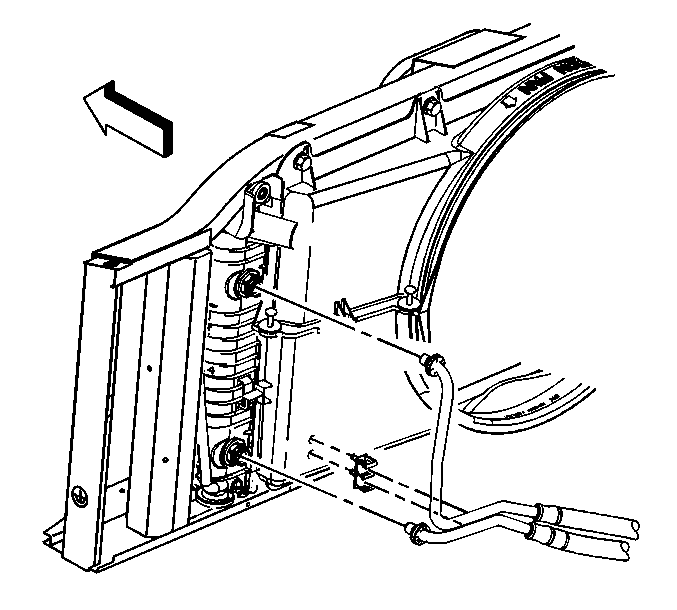
- Disconnect the engine oil cooler quick connect
fittings. Refer to
Engine Oil Cooler Pipe/Hose Quick Connect Fitting
.
- If equipped with a 5.3L or 6.0L engine, perform the following:
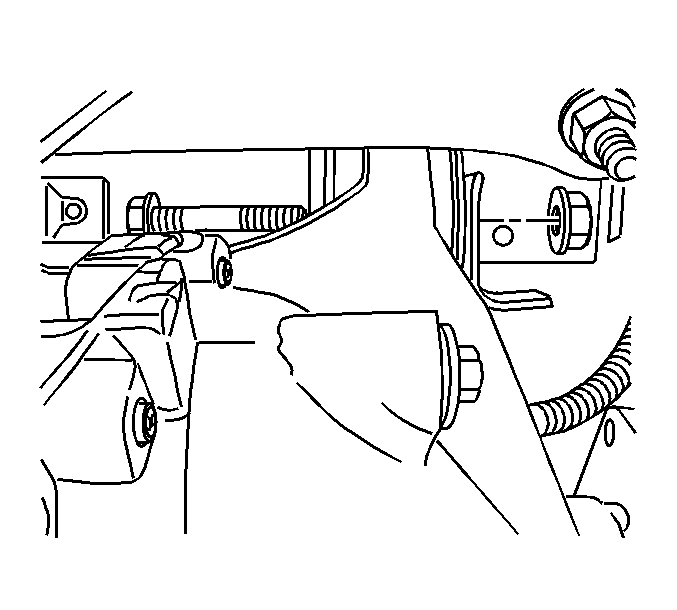
| 2.1. | Open the oil cooler hose clip located on the lower fan shroud. |
| 2.2. | Remove the oil cooler hoses from the clip. |
- Raise and suitably support the vehicle. Refer to
Lifting and Jacking the Vehicle
in General Information.
- If equipped with a 8.1L engine, perform
the following:
- Remove the oil cooler hoses from the clip.
- Raise and suitably support the vehicle. Refer to
Lifting and Jacking the Vehicle
in General Information.
- If
equipped, remove the engine shield bolts.
- Remove the engine shield.
- If equipped with a 5.3L or 6.0L engine,
perform the following:
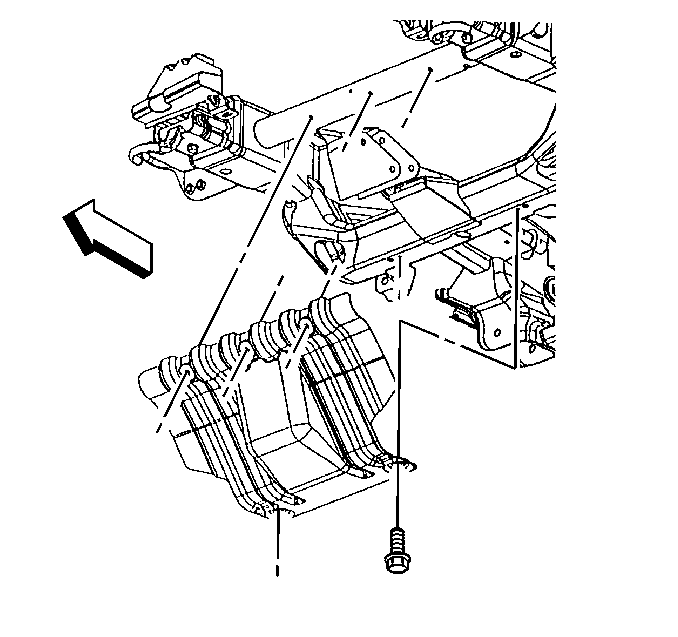
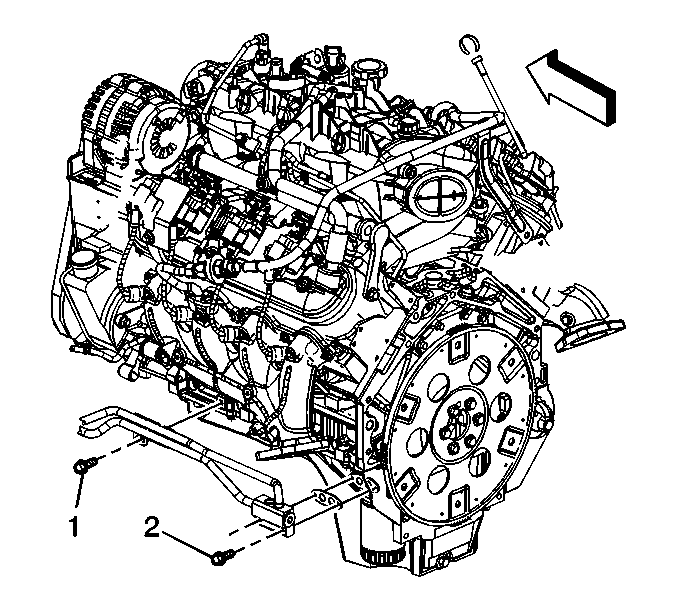
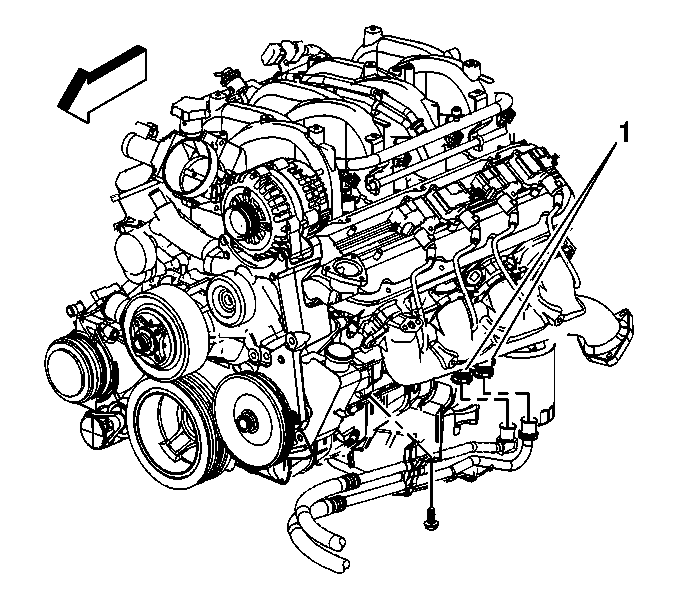
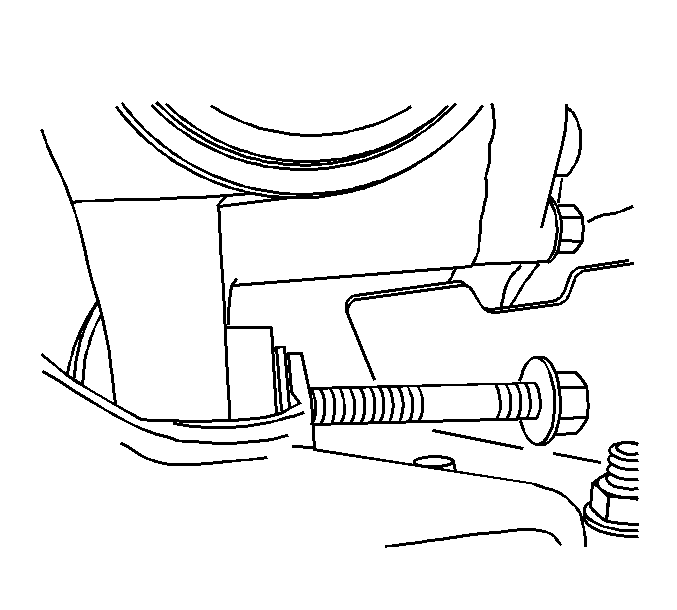
| 9.1. | Remove the oil cooler hose bracket bolt (1). |
| 9.2. | Remove the oil cooler hose adapter bolts (2). |
| 9.3. | Remove the oil cooler hose assembly and gasket. Discard the gasket. |
| 9.4. | Inspect the fittings, connectors and cooler hoses for damage or distortion. |
- If equipped with a 8.1L engine, perform
the following:
| 10.1. | Remove the oil cooler hose bracket bolt. |
| 10.2. | Disconnect the quick connect fittings (1) at the engine. |
| 10.3. | Remove the oil cooler hose assembly. Discard the gasket. |
| 10.4. | Inspect the fittings, connectors and cooler hoses for damage or distortion. |
Installation Procedure
Important: A distinct snap should be heard when assembling
the tube ends of the hose assembly to quick connectors. To ensure the tube is fully
inserted into the connector, check by giving the tube a forceful pull.
- If equipped with a 8.1L engine, perform the following:
| 1.1. | Remove the oil cooler hose assembly. |
| 1.2. | Connect the quick connect fittings (1) at the engine. |
Notice: Refer to Fastener Notice in the Preface section.
| 1.3. | Install the oil cooler hose bracket bolt. |
Tighten
Tighten the bolt to 50 N·m (37 lb ft).
- If equipped with a 5.3L or 6.0L engine,
perform the following:
| 2.1. | Install the oil cooler hose assembly and a new gasket. |
| 2.2. | Install the oil cooler hose adapter bolts (2). |
Tighten
Tighten the bolts to 12 N·m (106 lb in).
| 2.3. | Install the oil cooler hose bracket bolt (1). |
Tighten
Tighten the bolt to 25 N·m (18 lb ft).
- If
equipped, install the engine shield.
- Install the engine shield bolts.
Tighten
Tighten the bolts to 20 N·m (15 lb ft).
Important:
| • | Ensure the oil cooler line being installed has a plastic cap on the end
that connects to the quick connect fitting. If no plastic cap exists, or the plastic
cap is damaged, obtain a new cap. Install the cap onto the cooler line prior cooler
line installation. |
| • | Do not use the plastic cap in order to install the cooler line into the
fitting. |
- If equipped with a 8.1L engine perform the following:
- Install the oil cooler hoses to the clip.
Important:
| • | Ensure the oil cooler line being installed has a plastic cap on the end
that connects to the quick connect fitting. If no plastic cap exists, or the plastic
cap is damaged, obtain a new cap. Install the cap onto the cooler line prior cooler
line installation. |
| • | Do not use the plastic cap in order to install the cooler line into the
fitting. |
- If equipped with a 5.3L or 6.0L engine, perform the following:
| • | Install the oil cooler hoses to the hose clip on the fan shroud. |
| • | Snap the oil cooler hose clip shut. |
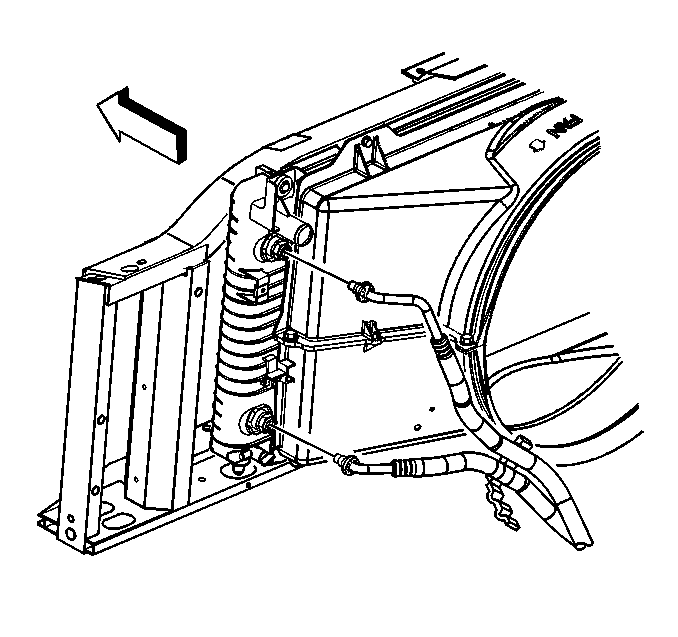
- Install the oil cooler lines to the radiator. Refer to
Engine Oil Cooler Pipe/Hose Quick Connect Fitting
.
Engine Oil Cooler Hose/Pipe Replacement 4WD
Removal Procedure
The optional oil cooler is either an integral part of the radiator or a separate
unit placed in front of the radiator. The cooler lines and hoses are serviceable.
- Disconnect the engine oil cooler quick connect
fittings. Refer to
Engine Oil Cooler Pipe/Hose Quick Connect Fitting
.
- If equipped with a 5.3L or 6.0L engine, perform the following:
| 2.1. | Open the oil cooler hose clip located on the lower fan shroud. |
| 2.2. | Remove the oil cooler hoses from the clip. |
- Raise and suitably support the vehicle. Refer to
Lifting and Jacking the Vehicle
.
- If equipped with a 8.1L engine, perform
the following:
- Remove the oil cooler hoses from the clip.
- Raise and suitably support the vehicle. Refer to
Lifting and Jacking the Vehicle
.
- Place a jack or utility stands at the rear of the vehicle.
- If equipped, remove the engine protection shield. Refer to
Engine Protection Shield Replacement
.
- If equipped, remove the front differential carrier shield. Refer to
Shield Replacement
.
- Place an adjustable jack under the front
differential carrier.
- Remove the inner axle housing nuts and washers from the bracket.
- Remove the differential carrier upper mounting
bolt and nut.
- Pivot the differential carrier forward and down on the lower mount bolt
while it is being supported by the adjustable jack.
- Secure the differential carrier to the jack.
- Remove the differential carrier lower mounting
bolt and nut.
- Lower the jack 4-6 inches.
- If equipped with a 5.3L or 6.0L engine,
perform the following:
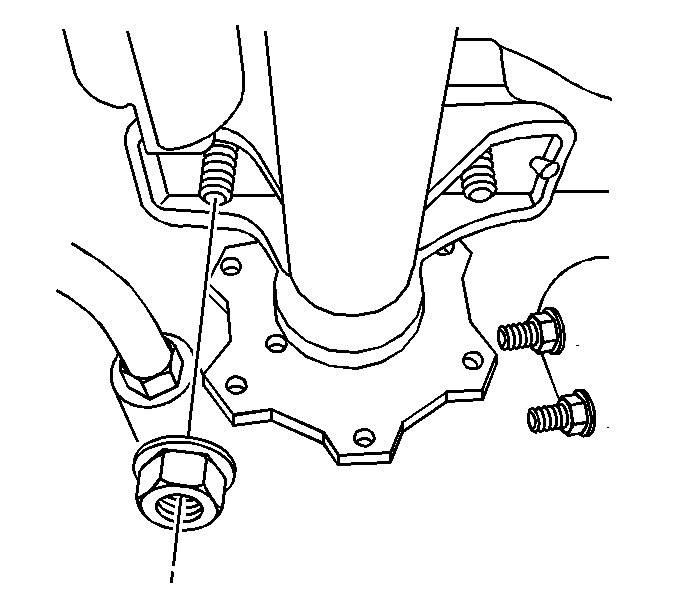
| 17.1. | Remove the oil cooler hose bracket bolt (1). |
| 17.2. | Remove the oil cooler hose adapter bolts (2). |
| 17.3. | Remove the oil cooler hose assembly and gasket. Discard the gasket. |
| 17.4. | Inspect the fittings, connectors, and cooler hoses for damage or distortion. |
- If equipped with a 8.1L engine, perform
the following:
| 18.1. | Remove the oil cooler hose bracket bolt. |
| 18.2. | Disconnect the quick connect fittings (1) at the engine. |
| 18.3. | Remove the oil cooler hose assembly. Discard the gasket. |
| 18.4. | Inspect the fittings, connectors, and cooler hoses for damage or distortion. |
Installation Procedure
Important: A distinct
snap should be heard when assembling the tube ends of the hose assembly to quick connectors.
To ensure the tube is fully inserted into the connector, check by giving the tube
a forceful pull.
- If equipped with a 8.1L engine, perform the following:
| 1.1. | Remove the oil cooler hose assembly and a NEW gasket. |
| 1.2. | Connect the quick connect fittings (1) at the engine. |
Notice: Refer to Fastener Notice in the Preface section.
| 1.3. | Install the oil cooler hose bracket bolt. |
Tighten
Tighten the bolt to 50 N·m (37 lb ft).
- If equipped with a 5.3L or 6.0L engine,
perform the following:
| 2.1. | Install the oil cooler hose assembly and a NEW gasket. |
| 2.2. | Install the oil cooler hose adapter bolts (2). |
Tighten
Tighten the bolts to 12 N·m (106 lb in).
| 2.3. | Install the oil cooler hose bracket bolt (1). |
Tighten
Tighten the bolt to 25 N·m (18 lb ft).
- Raise the jack in order to position the
differential carrier.
- Install the differential carrier lower mounting bolt and nut while it
is being supported by the jack.
- Pivot the differential carrier up and back on the lower mount bolt while
it is being supported by the jack.
- Install the differential carrier upper mounting
bolt and nut. Do not tighten the bolt at this time.
- Install the inner axle housing washers and
nuts to the brackets.
Tighten
| • | The inner axle housing bolts to 100 N·m (75 lb ft). |
| • | The upper and lower differential carrier bolts to 100 N·m
(75 lb ft). |
- Remove the adjustable jack from under the front differential carrier.
- If equipped, install the front differential carrier shield. Refer to
Shield Replacement
.
- If equipped, install the engine protection shield. Refer to
Engine Protection Shield Replacement
.
- Remove the jack or utility stand from the rear of the vehicle.
- Lower the vehicle.
Important:
| • | Ensure the oil cooler line being installed has a plastic cap on the end
that connects to the quick connect fitting. If no plastic cap exists, or the plastic
cap is damaged, obtain a new cap. Install the cap onto the cooler line prior cooler
line installation. |
| • | Do not use the plastic cap in order to install the cooler line into the
fitting. |
- If equipped with a 8.1L engine, perform the following:
- Install the oil cooler hoses to the clip.
Important:
| • | Ensure the oil cooler line being installed has a plastic cap on the end
that connects to the quick connect fitting. If no plastic cap exists, or the plastic
cap is damaged, obtain a new cap. Install the cap onto the cooler line prior cooler
line installation. |
| • | Do not use the plastic cap in order to install the cooler line into the
fitting. |
- If equipped with a 5.3L or 6.0L engine, perform the following:
| 15.1. | Install the oil cooler hoses to the hose clip on the fan shroud. |
| 15.2. | Snap the oil cooler hose clip shut. |
- Install the oil cooler lines to the radiator. Refer to
Engine Oil Cooler Pipe/Hose Quick Connect Fitting
.
