Tools Required
| • | J 39055
Forward Clutch Inner Seal Protector |
| • | J 39056
Coast Clutch Seal Protector |
- Using the
J 28585
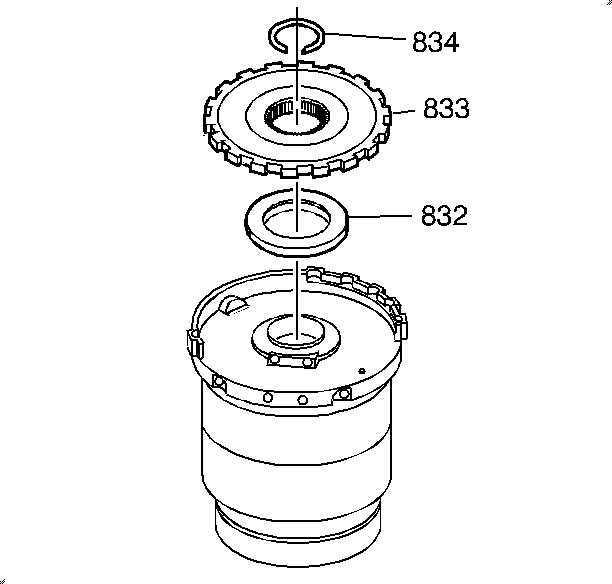
, remove the snap ring (834) from the final drive sun gear shaft.
- Remove the parking lock gear (833) and the thrust bearing (832).
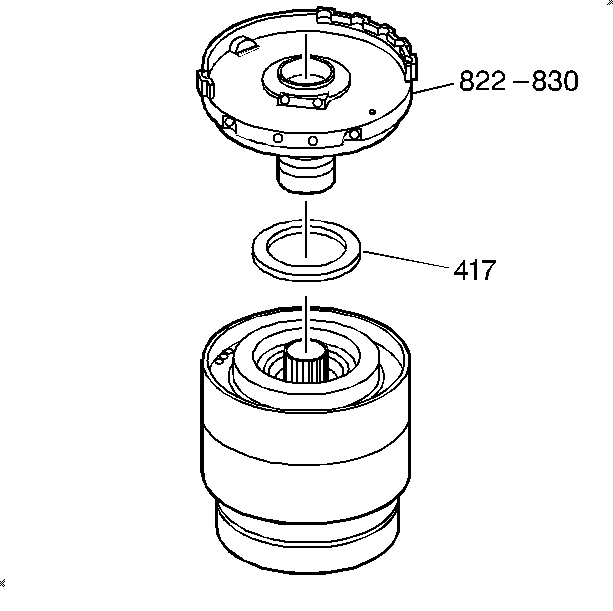
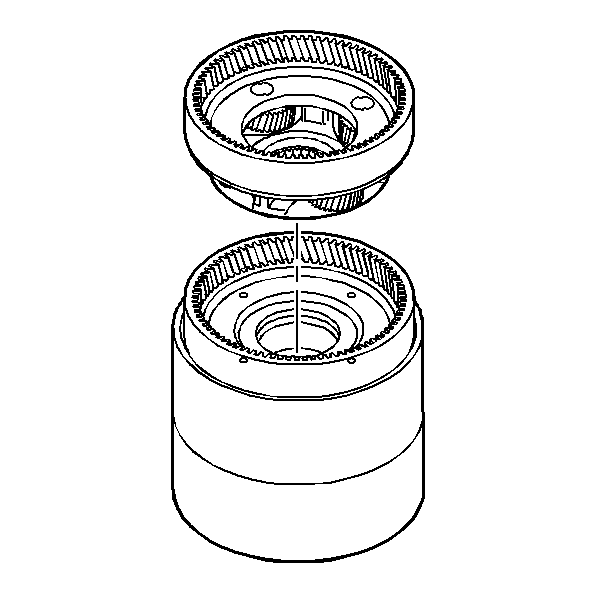
- Remove the forward and coast clutch support with the low roller clutch assembly (822-830).
- Remove the thrust bearing (417).
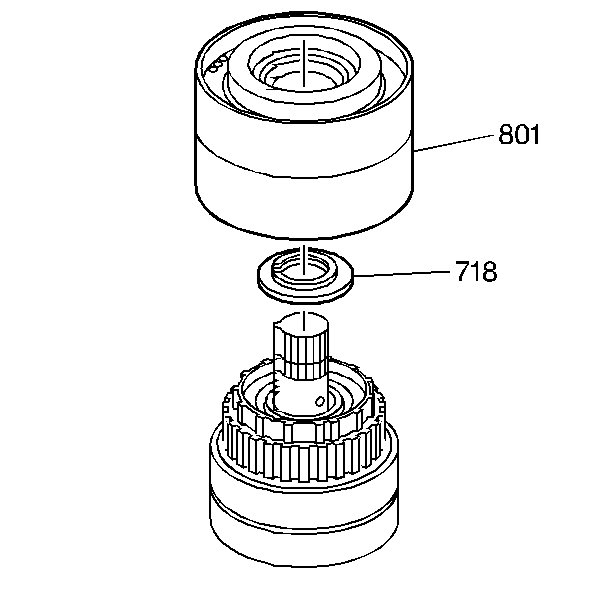
- Lift the forward and coast clutch housing (801) off of the coast clutch hub.
- Remove the thrust bearing (718) from the forward coast clutch housing (801).
- Separate the input carrier (708) from the input internal gear and flange.
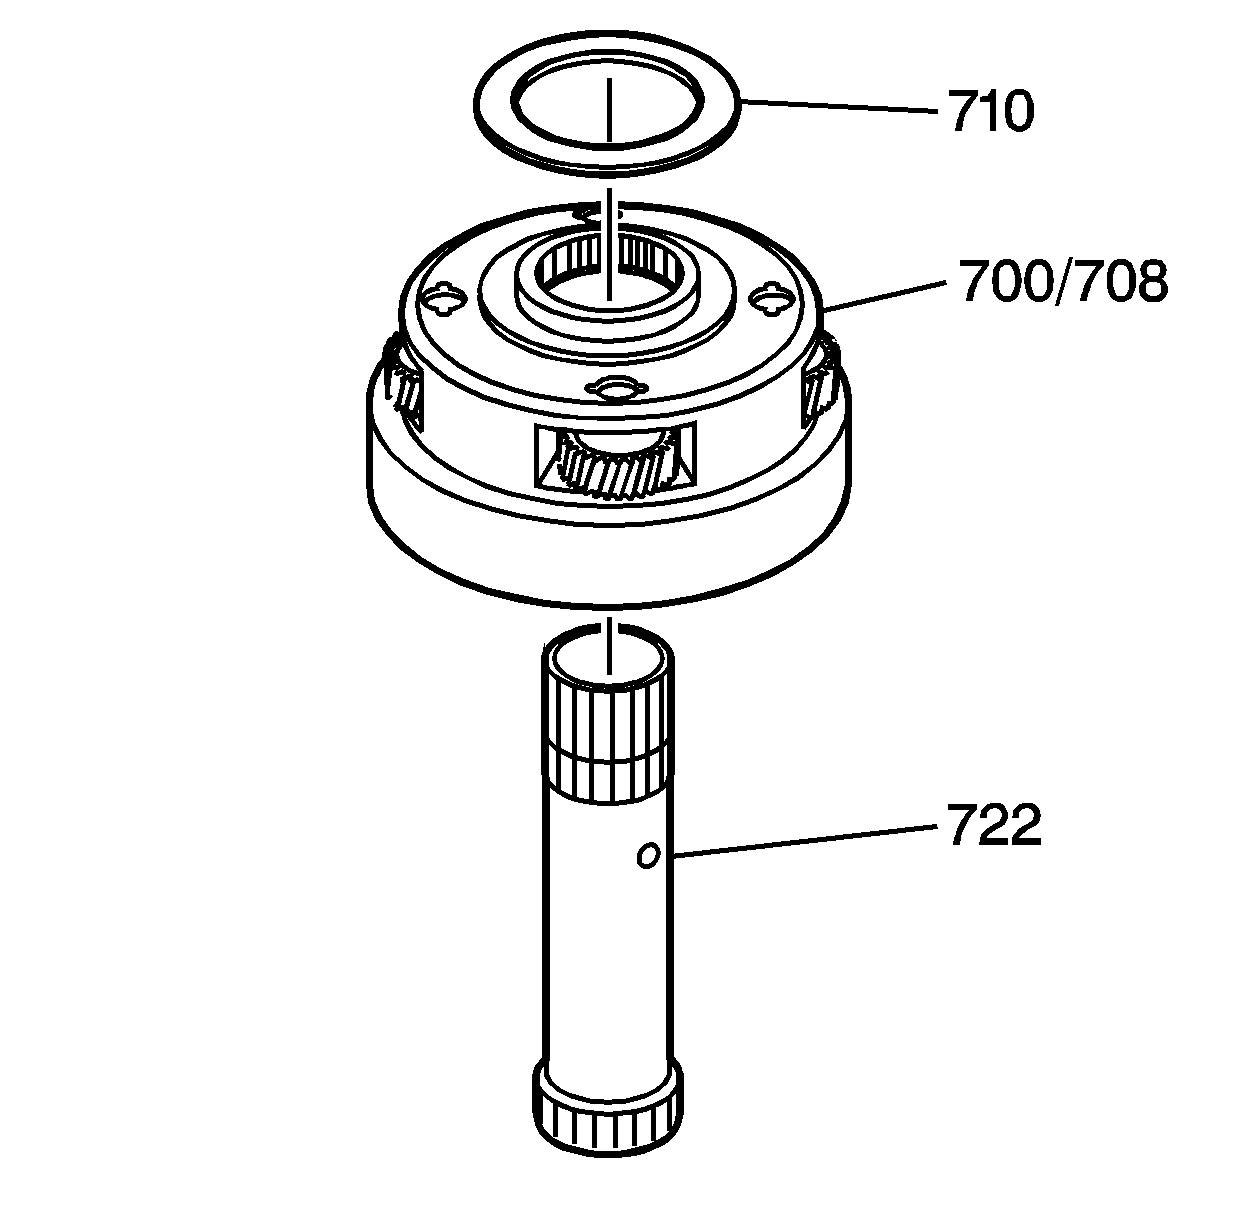
- Lift the input carrier assembly (700-708) off of the final drive sun gear shaft (722).
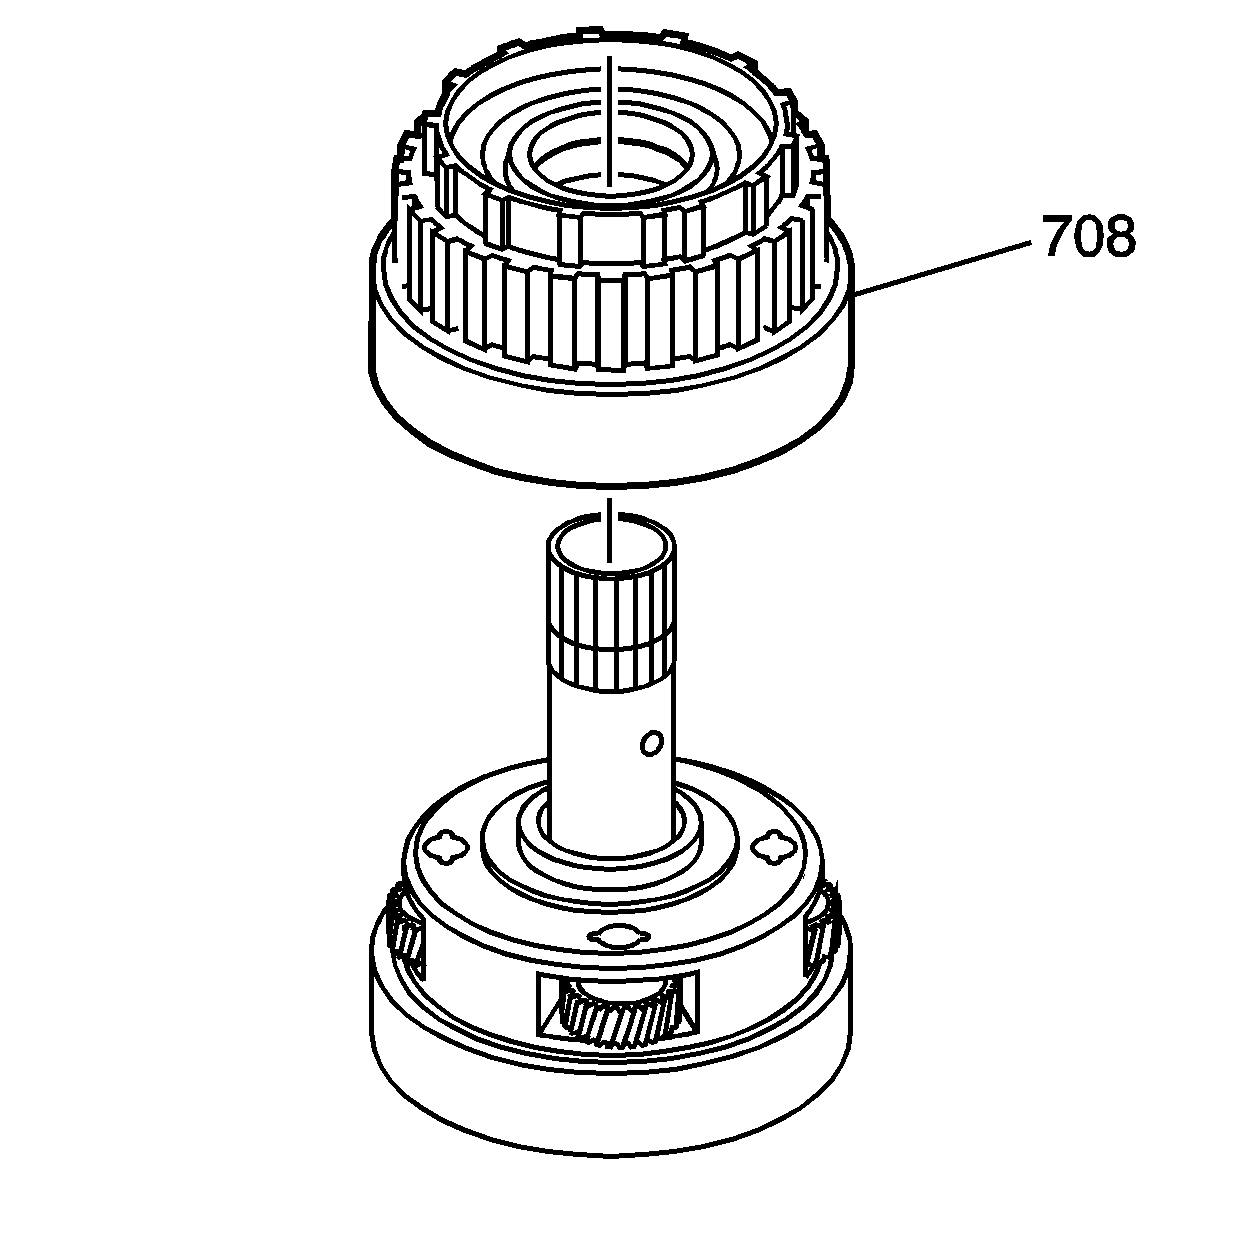
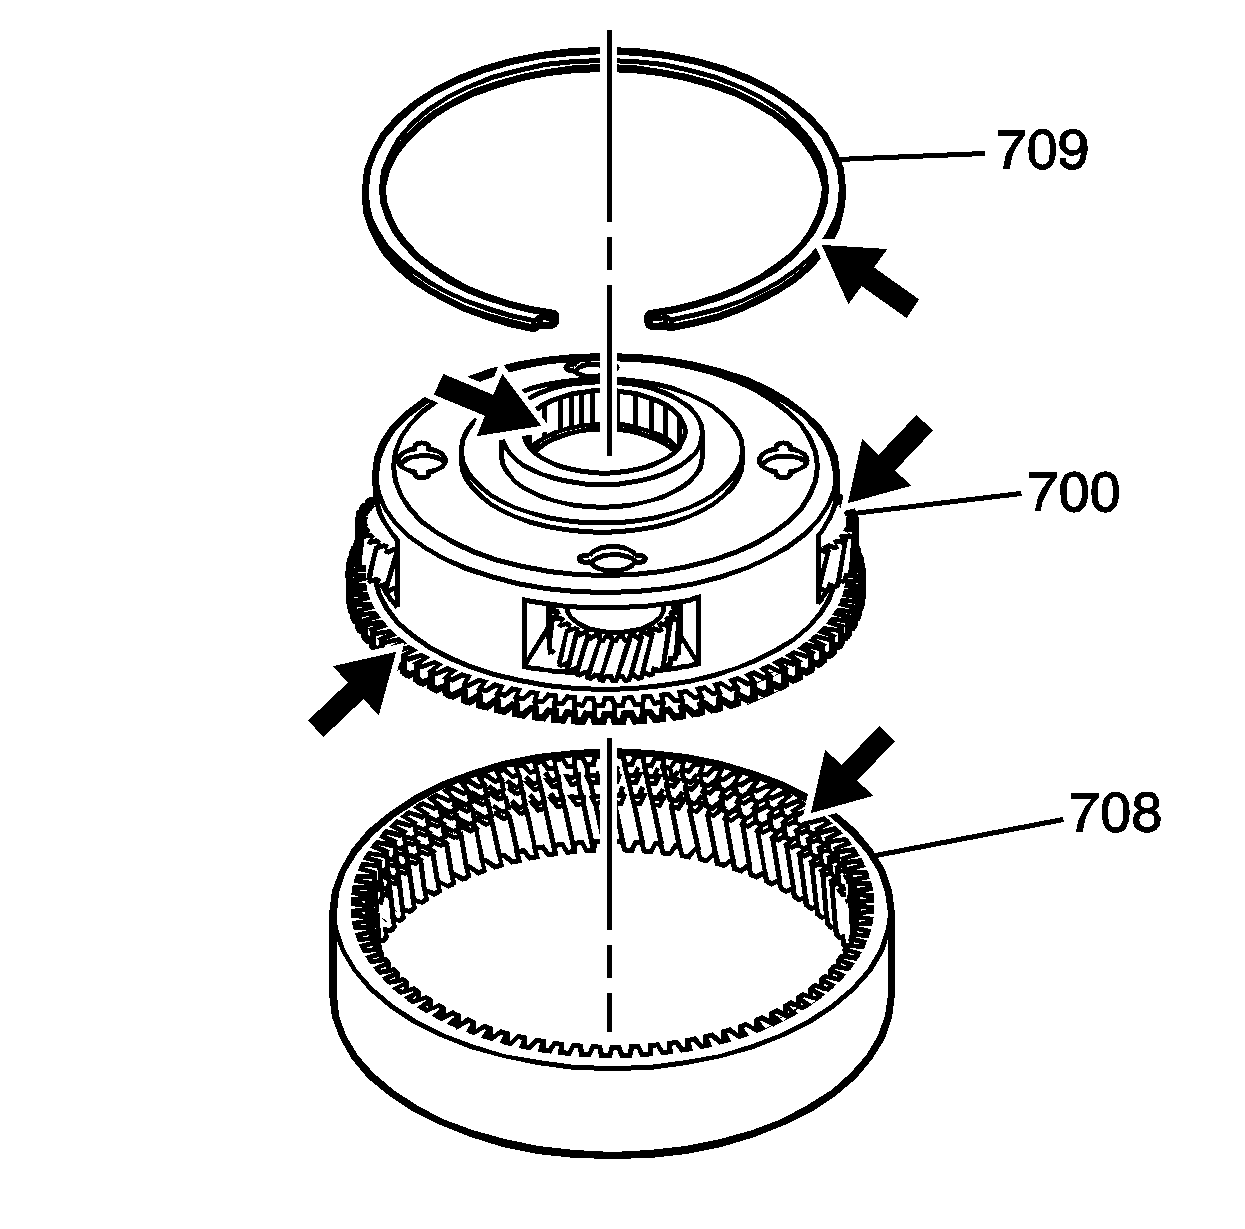
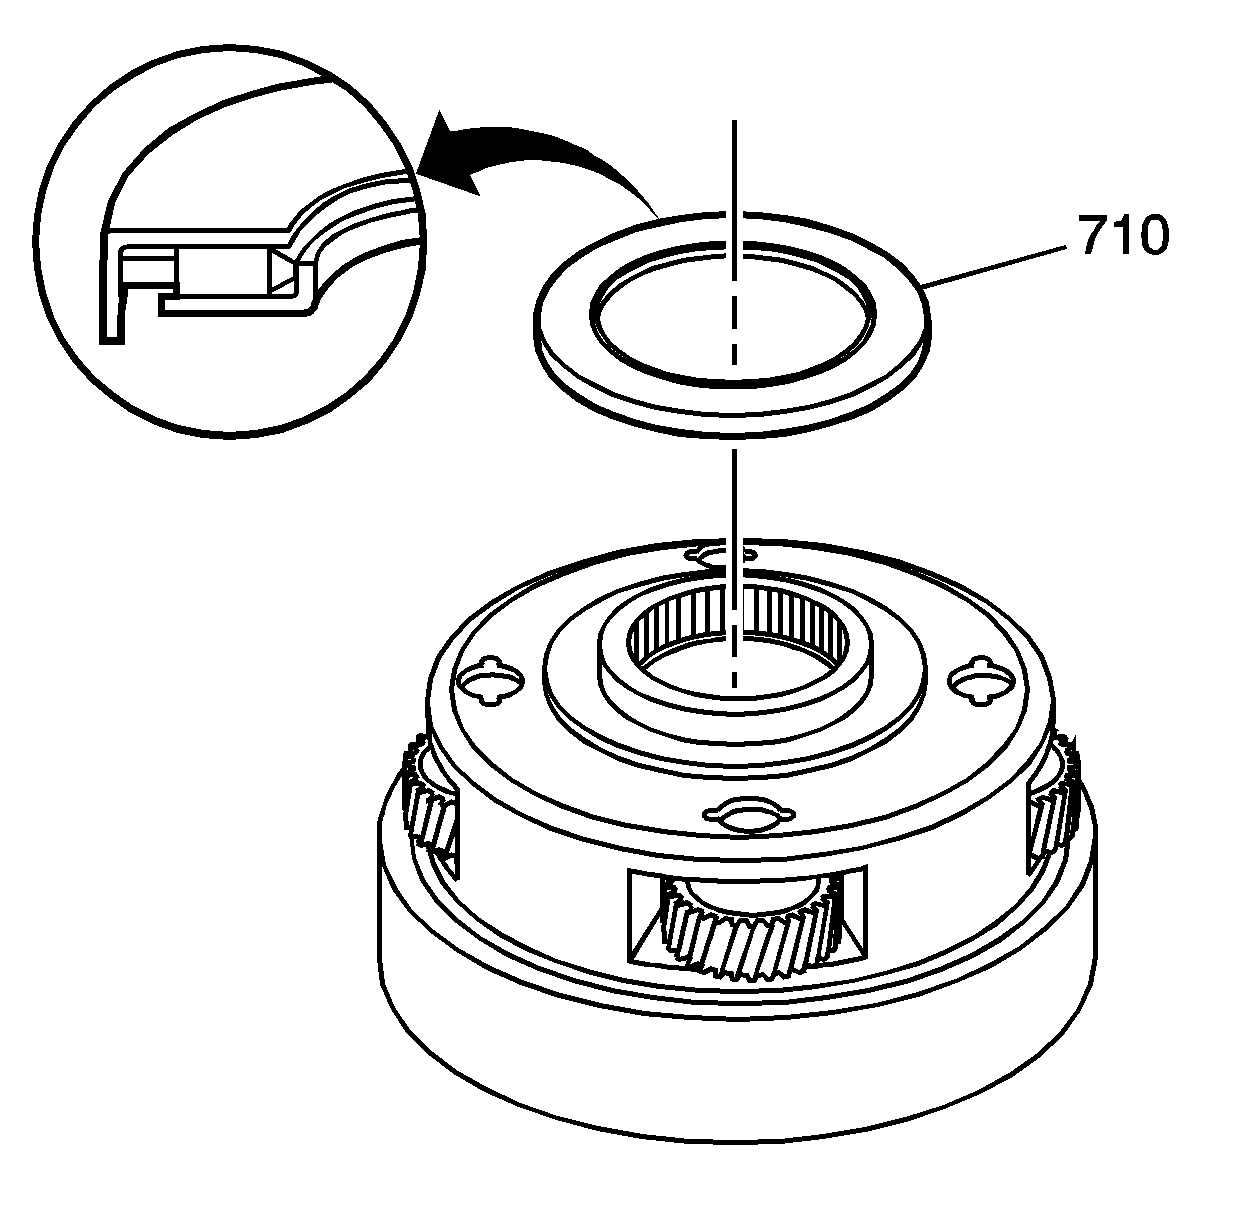
- Remove the thrust bearing (710) from the input carrier assembly (700-708).
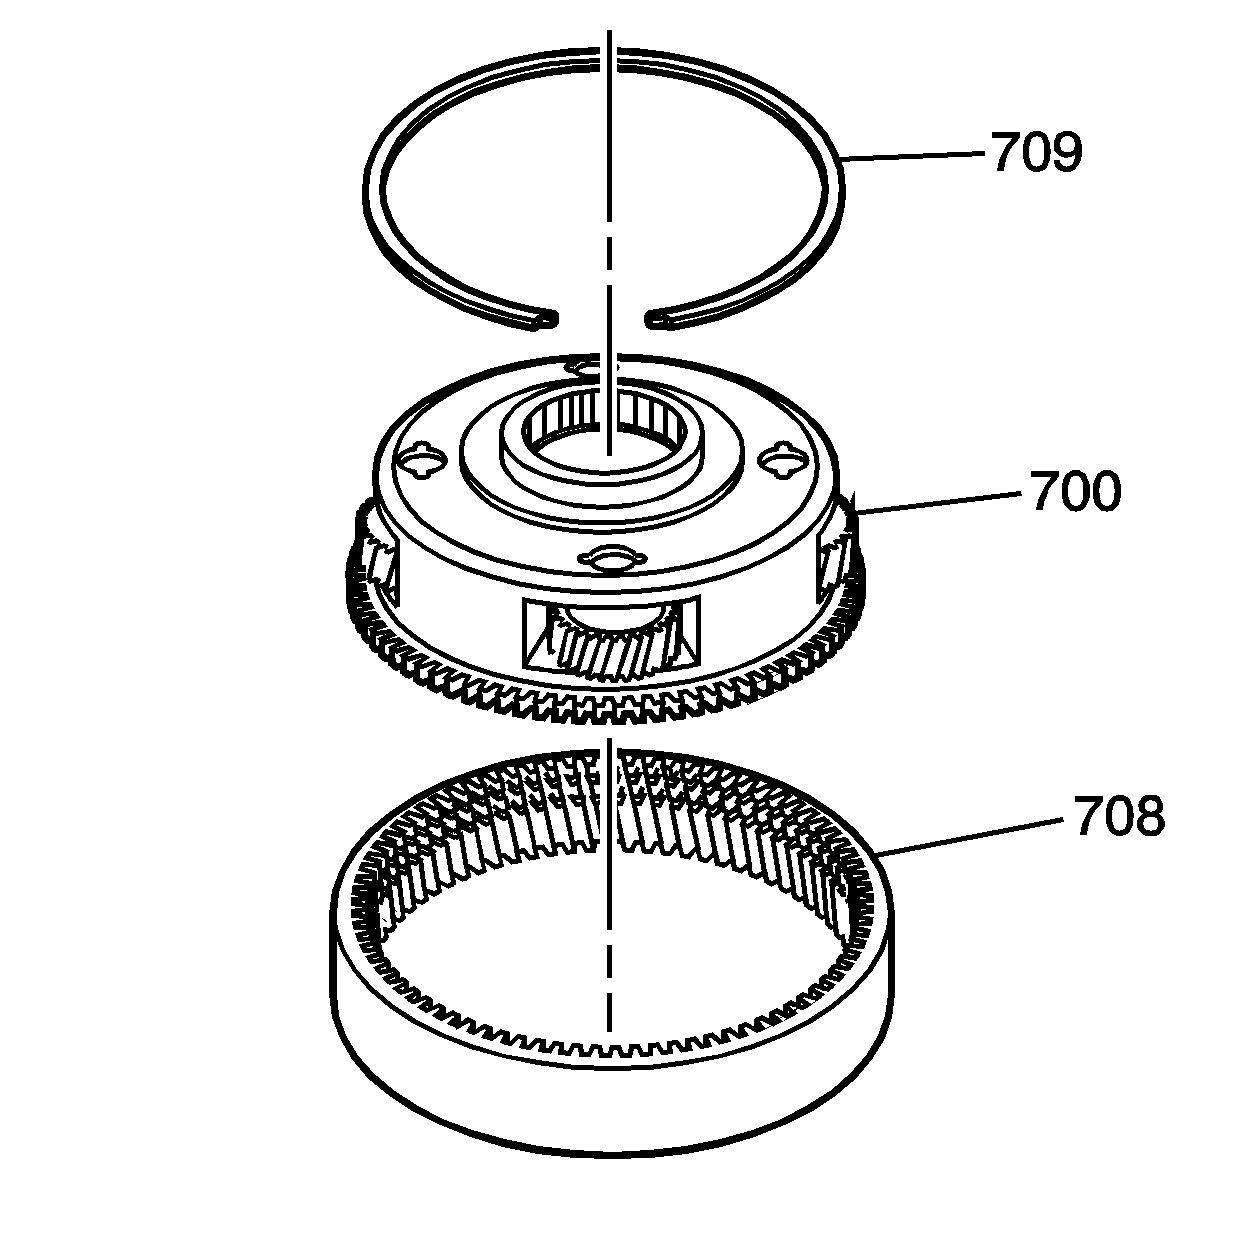
- Remove the snap ring (709) in order to separate the input carrier (700) from the reaction internal gear (708). The thrust bearing will stay inside of the
input carrier (700).
- Inspect the snap ring (709) for burrs or damage.
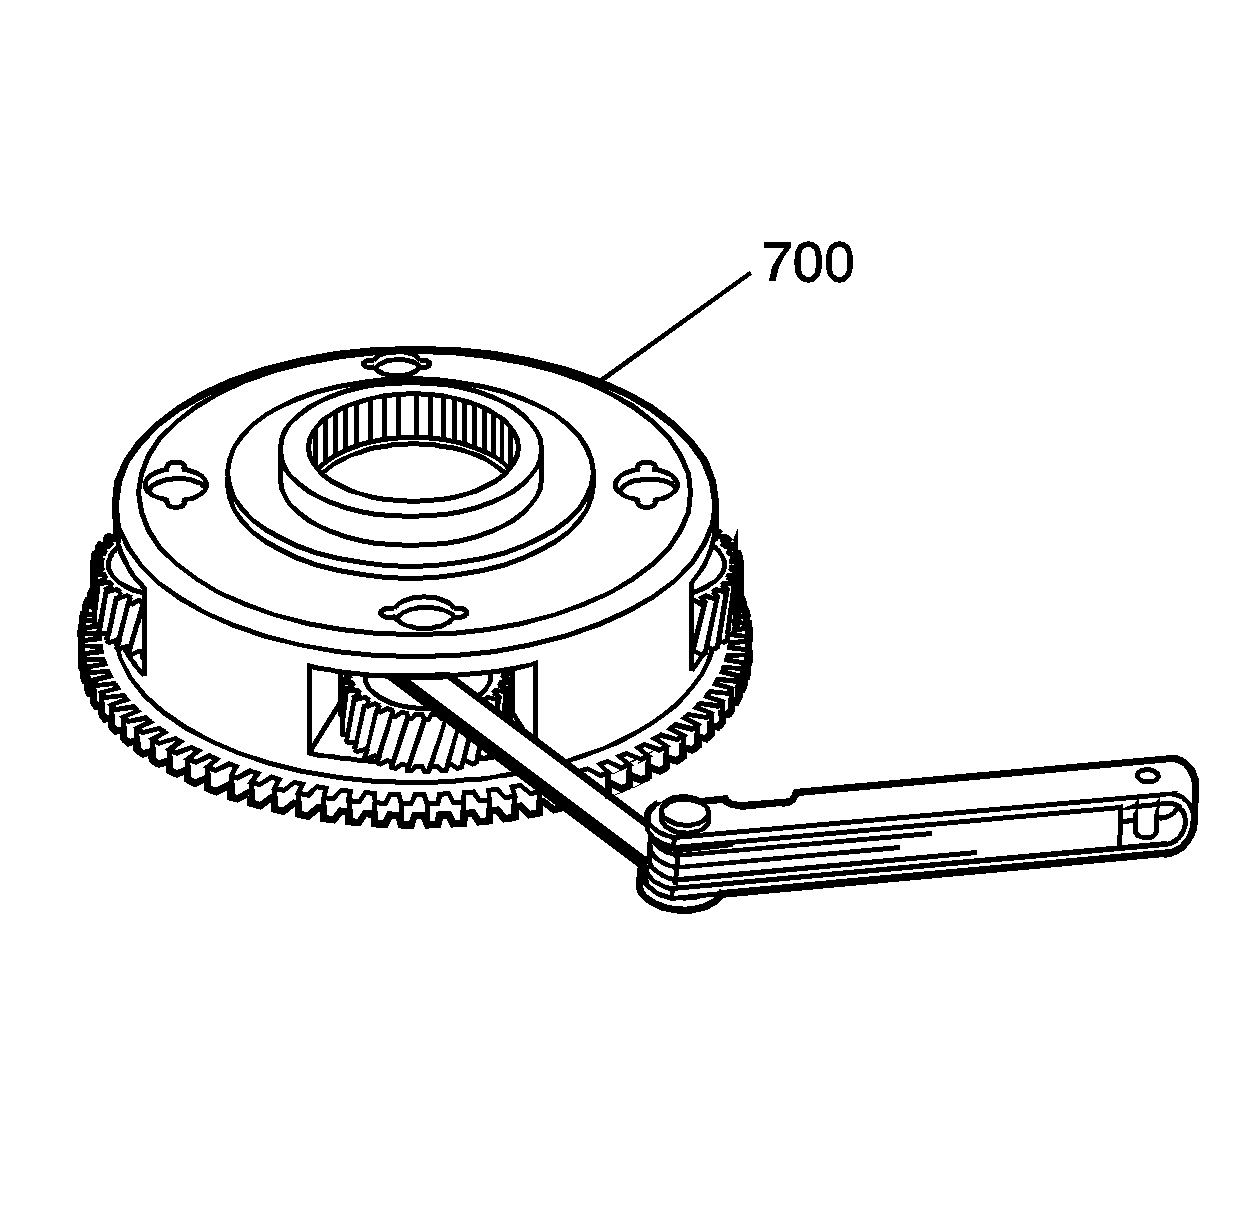
- Inspect the input carrier (700) pinions for nicked or broken teeth.
- Inspect the input carrier internal gear 708) for broken teeth.
- With a feeler gauge, measure the input carrier (700) end play. The end play should be within a range of 0.09-0.90 mm (0.003-0.035 in).
- Place the input carrier assembly (700) into the reaction internal gear (708).
- Install the snap ring (709).
- Install the thrust bearing (710) onto the input carrier and reaction internal gear assembly.
- Remove the following parts:
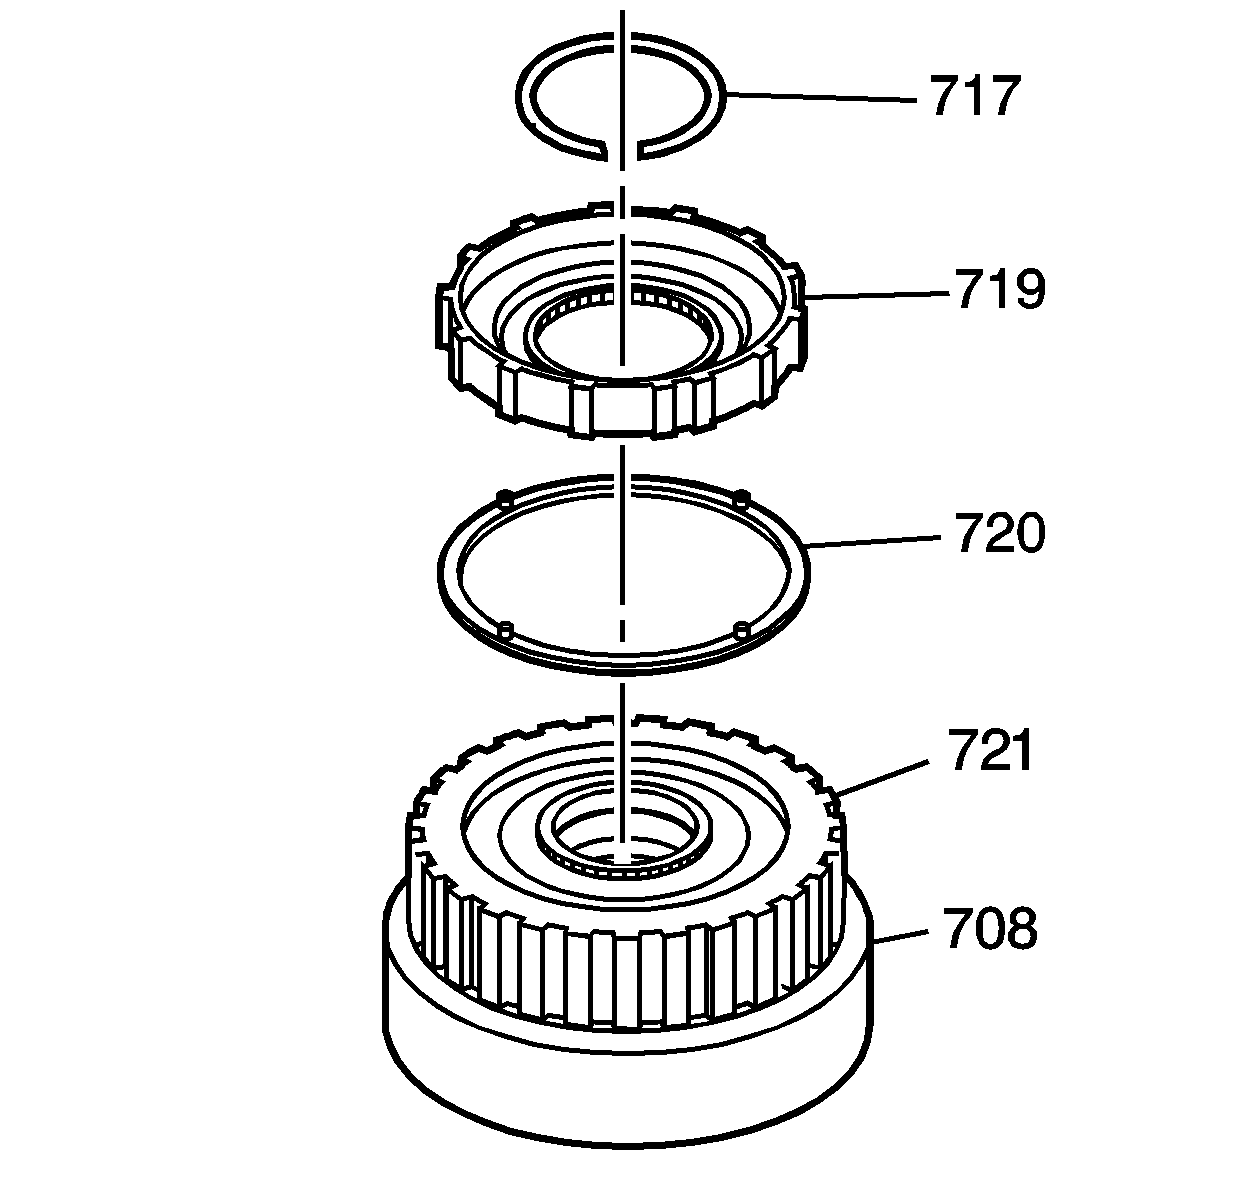
| • | The input internal gear snap ring (717) |
| • | The coast clutch hub (719) |
| • | The thrust washer (720) |
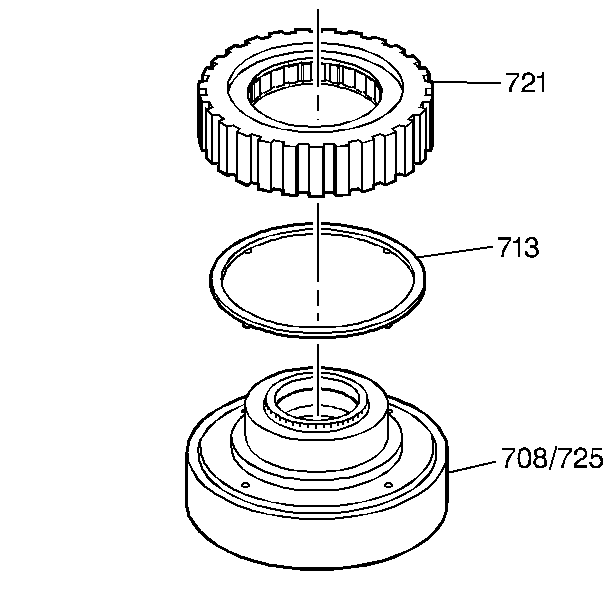
- Remove the forward sprag outer race (721) and forward sprag from the input internal gear flange (708/725). Remove the thrust washer (713).
- Remove the snap ring (709) from the input internal gear (708).
- Lift the input internal gear flange (725) from the input internal gear (708).
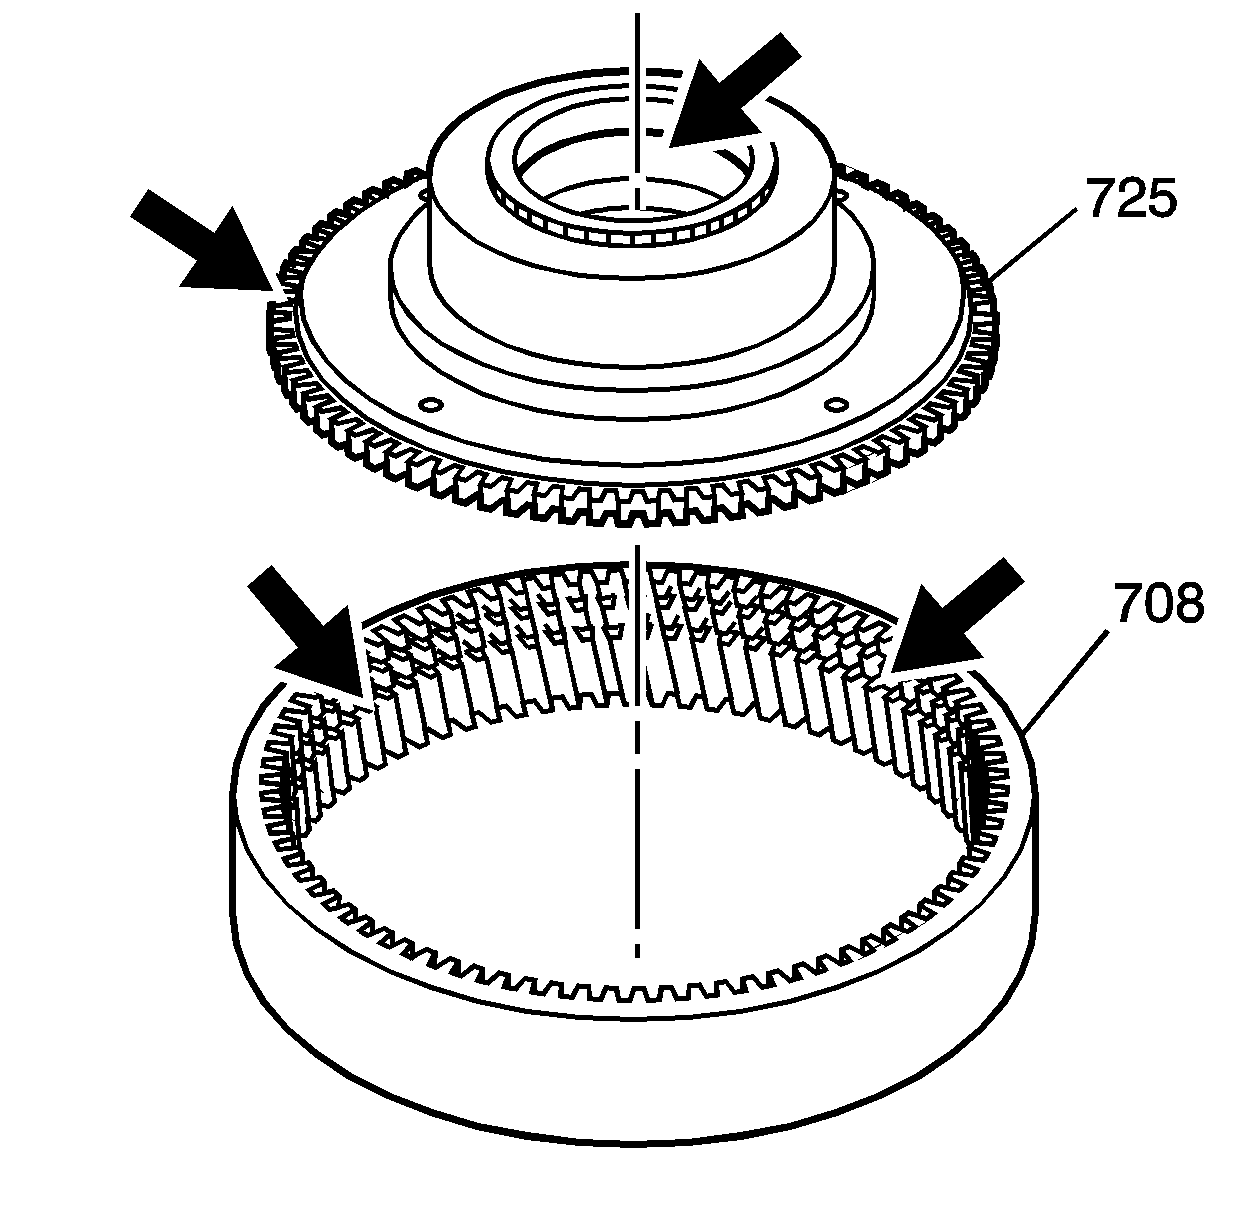
- Inspect the input internal gear flange (725) for broken teeth. Inspect the input internal gear flange bushing.
- Inspect the input internal gear (708) for nicked or broken teeth.
- Install the input internal gear flange (725) into the input internal gear (708).
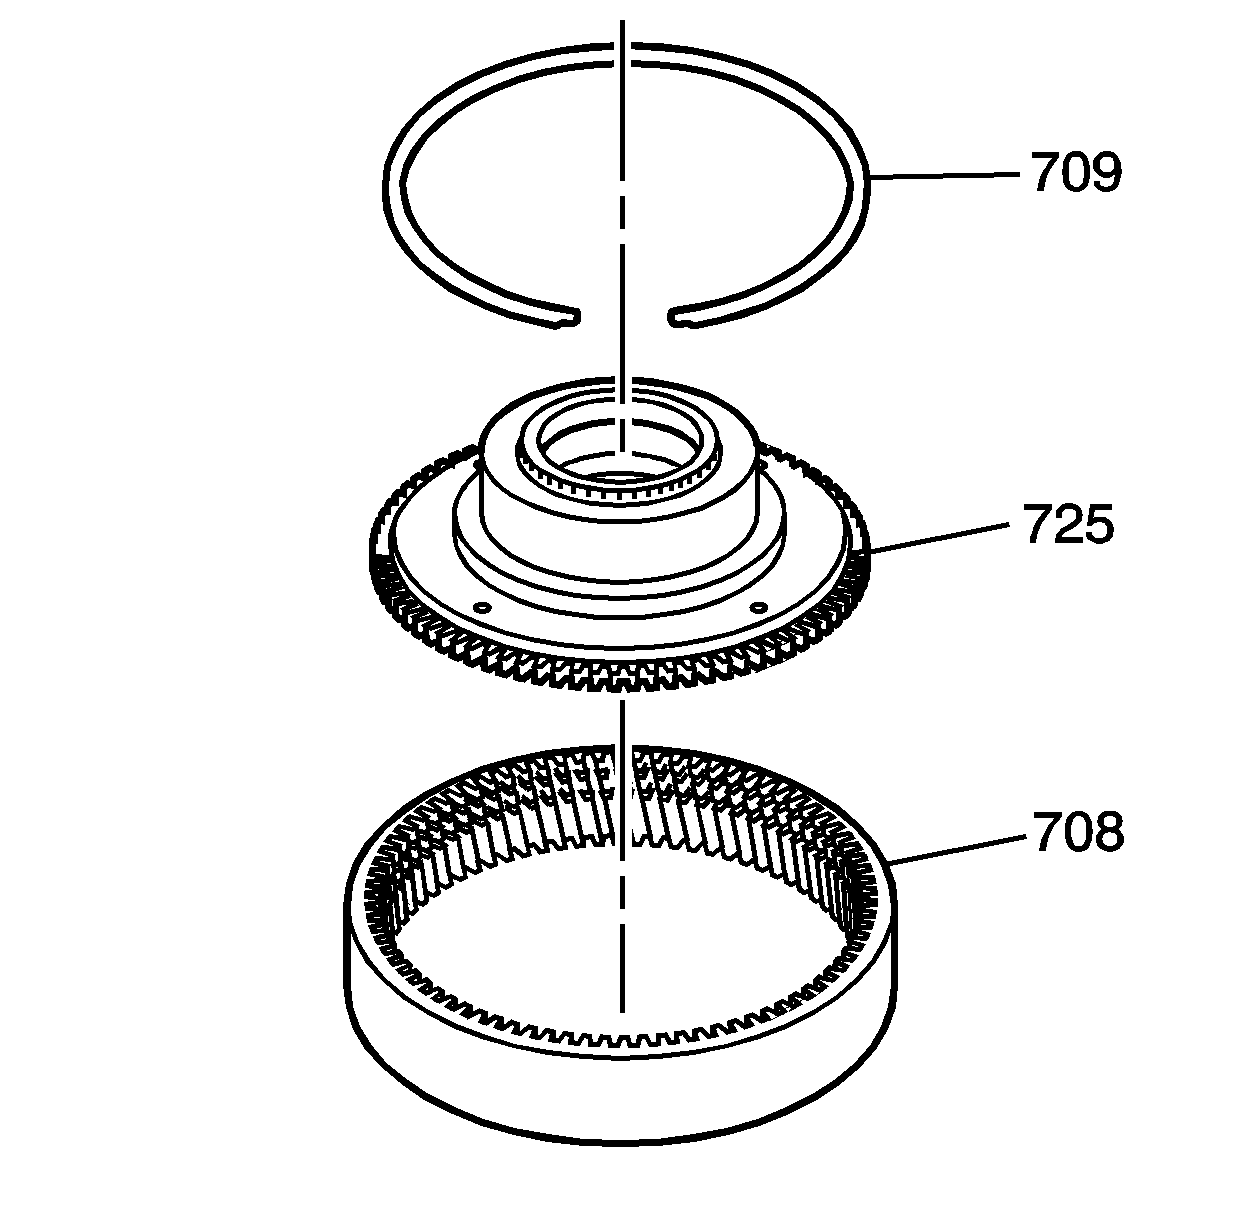
- Install the input internal gear snap ring (709).
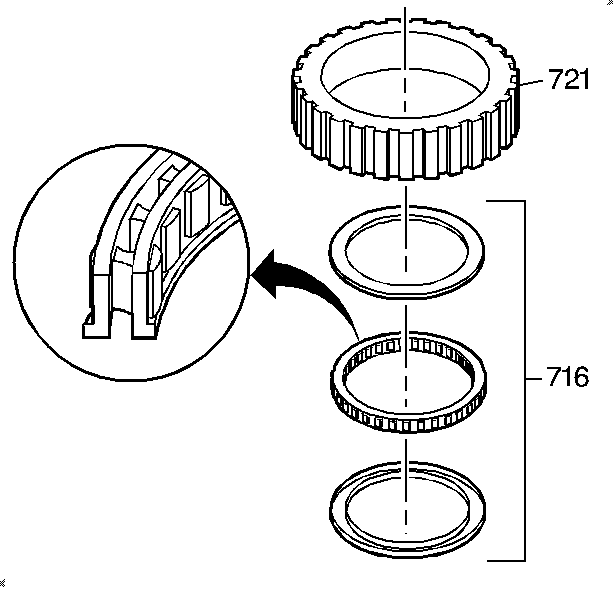
- Remove the forward sprag outer race (721).
- Disassemble the forward sprag clutch (716).
- Inspect the forward sprag (716) for the following:
| • | Damage to the inner side of the race |
Important: Oil feed holes in the forward sprag outer race must face the input internal gear.
Important: The lip on the forward sprag cage must face the input internal gear.
- Assemble the forward sprag clutch (716).
- Install the forward sprag clutch (716) into the forward sprag outer race (721).
- Install the thrust washer (713) onto the input internal gear flange (708/725).
- Install the forward sprag and outer race (721) onto the input internal gear flange (708/725).
- Check that the forward sprag rotation freewheels in a counterclockwise direction.
- Install the thrust washer (720) onto the coast clutch hub (719).
- Install the coast clutch hub (719) onto the input internal gear flange (708).
- Install the snap ring (717) onto the input internal gear flange (708).
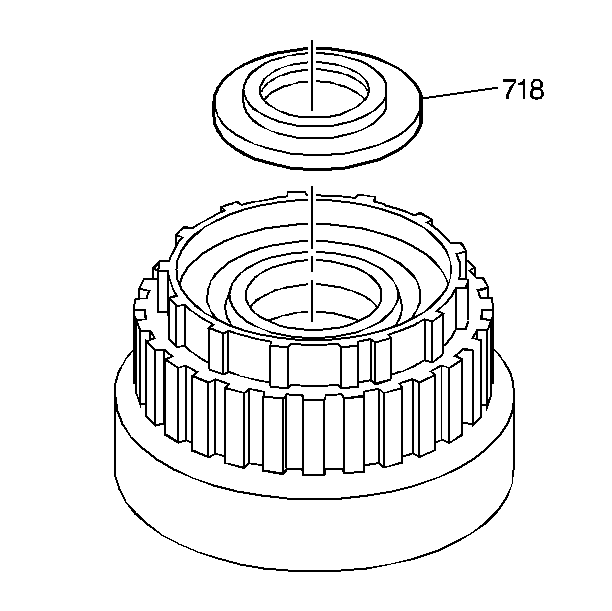
- Install the thrust bearing (718) onto the coast clutch hub.
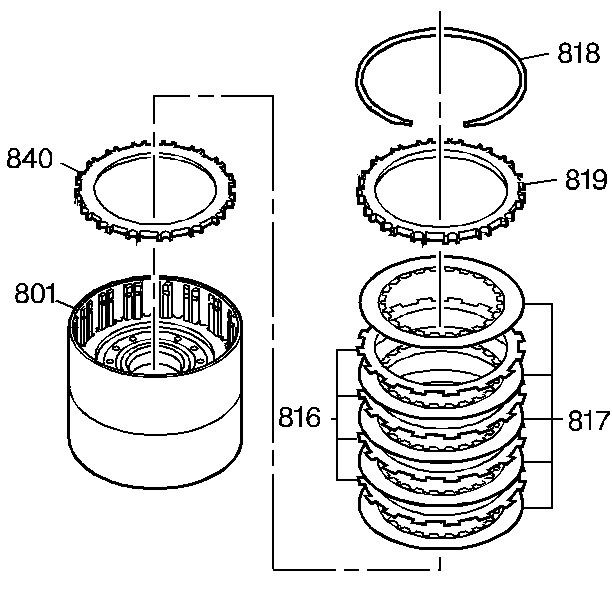
- Remove the forward and coast clutch housing snap ring (818).
- Remove the forward and coast clutch backing plate (819), and all of the forward clutch fiber (817) and steel (816) plates. Remove the apply plate (840).
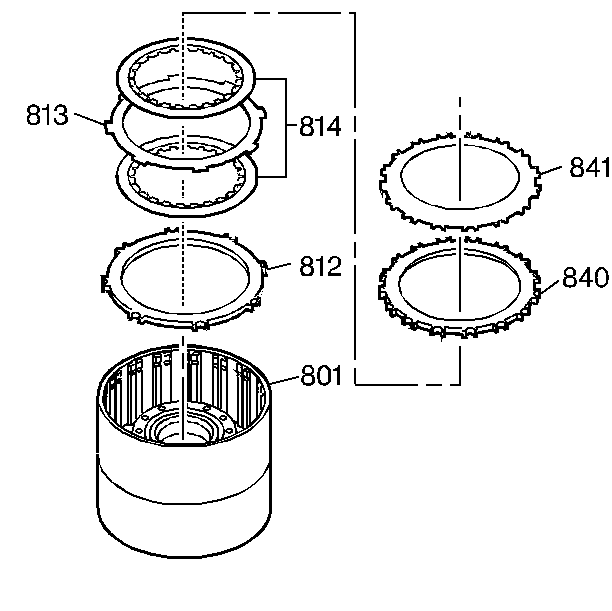
- Remove the forward and coast clutch belleville plate (841) and backing plate (840).
- Remove the coast clutch fiber (814) and steel (813) plates. Remove the apply plate (812).
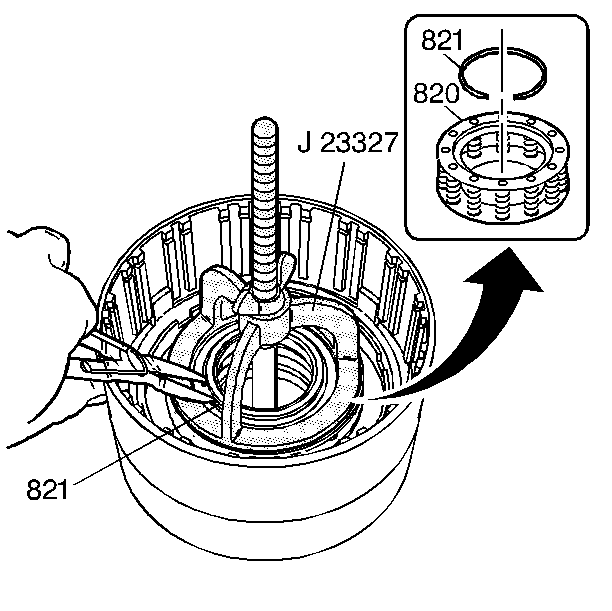
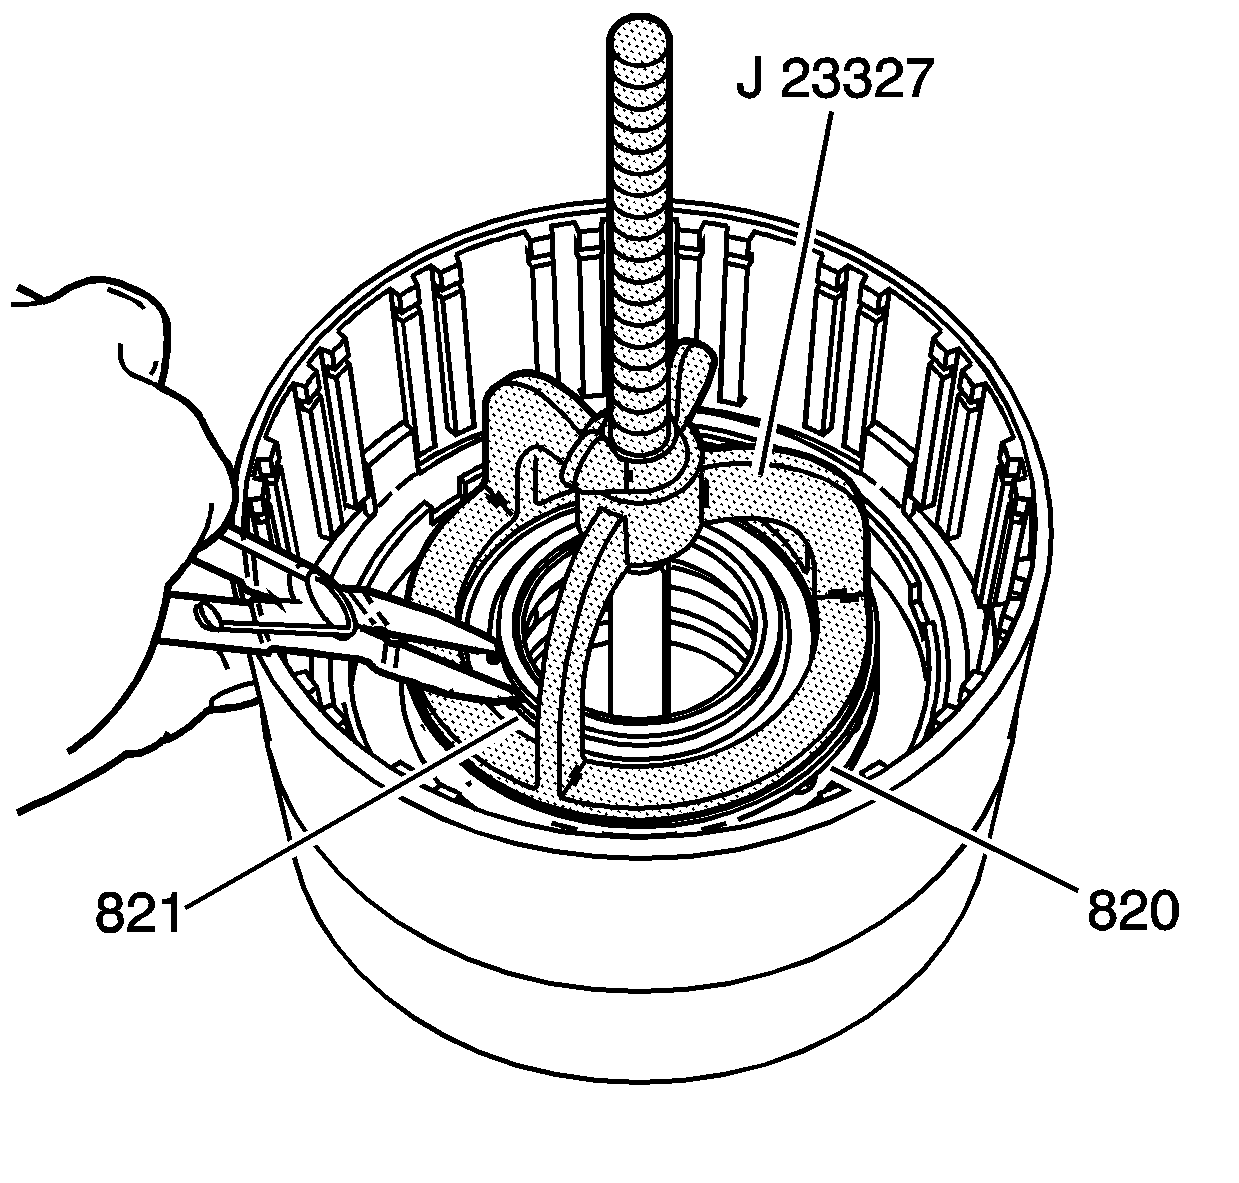
- Using the
J 23327
, compress the spring and retainer assembly (820).
Important: Do not overexpand the snap ring.
- Remove the snap ring (821).
- Remove the
J 23327
.
- Remove the spring and retainer assembly (820).
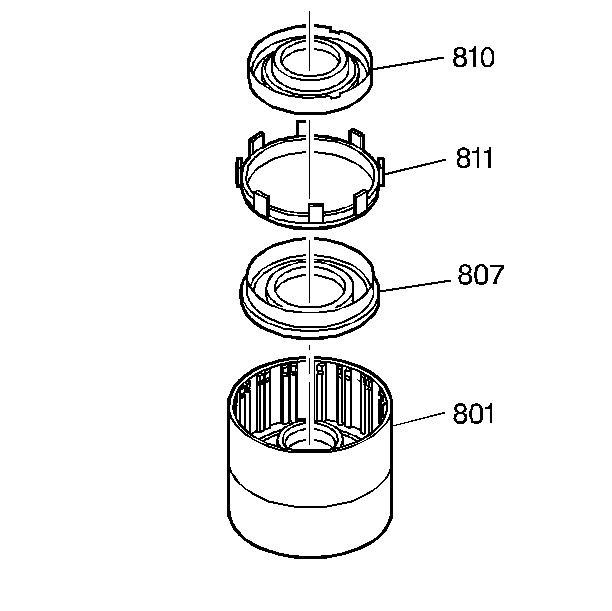
- Remove the coast clutch piston assembly (810).
- Remove the apply ring (811). Remove the forward clutch piston and seals assembly (807).
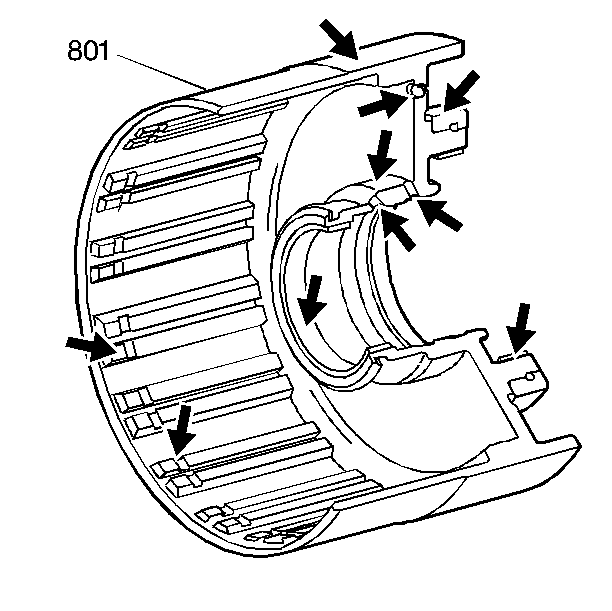
- Inspect the forward and coast clutch housing (801) for the following:
| • | Feed passages that are plugged |
| • | Splines that are worn or damaged |
| • | Bushings for excessive wear |
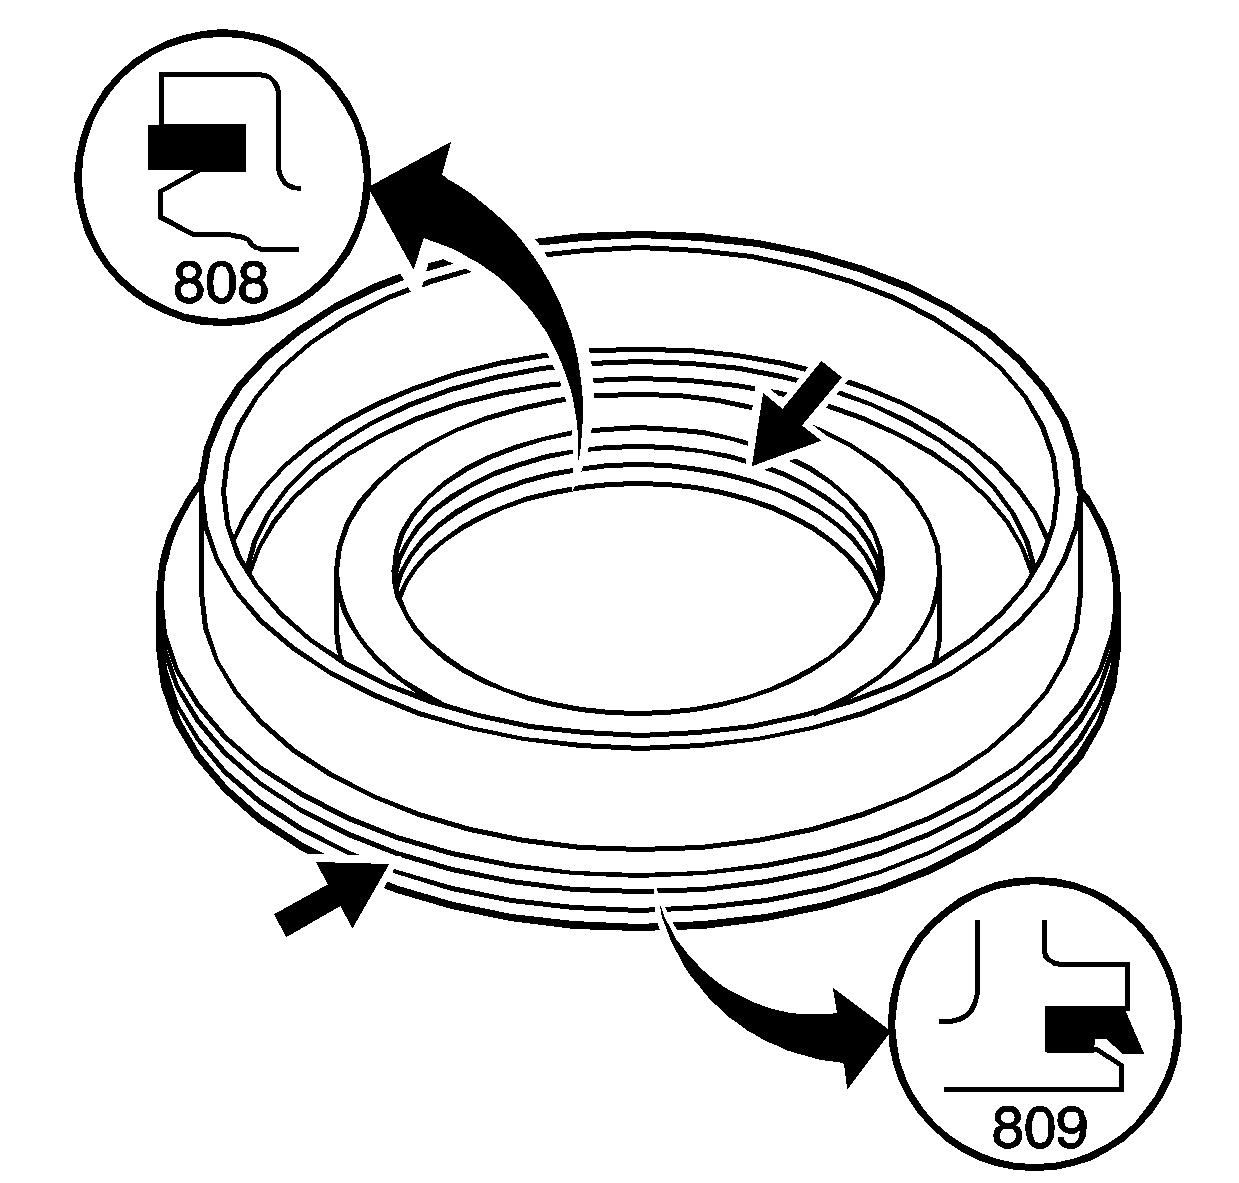
- Inspect the forward clutch piston seals (808, 809) for damage. If the seals are damaged, replace the
piston.
- Inspect the forward clutch piston for cracks or damage to the seal grooves.
- Install the new piston seals onto the forward clutch piston (807). Make sure that the outer seal does not roll backwards.
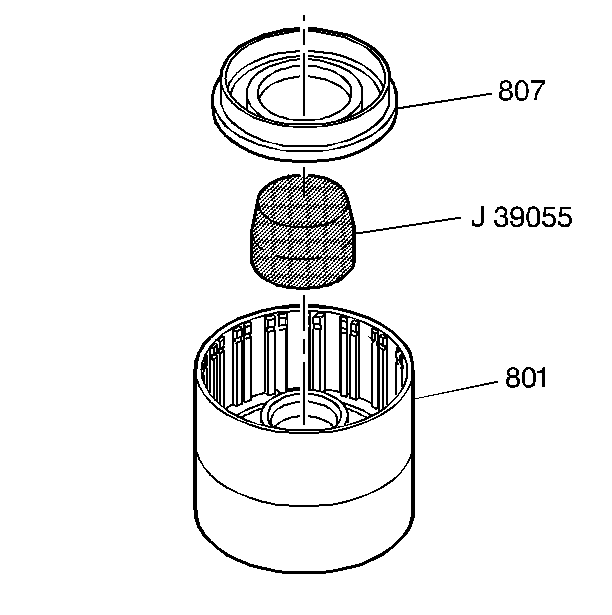
- Using the
J 39055
, install the forward clutch piston (807) into the forward and coast clutch housing (801).
- Remove the
J 39055
.
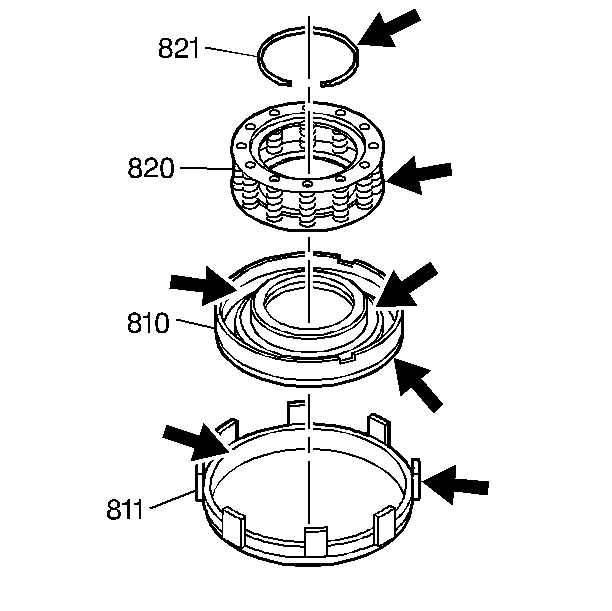
- Inspect the snap ring (821) for damage.
- Inspect the spring and retainer assembly (820) for a damaged cage and distorted or missing springs.
- Inspect the coast clutch piston assembly (810) for damage.
- Inspect the apply ring (811) for damage.
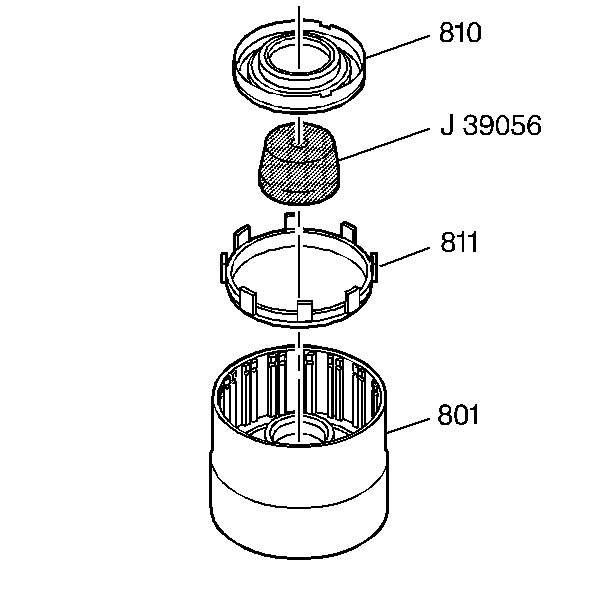
- Install the apply ring (811) into the forward and coast clutch housing (801).
- Using the
J 39056
, install the coast clutch piston assembly into the coast clutch housing. Make sure that the outer seal does not roll backwards.
- Remove the
J 39056
.
- Install the spring and retainer assembly (820) into the forward and coast clutch housing.
- Using the
J 23327
, compress the spring and retainer assembly (820). Install the snap ring (821).
- Remove the
J 23327
.
- Install the coast clutch apply plate (812) into the forward and coast clutch housing (801).
- Install the coast clutch fiber (814) and steel (813) plates.
- Install the forward and coast clutch plate (840), and the forward and coast clutch belleville plate (841).
- Install the forward and coast clutch plate (840)
- Install all of the forward clutch fiber (817) and steel (816) plates.
- Install the forward clutch backing plate (819).
- Install the snap ring (818).
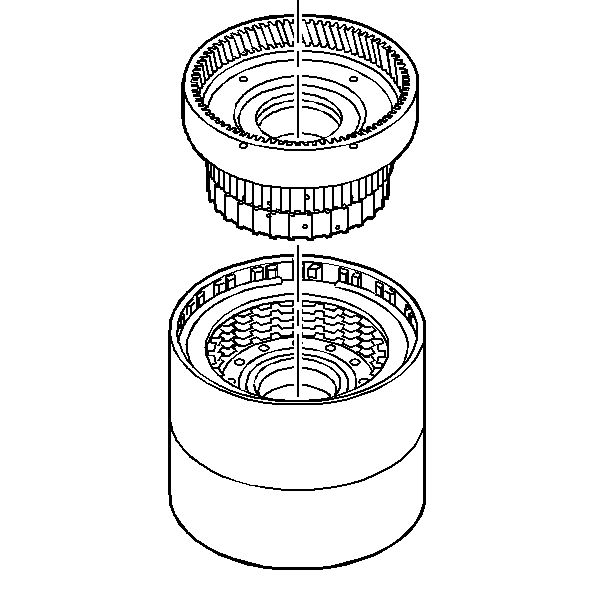
- Install the coast clutch hub with the thrust bearing, the forward sprag race, and the input internal gear and flange into the forward and coast clutch housing.
- When the splines on the hubs are properly engaged, the bushing on the input carrier will drop below the forward and coast clutch support hub, producing a dull metal sound.
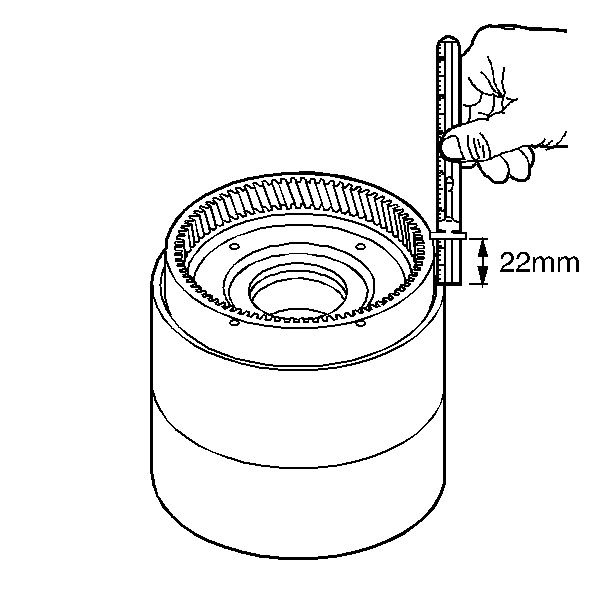
The distance from the top edge of the forward and coast clutch housing to the top edge of the input internal gear is approximately 22 mm (0.886 in).
- Install the input carrier and reaction internal gear with the thrust bearing onto the input internal gear.
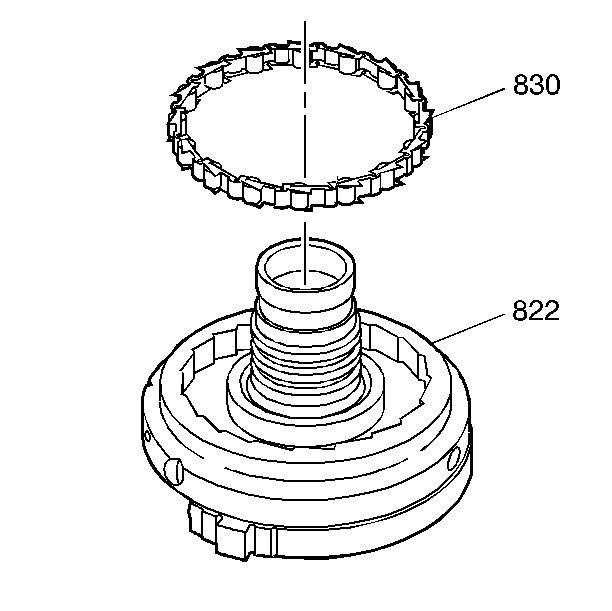
- Remove the low roller clutch assembly (830) from the forward and coast clutch support (822).
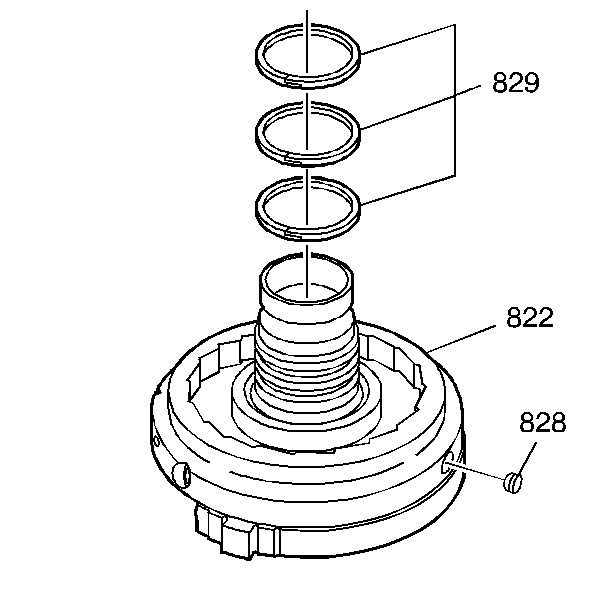
- Remove the three oil seal rings (829) from the forward and coast clutch support (822).
- Remove the cooler return seal (828).
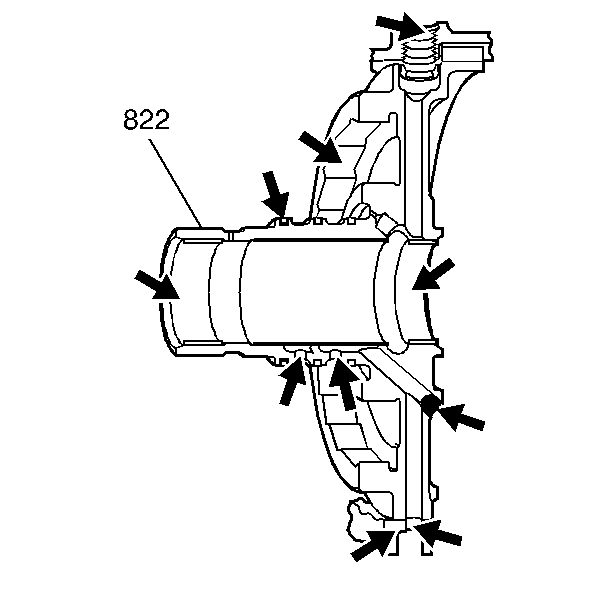
- Inspect the forward and coast clutch support (822) for the following:
| • | Damage to the seal ring grooves |
| • | Damage to the checkball |
| • | Damage and wear to the bushing and transfer sleeve |
- Install new oil seal rings (829).
Important: Do not press the seal so that the shape of the seal is distorted in the bore.
- Install a new cooler return seal (828) with the appropriate socket.
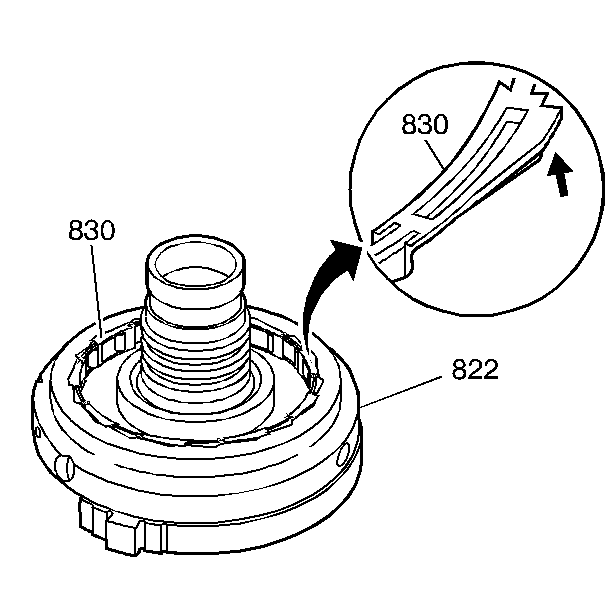
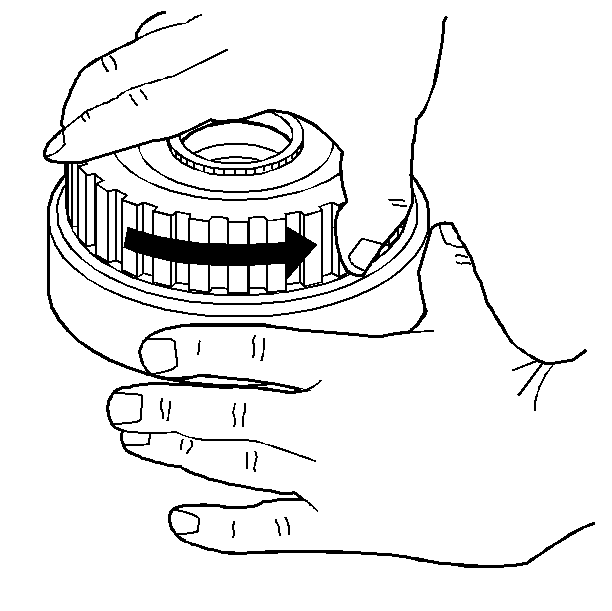
- Install the low roller clutch assembly (830) into the forward and coast clutch support (822). Turn the low roller clutch assembly (830) counterclockwise
as far as it can go. The tabs on the low roller clutch assembly (830) must rest on the face of the forward and coast clutch support (822).
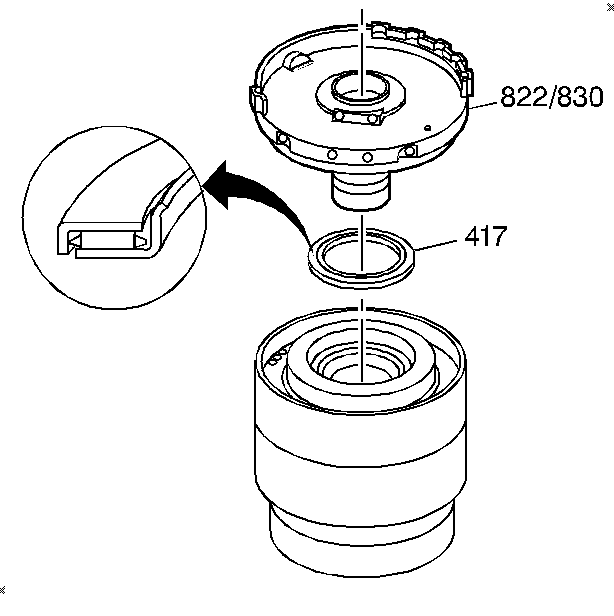
- Install the thrust bearing (417) onto the forward and coast clutch assembly.
- Install the forward and coast clutch support and low roller clutch assembly (822/830) onto the forward and coast clutch assembly.
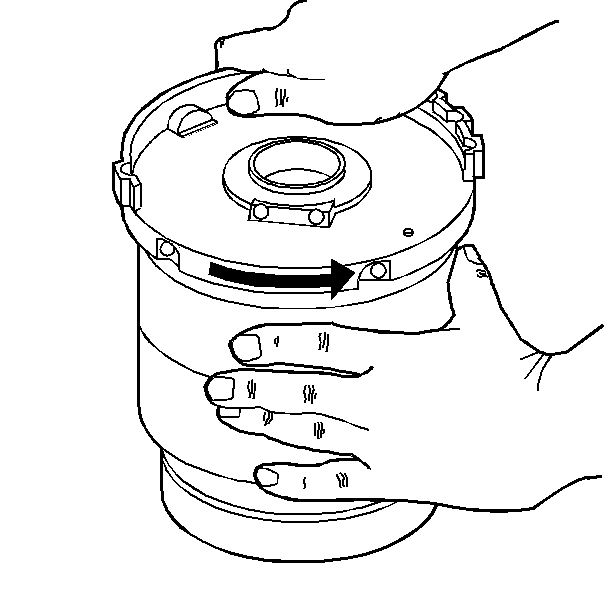
- Check the rotation of the low roller clutch assembly. The low roller clutch assembly should freewheel in the counterclockwise direction.
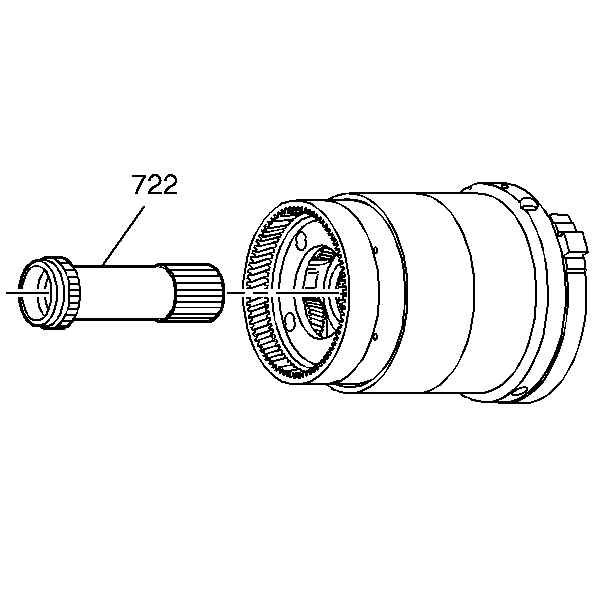
- Install the final drive sun gear shaft (722).

- Install the thrust bearing (832), the parking lock gear (833), and the snap ring (834) onto the final drive sun gear shaft (722).
