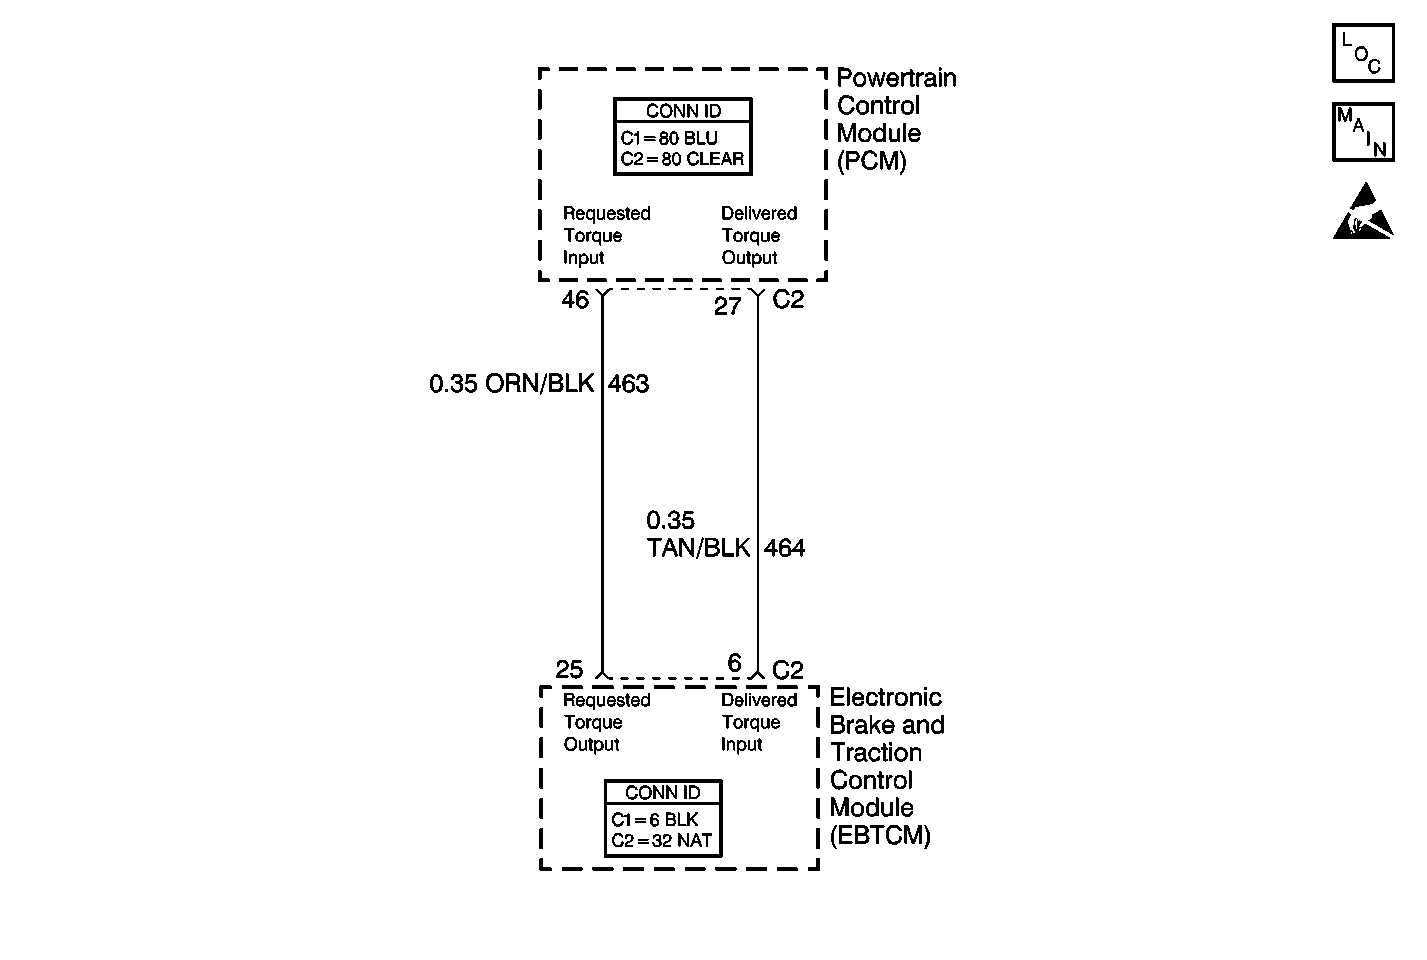
Circuit Description
The EBTCM and the PCM simultaneously controlled the traction control. The PCM sends a Delivered Torque message via a pulse width modulated (PWM) signal to the EBTCM confirming the delivered torque level for proper TCS operation. The EBTCM supplies the pull up voltage.
Conditions for Setting the DTC
The DTC sets if all of the following occur:
| • | The ignition is ON. |
| • | The PWM signal is out of range or no signal is received for 7 seconds. |
Action Taken When the DTC Sets
| • | A malfunction DTC is stored. |
| • | The TCS is disabled. |
| • | The TRACTION CONTROL indicator is turned ON. |
| • | The ABS remains functional. |
Conditions for Clearing the DTC
| • | The condition for DTC is no longer present and you used scan tool Clear DTCs function. |
| • | The condition for DTC is no longer present and you used the On-Board Clear DTCs function. |
| • | The EBTCM does not detect the DTC in 50 drive cycles. |
Diagnostic Aids
| • | It is very important that a thorough inspection of the wiring and connectors be performed. Failure to carefully and fully inspect wiring and connectors may result in misdiagnosis, causing part replacement with reappearance of the malfunction. |
| • | An intermittent malfunction can be caused by poor connections, broken insulation, or a wire that is broken inside the insulation. |
| • | If an intermittent malfunction exists, refer to Intermittents and Poor Connections Diagnosis in Wiring Systems. |
| • | The following conditions can cause this concern: |
| - | An open circuit. |
| - | An short to ground or voltage in the circuit. |
| - | A wiring problem, terminal corrosion, or poor connection in the circuit. |
| - | A communication frequency problem. |
| - | A communication duty cycle problem. |
| - | The EBTCM is not receiving information from the PCM. |
Test Description
The numbers below refer to step numbers on the diagnostic table.
Step | Action | Value(s) | Yes | No | ||||
|---|---|---|---|---|---|---|---|---|
1 | Did you perform the ABS Diagnostic System Check? | -- | Go to Step 2 | |||||
2 | Inspect the following grounds, ensuring that each ground is clean and torqued to the proper specifications:
Were any loose, damaged, or corroded grounds found? | -- | Go to Step 3 | Go to Step 4 | ||||
3 | Repair the ground as necessary. Refer to Wiring Repairs in Wiring Systems. Did you complete the repair? | -- | -- | |||||
Use a J 39200 DMM in order to measure the DC duty cycle between the J 39700 terminal 6 and terminal B. Is the duty cycle within the specified range? | 5-15% | Go to Step 5 | Go to Step 7 | |||||
Use a J 39200 DMM in order to measure the DC Hz between the J 39700 terminal 6 and terminal B. Is the frequency within the range specified? | 121-134 Hz | Go to Step 6 | Go to Step 13 | |||||
6 | Replace the EBTCM. Refer to Electronic Brake Control Module Replacement . Did you complete the repair? | -- | -- | |||||
7 |
Is the voltage within the specified range? | Battery Voltage | Go to Step 8 | Go to Step 10 | ||||
8 |
Is the voltage greater than the specified value? | 1 V | Go to Step 9 | Go to Step 12 | ||||
9 | Repair the short to voltage in CKT 464. Refer to Wiring Repairs in Wiring Systems. Did you complete the repair? | -- | -- | |||||
10 |
Is the resistance within the specified range? | OL (Infinite) | Go to Step 6 | Go to Step 11 | ||||
11 | Repair the short to ground in CKT 464. Refer to Wiring Repairs in Wiring Systems. Did you complete the repair? | -- | -- | |||||
12 | Use a J 39200 DMM in order to measure the resistance between the J 39700 terminal 6 and the PCM connector C2 terminal 27. Is the resistance less than the specified value? | 2 ohms | Go to Step 13 | Go to Step 14 | ||||
13 | Suspect the PCM. Refer to Powertrain On Board Diagnostic (OBD) System Check in Engine Controls - 4.0L, 4.6L. Is the diagnosis complete? | -- | -- | |||||
14 | Repair the open in CKT 464. Refer to Wiring Repairs in Wiring Systems. Did you complete the repair? | -- | -- |
