Circuit Description
This diagnostic test checks for a malfunction in the circuitry and hardware of the Linear EGR valve. This test is used to indicate a stuck open EGR valve. When the EGR valve desired position is 0 (closed) the current (closed) EGR pintle position is subtracted from the learned low EGR pintle position. If the difference between the two values is greater than 20 counts then a stuck open valve is indicated. When the open valve condition is indicated this test waits for the EGR to be opened enough so that a possible restriction (usually carbon deposits) could possibly clear. When the EGR valve desired position returns to 0 (closed) this test rechecks the difference between the closed and learned low pintle positions and if the significant difference is still there a timer is incremented. When the time limit has been reached a failure is indicated and this DTC is set.
Conditions for Running the DTC
| • | Closed EGR pintle position is 0. |
| • | After an initial failure (open valve condition) is first indicated the desired EGR position has been cycled 120 counts or more. |
Conditions for Setting the DTC
An open valve condition is monitored for at least 10 seconds, two times, this includes one time for the inital failure.
Action Taken When the DTC Sets
The PCM disables the Linear EGR valve for the ignition cycle.
| • | The PCM will illuminate the malfunction indicator lamp (MIL) when the diagnostic runs and fails. |
| • | The PCM will record operating conditions at the time the diagnostic fails. This information will be stored in the Freeze Frame and Failure Records. |
Conditions for Clearing the MIL/DTC
| • | The PCM will turn the MIL OFF after three consecutive drive trips that the diagnostic runs and does not fail. |
| • | A Last Test Failed (current) DTC will clear when the diagnostic runs and does not fail. |
| • | A History DTC will clear after forty consecutive warm-up cycles with no failures of any emission related diagnostic test. |
| • | Use a scan tool to clear DTCs. |
| • | Interrupting PCM battery voltage may or may not clear DTCs. This practice is not recommended. Refer to Clearing Diagnostic Trouble Codes in PCM Description and Operation. |
Test Description
Number(s) below refer to the step number(s) on the Diagnostic Table.
-
Checking if EGR valve feedback is valid with EGR OFF.
-
With the EGR valve OFF, the feedback should be 1.0 volt or less.
-
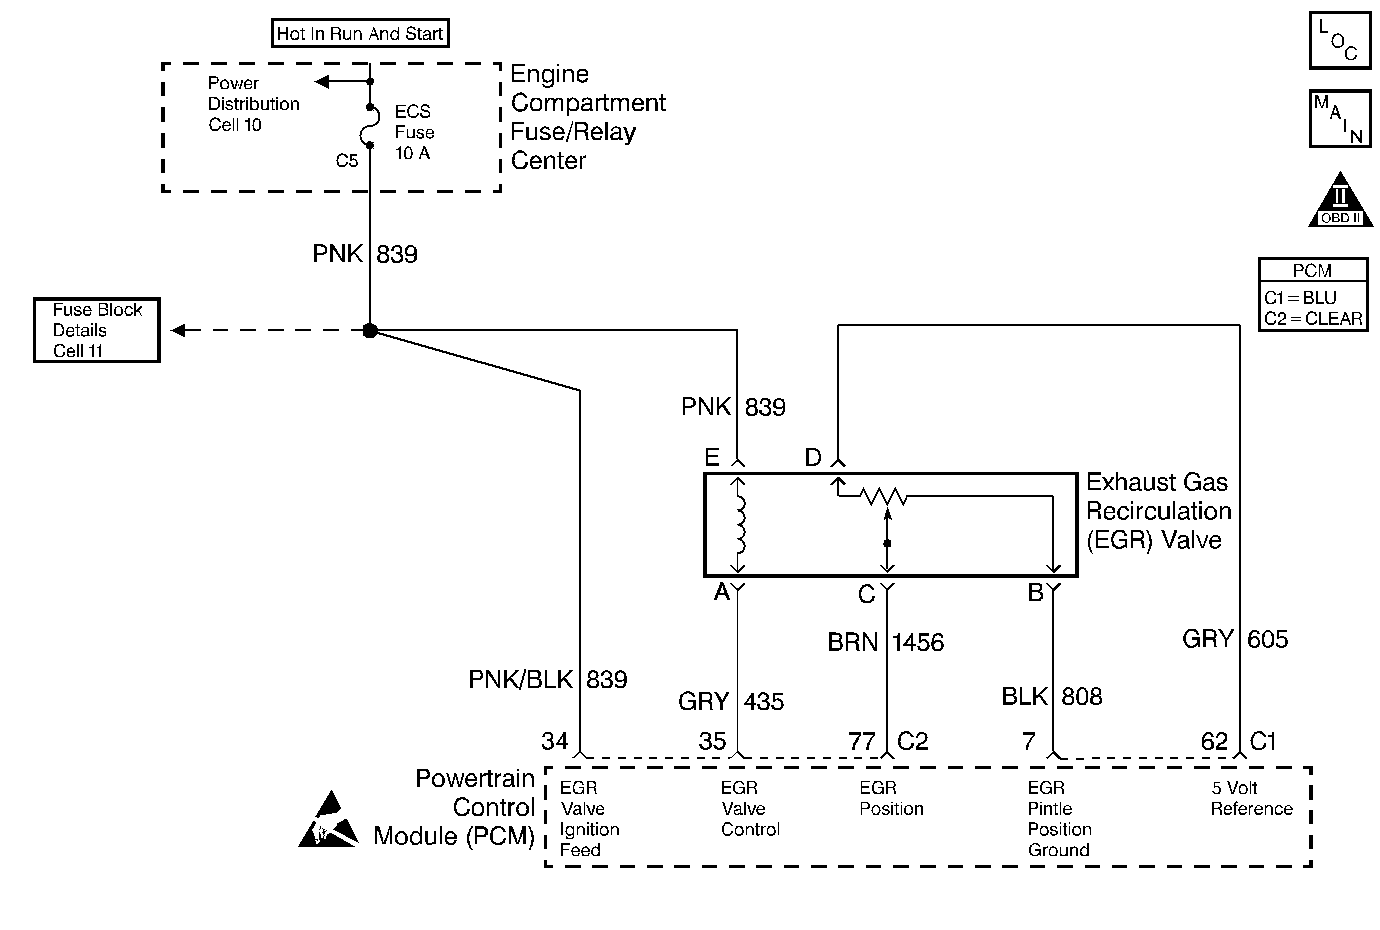
At 50% EGR commanded ON, compare the Actual EGR pintle position to the Commanded EGR pintle position. If the Actual EGR pintle position is 0, the fault is in the EGR control circuit, the EGR valve or the PCM. If the Actual EGR pintle position varies above and below the Commanded EGR pintle position the fault is in the EGR valve ignition feed (C2-34) or the PCM.
-
With the EGR valve commanded on full, the EGR pintle position should be above 4.0 volts.
-
The Freeze Frame or Failure Rec., EGR pintle position, display can help determine the root cause even if the problem cannot be reproduced. If a low pintle position is recorded in the snapshot, that means a low feedback circuit voltage caused the DTC to set.
-
The Freeze Frame or Failure Rec., EGR pintle position, display can help determine the root cause even if the problem cannot be reproduced. If a high pintle position is recorded in the snapshot, that means a high feedback circuit voltage, possibly open, caused the DTC to set. If an intermediate pintle position is recorded in the snapshot, that means the DTC was probably set because the PCM could not control the EGR solenoid either due to intermittents in the solenoid or a sticky EGR valve.
-
If audible valve movement is heard when disconnecting the EGR connector check the EGR Valve Control circuit for a short to ground.
-
A high voltage reading on the 5 volt reference circuit could be caused by a short to voltage on another 5 volt reference circuit, some 5V Ref. circuits are shared inside the PCM, or battery voltage bleeding onto the 5 volt reference circuit as in a defective Linear EGR Valve.
Step | Action | Value(s) | Yes | No |
|---|---|---|---|---|
1 | Did you perform the Powertrain On-Board Diagnostic (OBD) System Check? | -- | ||
Is the voltage between the range specified? | 0.18-2.06 volts | |||
Is the voltage the same or less than the value specified? | 1.0 volts | |||
Is the voltage between the range specified? | 2.0-3.0 volts | |||
Is the voltage the same or more than the value specified? | 4.0 volts | |||
Using a scan tool select Freeze Frame or Failure Rec. and check the EGR Pintle Pos. for when the DTC set. Is the voltage the same or more than the value specified? | 0.18 volts | |||
Is the voltage the same or more than the value specified? | 5.00 volts | |||
8 | Is the voltage the same or less than the value specified? | 0.18 volts | ||
9 |
Is the voltage the same or less than the value specified? | 0.18 volts | ||
10 | Using DMM J 39200 measure voltage to ground on jumper. Is voltage less than the value specified? | 4.5 volts | ||
11 |
Is voltage less than the value specified? | 4.5 volts | ||
12 |
Is resistance greater than the value specified? | 10K ohms | ||
13 | Measure the resistance between PCM connector C1 terminal 62 and EGR valve connector terminal D (harness side). Is the resistance less than the value specified? | 5 ohms | ||
14 |
Was terminal contact repaired? | -- | ||
15 |
Was terminal contact repaired? | -- | ||
16 |
Listen for audible valve movement when disconnecting the EGR connector. Is the voltage less than the value specified? | 2.06 volts | ||
17 |
Is voltage the same or less than the value specified? | 0.1 volts | ||
18 | Measure voltage to ground at EGR valve connector terminal D (harness side). Is voltage the same or less than the value specified? | 5.5 volts | ||
19 |
Is the resistance less than the value specified? | 5 ohms | ||
20 | Check for poor terminal contact at EGR valve and PCM connector C1 terminal 7, high resistance in the EGR Pintle Position Ground, sticky EGR valve, or intermittent short to voltage in the EGR Position Feedback circuit, the 5 Volt Reference circuit and the EGR Pintle Position Ground circuit. Was a repair made? | -- | Go to Diagnostic Aids | |
21 | Check terminal contact at PCM and EGR valve and check for a sticky EGR valve or debris in the EGR system which may have stuck the EGR valve. Was a repair made? | -- | Go to Diagnostic Aids | |
22 | Check terminal contact at EGR valve and PCM, high resistance in the EGR Position Feedback circuit and the 5 Volt Reference circuit, and check for a sticky EGR valve. Was a repair made? | -- | Go to Diagnostic Aids | |
23 | Check for intermittent opens or shorts to ground in the 5 Volt Reference circuit and the EGR Position Feedback circuit. Was a repair made? | -- | Go to Diagnostic Aids | |
24 | Check for intermittent open in the EGR Pintle Position Ground circuit or intermittent short to voltage in the EGR Position Feedback circuit, the EGR Pintle Position Ground circuit or the 5 Volt Reference circuit. The reference circuit short may be located on any of the PCM 5 volt reference circuits (I.E. TP sensor 5 volt reference). Was a repair made? | -- | Go to Diagnostic Aids | |
25 | Check for an open or short in the Ignition feed circuit and the EGR Valve Control circuit or a sticky EGR valve. Was a repair made? | -- | Go to Diagnostic Aids | |
26 | Repair open in the EGR Position Feedback circuit. Is the repair complete? | -- | -- | |
27 | Repair short to ground in the EGR Position Feedback circuit. Is the repair complete? | -- | -- | |
28 | Repair short to ground in the 5 Volt Reference circuit. The short may be located on any of the PCM 5 volt reference circuits (I.E. TP sensor 5 volt reference). Is the repair complete? | -- | -- | |
29 | Repair open in the 5 Volt Reference circuit. Is the repair complete? | -- | -- | |
30 | Repair short to voltage in the EGR Position Feedback circuit. Is the repair complete? | -- | -- | |
31 | Repair short to voltage on the EGR Pintle Position Ground circuit. Is the repair complete? | -- | -- | |
Repair the short to voltage on the 5 Volt Reference circuit. Refer to Wiring Repairs in Wiring Systems. Is the repair complete? | -- | -- | ||
33 | Repair open in the EGR Pintle Position Ground circuit. Is the repair complete? | -- | -- | |
34 | Replace the EGR valve. Refer to Exhaust Gas Recirculation Valve Replacement . Is the replacement complete? | -- | -- | |
35 | Replace the PCM. Refer to Powertrain Control Module Replacement/Programming . Is the replacement complete? | -- | -- |
