Removal Procedure
Caution: When carrying an undeployed inflatable restraint seat belt pretensioner:
• Do not carry the seat belt pretensioner by the wires or connector. • Carry the seat belt pretensioner by the piston tube, keeping hands and
fingers away from the cable. • Make sure the open end of the seat belt pretensioner piston tube points
away from you and other people. • Do not cover the seat belt pretensioner piston tube opening with your
hand.
Caution: Refer to SIR Inflator Module Handling and Storage Caution in the Preface section.
- Disable the SIR system. Refer to SIR Disabling and Enabling or SIR Disabling and Enabling .
- Disconnect the pretensioner 4-way electrical connector from the 2-way side air bag connector.
- Disconnect the 2-way seat belt switch electrical connector.
- Remove the seat. Refer to Bucket Seat Replacement in Seats.
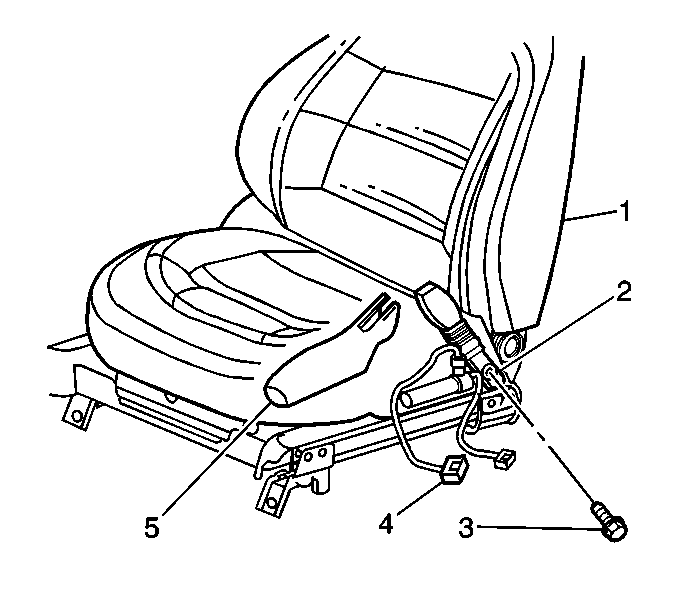
- Remove the pretensioner trim cover (5) by pulling up on the front of the cover and then pulling forward.
- Remove the pretensioner nut (3) and remove the pretensioner (2) from the seat (1).
- Fully deploy the module before disposal. If the module was replaced under warranty, fully deploy and dispose of the module after the required retention period. Refer to Pretensioner Handling and Scrapping .
Important: Note the wiring and connector routing during the removal, in order to route the wiring properly during assembly.
Installation Procedure
- Align the locating tab to the slot and install the pretensioner (2) to the seat (1).
- Install the nut (3) while holding the pretensioner in place.
- Install the pretensioner trim cover by engaging the rear of the trim cover to the pretensioner, then push down on the front.
- Install the seat. Refer to Bucket Seat Replacement in Seats.
- Route the pretensioner harness (4) and the seat belt wiring to the seat.
- Connect the pretensioner 4-way electrical connector to the 2-way side air bag connector.
- Enable the SIR system. Refer to SIR Disabling and Enabling or SIR Disabling and Enabling .
Important: The pretensioner has a locating tab that ensures the pretensioner is in the proper position.
Notice: Use the correct fastener in the correct location. Replacement fasteners must be the correct part number for that application. Fasteners requiring replacement or fasteners requiring the use of thread locking compound or sealant are identified in the service procedure. Do not use paints, lubricants, or corrosion inhibitors on fasteners or fastener joint surfaces unless specified. These coatings affect fastener torque and joint clamping force and may damage the fastener. Use the correct tightening sequence and specifications when installing fasteners in order to avoid damage to parts and systems.
Tighten
Tighten the nut to 41 N·m (30 lb ft).
