For 1990-2009 cars only
Removal Procedure
Caution: Refer to SIR Caution in the Preface section.
- Disable the SIR. Refer to SIR Disabling and Enabling and SIR Disabling and Enabling in SIR.
- Disconnect the negative battery cable. Refer to Battery Negative Cable Disconnection and Connection in Engine Electrical.
- Remove the I/P center storage compartment or the floor console. Refer to Instrument Panel Compartment Replacement or Front Floor Console Replacement .
- Remove the left I/P outer trim cover. Refer to Instrument Panel Outer Trim Cover Replacement - Left Side .
- Remove the right I/P outer trim cover. Refer to Instrument Panel Outer Trim Cover Replacement - Right Side .
- Remove the headlamp switch. Refer to Headlamp Switch Replacement .
- Remove the drivers knee bolster bracket. Refer to Driver Knee Bolster Bracket Replacement .
- Remove the radio. Refer to Radio Replacement in Entertainment.
- Remove the HVAC control module. Refer to HVAC Control Module Replacement .
- Remove the I/P cluster. Refer to Instrument Cluster Replacement .
- Remove the I/P storage compartment. Refer to Instrument Panel Storage Compartment Replacement .
- Remove the right I/P accessory trim plate. Refer Instrument Panel Accessory Trim Plate Replacement - Right Side .
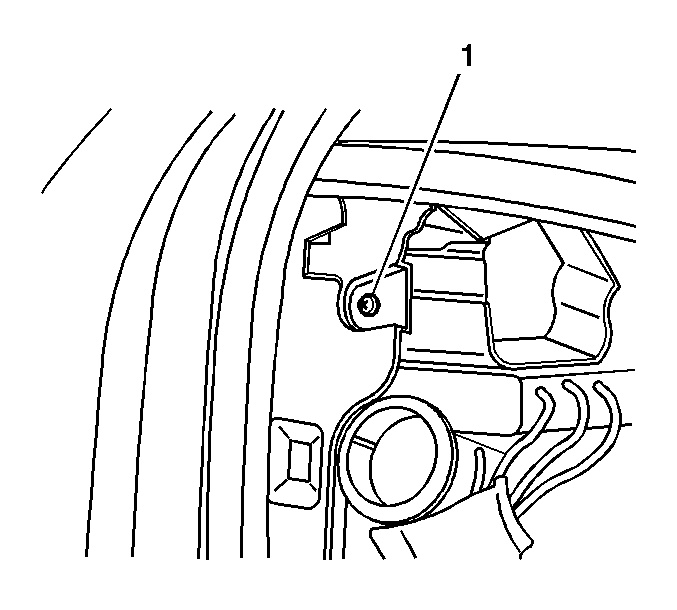
- Remove the I/P screws (1) from each end of the I/P retainer.
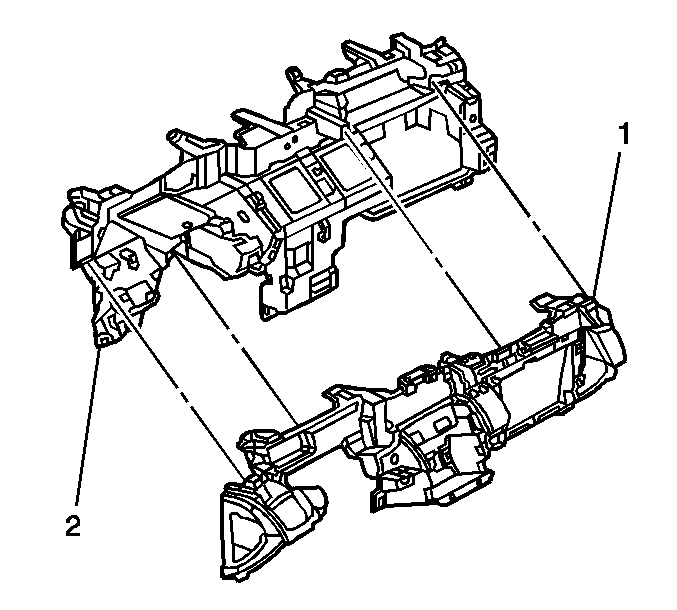
- Remove the remaining bolts from the I/P retainer (1).
- Partially remove the I/P retainer (1) from the I/P carrier (2).
- Guide the wiring through the I/P retainer openings as necessary.
- Remove the I/P retainer (1) from the vehicle.
- Remove the Inside air temperature sensor from the I/P retainer (1). Refer to Inside Air Temperature Sensor Replacement in HVAC-Automatic.
Disconnect the inside air temperature sensor electrical connector.
Installation Procedure
- Install the Inside air temperature sensor to the I/P retainer (1). Refer to Inside Air Temperature Sensor Replacement in HVAC-Automatic.
- Partially install the I/P retainer (1) to the I/P carrier (2) and guide the wiring through the I/P retainer openings.
- Connect the inside air temperature sensor electrical connector.
- Install the I/P retainer bolts.
- Install the screws (1) to the I/P retainer.
- Install the headlamp switch. Refer to Headlamp Switch Replacement in Lighting Systems.
- Install the drivers knee bolster bracket. Refer to Driver Knee Bolster Bracket Replacement .
- Install the radio. Refer to Radio Replacement in Entertainment.
- Install the HVAC control module. Refer to HVAC Control Module Replacement in HVAC-Automatic.
- Install the I/P cluster. Refer to Instrument Cluster Replacement .
- Install the I/P storage compartment. Refer to Instrument Panel Storage Compartment Replacement .
- Install the right I/P accessory trim plate. Refer to Instrument Panel Accessory Trim Plate Replacement - Right Side .
- Install the left I/P outer trim cover. Refer to Instrument Panel Outer Trim Cover Replacement - Left Side .
- Install the right I/P outer trim cover. Refer to Instrument Panel Outer Trim Cover Replacement - Right Side .
- Install the I/P center storage compartment or the floor console. Refer to Instrument Panel Compartment Replacement or Front Floor Console Replacement .
- Connect the negative battery cable. Refer to Battery Negative Cable Disconnection and Connection in Engine Electrical.
- Enable the SIR. Refer to SIR Disabling and Enabling and SIR Disabling and Enabling in SIR.
