Customer Satisfaction-Engine Block Cylinder Head Bolt Thread Holes-Deep Counterbore

| Subject: | 99086 -- Engine Block Cylinder Head Bolt Thread Holes -- Deep Counterbore |
| Models: | Certain 1999 Oldsmobile Aurora Model Vehicle |
| Equipped with 4.0L Engine (RPO L47-VIN Code C) |
| Certain 1999 Cadillac Seville, DeVille and Eldorado Model Vehicles |
| Equipped with 4.6L Engine (RPO LD8-VIN Code Y or RPO L37-VIN Code 9) |
THIS CAMPAIGN BULLETIN ADDRESSES VEHICLES IN DEALER INVENTORY AND VEHICLES DELIVERED TO CUSTOMERS. VEHICLES THAT PASS THE INSPECTION PROCEDURE WILL BE RELEASED FROM THE STOP DELIVERY ISSUED SEPTEMBER 13, 1999 VIA DCS MESSAGE WIS19990023 AND WIS19990024. DEALER INVENTORY VEHICLES THAT DO NOT PASS THE INSPECTION ARE NOT TO BE DELIVERED TO CUSTOMERS BUT ARE NOT TO BE RETURNED TO GENERAL MOTORS. CUSTOMER VEHICLES THAT DO NOT PASS THE INSPECTION HAVE SPECIAL INSTRUCTIONS. REFER TO THE SERVICE PROCEDURE FOR DETAILS.
Important: Cadillac customers involved in this campaign will be notified by GM beginning December 17, 1999. Oldsmobile Aurora customers involved in this campaign will be notified by GM at a later date when 4.0L engines become available.
General Motors has decided that certain 1999 Oldsmobile Aurora model vehicles, equipped with 4.0L engine (RPO L47, VIN C) and Cadillac Seville, DeVille and Eldorado model vehicles equipped with 4.6L engine (RPO LD8, VIN 9 or RPO L37 VIN Y) may exhibit a condition in which they cylinder head bolts may become loose and cause coolant leaks and possible engine damage. This may be due to the engine block cylinder head bolt counterbore holes being machined too deeply into the engine block.
To prevent the possibility of this condition occurring, dealers are to inspect vehicles held under the above referenced stop delivery and those delivered to customers. Depending on the findings, the engine may not require any further repairs, may require replacement or the vehicle may need to be returned to GM.
Vehicles Involved
Involved are certain 1999 Oldsmobile Aurora model vehicles equipped with 4.0L engine (RPO L47, VIN C) and Cadillac Seville, DeVille and Eldorado model vehicles equipped with 4.6L engine (RPO LD8, VIN Y and RPO L37, VIN 9), and built within the following VIN breakpoints:
Year | Division | Model | Plant | From | Through |
|---|---|---|---|---|---|
1999 | Oldsmobile | Aurora | Orion | X4115396 | X4117518 |
1999 | Cadillac | Seville | Hamtramck | XU938976 | XU940640 |
1999 | Cadillac | DeVille | Hamtramck | XU791675 | XU802142 |
1999 | Cadillac | Eldorado | Hamtramck | XU613134 | YX614972 |
Important: Dealers should confirm vehicle eligibility through VISS (Vehicle Information Service System) prior to beginning campaign repairs. Information for Oldsmobile Auroras delivered to customer will be loaded in VISS at a later date when 4.0L engines are available and Oldsmobile owner letters are mailed. [Not all vehicles within the above breakpoints may be involved.]
Involved vehicles have been identified by Vehicle Identification Number. Computer listings containing the complete Vehicle Identification Number, customer name and address data have been prepared, and are being furnished to involved dealers with the campaign bulletin. The customer name and address data furnished will enable dealers to follow-up with customers involved in this campaign. Any dealer not receiving a computer listing with the campaign bulletin has no involved vehicles currently assigned.
These dealer listings may contain customer names and addresses obtained from State Motor Vehicle Registration Records. The use of such motor vehicle registration data for any other purpose is a violation of law in several states. Accordingly, you are urged to limit the use of this listing to the follow-up necessary to complete this campaign.
Parts Information
Parts required to complete this campaign are to be obtained from General Motors Service Parts Operations (GMSPO). Please refer to your "involved vehicles listing" prior to ordering requirements. Normal orders should be placed on a DRO = Daily Replenishment Order. An emergency requirement should be ordered on a CSO = Customer Special Order.
Part Number | Description | Qty/ Vehicle |
|---|---|---|
12369567 | Asm., 4.0L L47 Aurora V8 Service Engine | 1, if required |
12369570 | Asm., 4.6L L37 VIN 9 Northstar V8 Service Engine | 1, if required |
12369571 | Asm., 4.6L LD8 VIN Y Northstar V8 Service Engine | 1, if required |
12558024 | Gasket, Exhaust Manifold | 2, if required |
3522442 | Gasket, EGR | 1, if required |
3544534 | Gasket, Converter Pipe | 1, if required |
1647558 | Gasket, Crossover Pipe | 2, if required |
25534689 | O-ring, Oil Level Indicator Tube | 1, if required |
3543719 | O-ring, Oil Filter Adapter | 2, if required |
3537121 | Gasket, Intake Manifold | 2, if necessary |
3536903 | Gasket, Camshaft Cover-RH | 1, if necessary |
3536904 | Gasket, Camshaft Cover Spark Plug-RH | 4, if necessary |
Important: Due to the small number of vehicles involved, dealers are encouraged not to order campaign parts for use as shelf stock. Parts should only be ordered when inspection determines that it is necessary to replace the engine.
Customer Notification
Customers will be notified of this campaign on their vehicles by General Motors beginning December 17, 1999. Oldsmobile Aurora customers will be notified of this campaign on their vehicles by General Motors at a later date when 4.0L engines become available. (See copy of typical customer letter included with this bulletin -- actual divisional letter may vary slightly).
Dealer Campaign Responsibility
All unsold new vehicles in dealers' inventory and subject to this campaign MUST be held, inspected and returned to GM if this condition exists, per the service procedure of this campaign bulletin. All unsold new vehicles in dealers' inventory and subject to this campaign MUST be held, inspected and may be released from the "Stop Delivery" order BEFORE customers take possession of these vehicles if this condition does not exist, per the service procedure of this campaign bulletin.
Cadillac customers who have recently purchased vehicles sold from your vehicle inventory, and for which there is no customer information indicated on the dealer listing, are to be contacted by the dealer. Oldsmobile customers who have recently purchased vehicles sold from your vehicle inventory, and for which there is not customer information indicated on the dealer listing, are not to be contacted by the dealer until the Oldsmobile customer letter and Olds Aurora dealer listing are mailed at a later date. Arrangements are to be made to make the required correction according to the instructions contained in this bulletin. This could be done by mailing to such customers a copy of the customer letter accompanying this bulletin. Campaign follow-up cards should not be used for this purpose, since the customer may not as yet have received the notification letter.
In summary, whenever a vehicle subject to this campaign enters your vehicle inventory, or is in your dealership for service in the future, please take the steps necessary to be sure the campaign correction has been made before selling or releasing the vehicle.
Service Procedure
Engine Inspection Procedure
Tools Required
| • | J 28467-B Engine Support Fixture |
| • | J 36660 Electronic Torque/Angle Meter |
- Prep the vehicle prior to electrical disconnection. Any customized settings should be recorded. These settings include:
- For Aurora and Seville vehicles only, remove the rear seat lower cushion.
- Disconnect the ground (negative) battery cable.
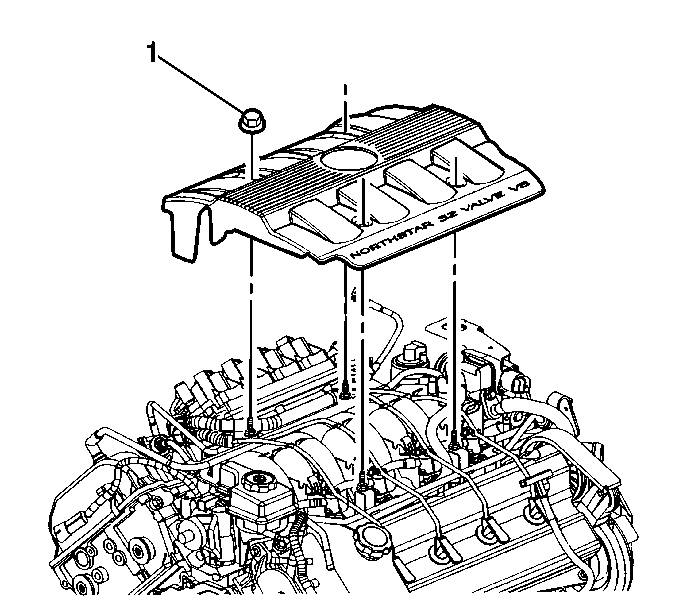
- Remove the fuel injector sight shield.
- For DeVille and Eldorado vehicles only, remove the right and the left torque struts and the bolts/nuts.
- For DeVille and Eldorado vehicles only, reinstall the bolt and the nut in the right engine strut bracket.
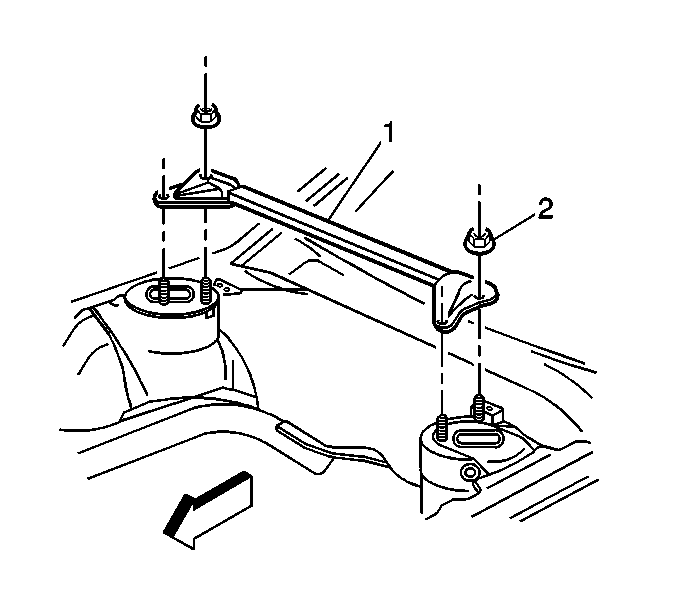
- For DeVille and Eldorado vehicles only, remove the strut tower-to-tower brace and the nuts.
- For DeVille and Eldorado vehicles only, reinstall the strut tower-to-tower bracket nuts.
- For Seville vehicles only, disconnect the hood lamp harness from the stepper motor stud.
- For Aurora vehicles only, disconnect the front wiring harness from the harness interface.
- For Aurora vehicles only, disconnect the wiring harness connector from the stepper motor.
- For Aurora vehicles only, disconnect the cruise cable from the stepper motor.
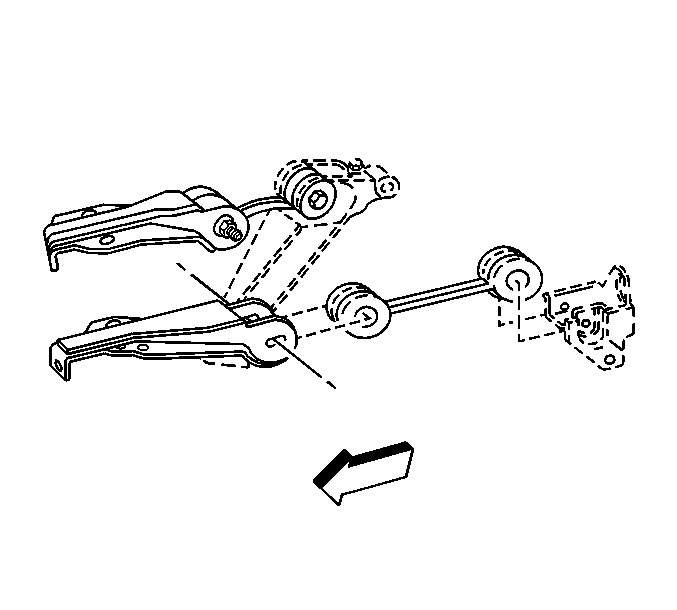
- For Aurora and Seville vehicles only, remove the stepper motor and the nuts. Set the motor and nuts aside.
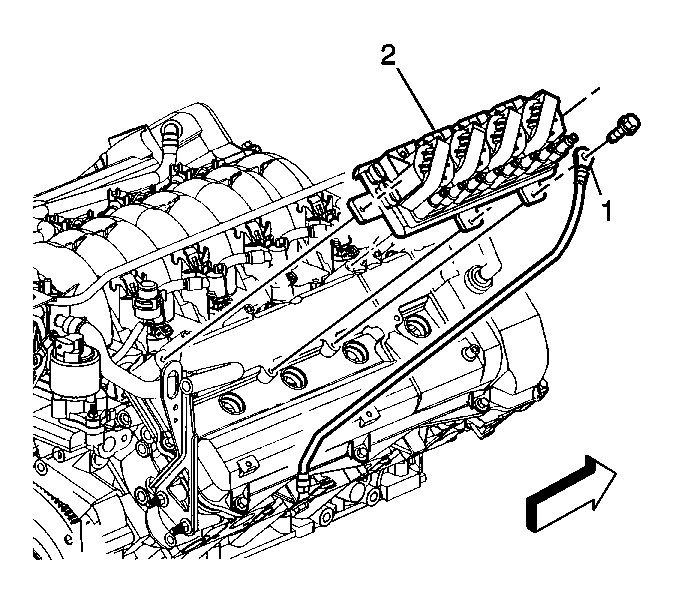
- Disconnect the ignition control module assembly wiring harness connectors.
- Disconnect the four center coil wires from the ignition control module assembly.
- Remove the ignition control module assembly bolts.
- Place the ignition control module assembly forward for access to the right side spark plug wires.
- Disconnect the right side spark plug wires.
- For Aurora and Seville vehicles only, remove the push retainer from the driver's side rear fuel injector sight shield stud.
- For Aurora and Seville vehicles only, remove the front spark plug wire harness retainer from the driver's side rear fuel injector sight shield stud.
- Set aside the ignition control module assembly and the spark plug wires.
- Disconnect the EVAP solenoid wiring harness connector.
- Remove the EVAP solenoid bracket bolt.
- For Aurora and Seville vehicles only, disconnect the EVAP tube from the intake manifold.
- Set aside the EVAP solenoid and tubing.
- Disconnect the PCV valve and the tubing. Set the valve and the tubing aside.
- Disconnect the oxygen sensor wiring harness connector.
- For Seville vehicles only, disconnect the oxygen sensor wiring harness retainer from the driver's side wiring harness retainer clip on the right camshaft cover.
- For Aurora, DeVille and Eldorado vehicles only, disconnect the oxygen sensor wiring harness retainer from the center wiring harness retainer clip on the right camshaft cover.
- Disconnect the wiring harness connector from the camshaft position sensor.
- Disconnect the starter wiring harness connector.
- Unlock the wiring harness retainer clip on the front of the right camshaft cover and remove the starter wiring harness.
- Unlock the three wiring harness retainer clips across the back of the right camshaft cover and remove the engine wiring harness.
- For DeVille and Eldorado vehicles only, install the J 28467-33 adapters on top of the strut tower-to-tower brace nuts.
- For DeVille and Eldorado vehicles only, install both the J 28467-5A strut tower support assemblies over the J 28467-33 adapters.
- For DeVille and Eldorado vehicles only, install the J 28467-33 wing nuts.
- For DeVille and Eldorado vehicles only, install the J 28467-3 strut tower tube into the J 28467-5A strut tower support assemblies.
- For DeVille and Eldorado vehicles only, install the left J 28467-2A tube and the J 28467-4A support over the left lift bracket.
- For DeVille and Eldorado vehicles only, install the right J 28467-2A tube and the J 28467-4A support over the right engine strut bracket.
- For DeVille and Eldorado vehicles only, install the J 28467-1A cross bracket assemblies on the left and the right J 28467-2A tube and the J 28467-3 strut tower tube.
- For DeVille and Eldorado vehicles only, install the J 28467-6A lift hook bracket with the J 28467-7A lift hook and the J 28467-34 wing nut over each of the J 28467-2A tube and the J 28467-4A support assemblies.
- For DeVille and Eldorado vehicles only, install the left J 28467-7A lift hook to the left engine bracket.
- For DeVille and Eldorado vehicles only, install the right J 28467-7A lift hook to the right engine strut bracket bolt.
- Raise and suitably support the vehicle.
- For Aurora vehicles only, disconnect the wiring harness connector from the power steering pump pressure switch (PSP).
- For Aurora vehicles only, disconnect the wiring harness connector from the variable steering actuator (VSA).
- For Aurora, Eldorado and Seville vehicles only, disconnect the wiring harness connector from the vehicle speed sensor (VSS).
- For Seville vehicles only, disconnect the wiring harness connector from the A/C switch.
- For Eldorado and Seville vehicles only, disconnect the wiring harness retainer from the transmission brace.
- For DeVille and Eldorado vehicles only, remove the frame-to-body deflector bolts.
- For DeVille and Eldorado vehicles only, remove the frame-to-body deflector.
- For Eldorado vehicles only, remove the left front splash shield retaining clips as necessary to access the left front frame cradle bolt.
- For DeVille and Eldorado vehicles only, remove the left and the right front frame cradle bolts.
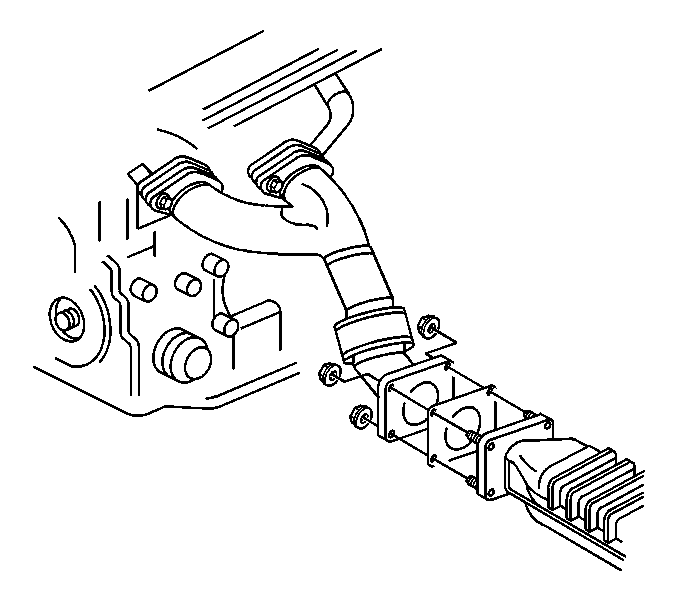
- For DeVille and Eldorado vehicles only, remove the converter nuts at the exhaust manifold rear pipe.
- For DeVille and Eldorado vehicles only, disconnect the exhaust manifold rear pipe at the converter. Position the converter out of the way.
- Remove the support and lower the vehicle.
- Position the engine wiring harness away from the right camshaft cover using tie straps.
- For DeVille and Eldorado vehicles only, lower the front of the engine by turning the J 28467-34 wing nuts ten full turns.
- Remove the wiring harness bolt/retainer(s) across the back of the right camshaft cover as necessary to access the camshaft cover bolts.
- For DeVille and Eldorado vehicles only, remove the heater pipe clip retainer bolt(s) across the back of the right cylinder head as necessary to access the camshaft cover bolts.
- Loosen the right camshaft cover bolts.
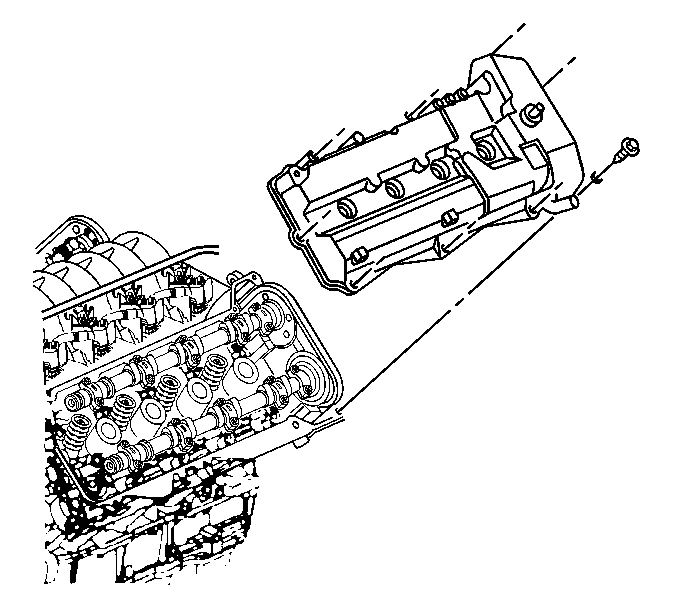
- Remove the right camshaft cover.
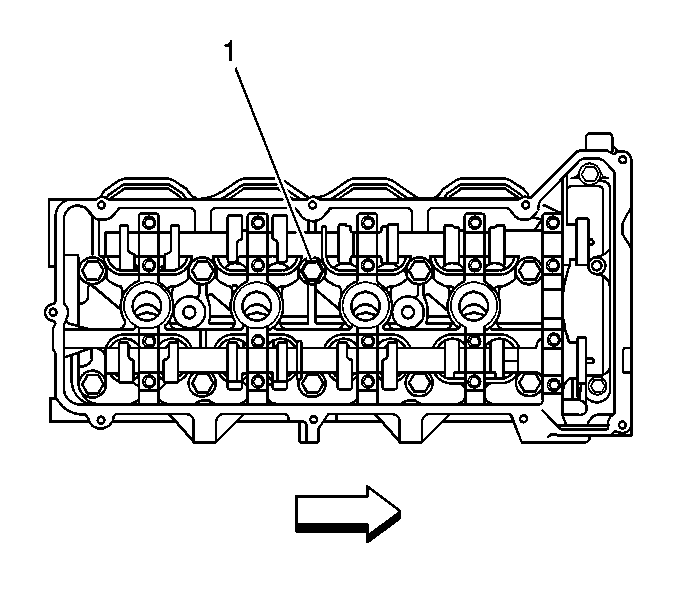
- Remove the inboard center cylinder head bolt (1).
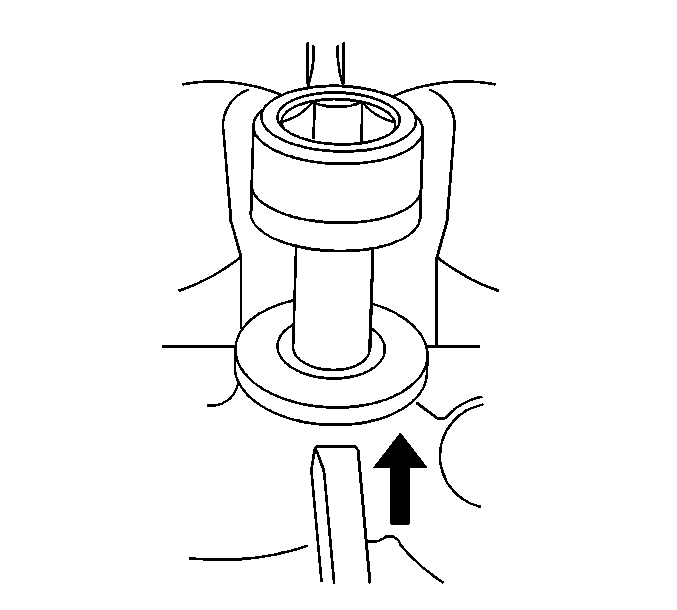
- Place the cylinder head bolt in the cylinder head bolt hole until the bolt contacts the top of the cylinder head bolt threads in the engine block.
- Ensure that the cylinder head bolt washer is placed down at the cylinder head.
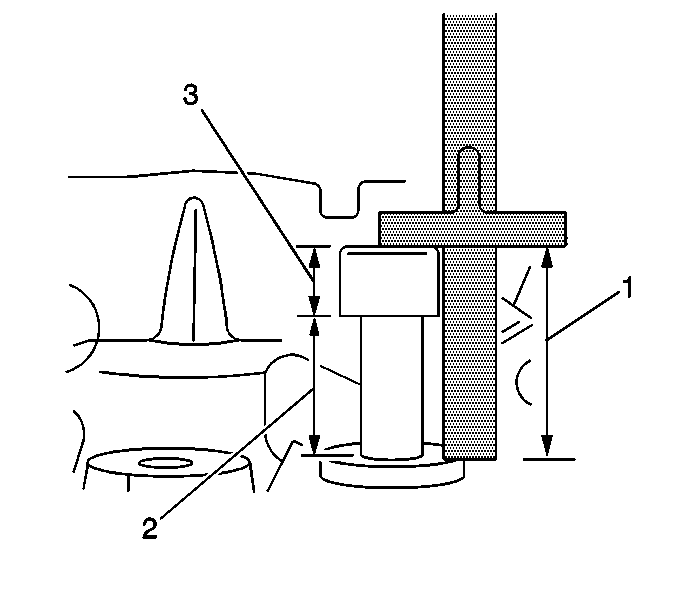
- The illustration above is showing 6" steel ruler to measure the distance of the cylinder head bolt from the top surface of the cylinder head bolt head to the top surface of the cylinder head bolt washer (1).
- Determine the cylinder head bolt shank measurement (2) by subtracting the cylinder head bolt head height (3) from the overall height (1) measured in Step 66.
- If the distance is greater than 21 mm (0.827 in), this is a good engine and the vehicle can be released for sale if in dealer inventory or released back to the owner. Proceed to Step 70.
- If the distance measures 21 mm (0.827 in) or less, the engine failed the inspection. For vehicles in dealer inventory, the engine must be reassembled and held for return to GM. Further return instructions will be provided. For customer vehicles only, remove and replace the engine.
- Remove the cylinder head bolt out of the block.
| • | Record customer's radio station settings. |
| • | Theft-lock number |
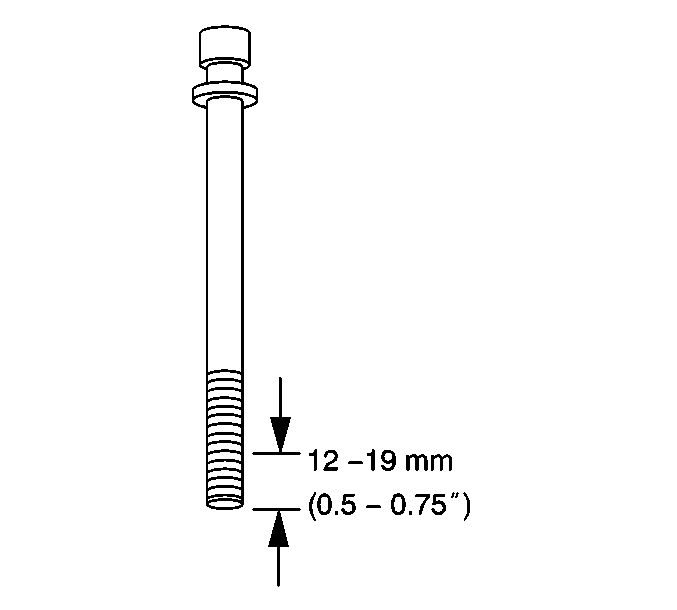
| 70.1. | Apply GM P/N 12345493, or the equivalent, completely around the cylinder head bolt threads in an area 12 to 19 mm (1/2 to 3/4 in) from the bottom of the bolt. |
| 70.2. | Reinstall the cylinder head bolt. |
| 70.3. | For engines passing the inspection and for failed engines in dealer inventory to be returned to GM, tighten the cylinder bolt using J 36660. |
Tighten
| • | Tighten to 30 N·m (22 lb ft) for the first pass. |
| • | Tighten 180 degrees for the second pass. |
Reassembly Procedure for Inspected Engines
Engine reassembly will be required for all engines passing inspection and also for engines failing inspection and in dealer inventory to be returned to GM.
Important: Ensure the spark plug and the camshaft cover seals are not damaged or the seals were not pulled from their grooves in the camshaft cover during removal. Reuse the seals if undamaged.
- Install the spark plug and camshaft cover seals as required. It is not necessary to install new seals on engines that are to be replaced.
- Install the right camshaft cover.
- Install the right camshaft cover bolts.
- For DeVille and Eldorado vehicles only, install the heater pipe retainer bolt(s) across the back of the right cylinder head that was removed to access the camshaft cover bolts.
- Install the wiring harness bolt/retainer(s) across the back of the right cylinder head that were removed to access the camshaft cover bolts.
- For DeVille and Eldorado vehicles only, raise the front of the engine by turning the J 28467-34 hook wing nut ten full turns.
- Remove the tie straps used to position the engine wiring harness away from the right camshaft cover.
- Raise and suitably support the vehicle.
- For DeVille and Eldorado vehicles only, install the two front engine frame mounting bolts.
- For Eldorado vehicles only, install the left front splash shield retaining clips removed to access the left front frame cradle bolt.
- For DeVille and Eldorado vehicles only, install the frame-to-body deflector and the bolts.
- For Eldorado and Seville vehicles only, connect the wiring harness to the transmission brace.
- For Seville vehicles only, connect the wiring harness connector to the A/C switch.
- For Aurora, Eldorado and Seville vehicles only, connect the wiring harness connector to the vehicle speed sensor (VSS).
- For Aurora vehicles only, connect the wiring harness connector to the variable steering actuator (VSA).
- For Aurora vehicles only, connect the wiring harness connector to the power steering pump pressure switch (PSP).
- For DeVille and Eldorado vehicles only, connect the converter to the intermediate pipe and install the nuts.
- Remove the support and lower the vehicle.
- Install the engine wiring harness and lock the three wiring harness retainers across the back of the right camshaft cover.
- Install the starter wiring harness and lock the wiring harness retainer on the front of the right camshaft cover.
- Connect the starter wiring harness connector.
- Connect the wiring harness connector to the camshaft position sensor.
- For Aurora, DeVille and Eldorado vehicles only, connect the oxygen sensor harness retainer to the center wiring harness retainer clip on the right camshaft cover.
- For Seville vehicles only, connect the oxygen sensor harness retainer to the driver's side wiring harness retainer clip on the right camshaft cover.
- Connect the oxygen sensor connector.
- Connect the PCV and the hose to the right camshaft cover.
- Install the EVAP solenoid and the bolt.
- Connect the EVAP wiring harness connector.
- For Eldorado vehicles only, connect the EVAP tube to the intake manifold.
- For Eldorado vehicles only, install the front spark plug wire harness retainer to the driver side rear fuel injector sight shield stud.
- For Eldorado vehicles only, install the push retainer to the driver side rear fuel injector sight shield stud.
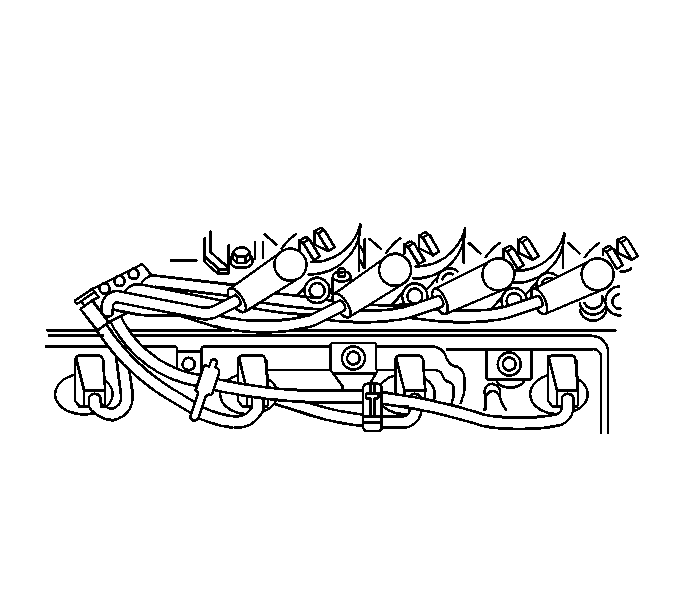
- Connect the right side spark plug wires. Route the spark plug wires exactly as shown. If you do not route the wires as shown, a misfire or surge condition could occur.
- Install the ignition control module.
- For Eldorado vehicles only, place the ground strap for the ignition control module at the passenger's side inboard bolt location.
- For Aurora, DeVille and Seville vehicles only, place the ground strap for the ignition control module at the passenger's side outboard bolt location.
- Install the four ignition control module bolts.
- Connect the four center coil wires to the ignition control module.
- Connect the ignition control module wiring harness connectors.
- For Aurora and Seville vehicles only, install the stepper motor and the nuts.
- For Aurora vehicles only, connect the cruise cable at the stepper motor.
- For Aurora vehicles only, connect the wiring harness connector to the stepper motor.
- For Aurora vehicles only, connect the front harness to the harness interface.
- For Seville vehicles only, connect the hood lamp harness to the stepper motor stud.
- For DeVille and Eldorado vehicles only, remove the J 28467-6A lift hook bracket with the J 28467-7A lift hook and the J 28467-34 wing nut from each of the J 28467-2A tube and the J 28467-4A support assemblies.
- For DeVille and Eldorado vehicles only, remove the J 28467-1A cross bracket assemblies from the left and the right J 28467-2A tube and the J 28467-3 strut tower tube.
- For DeVille and Eldorado vehicles only, remove both the J 28467-2A tube and the J 28467-4A support assemblies.
- For DeVille and Eldorado vehicles only, remove the J 28467-3 strut tower tube from the J 28467-5A strut tower support assemblies.
- For DeVille and Eldorado vehicles only, remove the J 28467-33 wing nuts.
- For DeVille and Eldorado vehicles only, remove both the J 28467-5A strut tower support assemblies from the J 28467-33 adapters.
- For DeVille and Eldorado vehicles only, remove the J 28467-33 adapters from on top of the strut tower-to-tower brace nuts.
- For DeVille and Eldorado vehicles only, remove the J 28467-33 adapters from the top of the strut tower-to-tower brace nuts.
- For DeVille and Eldorado vehicles only, remove the bolt in the right engine strut bracket.
- For DeVille and Eldorado vehicles only, install both the engine-to-radiator support torque struts and the bolts/nuts.
- For DeVille and Eldorado vehicles only, remove the strut tower-to-tower brace nuts.
- Install the strut tower-to-tower brace and the nuts.
- For DeVille and Eldorado vehicles only, install the fuel injector sight shield and the nuts.
- Connect the ground (negative) battery cable.
- For Aurora and Seville vehicles only, install the rear seat lower cushion.
- Reestablish any customer settings.
- Install the GM Campaign Identification Label.

Tighten
Tighten the right camshaft cover bolts to 10 N·m (89 lb in).
Tighten
Tighten the heater pipe retainer bolts to 2 N·m (18 lb in).
Tighten
Tighten the wiring harness retainer bolts to 6 N·m (53 lb in).
Tighten
Tighten the engine frame bolts to 100 N·m (74 lb ft).
Tighten
Tighten the frame-to-body deflector bolts to 6 N·m (53 lb in).
Tighten
Tighten the converter to intermediate pipe nuts to 25 N·m
(18 lb ft).
Tighten
Tighten the EVAP solenoid bolt to 12 N·m (106 lb in).
Tighten
Tighten the ignition control module bolts to 12 N·m (106 lb in).
Tighten
Tighten the stepper motor nuts to 9 N·m (80 lb in).
Tighten
Tighten the torque struts bolts/nuts to 78 N·m (758 lb ft).
Tighten
Tighten the strut tower-to-tower brace nuts to 28 N·m (21 lb ft).
Tighten
Tighten the fuel injector sight shield nuts to 3 N·m (27 lb in).
Tighten
Tighten the ground (negative) batter cable bolt at the battery to 15 N·m
(11 lb ft).
Engine Replacement Customer Discussion Guide
This section is intended as a discussion guide between the dealer and the customer once a vehicle has been inspected and determined to exhibit the condition.
We have inspected your vehicle's engine and found deep counterbores in the cylinder block.
| • | If you leased your vehicle, General Motors will have your dealer replace the engine assembly and provide your with courtesy transportation of the same brand while your vehicle is in for repair. Additionally, GM will provide a GM SmartCare maintenance policy on the repaired vehicle for the duration of your lease. If you bought GM SmartCare coverage with your 1999 Cadillac DeVille, Seville, Eldorado; or Oldsmobile Aurora, GM will refund the purchase price of the GM SmartCare plan. |
| • | If you purchased your vehicle, General Motors will have your dealer replace the engine assembly and provide your with courtesy transportation of the same brand while your vehicle is in for repair. GM will cover your repaired vehicle with a GM Protection Plan Policy with a "0" deductible for a total coverage of 5 year/60,000 miles. If you bought GM Protection Plan coverage with your 1999 Cadillac DeVille, Seville, Eldorado; or Oldsmobile Aurora, GM will refund the purchase price of the GM Protection Plan. |
Your complete satisfaction with your 1999 Cadillac DeVille, Seville, Eldorado; or Oldsmobile Aurora is important to us.
GMPP/SmartCare Processing -- Engine Replacements Only
Fill out the application for GMPP or SmartCare, to be owned by the customer. These plans are only available within 12 months of the date of vehicle purchase or lease. Submit the application to Plan Headquarters, noting that you have a customer whose vehicle has had the engine replaced on campaign 99086 and that you need to provide GMPP or SmartCare coverage. When completing the application, use the special code number 699006 in the dealer code field instead of the dealer code. If the customer's vehicle usage is defined as "commercial multi-driver" by GMPP, you must select the appropriate plan coverage. The GMPP will be 60 months/60,000 miles Major Guard with no deductible. SmartCare will be for the term of the vehicle lease.
Dealer Application Instructions
Dealership personnel must complete a General Motors Protection Plan Contract Registration form (Item #701CMPP9 or 701ALL0) for each vehicle as follows:
- Vehicle Information: Complete all fields
- GMPP or MRP: Check GMPP
- Major Guard Coverage: Insert Vehicle In Service date; Select 60 months, 60,000 miles OR
- SmartCare Coverage: Select Term of Lease
- Plan Price/Tax/Total: Enter $-0- for SmartCare and Mechanical Coverage
- Customer: Complete all information
- Dealer: Dealer Name, Address, and Signature Required. NOTE THAT DEALER CODE SHOULD NOT BE ENTERED. ENTER CODE 699006.
- Lienholder: Powertrain Recall Major Guard/SmartCare Promotion must appear in the Lienholder/Lessor Field
- Customer Acceptance: Signature and Date Required
- Mailing: Dealerships will mail the completed Contract Registration form to:
Powertrain Recall Major Guard/SmartCare Promotion
National Mechanical Service Center
Attention: Ms. Shelvie Foust
P.O. Box 6855
Chicago, IL 60680-6855
PERSONAL & CONFIDENTIAL
Important: Do not submit via CDR.
| • | For copies of the Contract Registration, contact Program Supplies at 1-800-456-4578 and request Stock #701ALL0 or visit the GM Protection Plan Web address: www.gmacdealer.com. At the GMAC Dealer World home page, select the Online Ordering button and then select the "Point of Sale & Protection Plan Supplies" option. |
| • | If the customer's vehicle usage is defined as "Commercial Multi-Driver," the Commercial box must be checked. |
| • | If the customer purchased a GMPP at the time of the new vehicle sale, a cancellation form must first be processed. The CAC will assist in processing a refund of the customer's purchase price. |
There will be no charge to dealers or customers for these plans.
The customer will receive a GMPP or SmartCare verification in the mail.
In the event a customer purchased GMPP at the time of new vehicle sale, or SmartCare at the time of new vehicle lease, CAC will assist in processing a refund of the customer's purchase price for the respective plan while the customer retains plan coverage on the vehicle. If the customer's original purchase included purchase of a non-GMPP plan, please review this issue with the CAC.
Vehicles in Dealer Inventory
Vehicles in dealer inventory, which were found to have this condition are to remain on "Stop Delivery." DO NOT REPLACE THE ENGINE IN THESE VEHICLES. Additional instructions will be provided relative to dealer invoice credit, floor plan and vehicle return disposition to General Motors.
Engine Removal and Replace Procedure
| • | Ordering "Goodwrench" engines through GMSPO |
| Refer to the parts information section of this bulletin for Goodwrench service replacement engine assembly and other necessary part numbers. |
| • | Engine Removal |
| Refer to the engine section of the appropriate service manual for engine removal procedure. |
| • | Engine Component Transfer |
| Refer to the engine section of the appropriate service manual for engine component removal and installation procedures. |
| • | Engine Installation |
| Refer to the engine section of the appropriate service manual for engine installation procedure. |
| Install the Campaign Label |
| • | Engine Disposition for replaced engines |
| Engines must be returned under the normal GMSPO core return program. |
Campaign Identification Label
Each vehicle corrected in accordance with the instructions outlined in this Product Campaign Bulletin will require a "Campaign Identification Label". Each label provides a space to include the campaign number and the five (5) digit dealer code of the dealer performing the campaign service. This information may be inserted with a typewriter or a ball point pen.
Each "Campaign Identification Label" is to be located on the radiator core support in an area which will be visible when the vehicle is brought in by the customer for periodic servicing. When installing the Campaign Identification Label, be sure to pull the tab to allow the adhesion of the clear protective covering. Additional Campaign Identification Labels can be obtained from Dealer Support Materials by calling 1-888-414-6322 (Monday-Friday, 8:00 am to 5:00 pm EST). Ask for Item Number S-1015 when ordering.
Apply the "Campaign Identification Label" only on a clean, dry surface.
Claim Information
Submit a Product Campaign Claim with the information indicated below.
Repair Performed | Part Count | Part No. | Parts Allow | CC-FC | Labor Op | Labor Hours* | Net Item |
|---|---|---|---|---|---|---|---|
Engine passed bolt hole inspection. Dealer or Customer vehicle. Inspection: | NA | NA | NA | MA-96 | V0434 |
|
|
E-Car, Eldorado |
|
|
|
|
| 2.4 hrs |
|
G-Car, Aurora |
|
|
|
|
| 1.6 hrs |
|
KD, KE, KF-Car, DeVille |
|
|
|
|
| 1.9 hrs |
|
KS, KY-Car, Seville |
|
|
|
|
| 1.5 hrs |
|
Dealer inventory vehicle engine failed bolt hole inspection. Vehicle to be returned to GM. Inspection: | N/A | N/A | N/A | MA-96 | V0435 |
|
|
E-Car, Eldorado |
|
|
|
|
| 2.4 hrs |
|
G-Car, Aurora |
|
|
|
|
| 1.6 hrs |
|
KD, KE, KF-Car, DeVille |
|
|
|
|
| 1.9 hrs |
|
KS, KY-Car, Seville |
|
|
|
|
| 1.5 hrs |
|
Customer vehicle engine failed bolt hole inspection. Inspection and Engine R: | -- | -- | ** | MA-96 | V0436 |
| *** |
E-Car, Eldorado |
|
|
|
|
| 13.6 hrs |
|
G-Car, Aurora |
|
|
|
|
| 10.7 hrs |
|
KD, KE, KF-Car, DeVille |
|
|
|
|
| 13.1 hrs |
|
KS, KY- Car, Seville |
|
|
|
|
| 13.1 hrs |
|
Adjust Toe for Above, if necessary.Add: |
|
|
|
|
| Add: 0.6 hr |
|
* -- For Campaign Administrative Allowance, add 0.1 hours to the "Labor Hours". ** -- The "Parts Allowance" should be the sum total of the current GMSPO Dealer Net price plus 40% for parts needed to complete the repair. *** -- The amount identified in the "Net Item" column should represent the sum total of the Current GMSPO Net Price plus 40% for engine oil, oil filter and refrigerant needed to perform the required repairs. | |||||||
Refer to the General Motors Corporation Claims Processing Manual for details on Product Campaign Claim Submission.
December, 1999Dear <Division(s) Customer:
This notice is sent to inform you that General Motors is conducting a customer satisfaction recall campaign that includes your vehicle.
Reason For This Recall
General Motors has decided that certain 1999 Oldsmobile Aurora model vehicles, equipped with 4.0L engine and Cadillac Seville, DeVille and Eldorado model vehicles equipped with 4.6L engine may have engine blocks in which the cylinder bolt counterbore holes are too deep. This can cause a coolant leak and lead to engine failure.
What Will Be Done
To prevent the possibility of this condition occurring, your dealer will inspect the engine, and if necessary, replace the engine. This service will be performed for you at no charge .
If the inspection shows the engine in your <division> has this problem, General Motors will do the following:
| • | If you leased your vehicle, General Motors will have your dealer replace the engine assembly and provide your with courtesy transportation of the same brand while your vehicle is in for repair. Additionally, GM will provide a GM SmartCare maintenance policy on the repaired vehicle for the duration of your lease. If you bought GM SmartCare coverage with your 1999 <Oldsmobile Aurora or Cadillac DeVille, Seville, Eldorado>, GM will refund the purchase price of the GM SmartCare plan. |
| • | If you purchased your vehicle, General Motors will have your dealer replace the engine assembly and provide your with courtesy transportation of the same brand while your vehicle is in for repair. GM will cover your repaired vehicle with a GM Protection Plan Policy with a "0" deductible for a total coverage of 5 year/60,000 miles. If you bought GM Protection Plan coverage with your 1999 <Oldsmobile Aurora or Cadillac DeVille, Seville, Eldorado>, GM will refund the purchase price of the GM Protection Plan. |
Your complete satisfaction with your 1999 <Oldsmobile Aurora or Cadillac DeVille, Seville, Eldorado> is important to us. If your vehicle has this engine condition, your dealer will contact you to give you the details and answer your questions.
Contacting Your Dealer
Please contact your <<Division>> dealer as soon as possible to arrange a service date and to assure parts availability. Instructions for making this correction have been sent to your dealer. Please ask your dealer if you wish to know how much time will be needed to schedule, process, and repair your vehicle.
If you experience any trouble scheduling your vehicle or you have any questions regarding this recall action, please contact the appropriate Customer Assistance/Relations Center at the number listed below:
Division | Number | Deaf, Hearing Impaired, or Speech Impaired* |
|---|---|---|
Cadillac | 1-800-458-8006 | 1-800-833-2622 |
Oldsmobile | 1-800-442-6537 | 1-800-833-6537 |
* Utilizes Telecommunication Devices for the Deaf/Text Telephones (TDD/TTY) | ||
Customer Reply Card
The enclosed customer reply card identifies your vehicle. Presentation of this card to your dealer will assist in making the necessary correction in the shortest possible time. If you no longer own this vehicle, please let us know by completing the postage paid reply card and returning it to us.
We are sorry to cause you this inconvenience; however, we have taken this action in the interest of your continued satisfaction with our products.
<Division(s)>
General Motors Corporation
Enclosure
