BRAKE PULSATION AND ON CAR BRAKE ROTOR TURNING

MODELS AFFECTED: 1985-1989 DE VILLES AND FLEETWOODS 1986-1989 ELDORADOS AND SEVILLES 1987-1989 ALLANTES 1982-1988 CIMARRONS 1985-1989 FLEETWOODS AND BROUGHAMS
This bulletin discusses brake pulsation diagnosis and repair. Information is provided on a new caliper mounting bolt and sleeve bushing assembly for selected models and new equipment available for on-car rotor finishing.
CONDITION
Some vehicles may exhibit a pulsating or vibrating condition (roughness) when the brakes are applied. This bulletin specifically addresses pulsation resulting from disc brake rotor thickness variation. It should be recognized that vibration perceived by the customer may be induced by rear brakes or may also be due to vibration from other components such as drivetrain, tires, and/or road surface conditions.
CAUSES
One possible cause of rear drum brake pulsation is an out-of-round condition (radial run out) in a rear drum. This may occur during manufacture, however, a brake drum may also be distorted if pried off, struck with a hammer, or dropped during routine brake inspection or service. Causes of rear brake pulsation on vehicles equipped with four-wheel disc brakes are essentially the same as those described for front brake pulsation.
FRONT BRAKE PULSATIONS
One possible cause of front brake pulsation is variation in the thickness of the disc brake rotors. This condition generally appears after the vehicle has accumulated some mileage. Rotor thickness variation is the result of a combination of conditions that cause the rotor to wear while the vehicle is in motion and the brakes are not applied. All of the following three elements must be present:
1. Rotor/Bearing System Run Out 2. Caliper Drag 3. Abrasive Lining Material
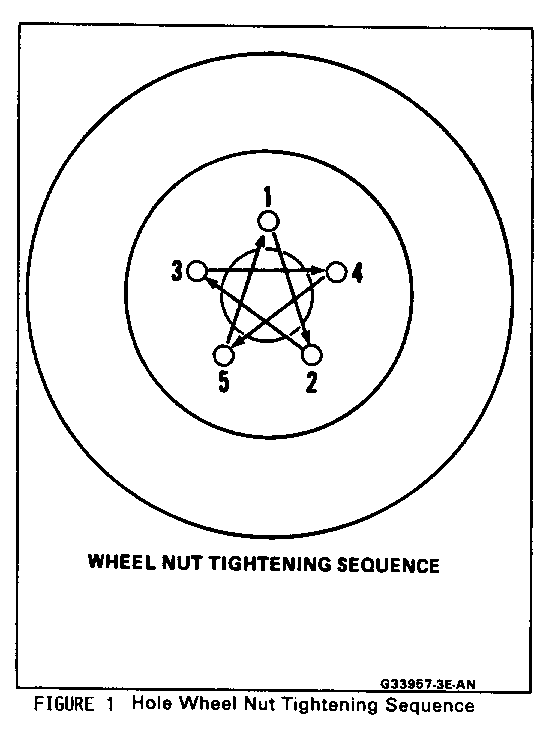
1. Rotor/Bearing System Run Out - For uneven wear to occur, rotor/bearing system run out must be great enough to produce high spots on the rotor. Lateral run out on brake rotors may be caused by tolerance "stack-up" and by distortion due to over tightening wheel nuts or tightening the wheel nuts in the wrong sequence. (To prevent distortion of the hub and rotor assembly, wheel nuts should be tightened in two steps using a suitable torque wrench following the alternate nut tightening sequence shown in Figure 1. Applying torque in two steps helps reduce distortion by providing a gradual and even distribution of clamp load over the surface of the hub.)
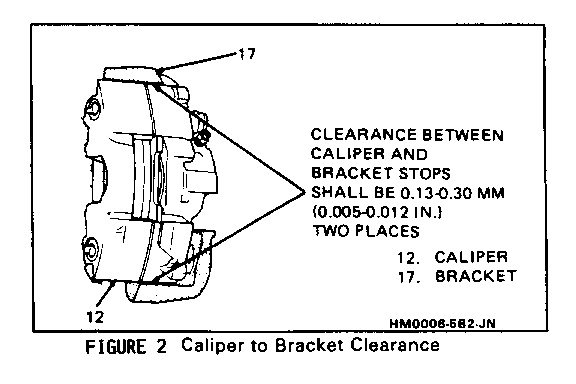
2. Caliper Drag - Disc brake pads (inboard and/or outboard) must drag sufficiently to contact high spots on the rotor when brakes are not applied. Caliper drag is usually caused by interference between the caliper and the bracket stops on the steering knuckle or by binding of the caliber mounting bolt sleeve bushings.
(Caliper-to-bracket stop clearance should be checked with calipers in position and the mounting bolts torqued to specification. Clearance measured at the two locations shown in Figure 2 should be within specifications for the vehicle tested. If clearance is too great, the caliper may move and cause a clunking noise when brakes are applied. If there is not enough clearance, the caliper may drag on the knuckle. Caliper bracket stops can be filed to adjust clearance.)
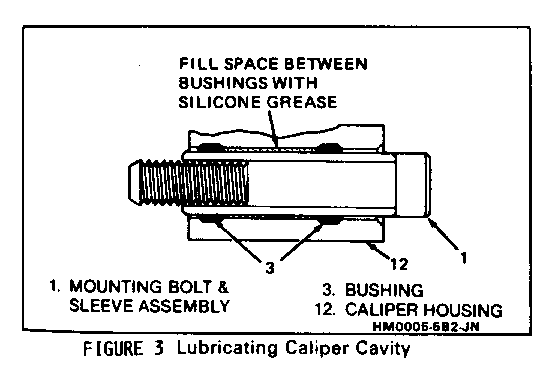
When servicing calipers, caliper mounting bolts should be cleaned and inspected for corrosion. Always replace corroded mounting bolts; do not attempt to polish away corrosion. To prevent binding, the mounting bolt sleeve bushings should be coated with silicone lubricant, P/N 12345579 or equivalent. Refer to Figure 3. A light application of silicone lubricant should also be applied to the caliper bracket stops.
1989 DeVilles and Fleetwoods are equipped with a new caliper mounting bolt and sleeve bushing assembly that reduces the possibility of binding. New parts are available for service of past model 1982-1988 Cimarrons, 1985-1988 DeVilles, and Fleetwoods as follows:
Carline PN
DeVille, Fleetwood 18016163 Cimarron 18016164
Parts are currently available from GMSPO.
3. Abrasive Lining Material - For uneven rotor wear to occur, shoe lining material must be abrasive enough to cause wear while rubbing against rotor high spots. Some types of brake lining material are more abrasive than others. The more abrasive the material, the more quickly wear will occur when rotor high spots contact the lining.
Product Engineering selects the type of brake lining material to be used based on the friction coefficient requirements of a particular vehicle. Brake linings and other components should be replaced only with the parts recommended in the GMSPO parts catalog or the latest service bulletin.
DIAGNOSIS
Test Drive:
Before any diagnosis is performed, it is essential that the vehicle be road tested to determine the exact nature of the problem and to get a feel for the vehicle vibration characteristics. The road test is used to determine whether brake pulsation is present or whether the vibration is due to some other cause (tire and wheel vibration/balance, bent or out-of-round wheel rims, drivetrain, etc.).
When a brake pulsation condition is confirmed, a road test will determine whether the front or rear brakes are the cause.
If vibration/roughness is determined to be from a source other than brakes, perform necessary repairs.
Brakes should be tested while driving on a dry, clean and a reasonably smooth road surface. Rear brake pulsation is more easily isolated. When rear brake pulsation has been eliminated or repaired, a full brake system test can be used to diagnose front brake pulsation. Begin by testing the rear brakes as follows:
Rear Brake Pulsation Test:
1. Accelerate to approximately 20 mph. 2. Place gear selector in neutral.
3. a. On Cimarrons, hold park brake release in return position while lightly applying the parking brake to stop the vehicle.
b. On all other models, hold the gear selector in Neutral while applying the parking brake lightly to stop the vehicle. Moving the gear selector to any drive position allows vacuum release of the parking brake. (Failure to release the parking brake could result in rear brake lock.)
4. OBSERVE: Does the parking brake pedal pulsate? Is there noticeable vibration in the vehicle (different than road induced)?
5. If either of these conditions is present, refinish or replace drums/rotors as required.
If no brake pulsation is indicated, test the front brakes.
Front Brake Pulsation Test (Full Brake System):
1. Perform 20 to zero mph brake test:
a. Accelerate vehicle to 20 mph. b. Place selector in neutral. c. Apply brakes lightly to stop the vehicle. If pulsation is felt, service front brakes as described in this bulletin. If no pulsation is present, continue to step 2.
2. Perform 45 to 50 mph brake test: a. Accelerate vehicle to 50 mph. b. Place selector in neutral. c. Apply brakes using medium pedal pressure. If pulsation is felt, service front brakes as described in this bulletin. If no pulsation is present, continue to step 3.
3. Heat up the brake system by performing 10 stops from approximately 30 mph using medium pedal pressure. Then repeat 20 to zero mph test in step 1.
a. If pulsation is felt, service front brakes as described in this bulletin. b. If no pulsation is present, check tires and drivetrain components for other possible causes of customer complaint.
ROTOR REFINISHING
Rotor refinishing should only be performed when rotor thickness variation (non-parallelism) is present or when the rotor surface has scoring grooves deeper than .015 inches. Replacement rotors taken from stock should be mounted and checked for lateral run out; and if run out exists, then the rotor must be refinished on the vehicle.
When rotors are refinished, a correct surface finish is important for satisfactory braking. Following a light finish-cutting operation of between .001 and .002 inches, correct surface should be obtained by rubbing with 120 grit emery cloth. Surface finish may be checked by running a fingernail over the surface of a new rotor from stock or one from a known good vehicle. For best results, cutting equipment should be maintained in correct working condition. If an acceptable finish surface cannot be obtained, contact the equipment manufacturer for assistance.
On-Vehicle Rotor Finishing:
The recommended procedure for refinishing brake rotors is through the use of on-vehicle rotor turning equipment (Kent-Moore J-37704). This method is particularly effective because it can compensate for stacked tolerances that cause rotorlbearing system run out, and help prevent a return of the condition. Full set up and operating instructions are provided with the equipment. Contact Kent-Moore for ordering information.
We believe this source and their equipment to be reliable. There may be additional manufacturers of such equipment. General Motors does not endorse, indicate any preference for, or assume any responsibility for product or equipment from these firms or for any such items which may be available from other sources.
Lateral Run out Check:
A lateral run out check is an integral part of the on-car refinishing procedure. If off-vehicle rotor refinishing is used, the following lateral run out check should be performed:
1. Remove wheel, invert wheel nuts, and reinstall them on the studs. Tighten nuts to 20 lbs. ft. following the tightening sequence shown in Figure 1.
2. Fasten a dial indicator to the caliper so that the indicator button contacts the rotor approximately 13mm (0.500") from the outer edge.
3. Zero the dial indicator needle.
4. Rotate the rotor one complete revolution while observing run out indicated on the dial. Total Indicated Run out (TIR) should not exceed 0.08mm (0.003").
On front-wheel-drive vehicles, lateral rotor run out due to stacked tolerances can often be reduced by rotating (indexing) the rotor one or two bolt holes in relation to the hub. If excessive run out cannot be corrected by indexing the rotor, check the hub and bearing assembly for looseness.
NOTICE: Whenever the brake rotor has been separated from the wheel bearing flange, clean any rust or foreign material from the mating surfaces of the wheel bearing flange and rotor. Failure to do this may result in increased lateral run out of the rotor and brake pulsation.
5. If lateral rotor run out exceeds the amount specified in step 4, refinish the rotor on the vehicle.
Rotor Thickness Variation Check:
Variations in rotor thickness can be checked by measuring the thickness of the rotor at four or more points around the surface of the rotor. Use a micrometer calibrated in one-tenth increments per .001". All measuring points must be the same distance in from the edge of the rotor.
A rotor that varies in thickness by more than 0.013mm (0.0005") can cause pedal pulsation and/or front-end vibration during brake applications. Rotors with 0.013mm or higher thickness variations should be refinished or replaced as necessary.
General Motors bulletins are intended for use by professional technicians, not a "do-it-yourselfer". They are written to inform those technicians of conditions that may occur on some vehicles, or to provide information that could assist in the proper service of a vehicle. Properly trained technicians have the equipment, tools, safety instructions and know-how to do a job properly and safely. If a condition is described, do not assume that the bulletin applies to your vehicle, or that your vehicle will have that condition. See a General Motors dealer servicing your brand of General Motors vehicle for information on whether your vehicle may benefit from the information.
