It is very important to know how much weight your vehicle can carry. This weight is called the vehicle capacity weight and includes the weight of all occupants, cargo, and all nonfactory-installed options. Two labels on your vehicle show how much weight it may properly carry, the Tire and Loading Information label and the Certification label.
Caution: Do not load the vehicle any heavier than the Gross Vehicle Weight Rating (GVWR), or either the maximum front or rear Gross Axle Weight Rating (GAWR). If you do, parts on the vehicle can break, and it can change the way your vehicle handles. These could cause you to lose control and crash. Also, overloading can shorten the life of the vehicle.
Tire and Loading Information Label
Label Example
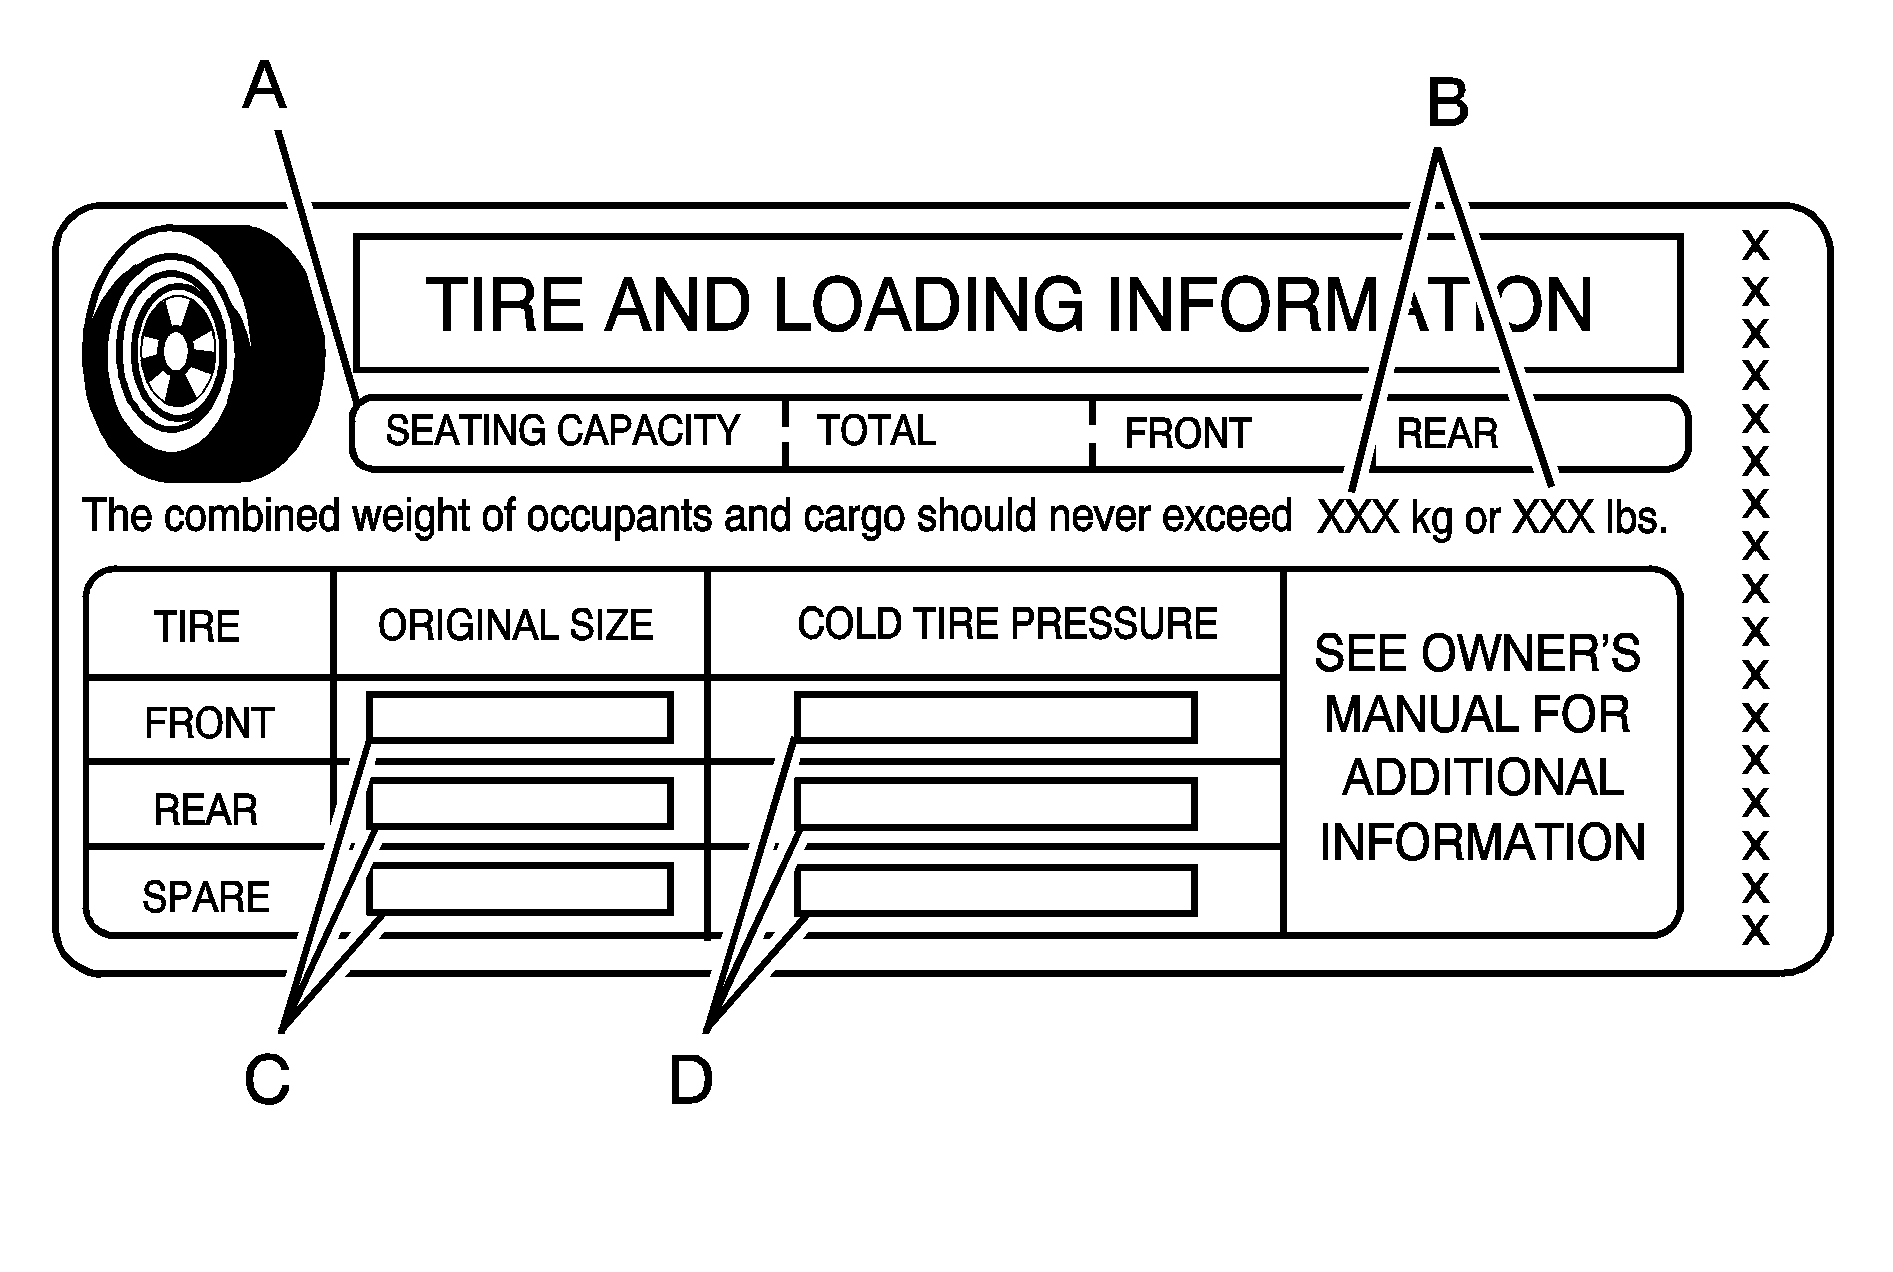
A vehicle specific Tire and Loading Information label is attached to the vehicle's center pillar (B-pillar). With the driver's door open, you will find the label attached below the door lock post (striker). The Tire and Loading Information label shows the number of occupant seating positions (A), and the maximum vehicle capacity weight (B) in kilograms and pounds.
The Tire and Loading Information label also shows the tire size of the original equipment tires (C) and the recommended cold tire inflation pressures (D). For more information on tires and inflation see Tires and Inflation - Tire Pressure .
There is also important loading information on the Certification label. It tells you the Gross Vehicle Weight Rating (GVWR) and the Gross Axle Weight Rating (GAWR) for the front and rear axle; see "Certification Label" later in this section.
If you have a Professional Vehicle, a Tire and Loading Information label specific to your vehicle will be provided and installed by the final body manufacturer. The Tire and Loading Information label, should be attached to the B-pillar of your vehicle. See the final stage manufacturer's manual or contact them directly. The label shows the original tires installed on your professional vehicle and the recommended cold tire inflation pressures for those tires. The label also tells you the professional vehicle's capacity weight.
Steps for Determining Correct Load Limit
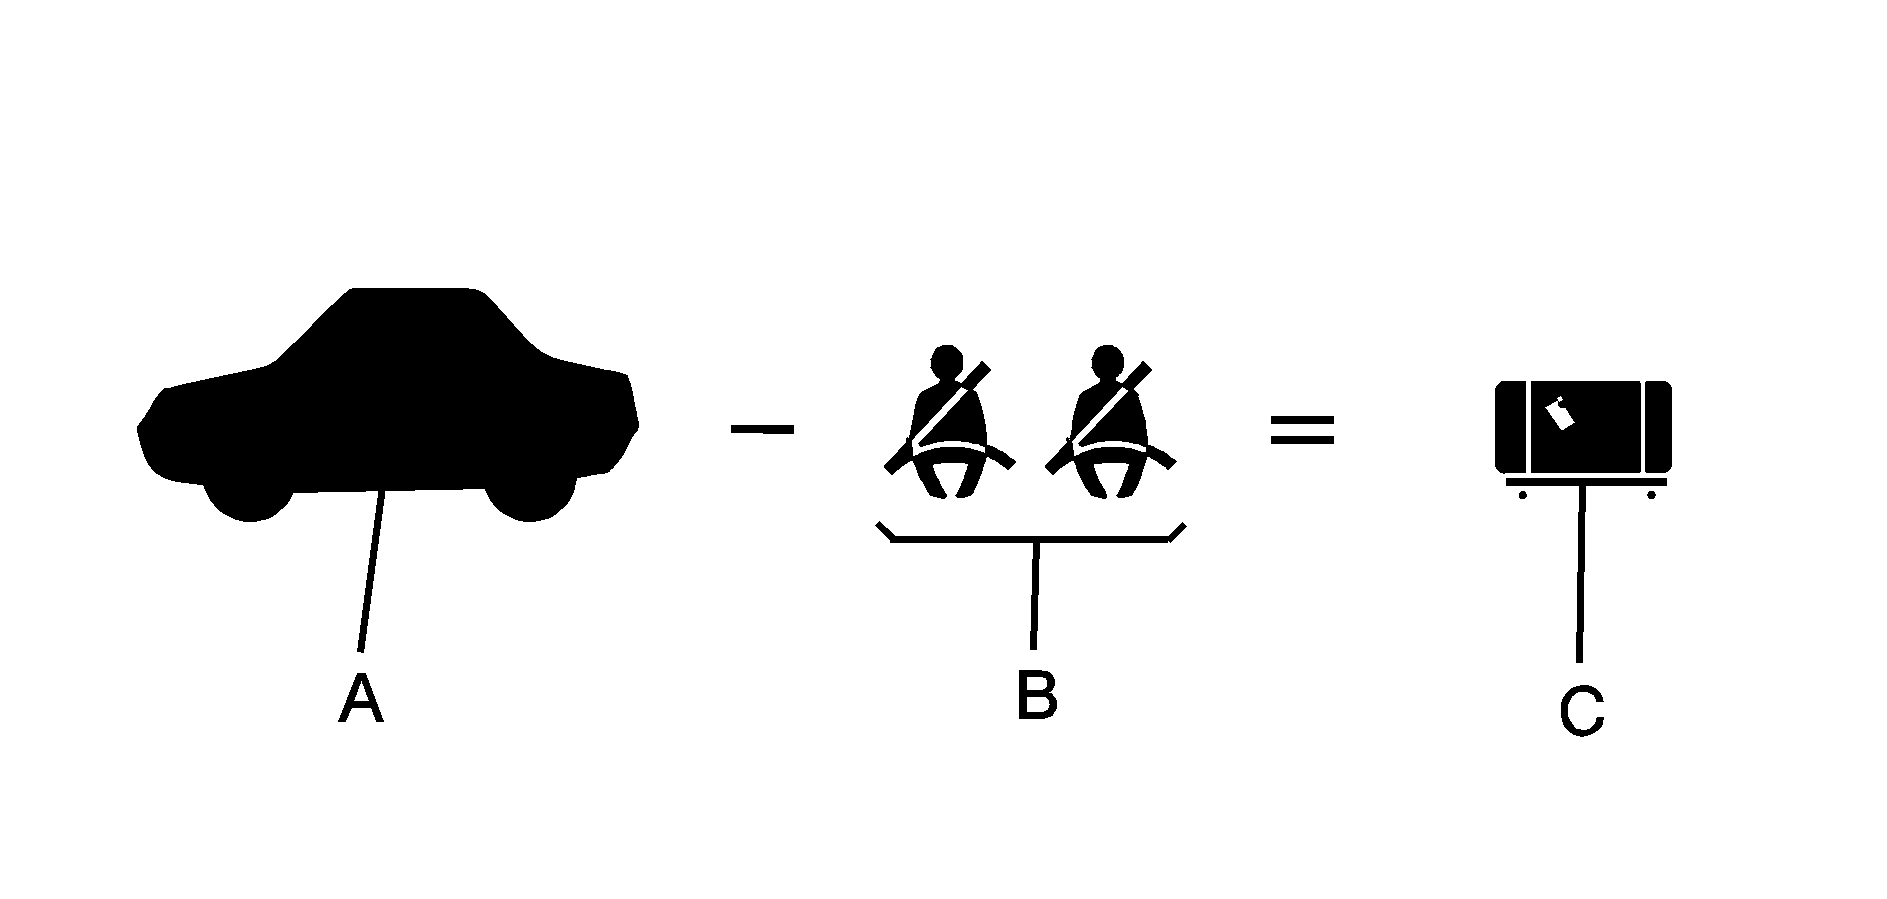
- Locate the statement "The combined weight of occupants and cargo should never exceed XXX kg or XXX lbs" on your vehicle's placard.
- Determine the combined weight of the driver and passengers that will be riding in your vehicle.
- Subtract the combined weight of the driver and passengers from XXX kg or XXX lbs.
- The resulting figure equals the available amount of cargo and luggage load capacity. For example, if the "XXX" amount equals 1400 lbs and there will be five 150 lb passengers in your vehicle, the amount of available cargo and luggage load capacity is 650 lbs (1400 - 750 (5 x 150) = 650 lbs).
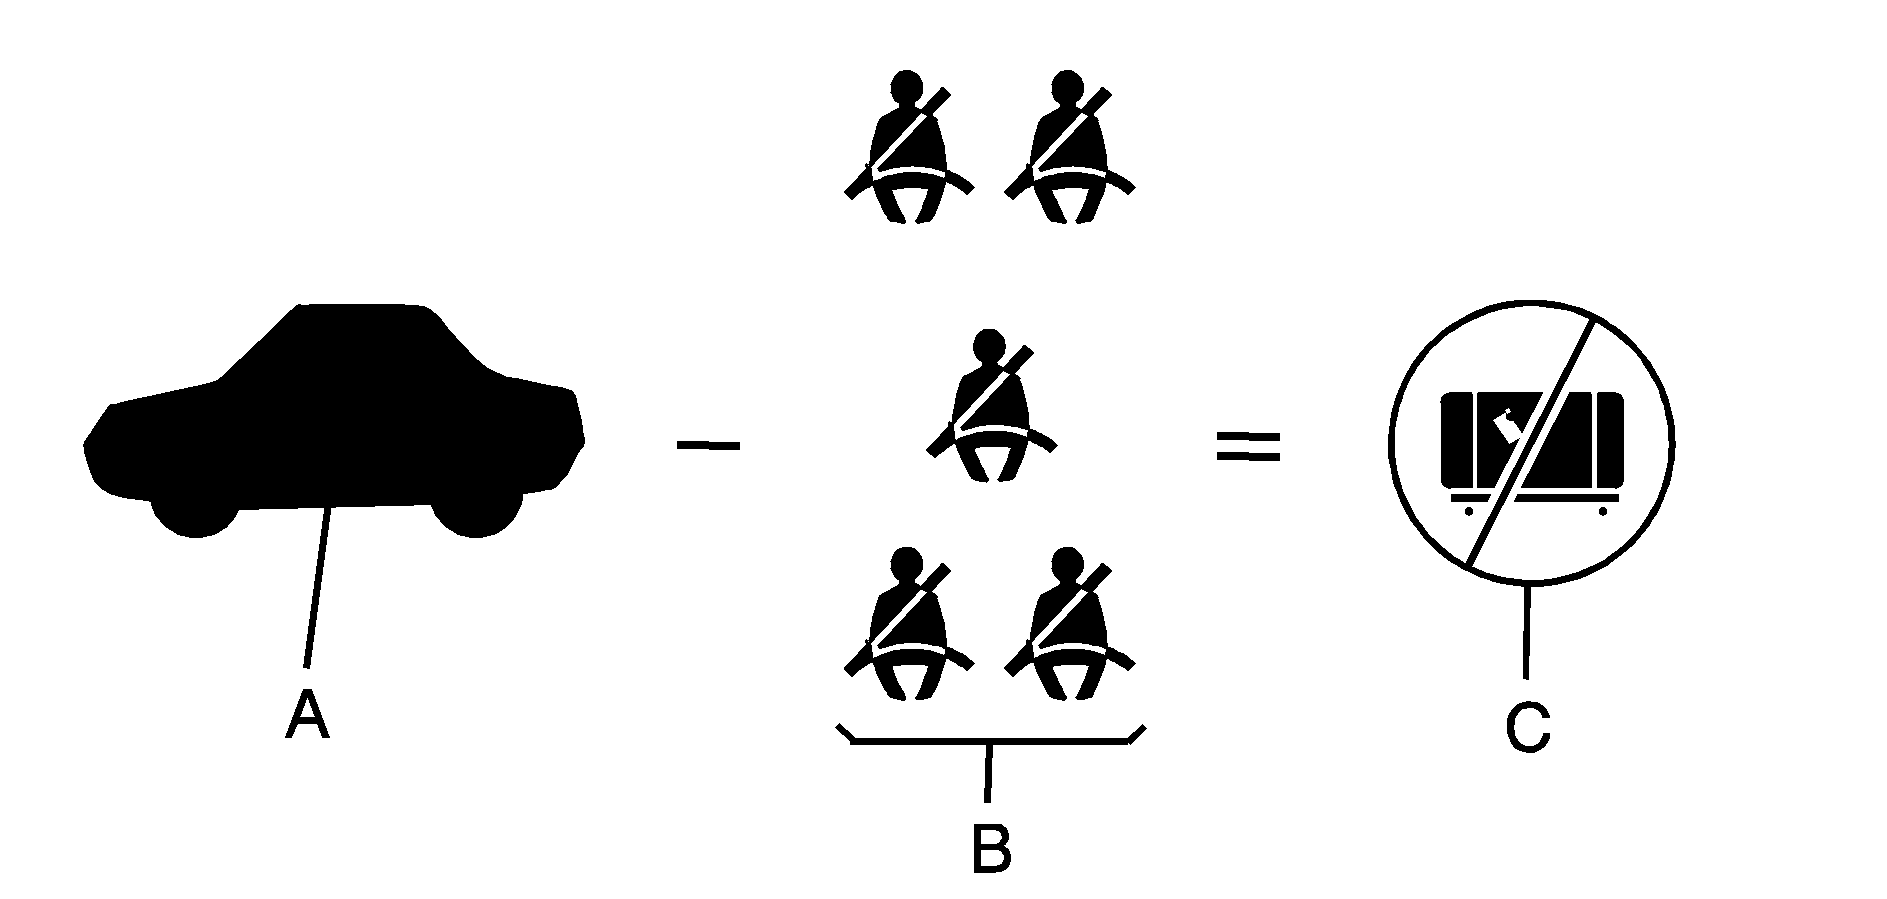
- Determine the combined weight of luggage and cargo being loaded on the vehicle. That weight may not safely exceed the available cargo and luggage load capacity calculated in Step 4.
- If your vehicle will be towing a trailer, the load from your trailer will be transferred to your vehicle. Consult this manual to determine how this reduces the available cargo and luggage load capacity of your vehicle.
If your vehicle can tow a trailer, see "Towing a Trailer" for important information on towing a trailer, towing safety rules, and trailering tips.
Example 1
Item | Description | Total |
|---|---|---|
A | Vehicle Capacity Weight for Example 1 = | 1,000 lbs (453 kg) |
B | Subtract Occupant Weight @ 150 lbs (68 kg) × 2 = | 300 lbs (136 kg) |
C | Available Occupant and Cargo Weight = | 700 lbs (317 kg) |
Example 2

Item | Description | Total |
|---|---|---|
A | Vehicle Capacity Weight for Example 2 = | 1,000 lbs (453 kg) |
B | Subtract Occupant Weight @ 150 lbs (68 kg) × 5 = | 750 lbs (340 kg) |
C | Available Cargo Weight = | 250 lbs (113 kg) |
Example 3
Item | Description | Total |
|---|---|---|
A | Vehicle Capacity Weight for Example 3 = | 1,000 lbs (453 kg) |
B | Subtract Occupant Weight @ 200 lbs (91 kg) × 5 = | 1,000 lbs (453 kg) |
C | Available Cargo Weight = | 0 lbs (0 kg) |
Refer to your vehicle's Tire and Loading Information label for specific information about your vehicle's capacity weight and seating positions. The combined weight of the driver, passengers, and cargo should never exceed your vehicle's capacity weight.
Certification Label
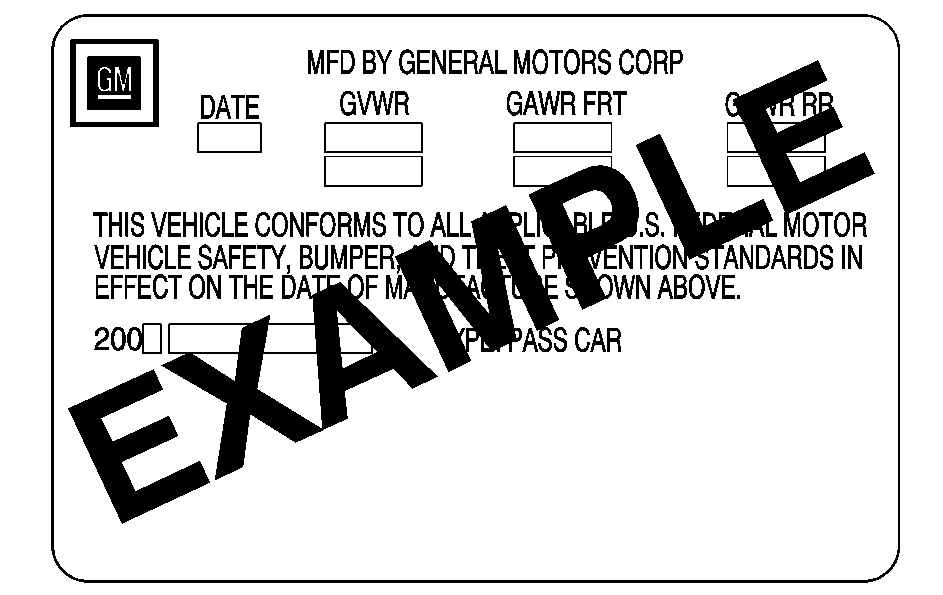
A vehicle specific Certification label is attached to the rear edge of the driver's door. This label shows the gross weight capacity of your vehicle, called the Gross Vehicle Weight Rating (GVWR). The GVWR includes the weight of the vehicle, all occupants, fuel, and cargo. Never exceed the GVWR for your vehicle, or the Gross Axle Weight Rating (GAWR) for either the front or rear axle.
If your vehicle is a Professional Vehicle, the vehicle specific Certification label is provided by the final stage manufacturer. The coach-builder should be consulted if the final stage manufacturer's label is not present. The Gross Vehicle Weight Rating GVWR label should be on the driver's door edge.
If you do have a heavy load, you should spread it out. See "Steps for Determining Correct Load Limit" earlier in this section.
Caution: Do not load the vehicle any heavier than the Gross Vehicle Weight Rating (GVWR), or either the maximum front or rear Gross Axle Weight Rating (GAWR). If you do, parts on the vehicle can break, and it can change the way your vehicle handles. These could cause you to lose control and crash. Also, overloading can shorten the life of the vehicle.
Notice: Overloading your vehicle may cause damage. Repairs would not be covered by your warranty. Do not overload your vehicle.
If you put things inside your vehicle, like suitcases, tools, packages, or anything else, they will go as fast as the vehicle goes. If you have to stop or turn quickly, or if there is a crash, they will keep going.
Caution: Things you put inside your vehicle
can strike and injure people in a sudden stop or turn, or in a crash.
• Put things in the trunk of your vehicle. In a trunk,
put them as far forward as you can. Try to spread the weight evenly. • Never stack heavier things, like suitcases, inside
the vehicle so that some of them are above the tops of the seats. • Do not leave an unsecured child restraint in your
vehicle. • When you carry something inside the vehicle,
secure it whenever you can.
Automatic Level Control
This feature keeps the rear of your vehicle level as the load changes. It is automatic, you do not need to adjust anything.
This type of level control is fully automatic and will provide a better leveled riding position as well as better handling under a variety of passenger and loading conditions. An air compressor connected to the rear shocks will raise or lower the rear of the vehicle to maintain proper vehicle height. The system is activated when the ignition key is turned to ON/RUN and will automatically adjust vehicle height thereafter. The system may exhaust (lower vehicle height) for up to ten minutes after the ignition key has been turned to LOCK/OFF. You may hear the air compressor operating when the height is being adjusted.
