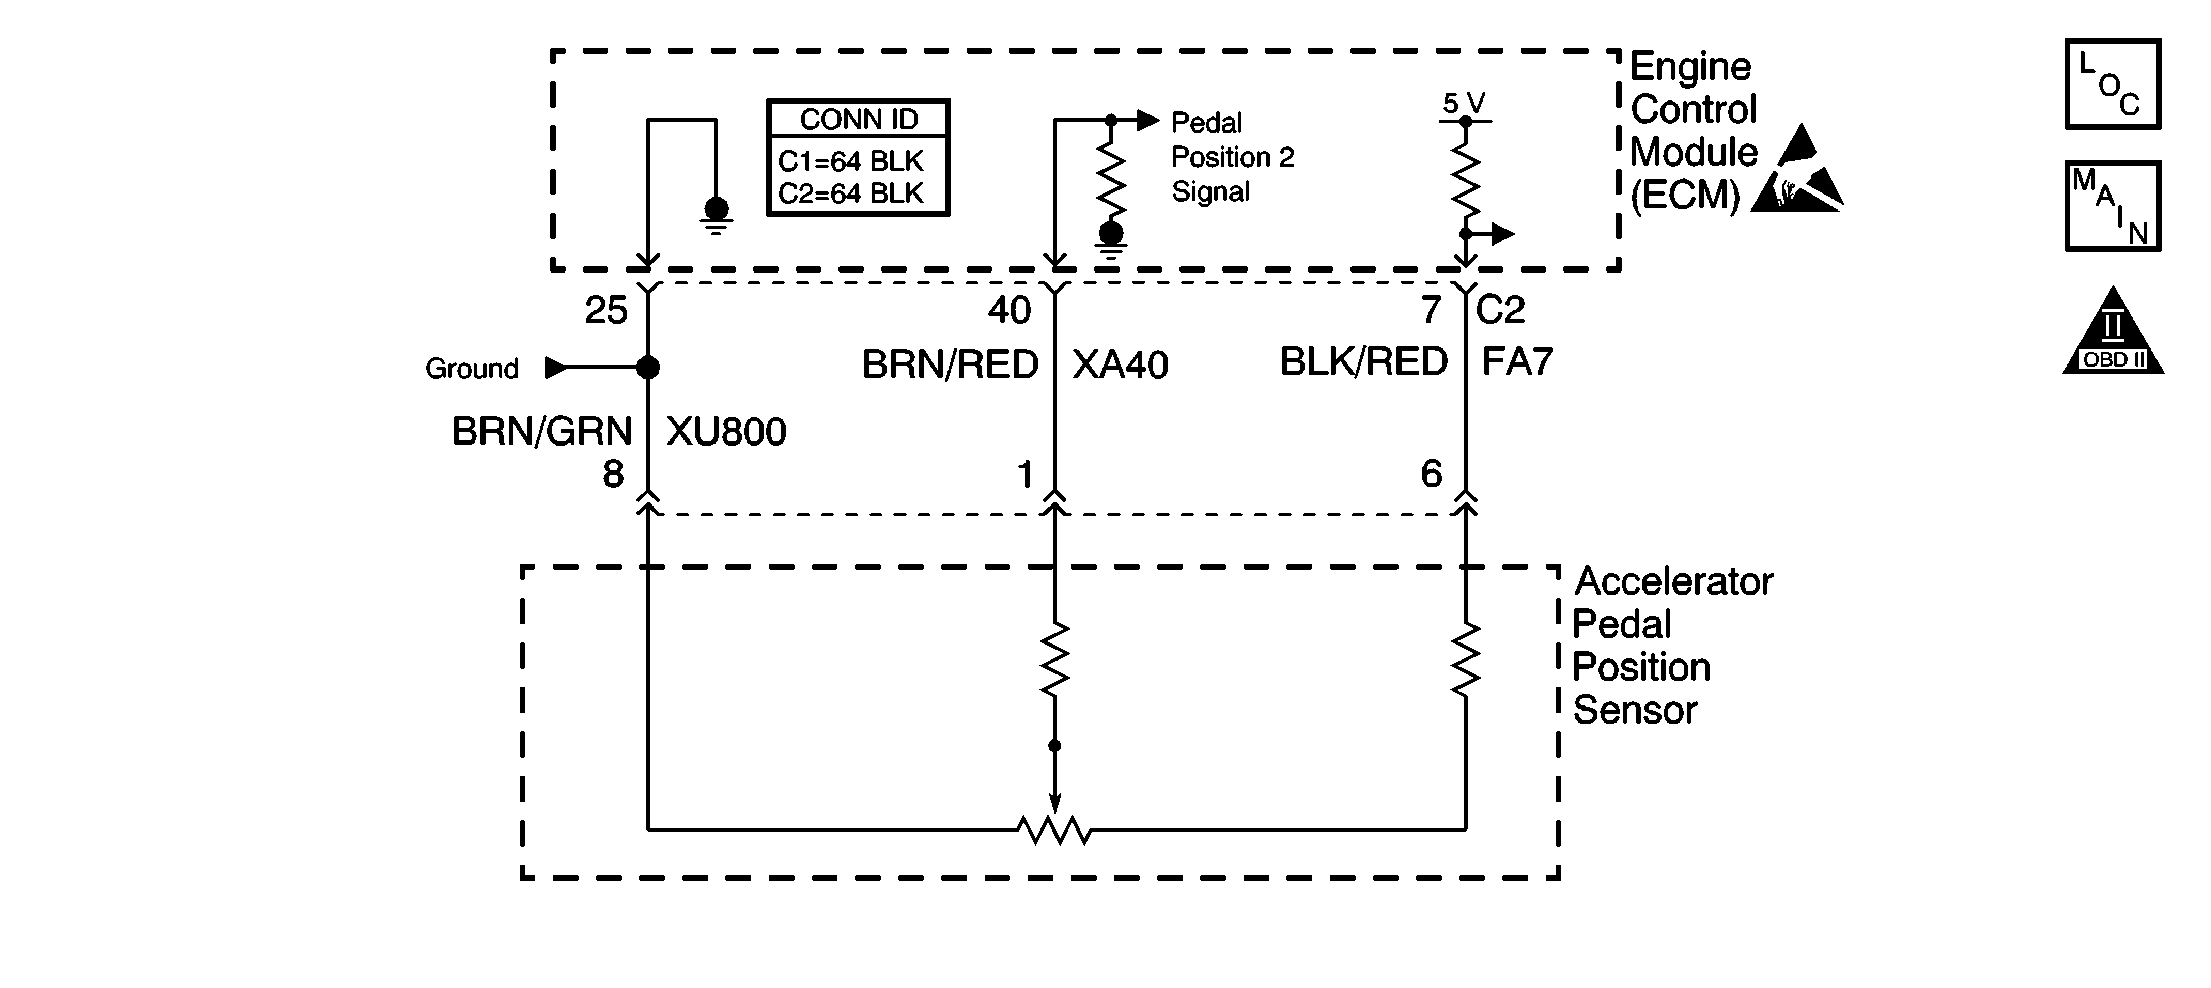
Circuit Description
The accelerator pedal position (APP) sensors are two sensors that are housed inside one assembly.
The ECM supplies the 5 volt reference and the ground circuit for both of the sensors. The APP 1 sensor sends a signal to the ECM of the drivers demand. The ECM then calculates the proper spark and PWM fueling.
The APP 1 sensor is the main control of the system. The APP 2 sensor is used for comparison of the APP 1 sensor. The ECM constantly monitors these two sensors and if the sensors are not within a calibrated value a DTC will set.
Conditions for Running the DTC
The battery voltage is greater than 7 volts.
Conditions for Setting the DTC
| • | The APP sensor 2 voltage is greater than 4.8 volts or less than 0.10 volt. |
| • | The rationality to APP sensor 1 is greater than 0.2 volt in part load, or greater than 1.0 volt in full throttle. |
Action Taken When the DTC Sets
The ECM illuminates the malfunction indicator lamp (MIL) and records the operating conditions in the Freeze Frame on the first drive trip that the diagnostic runs and fails.
Conditions for Clearing the MIL/DTC
| • | The ECM turns off the MIL after 3 consecutive drive trips that the diagnostic runs and passes. |
| • | A History DTC clears after 40 consecutive warm-up cycles in which no failures are reported by this diagnostic or any other emission related diagnostic. |
| • | The ECM battery voltage is interrupted. |
| • | The scan tool clears the MIL/DTC. |
Diagnostic Aids
With the ignition ON and the engine OFF view the APP sensor 1 and the APP sensor 2 with a scan tool. Slowly depress the accelerator pedal, if one sensor value changes and the other does not, inspect the sensor circuits for high resistance or shorts. If the circuits are OK, replace the APP sensor.
Notice: Using the J 35616-A Connector Test Adapter Kit will prevent damage to the harness connector terminals.
Use the J 35616 Connector Test Adapter Kit for any test that requires probing the ECM harness connector or a component harness connector.
Check for the following conditions:
| • | Poor connections at the ECM or at the component--Inspect the harness connectors for the following conditions: |
| - | Backed out terminals |
| - | Improper mating |
| - | Broken locks |
| - | Poor terminal to wire connection |
| - | Refer to Engine Control Module Diagnosis , Checking Terminal Contact for the proper procedure. |
| • | Damaged harness--Inspect the wiring harness for damage. If the harness appears to be OK, observe the scan tool while moving the related connectors and the wiring harnesses. A change in the display may help in order to locate the fault. If the sensor signal is only affected when the harness is moved at a component, and there is no problem with the harness or the connections, the component may be damaged. |
| Refer to Symptoms for the Intermittents. |
| • | Inspect the APP sensor mounting bolts and actuator arm. The bolts should be tight. If the APP sensor is loose, a false reading could be sent to the ECM. |
Test Description
The numbers below refer to the step numbers on the diagnostic table.
-
This step tests for the proper operation of the circuit in the low voltage range.
-
This step tests for the proper operation of the circuit in the high voltage range. If the fuse in the jumper opens when you perform this test, the signal circuit is shorted to ground.
-
This step tests for a short to voltage in the 5 volt reference circuit.
-
This step tests for a high resistance or an open in the ground circuit.
Step | Action | Values | Yes | No |
|---|---|---|---|---|
1 | Did you perform the Powertrain On-Board Diagnostic (OBD) System Check? | -- | Go to Step 2 | |
2 |
Does the scan tool indicate that the APP sensor 2 parameter is within the specified range? | 0.2 V to 4.8 V | Go to Diagnostic Aids | Go to Step 3 |
Does the scan tool indicate that the APP sensor 2 parameter is less than the specified value? | 0.2 V | Go to Step 4 | Go to Step 10 | |
Does the scan tool indicate that the APP sensor 2 parameter is more than the specified value? | 4.8 V | Go to Step 5 | Go to Step 8 | |
Does the voltage measure less than the specified value? | 5.2 V | Go to Step 6 | Go to Step 7 | |
Does the resistance measure less than the specified value? | 5 ohms | Go to Step 12 | Go to Step 11 | |
7 | Test the 5 volt reference circuit of the APP sensor 2 for a short to voltage. Refer to Wiring Repairs in Wiring Systems. Did you find and correct the condition? | -- | Go to Step 16 | Go to Step 13 |
8 | Test the 5 volt reference circuit of the APP sensor 2 for a short to ground, a high resistance, or an open. Refer to Wiring Repairs in Wiring Systems. Did you find and correct the condition? | -- | Go to Step 16 | Go to Step 9 |
9 | Test the signal circuit of the APP sensor 2 for a short to ground, a short to a ground circuit, a high resistance, or an open. Refer to Wiring Repairs in Wiring Systems. Did you find and correct the condition? | -- | Go to Step 16 | Go to Step 13 |
10 | Test the signal circuit of the APP sensor 2 for a short to voltage. Refer to Wiring Repairs in Wiring Systems. Did you find and correct the condition? | -- | Go to Step 16 | Go to Step 13 |
11 |
Did you find and correct the condition? | -- | Go to Step 16 | Go to Step 13 |
12 | Inspect for connections at the harness connector of the APP sensor 2. Refer to Intermittents and Poor Connections Diagnosis and Connector Repairs in Wiring Systems. Did you find and correct the problem? | -- | Go to Step 16 | Go to Step 14 |
13 | Inspect for poor connections at the harness connector of the engine control module. Refer to Intermittents and Poor Connections Diagnosis and Connector Repairs in Wiring Systems. Did you find and correct the condition? | -- | Go to Step 16 | Go to Step 15 |
14 | Replace the throttle body assembly . Refer to Throttle Body/Throttle Position Sensor Replacement . Did you complete the replacement? | -- | Go to Step 16 | -- |
15 |
Does the scan tool indicate the diagnostic Passed? | -- | Go to Step 16 | -- |
16 | Does the scan tool display any additional, undiagnosed DTCs? | -- | Go to Step 2 | System OK |
