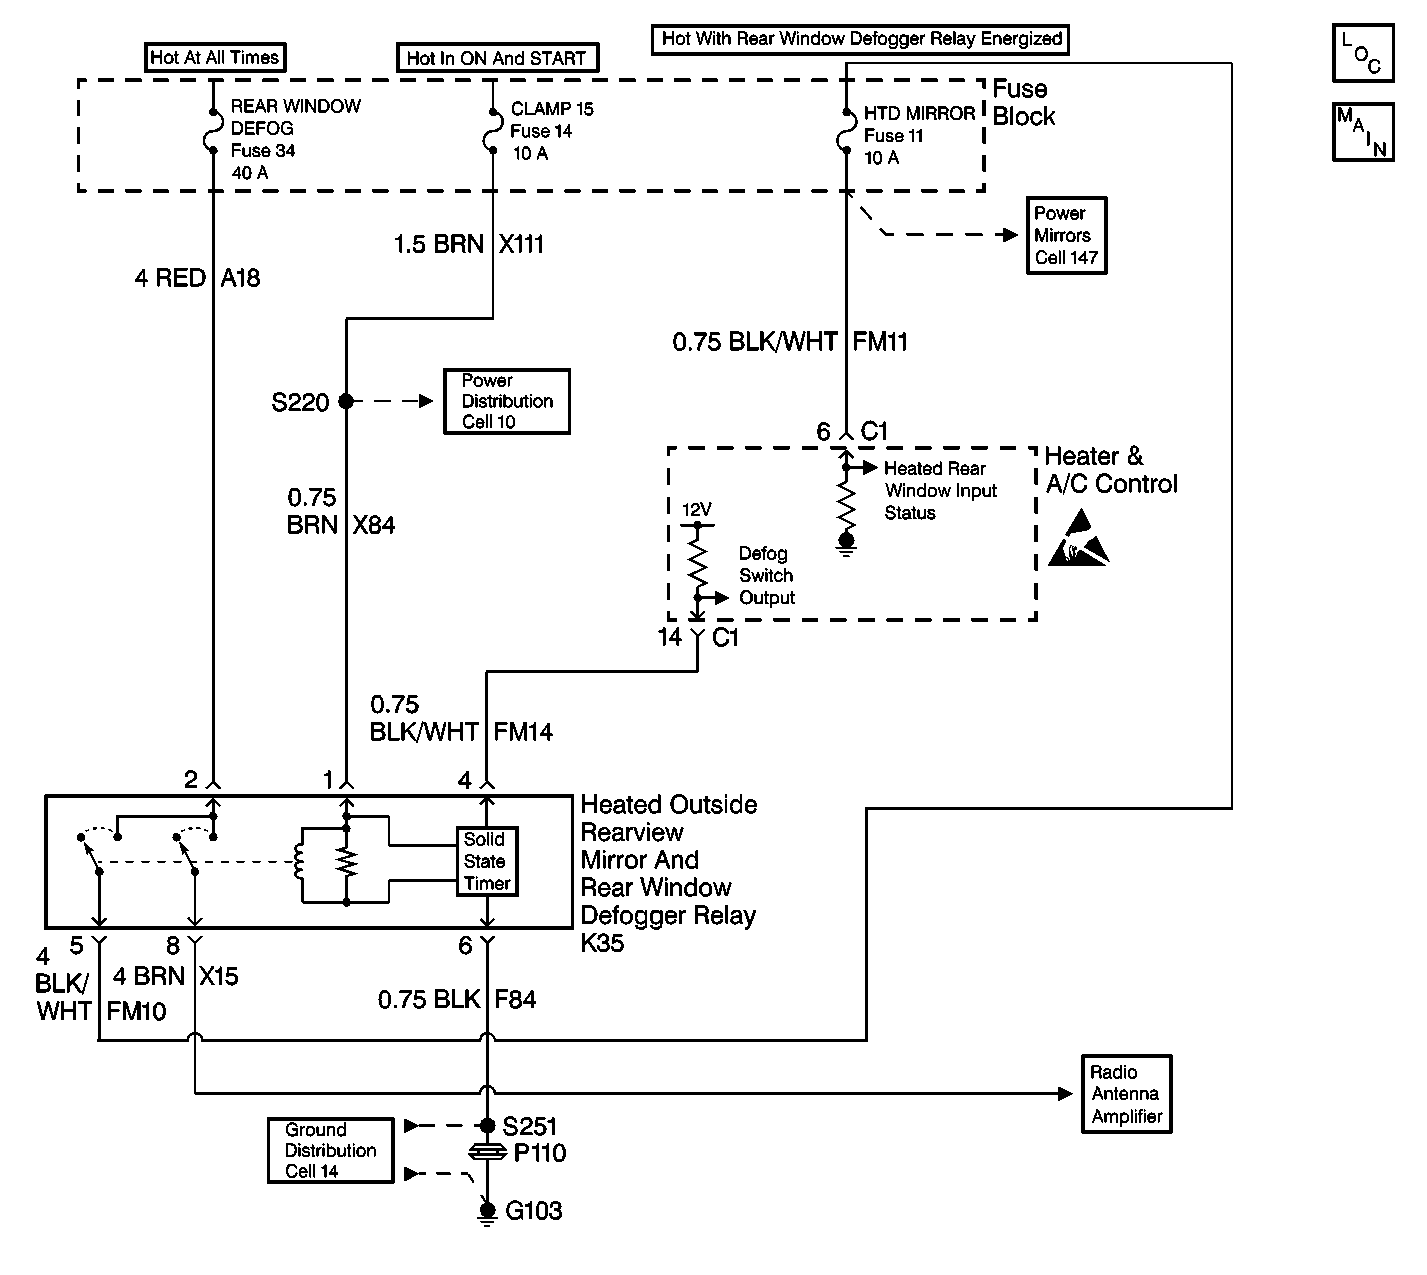
Circuit Description
Pressing the rear defogger button on the heater and A/C control unit activates the rear defogger and both heated outside rear view mirrors. The heater and A/C control unit supplies a reference voltage of approximately 6 to 7 volts to terminal 4 of the relay box where the heated outside rear view mirror and rear window defogger relay (K35) resides. Relay K35 completes the reference voltage circuit to ground. Pressing the rear defogger button, when the engine is running, momentarily opens the reference circuit from ground. This signals the relay to energize the relay coil. When the relay coil energizes, two relay contacts close supplying voltage to the radio antenna amplifier which routes the voltage to the rear defogger grid. The radio antenna amplifier provides the ground for the rear defogger grid. Voltage is also supplied to the heated outside rear view mirrors through the HTD MIRROR fuse. Ground G103 provides the ground for the heated outside rear view mirrors. With voltage supplied and ground provided to the defogger grid and outside mirrors, the grid and outside mirrors begin to warm. A rear defog symbol is illuminated on the heater and A/C control display indicating that the rear defogger is active.
Approximately fifteen minutes after the rear defogger is activated, a timer (internal to relay K35) deactivates the relay. This opens the relay contacts and terminates the voltage source to the defogger grid and outside mirrors. This begins to cool the rear window and outside mirror glass.
The rear defogger operation can be shut off anytime before the fifteen minute time period expires by pressing the rear defogger button.
In addition to the rear defogger grid and heated outside rear view mirrors receiving voltage, the heater and A/C control unit receives a voltage feedback signal at connector C1 terminal 6. Whenever a rear defog request is made, with the engine running, the heater and A/C control unit will monitor the feedback circuit for the voltage. Receiving the voltage feedback signal indicates that the relay energized and the circuit is complete to the heater and A/C control unit.
Conditions for Setting the DTC
A DTC 34 indicates that the heater and A/C control unit did not receive the voltage feedback signal at connector C1 terminal 6 after a rear defog request was made.
Action Taken When the DTC Sets
| • | The heater and A/C control stores a DTC 34 in memory. |
| • | DTCs 32 and 33 may also be present and is normal. |
Conditions for Clearing the DTC
| • | Using a scan tool. |
| • | When the condition for the fault is no longer present the DTC changes from a current status to a history status. |
| • | A history DTC will clear after 20 consecutive ignition cycles if the condition for the fault is no longer present. |
Diagnostic Aids
| • | If the DTC is a history or an intermittent. Try to perform the tests shown while moving wiring harnesses and connectors, this can often cause the malfunction to appear. |
| • | When moving related harnesses and harness connectors, visually/physically inspect wiring and connectors for insulation that is rubbed through causing an intermittent open. |
| • | For additional information, refer to Intermittents and Poor Connections Diagnosis in Wiring Systems. |
Test Description
The numbers below refer to the step numbers on the diagnostic table.
Step | Action | Value(s) | Yes | No | ||||||
|---|---|---|---|---|---|---|---|---|---|---|
1 | Did you perform the Defogger System Check? | -- | Go to Defogger System Check | |||||||
Did you find and correct the condition? | -- | |||||||||
3 |
Does the DTC reset? | -- | System OK | |||||||
4 |
Does the voltage measure near the specified value? | 12 V | ||||||||
5 |
Did you find and correct the condition? | -- | ||||||||
6 |
Does the voltage measure near the specified value? | 12 V | ||||||||
7 |
Does the DTC reset? | -- | -- | System OK | ||||||
8 | Inspect for poor connections at the heater and A/C control connector C1. Refer to Intermittents and Poor Connections Diagnosis in Wiring Systems. Did you find and correct the condition? | -- | ||||||||
9 |
Does the voltage measure near the specified value? | 12 V | ||||||||
10 | Test the battery feed circuit to the relay box terminal 2 for an open. Refer to Testing for Continuity in Wiring Systems. Did you find and correct the condition? | -- | -- | |||||||
11 | Replace the heater and A/C control unit. Did you complete the replacement? | -- | -- | |||||||
12 | Test the battery feed circuit to the HTD MIRROR fuse for an open. Refer to Testing for Continuity in Wiring Systems. Did you find and correct the condition? | -- | ||||||||
13 | Test the ignition feed circuit to the relay box terminal 1 for an open. Refer to Testing for Continuity in Wiring Systems. Did you find and correct the condition? | -- | -- | |||||||
14 | Inspect for poor connections at relay K35. Did you find and correct the condition? | -- | ||||||||
15 | Replace relay K35. Did you complete the replacement? | -- | -- |
