Removal Procedure
- Disable the SIR system. Refer to SIR Disabling and Enabling .
- Remove the windshield garnish molding. Refer to Windshield Pillar Garnish Molding Replacement in Interior Trim.
- Remove the center pillar garnish moldings. Refer to Center Pillar Garnish Molding Replacement in Interior Trim.
- Remove the rear sail panel. Refer to Sail Panel Replacement in Interior Trim.
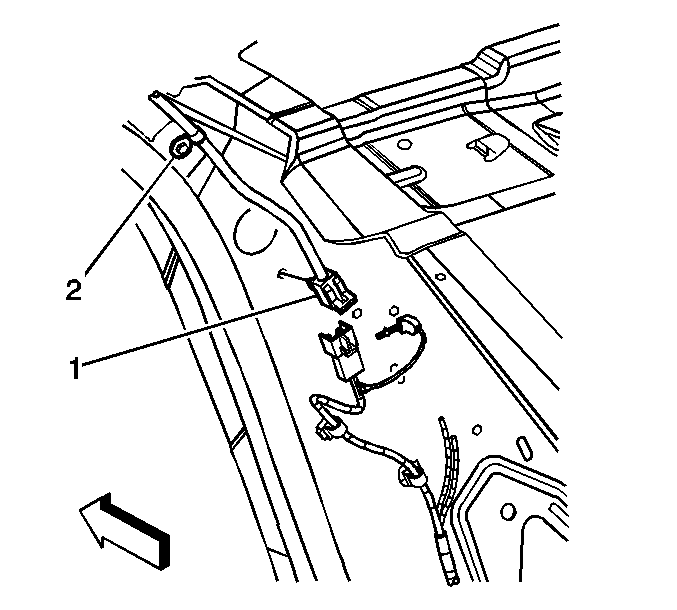
- Remove the connector position assurance (CPA) from the harness connector (1) to the inflatable restraint roof rail module.
- Disconnect the harness connector (1) from the roof rail module.
- Lower the headliner to gain clearance to the roof rail module.
- Remove the fasteners (2) from the roof rail module.
- Remove the roof rail module from the roof.
Caution: Refer to SIR Caution in the Preface section.
Caution: Refer to SIR Inflator Module Handling and Storage Caution in the Preface section.
Caution: In order to prevent SIR deployment, personal injury, or unnecessary SIR system repairs, do not strike the door or the door pillar in the area of the side impact sensor (SIS). Turn OFF the ignition and remove the key when performing service in the area of the SIS.
Installation Procedure
- Remove any dirt, grease, or other impurities from the mounting surface.
- Install the mounting fasteners to the inflatable restraint roof rail module.
- Install the roof rail module harness connector (1) to the wiring harness.
- Install the CPA to the roof rail module harness connector.
- Install the windshield garnish molding. Refer to Windshield Pillar Garnish Molding Replacement in Interior Trim.
- Install the center pillar garnish moldings. Refer to Center Pillar Garnish Molding Replacement in Interior Trim.
- Install the rear sail panel. Refer to Sail Panel Replacement in Interior Trim.
- Enable the SIR system. Refer to SIR Disabling and Enabling .
- Fully deploy the module before disposal. If the module was replaced under warranty, fully deploy and dispose of the module after the required retention period. Refer to Inflator Module Handling and Scrapping .
Caution: Do not strike or jolt the inflatable restraint side impact sensor (SIS). Before applying power to the SIS make sure that it is securely fastened. Failure to observe the correct installation procedures could cause SIR deployment, personal injury, or unnecessary SIR system repairs.
Notice: Use the correct fastener in the correct location. Replacement fasteners must be the correct part number for that application. Fasteners requiring replacement or fasteners requiring the use of thread locking compound or sealant are identified in the service procedure. Do not use paints, lubricants, or corrosion inhibitors on fasteners or fastener joint surfaces unless specified. These coatings affect fastener torque and joint clamping force and may damage the fastener. Use the correct tightening sequence and specifications when installing fasteners in order to avoid damage to parts and systems.
Tighten
Tighten the fasteners to 9 N·m (80 lb in).
