For 1990-2009 cars only
Removal Procedure
- Remove the following components according to the RPO code:
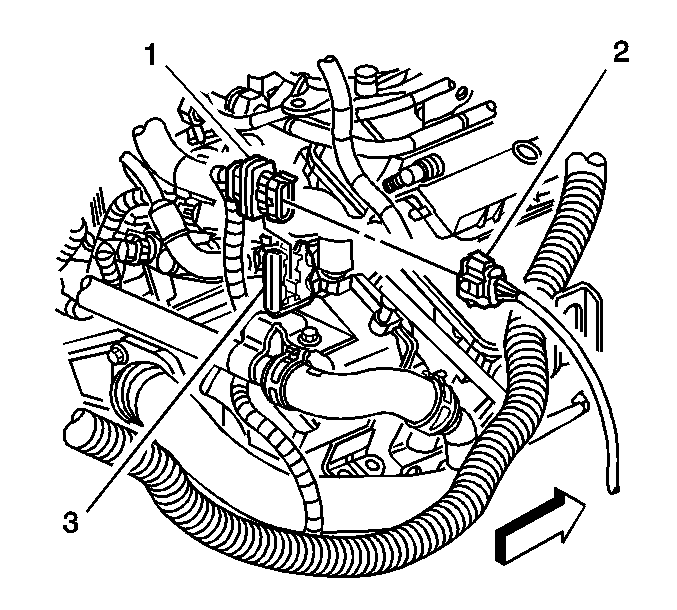
- Disconnect the electrical connector (2) from the coil pack (1).
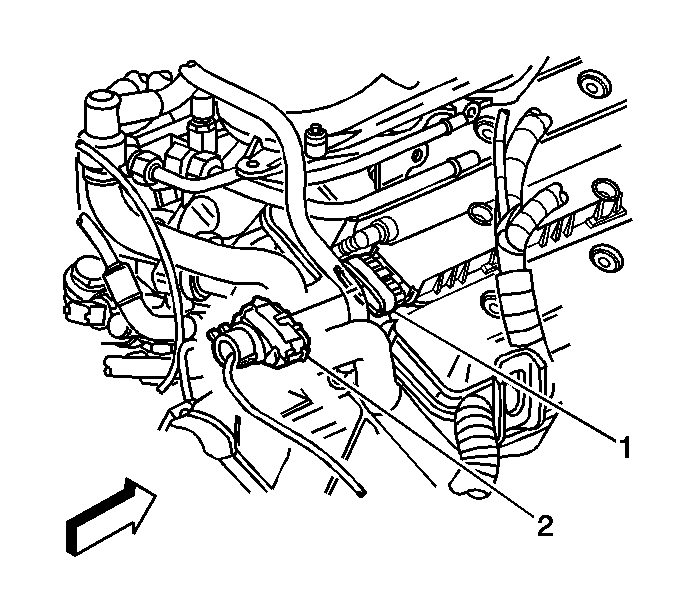
- Remove the heated oxygen sensor connector (1) from the bracket (3).
- Remove the bolt securing the surge tank outlet pipe to the vent housing-LHD ONLY.
- Disconnect the following from the crankcase vent housing (4):
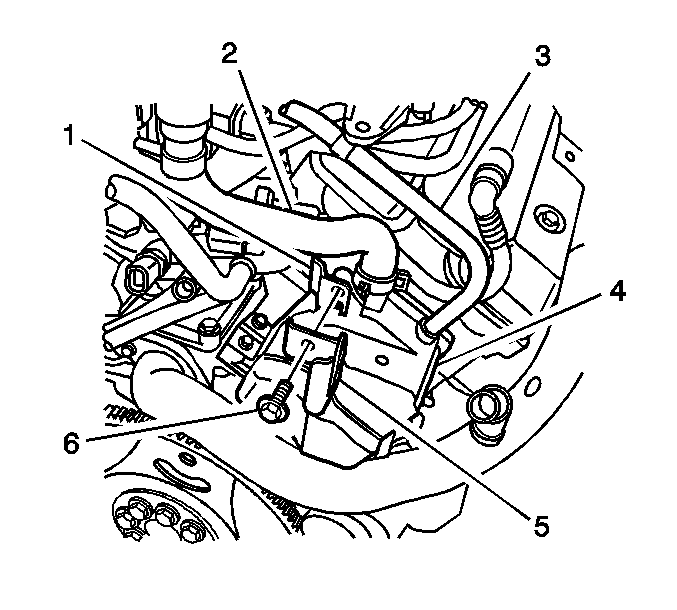
- Remove the bolt (6) securing the following to the crankcase vent housing (4):
- Remove the crankcase vent housing bolts.
- Remove the crankcase vent housing from the engine block.
- Plug the open ports to the crankcase, in order to prevent foreign objects from entering the engine.
- Clean and inspect the surface of the engine block and crankcase vent housing.
| • | LHD |
| - | The air inlet grill panel. Refer to Air Inlet Grille Panel Replacement in Body Front End. |
| - | The fasteners securing the front air inlet panel assembly to the battery tray and cowl. |
| - | The front air inlet panel assembly from the vehicle. |
| • | RHD |
| • | The wiper motor module. Refer to Windshield Wiper System Module Replacement in Wipers/Washer Systems. |
| • | The crankcase ventilation fresh air hose (2) |
| • | The crankcase ventilation dirty air hose (3) |
| • | The engine wiring harness push retainer |
| • | The heated oxygen sensor connector bracket (5) |
| • | The evaporative emission (EVAP) canister purge valve bracket (1) |
Installation Procedure
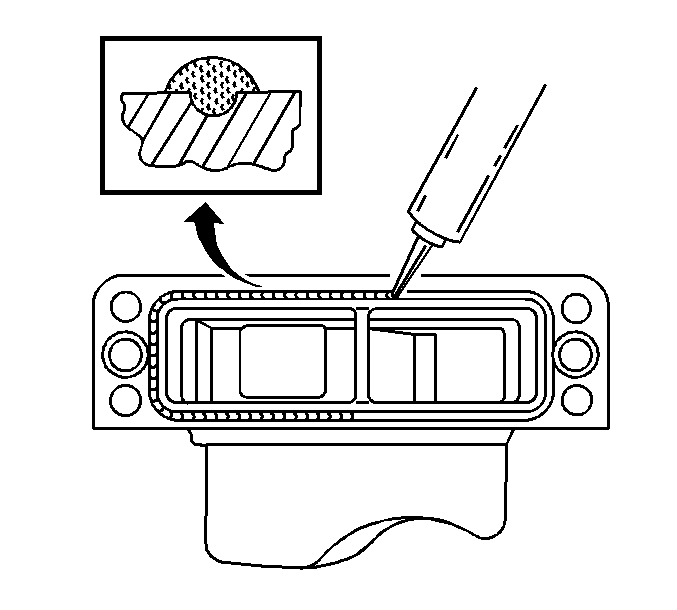
- Apply a 3 mm (0.12 in) bead of sealant GM P/N 1052942 (Canadian P/N 10953466) to the groove of the crankcase vent housing.
- Remove the plugs from the crankcase ports.
- Position the crankcase vent housing to the engine block.
- Install the crankcase vent housing bolts.
- Install the bolt (6) securing the following to the crankcase vent housing (4):
- Connect the following to the crankcase vent housing (4):
- Install the heated oxygen sensor connector (1) to the bracket (3).
- Install the bolt securing the surge tank outlet pipe to the vent housing-LHD ONLY.
- Connect the electrical connector (2) to the coil pack (1).
- Install the following components according to the RPO code:
Notice: Refer to Fastener Notice in the Preface section.
Tighten
Tighten the crankcase vent housing bolts to 8 N·m (71 lb in).
| • | The EVAP canister purge valve bracket (1) |
| • | The heated oxygen sensor connector bracket (5) |
Tighten
Tighten the EVAP canister purge valve bracket bolt to 8 N·m (71 lb in).
| • | The crankcase ventilation fresh air hose (2) |
| • | The crankcase ventilation dirty air hose (3) |
| • | The engine wiring harness push retainer |
Tighten
Tighten the surge tank outlet pipe to vent housing bolt to 9 N·m
(80 lb in).
| • | LHD |
| - | Position the front air inlet panel assembly to the battery tray and cowl. |
| - | Install the fasteners securing the front air inlet panel assembly to the battery tray and cowl. |
Tighten
Tighten the front air inlet panel assembly fasteners to 6 N·m (53 lb in).
| - | The air inlet grill panel. Refer to Air Inlet Grille Panel Replacement in Body Front End. |
| • | RHD |
| • | The wiper motor module. Refer to Windshield Wiper System Module Replacement in Wipers/Washer Systems. |
