For 1990-2009 cars only
Front Bumper Fascia Replacement Buick
Tools Required
J 38778 Door Trim Pad Clip Remover
Removal Procedure
- Raise and support the vehicle. Refer to Lifting and Jacking the Vehicle in General Information.
- Remove both of the front tires and wheels. Refer to Tire and Wheel Removal and Installation in Tires and Wheels.
- Remove the right and left front fender liner. Refer to Front Wheelhouse Liner Replacement in Body Front End.
- Disconnect both daytime running lamps (DRL). Refer to Daytime Running Lamp, Park and Turn Signal Lamp and Bulb Replacement - Front in Lighting Systems.
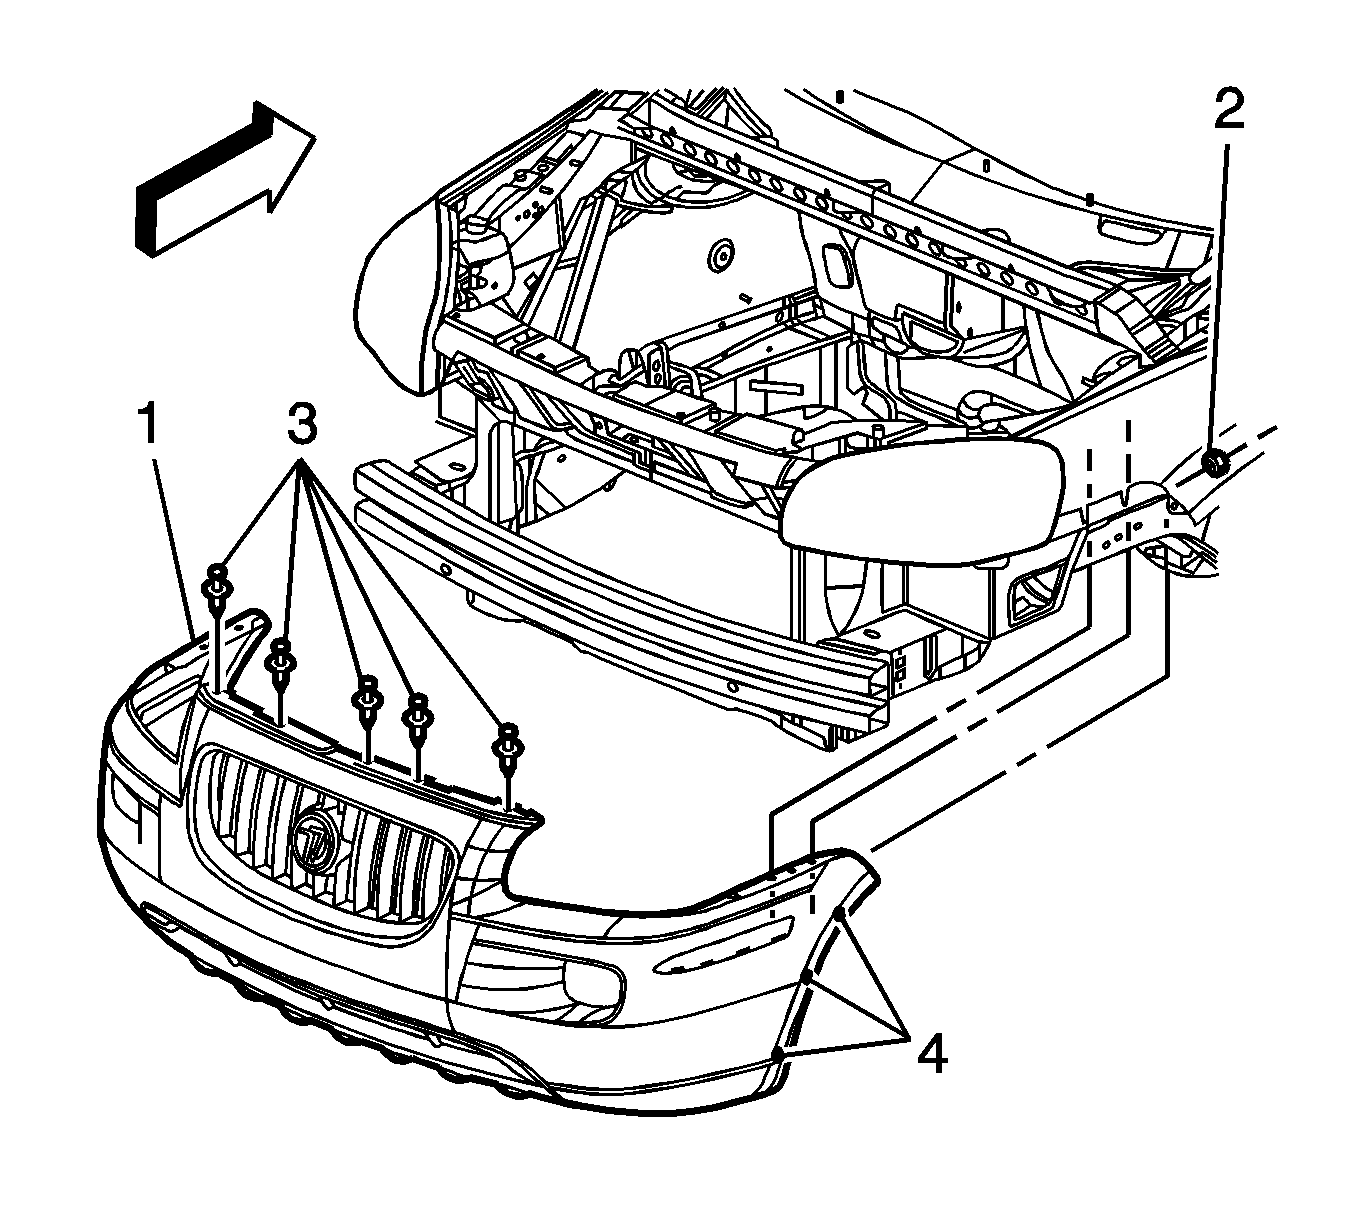
- Use the J 38778 to remove the push-in retainers (3) from the upper front bumper fascia.
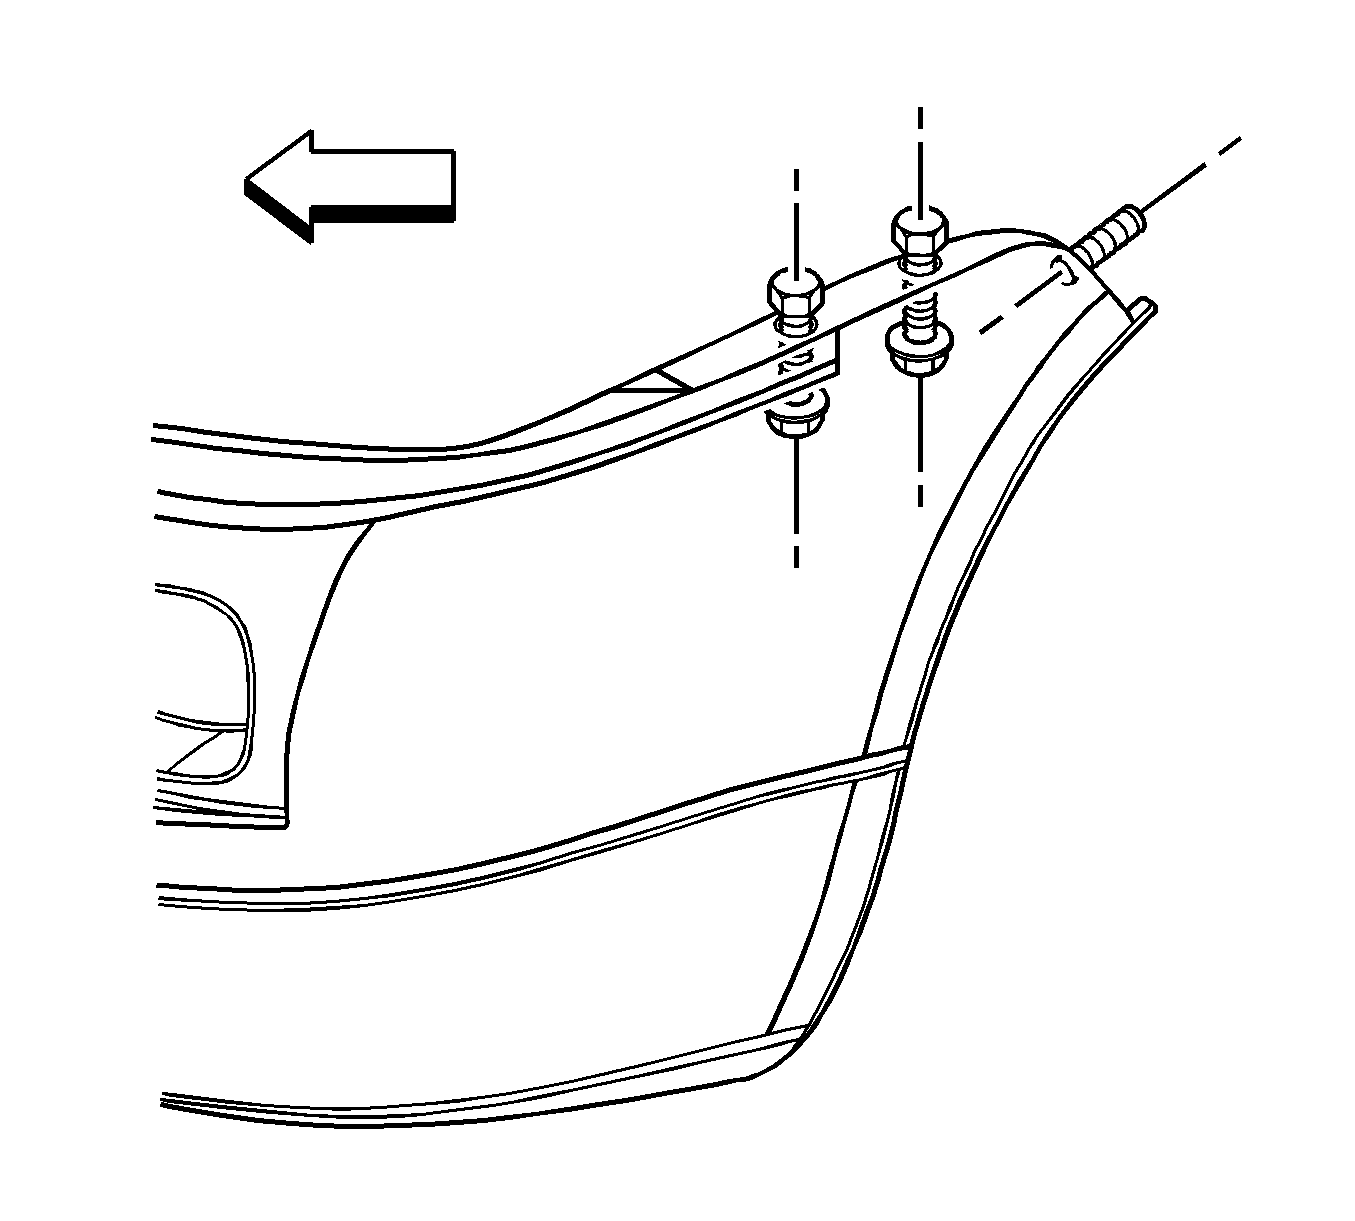
- Loosen the 2 hidden fasteners from the upper rear corners of the front fascia.
- Remove the front bumper fascia from the vehicle.
- Remove the DRL lamps from the fascia.
- Remove the 4 screws from the lower fascia.
- Remove the impact bar energy absorber.


Installation Procedure
- Install the DRL lamps to the fascia, connect the wiring as fascia is put on the vehicle.
- Position the energy absorber to the lower fascia.
- Install the screws in order to secure the energy absorber to the lower fascia.
- Align the front bumper fascia (1) to the front impact bar and to the body.
- Install the push-in retainers (3) to the upper front bumper fascia.
- Secure both rear upper corner fascia fasteners.
- Install both front headlamps. Refer to Headlamp Assembly or Headlamp Bulb Replacement in Lighting Systems.
- Install the right and left front fender liner. Refer to Front Wheelhouse Liner Replacement in Body Front End.
- Install both of the front tires and wheels. Refer to Tire and Wheel Removal and Installation in Tires and Wheels.
- Lower the vehicle.

Notice: Refer to Fastener Notice in the Preface section.

Tighten
Tighten the fasteners to 3 N·m (27 lb in).
Front Bumper Fascia Replacement Chevrolet
Tools Required
J 38778 Door Trim Pad Clip Remover
Removal Procedure
- Raise and support the vehicle. Refer to Lifting and Jacking the Vehicle in General Information.
- Remove both of the front tires and wheels. Refer to Tire and Wheel Removal and Installation in Tires and Wheels.
- Remove the right and left front fender liner. Refer to Front Wheelhouse Liner Replacement in Body Front End.
- Disconnect both daytime running lamps (DRL). Refer to Daytime Running Lamp, Park and Turn Signal Lamp and Bulb Replacement - Front in Lighting Systems.
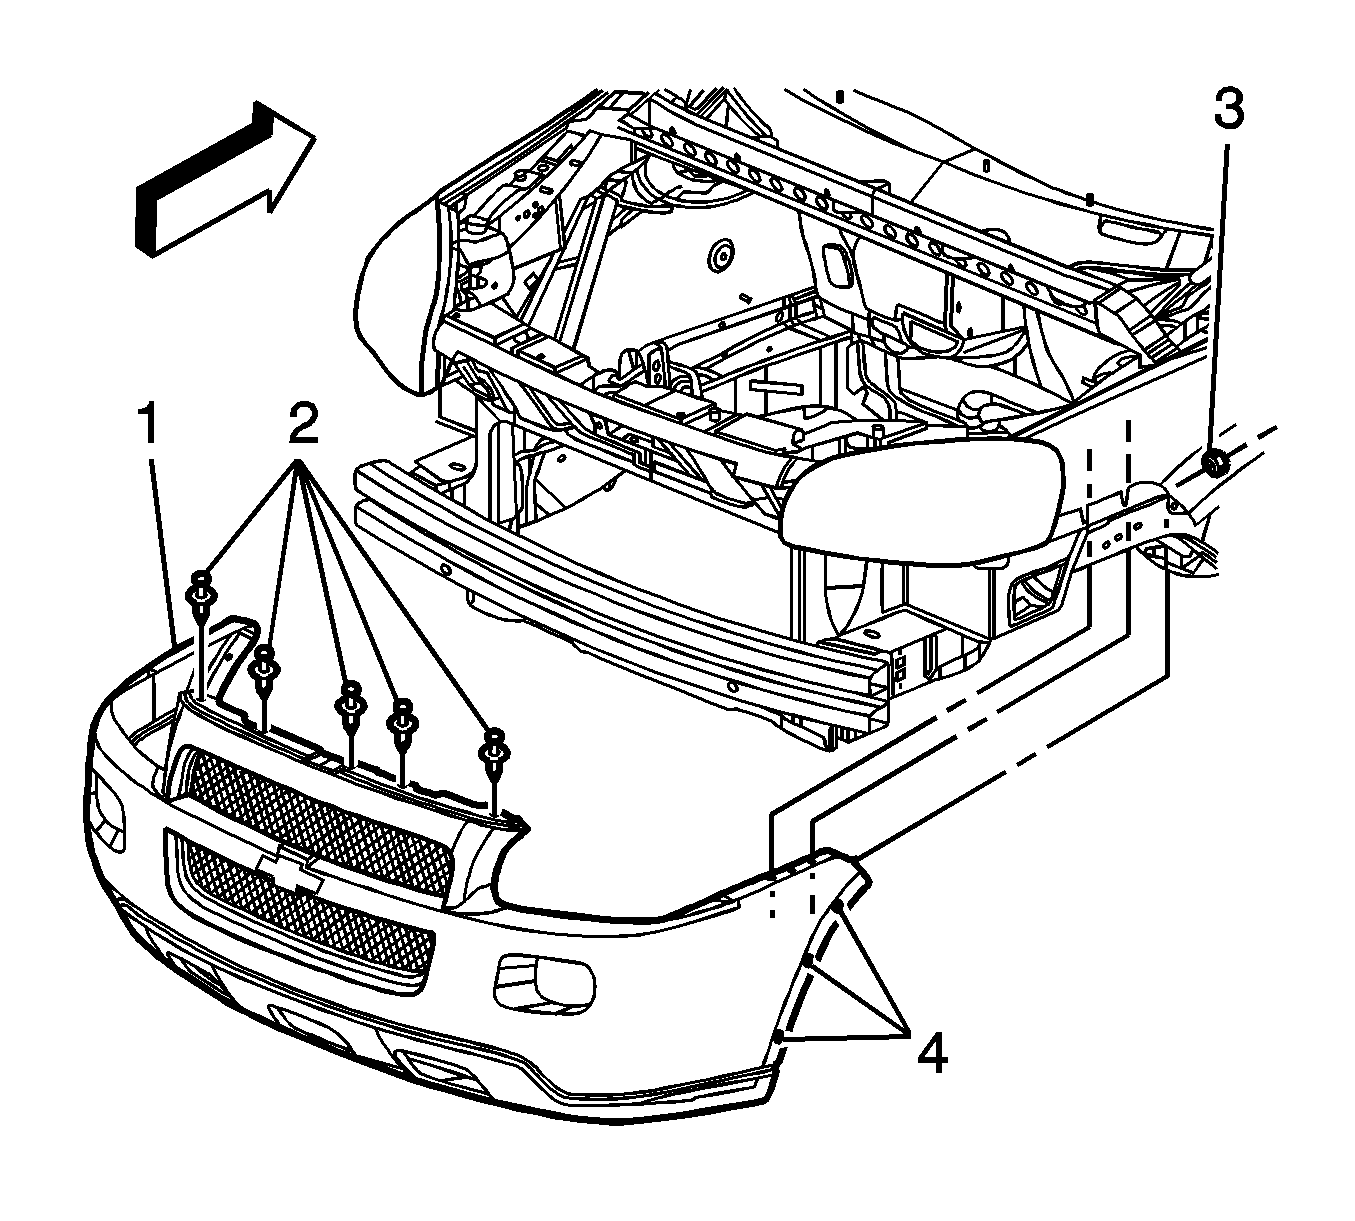
- Use the J 38778 to remove the push-in retainers (2) from the upper front bumper fascia.
- Loosen the 2 hidden fasteners from the upper rear corners of the front fascia.
- Remove the front bumper fascia from the vehicle.
- Remove the DRL lamps from the fascia.
- Remove the screws securing the energy absorber to the lower fascia.
- Remove the impact bar energy absorber from the lower fascia.


Installation Procedure
- Install the DRL lamps to the fascia, connect the wiring as fascia is put on the vehicle.
- Position the energy absorber to the lower fascia.
- Install the screws in order to secure the energy absorber to the lower fascia.
- Align the front bumper fascia (1) to the front impact bar and to the body.
- Install the push-in retainers (3) to the upper front bumper fascia.
- Secure both rear upper corner fascia fasteners.
- Install both front headlamps. Refer to Headlamp Assembly or Headlamp Bulb Replacement in Lighting Systems.
- Install the right and left front fender liner. Refer to Front Wheelhouse Liner Replacement in Body Front End.
- Install both of the front tires and wheels. Refer to Tire and Wheel Removal and Installation in Tires and Wheels.
- Lower the vehicle.

Notice: Refer to Fastener Notice in the Preface section.

Tighten
Tighten the fasteners to 3 N·m (27 lb in).
Front Bumper Fascia Replacement Pontiac
Tools Required
J 38778 Door Trim Pad Clip Remover
Removal Procedure
- Raise and support the vehicle. Refer to Lifting and Jacking the Vehicle.
- Remove both of the front tires and wheels. Refer to Tire and Wheel Removal and Installation.
- Remove the right and left front fender liner. Refer to Front Wheelhouse Liner Replacement.
- Disconnect both daytime running lamps (DRL). Refer to Daytime Running Lamp, Park and Turn Signal Lamp and Bulb Replacement - Front.
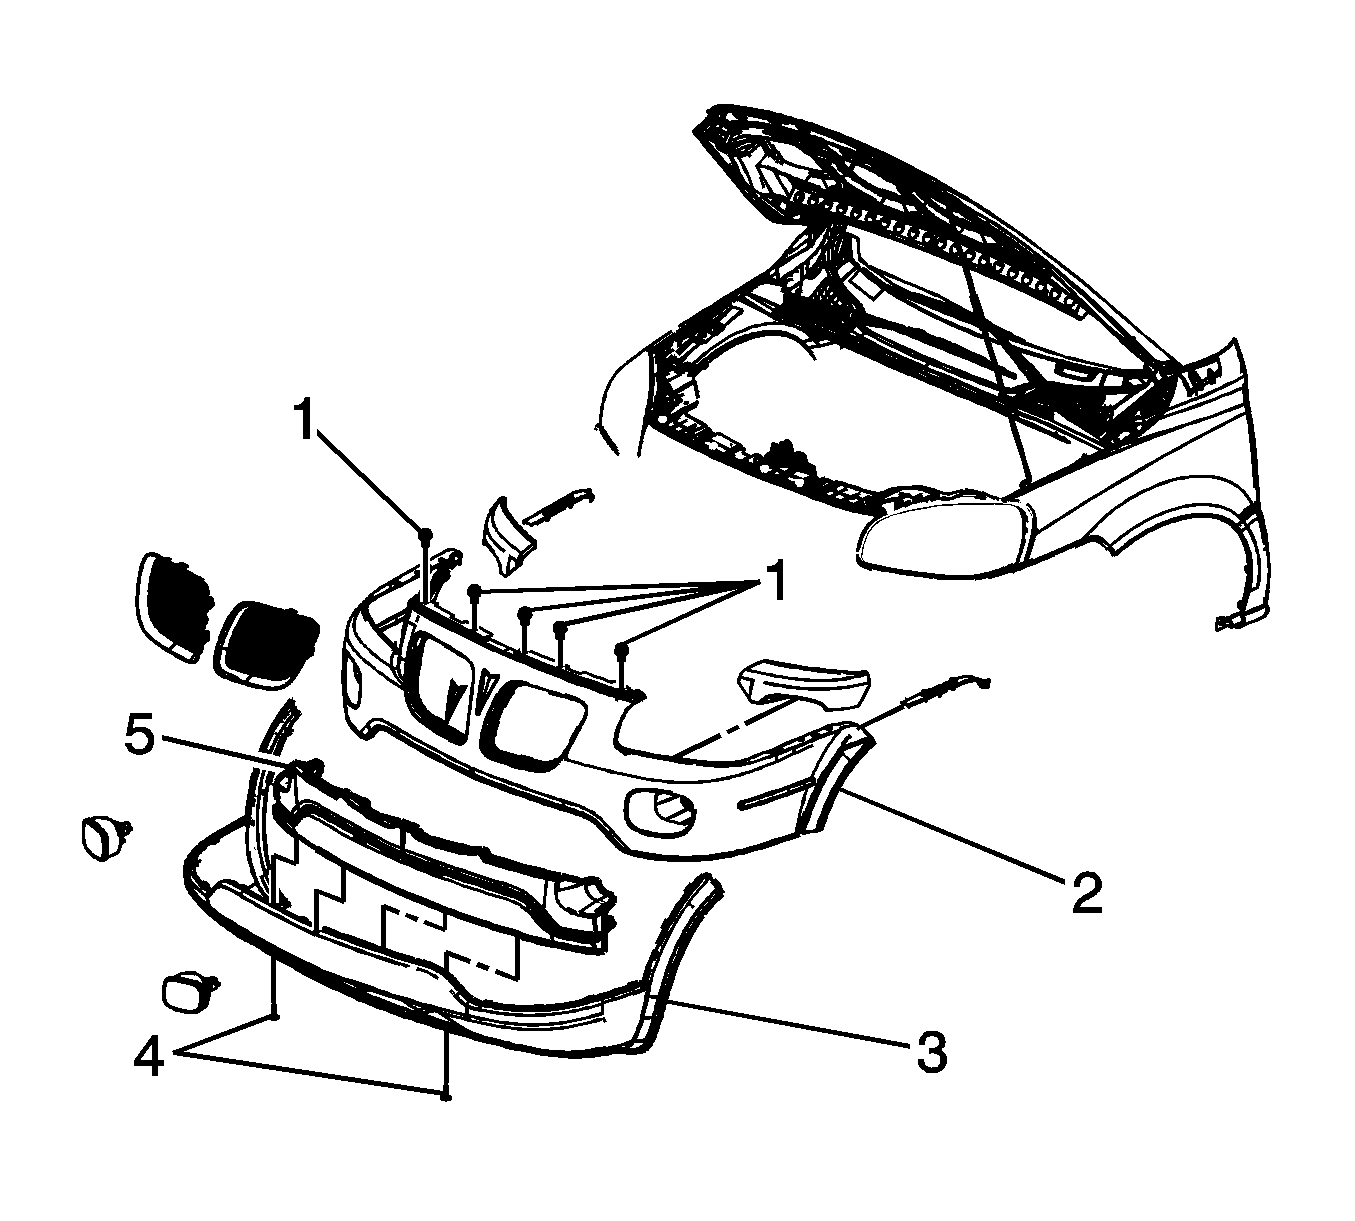
- Use the J 38778 to remove the push-in retainers (1) from the upper front bumper fascia.
- Loosen the 2 hidden fasteners from the upper rear corners of the front fascia.
- Remove the front bumper fascia from the vehicle.
- Remove the DRL lamps from the fascia.
- Remove the screws (4) securing the energy absorber to the lower fascia (3).
- Remove the energy absorber (5) from the lower fascia.


Installation Procedure
- Install the DRL lamps to the fascia, connect the wiring as fascia is put on the vehicle
- Position the energy absorber (5) to the lower fascia (3).
- Install the screws (4) in order to secure the energy absorber to the lower fascia.
- Align the front bumper fascia (2) to the front impact bar and to the body.
- Install the push-in retainers (1) to the upper front bumper fascia.
- Secure both rear upper corner fascia fasteners.
- Install both front headlamps. Refer to Headlamp Assembly or Headlamp Bulb Replacement.
- Install the right and left front fender liner. Refer to Front Wheelhouse Liner Replacement.
- Install both of the front tires and wheels. Refer to Tire and Wheel Removal and Installation.
- Lower the vehicle.

Notice: Refer to Fastener Notice in the Preface section.

Tighten
Tighten the fasteners to 3 N·m (27 lb in).
