For 1990-2009 cars only
Control Valve Body Disassemble Without Touch Activated Power
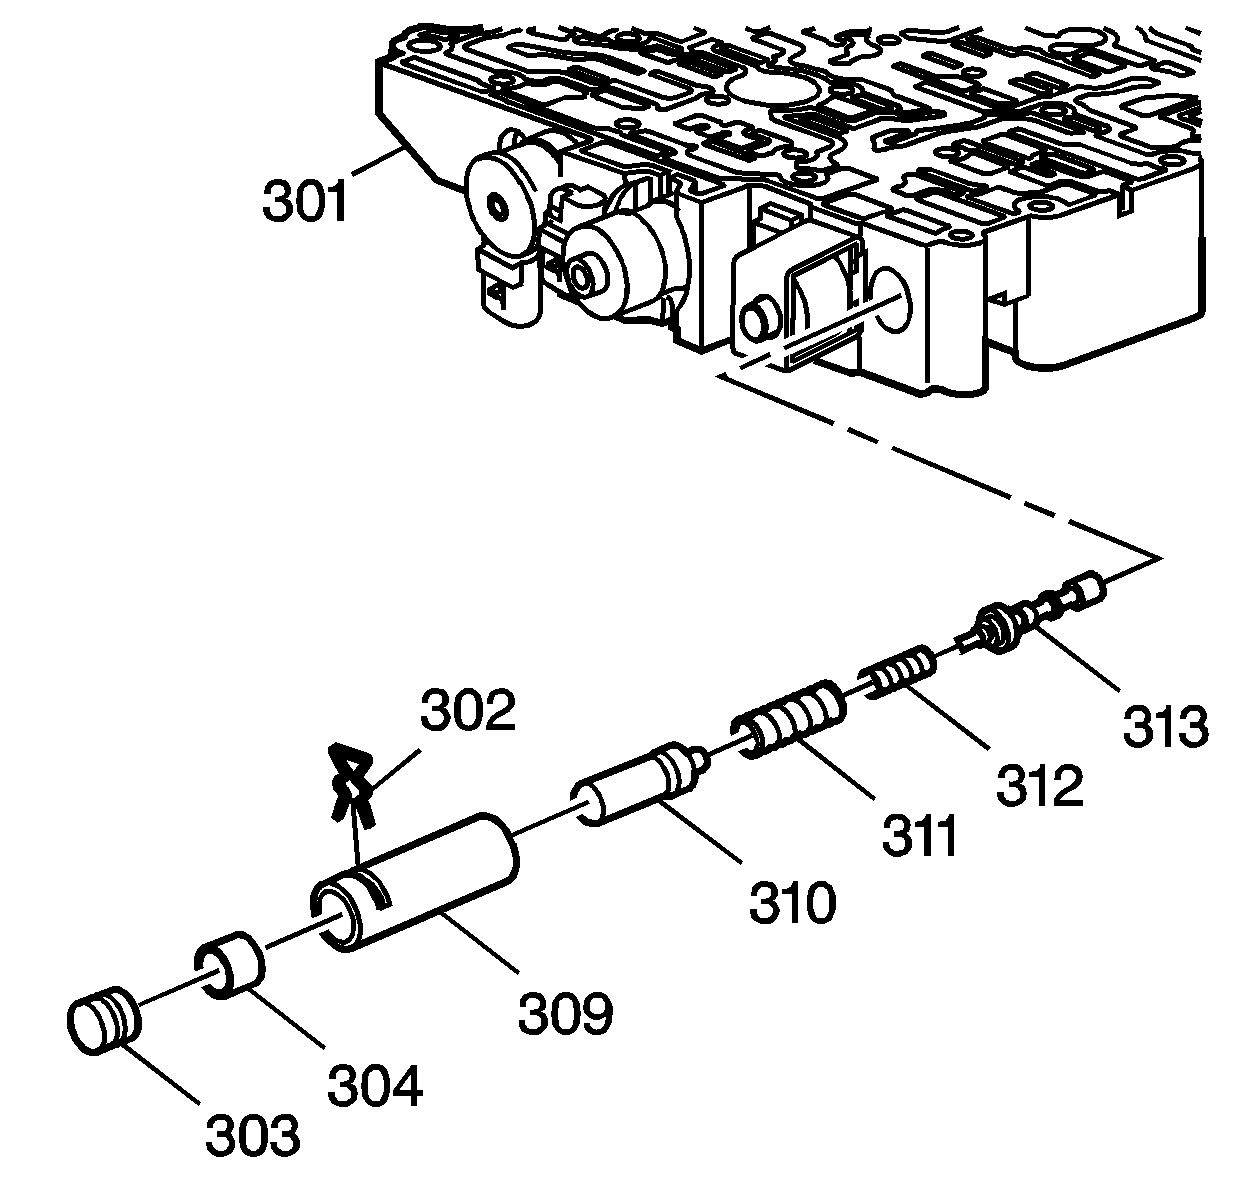
- Using a small screwdriver or pick, remove the line boost valve and bushing retainer (302) from the control valve body (301).
- Remove the line boost valve bore plug (303), line boost valve (304), reverse boost valve bushing (309), reverse boost valve (310), pressure regulator valve outer and inner springs (311, 312) and pressure regulator valve (313) from the control valve body (301).
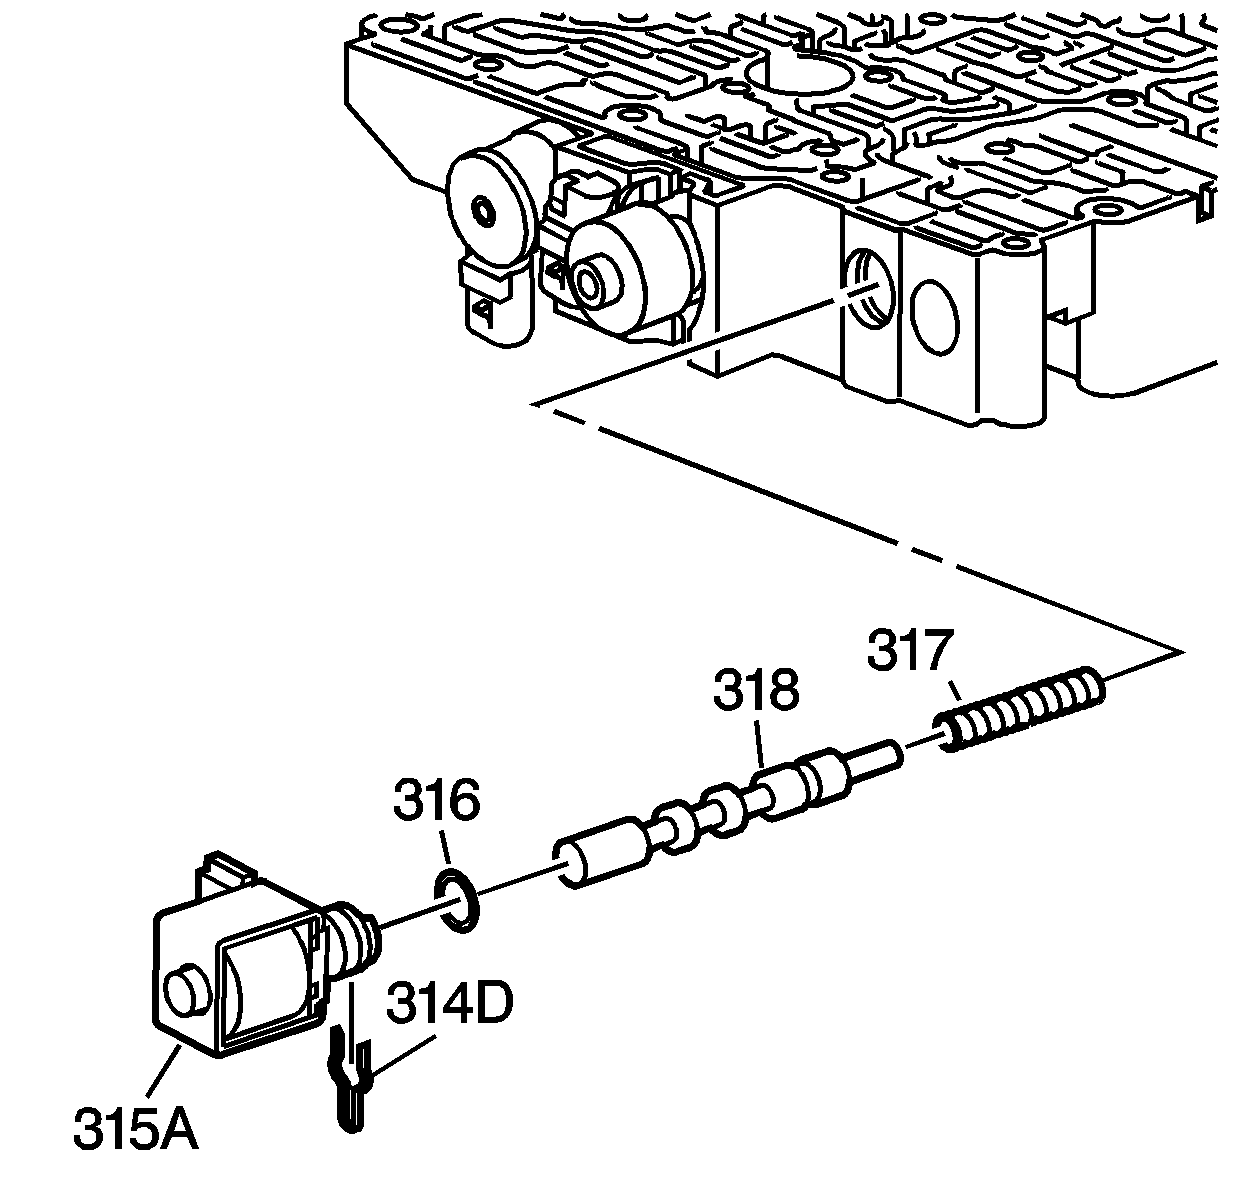
- Using a small screwdriver or pick, remove the 1-2, 3-4 shift solenoid valve retainer (314D) from the control valve body.
- Remove the 1-2, 3-4 shift solenoid (SS) valve (315A), 1-2 shift valve (318) and 1-2 shift valve spring (317) from the control valve body.
- Remove the O-ring seal (316) from the 1-2, 3-4 SS valve (315A) ONLY if it is damaged.
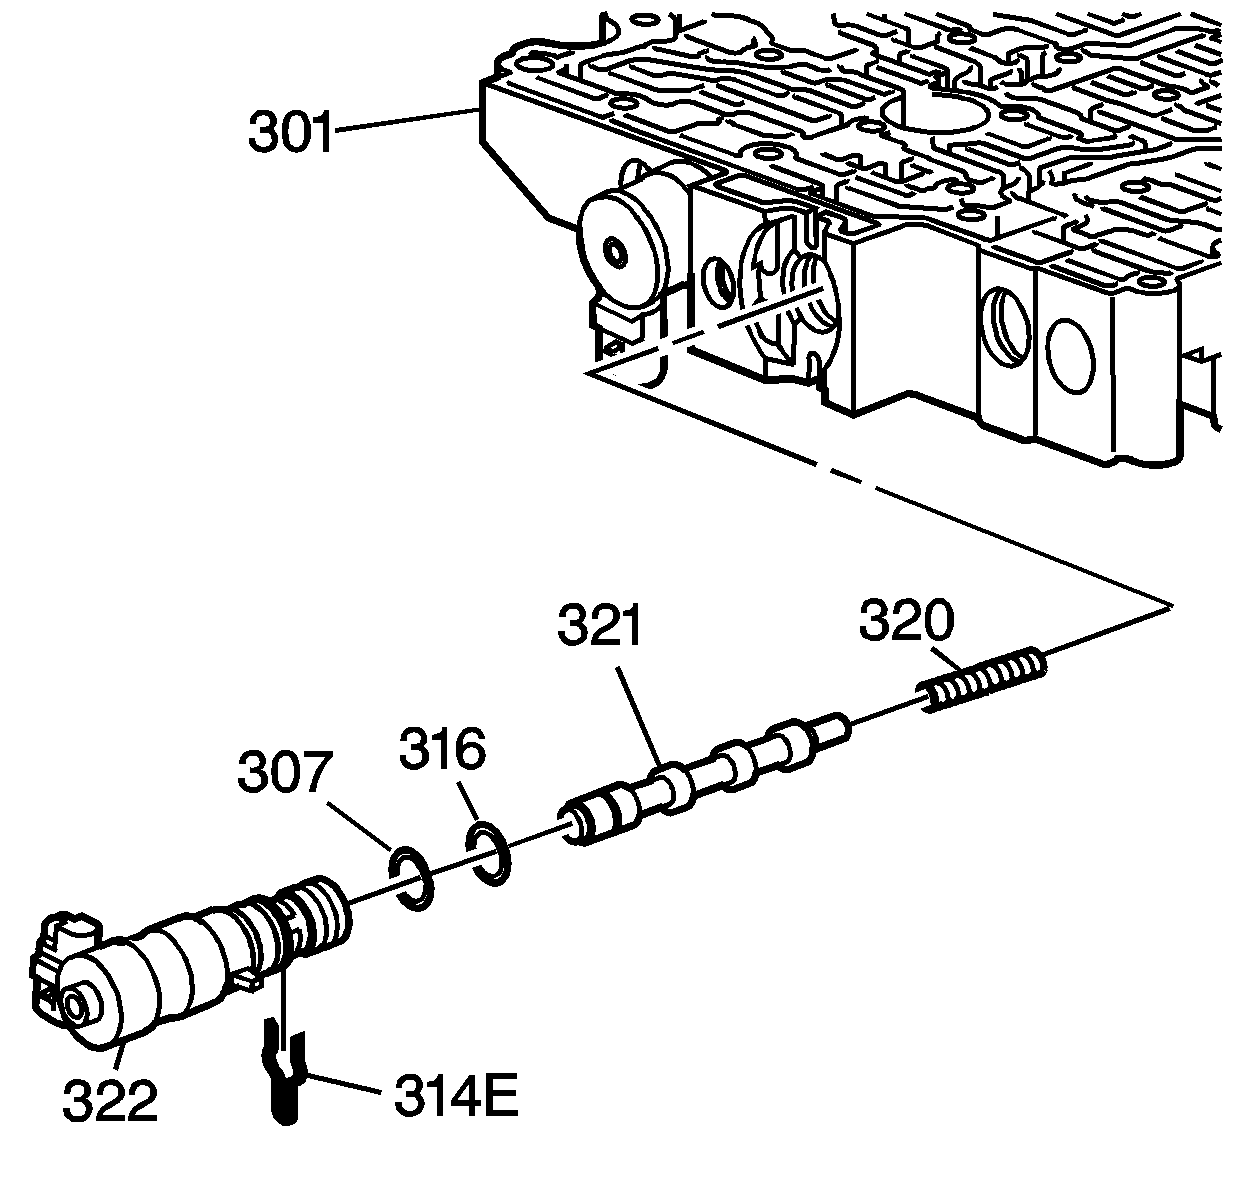
- Using a small screwdriver or pick, remove the pressure control solenoid valve retainer (314E) from the control valve body (301).
- Remove the pressure control (PC) solenoid valve (322), torque signal regulator valve (321) and torque signal regulator valve spring (320) from the control valve body (301).
- Remove the O-ring seals (307, 316) from the PC solenoid valve (322) ONLY if they are damaged.
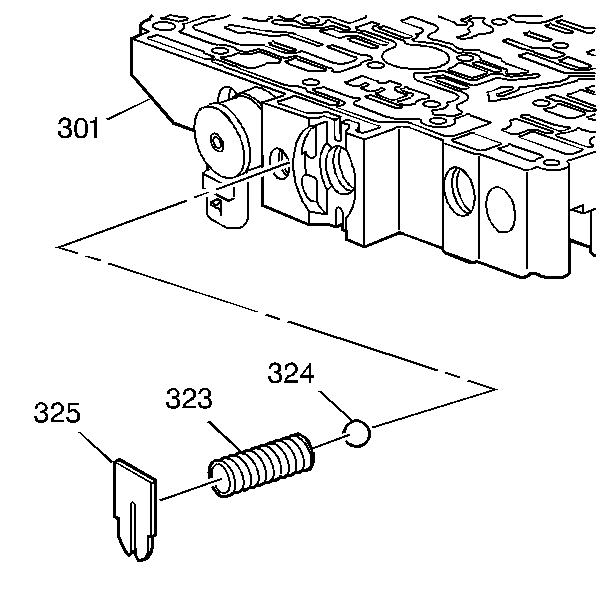
- Using a small screwdriver or pick, remove the line pressure relief valve spring retainer (325) from the control valve body (301).
- Remove the line pressure relief valve spring (323) and the line pressure relief valve (324) from the control valve body (301).
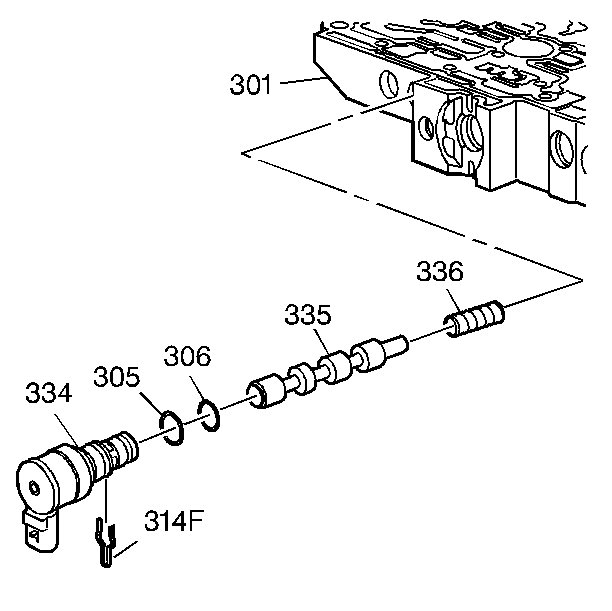
- Using a small screwdriver or pick, remove the TCC PWM solenoid valve retainer (314F) from the control valve body (301).
- Remove the TCC PWM solenoid valve (334), TCC control valve (335) and TCC control valve spring (336) from the control valve body (301).
- Remove the O-ring seals (305, 306) from the TCC PWM solenoid valve (334) ONLY if they are damaged.
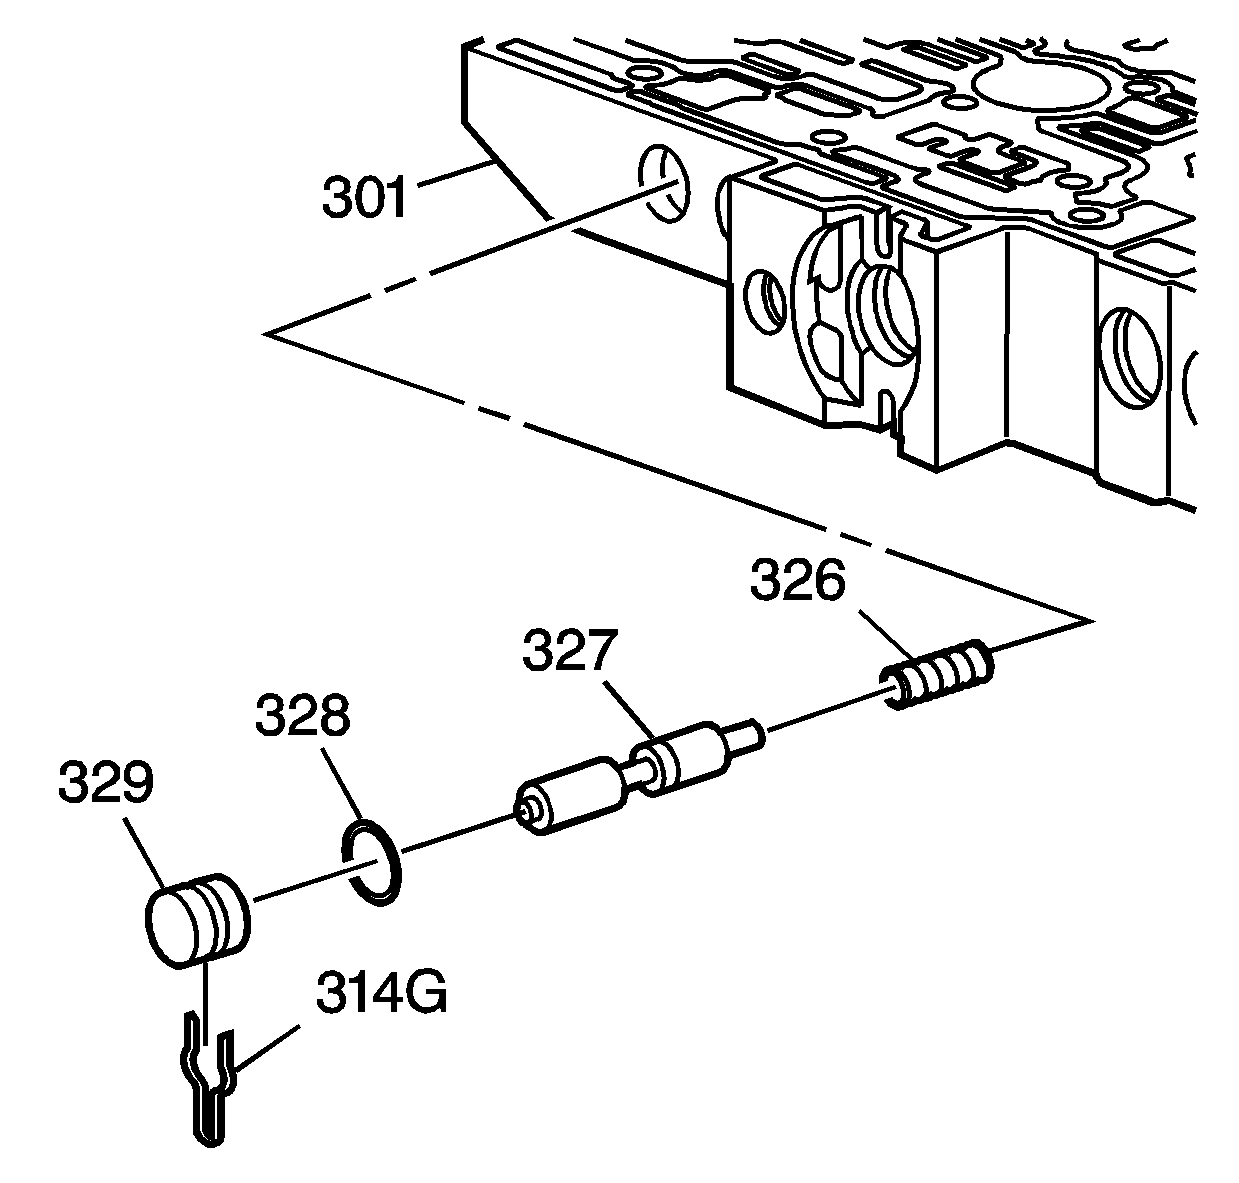
- Using a small screwdriver or pick, remove the TCC regulator apply valve bore plug retainer (314G) from the control valve body (301).
- Remove the TCC regulator apply valve bore plug (329), O-ring seal (328), TCC regulator apply valve (327) and TCC regulator apply valve spring (326) from the control valve body (301).
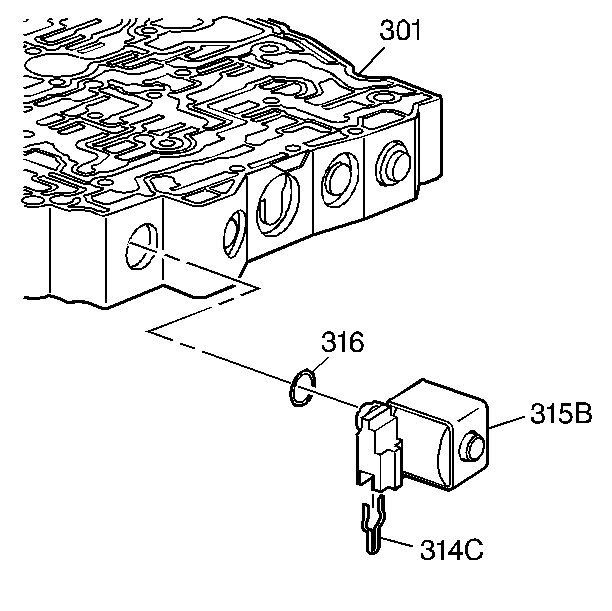
- Using a small screwdriver or pick, remove the 2-3 shift solenoid valve retainer (314C) from the control valve body (301).
- Remove the 2-3 shift solenoid (SS) valve (315B) from the control valve body (301).
- Remove the O-ring seal (316) from the 2-3 SS valve (315B) ONLY if it is damaged.
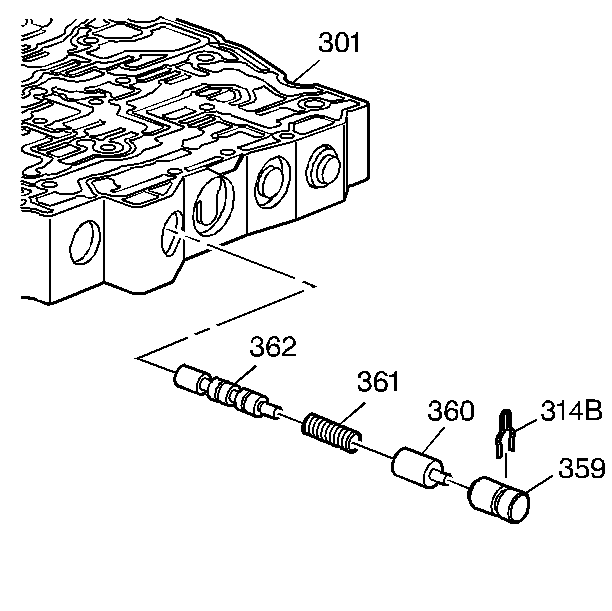
- Using a small screwdriver or pick, remove the 4-3 manual downshift valve retainer (314B) from the control valve body (301).
- Remove the 4-3 manual downshift valve bore plug (359), 4-3 manual downshift valve (360), 4-3 manual downshift valve spring (361) and 3-4 shift valve (362) from the control valve body (301).
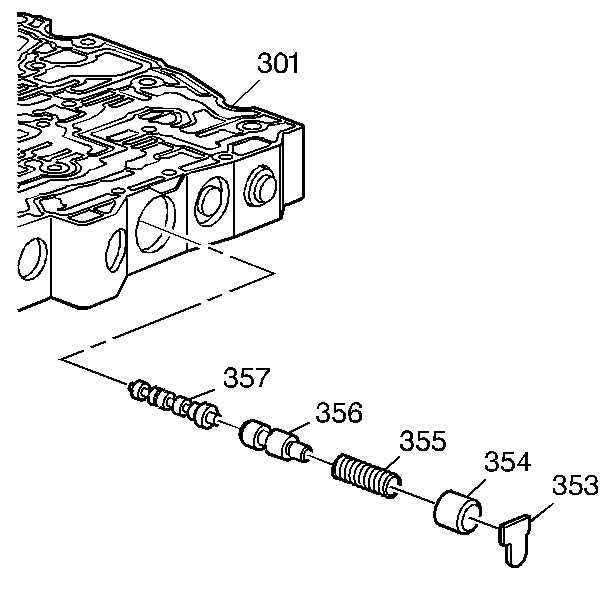
- Using a small screwdriver or pick, remove the 3-2 manual downshift valve retainer (353) from the control valve body (301).
- Remove the 3-2 manual downshift valve bore plug (354), 3-2 manual downshift valve spring (355), 3-2 manual downshift valve (356) and 2-3 shift valve (357) from the control valve body (301).
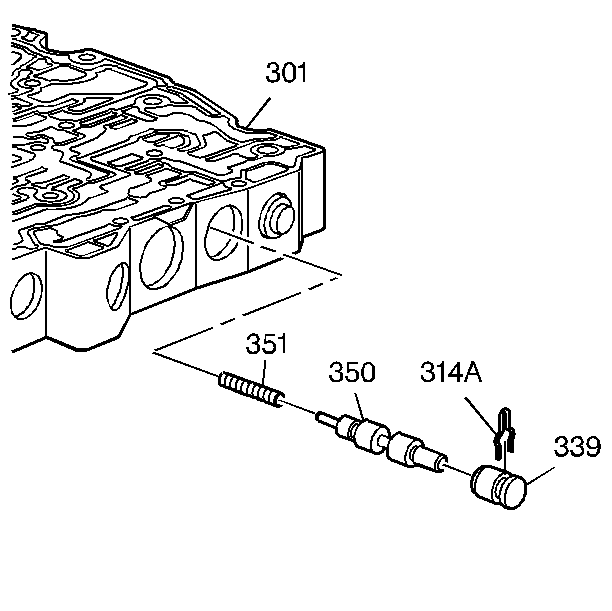
- Using a small screwdriver or pick, remove the 1-2 accumulator valve retainer (314A) from the control valve body (301).
- Remove the 1-2 accumulator valve bore plug (339), 1-2 accumulator valve (350) and 1-2 accumulator valve spring (351) from the control valve body (301).
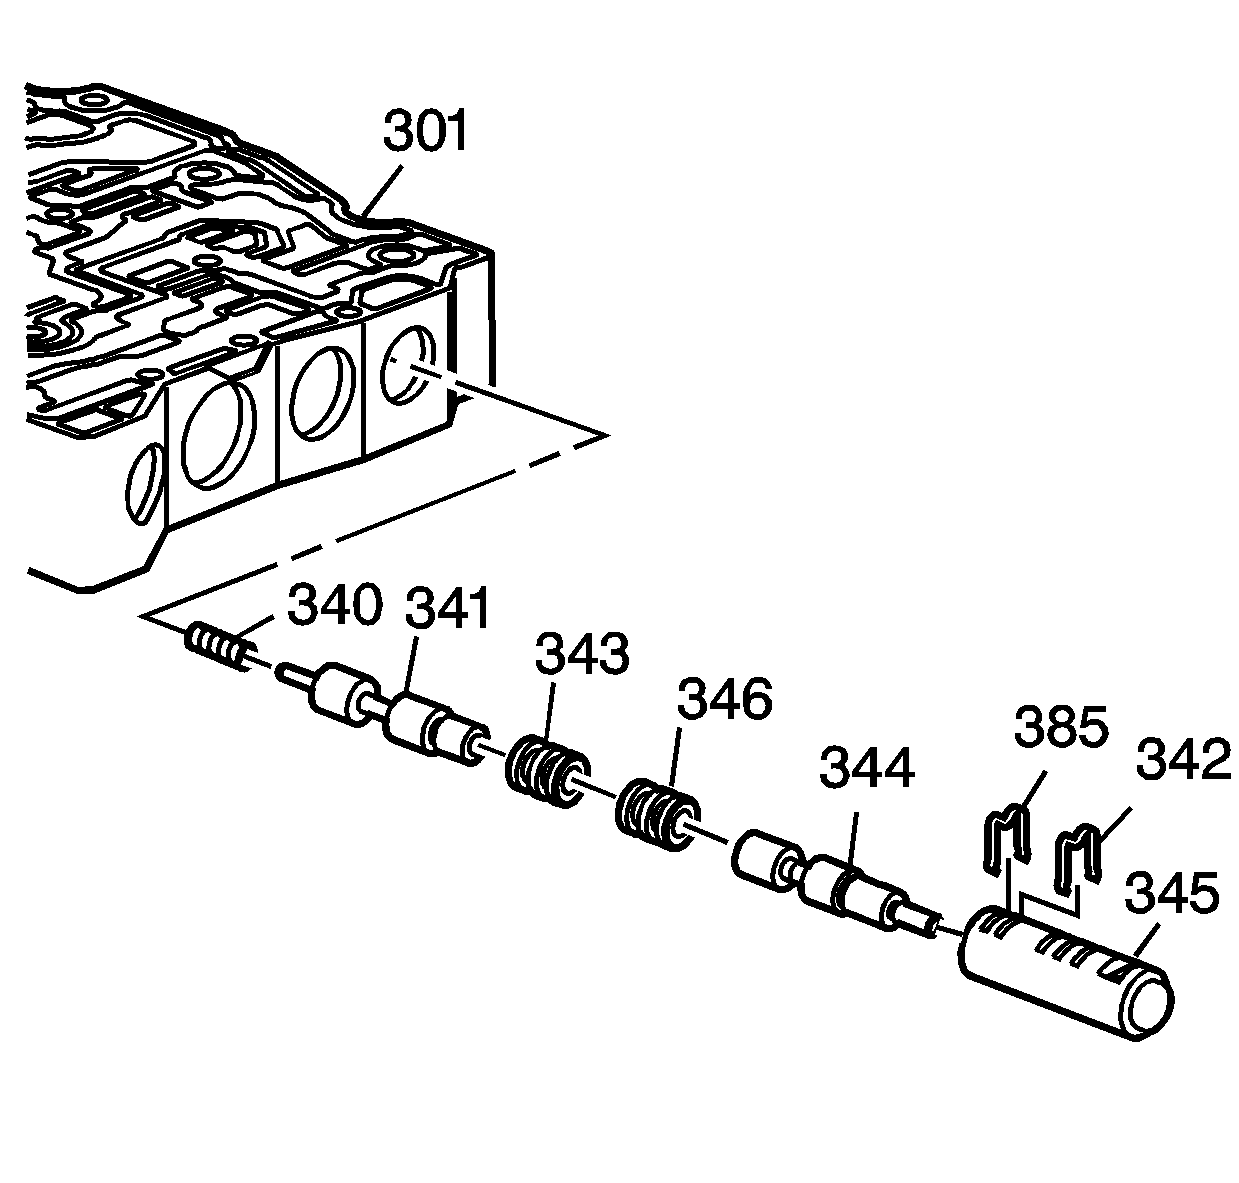
- Using a small screwdriver or pick, remove the 2-3 accumulator valve bushing assembly retainer (385) from the control valve body (301).
- Remove the 2-3 accumulator valve bushing assembly (345), 3-4 accumulator valve (341) and 3-4 accumulator valve spring (340) from the control valve body (301).
- Using a small screwdriver or pick, remove the 2-3 accumulator valve bore plug retainer (342) from the 2-3 accumulator valve bushing (345).
- Remove the 2-3 accumulator valve bore plug (343), the 2-3 accumulator valve spring (346) and the 2-3 accumulator valve (344) from the 2-3 accumulator valve bushing (345).
Caution: Valve Springs can be tightly compressed. Use care when removing retainers and plugs. Personal injury could result.
Important: Position the control valve body assembly on a clean surface during disassembly.
Important: All valves, springs and bushings must be laid out on a clean surface. Lay them exactly the way they are removed to aid reassembly.
Control Valve Body Disassemble With Touch Activated Power
- Using a small screwdriver or pick, remove the line boost valve and bushing retainer (302) from the control valve body (301).
- Remove the line boost valve bore plug (303), line boost valve (304), reverse boost valve bushing (309), reverse boost valve (310), pressure regulator valve outer and inner springs (311, 312) and pressure regulator valve (313) from the control valve body (301).
- Using a small screwdriver or pick, remove the 1-2, 3-4 shift solenoid valve retainer (314D) from the control valve body.
- Remove the 1-2, 3-4 shift solenoid (SS) valve (315A), 1-2 shift valve (318) and 1-2 shift valve spring (317) from the control valve body.
- Remove the O-ring seal (316) from the 1-2, 3-4 SS valve (315A) ONLY if it is damaged.
- Using a small screwdriver or pick, remove the pressure control solenoid valve retainer (314E) from the control valve body (301).
- Remove the pressure control (PC) solenoid valve (322), torque signal regulator valve (321) and torque signal regulator valve spring (320) from the control valve body (301).
- Remove the O-ring seals (307, 316) from the PC solenoid valve (322) ONLY if they are damaged.
- Using a small screwdriver or pick, remove the line pressure relief valve spring retainer (325) from the control valve body (301).
- Remove the line pressure relief valve spring (323) and the line pressure relief valve (324) from the control valve body (301).
- Using a small screwdriver or pick, remove the TCC PWM solenoid valve retainer (314F) from the control valve body (301).
- Remove the TCC PWM solenoid valve (334), TCC control valve (335) and TCC control valve spring (336) from the control valve body (301).
- Remove the O-ring seals (305, 306) from the TCC PWM solenoid valve (334) ONLY if they are damaged.
- Using a small screwdriver or pick, remove the TCC regulator apply valve bore plug retainer (314G) from the control valve body (301).
- Remove the TCC regulator apply valve bore plug (329), O-ring seal (328), TCC regulator apply valve (327) and TCC regulator apply valve spring (326) from the control valve body (301).
- Using a small screwdriver or pick, remove the 2-3 shift solenoid valve retainer (314C) from the control valve body (301).
- Remove the 2-3 shift solenoid (SS) valve (315B) from the control valve body (301).
- Remove the O-ring seal (316) from the 2-3 SS valve (315B) ONLY if it is damaged.
- Using a small screwdriver or pick, remove the 4-3 manual downshift valve retainer (314B) from the control valve body (301).
- Remove the 4-3 manual downshift valve bore plug (359), 4-3 manual downshift valve (360), 4-3 manual downshift valve spring (361) and 3-4 shift valve (362) from the control valve body (301).
- Using a small screwdriver or pick, remove the 3-2 manual downshift valve retainer (353) from the control valve body (301).
- Remove the 3-2 manual downshift valve bore plug (354), 3-2 manual downshift valve spring (355), 3-2 manual downshift valve (356) and 2-3 shift valve (357) from the control valve body (301).
- Using a small screwdriver or pick, remove the 1-2 accumulator valve retainer (314A) from the control valve body (301).
- Remove the 1-2 accumulator valve bore plug (339), 1-2 accumulator valve (350) and 1-2 accumulator valve spring (351) from the control valve body (301).
- Using a small screwdriver or pick, remove the 2-3 accumulator valve bushing assembly retainer (385) from the control valve body (301).
- Remove the 2-3 accumulator valve bushing assembly (345), 3-4 accumulator valve (341) and 3-4 accumulator valve spring (340) from the control valve body (301).
- Using a small screwdriver or pick, remove the 2-3 accumulator valve bore plug retainer (342) from the 2-3 accumulator valve bushing (345).
- Remove the 2-3 accumulator valve bore plug (343), the 2-3 accumulator valve spring (346) and the 2-3 accumulator valve (344) from the 2-3 accumulator valve bushing (345).

Caution: Valve Springs can be tightly compressed. Use care when removing retainers and plugs. Personal injury could result.
Important: Position the control valve body assembly on a clean surface during disassembly.
Important: All valves, springs and bushings must be laid out on a clean surface. Lay them exactly the way they are removed to aid reassembly.


