Caution: Do not move the vehicle until a firm brake pedal is obtained. Air in
the brake system can cause the loss of brakes with possible personal injury.
A bleeding operation is necessary in order to remove air
from the hydraulic brake system whenever air is introduced into the brake
system.
Bleed the hydraulic system at each brake if air has been introduced
into the system through low fluid level or by disconnecting the brake pipes
at the master cylinder. If a brake pipe is disconnected at one wheel, bleed
only that wheel cylinder/caliper. If the pipes are disconnected at any fitting
located between the master cylinder and brakes, bleed the brake system served
by the disconnected pipe.
Observe the following steps in order to reduce the time required to
bleed the hydraulic system:
| • | Ensure that the master cylinder reservoir is filled with brake
fluid. |
| • | Expel as much air as possible before installing the master cylinder
on the vehicle. |
Manual Bleeding
Tools Required
J 21472 Brake Bleeder
Wrench
Apply the brakes several times with the ignition OFF. This will deplete
the vacuum reserve. Use extreme care to prevent brake fluid from contacting
painted surfaces.
- Fill the master cylinder
reservoir with the brake fluid specified in Maintenance and Lubrication in
General Information.
| • | Maintain the fluid level in the reservoir during the bleeding
operation. |
| • | Use an assistant in the vehicle in order to press the brake pedal
during the manual bleeding process. |
- If the master cylinder is suspected to have air in the bore, bleed
the master cylinder before bleeding the wheel cylinders or the calipers. Complete
the following steps:
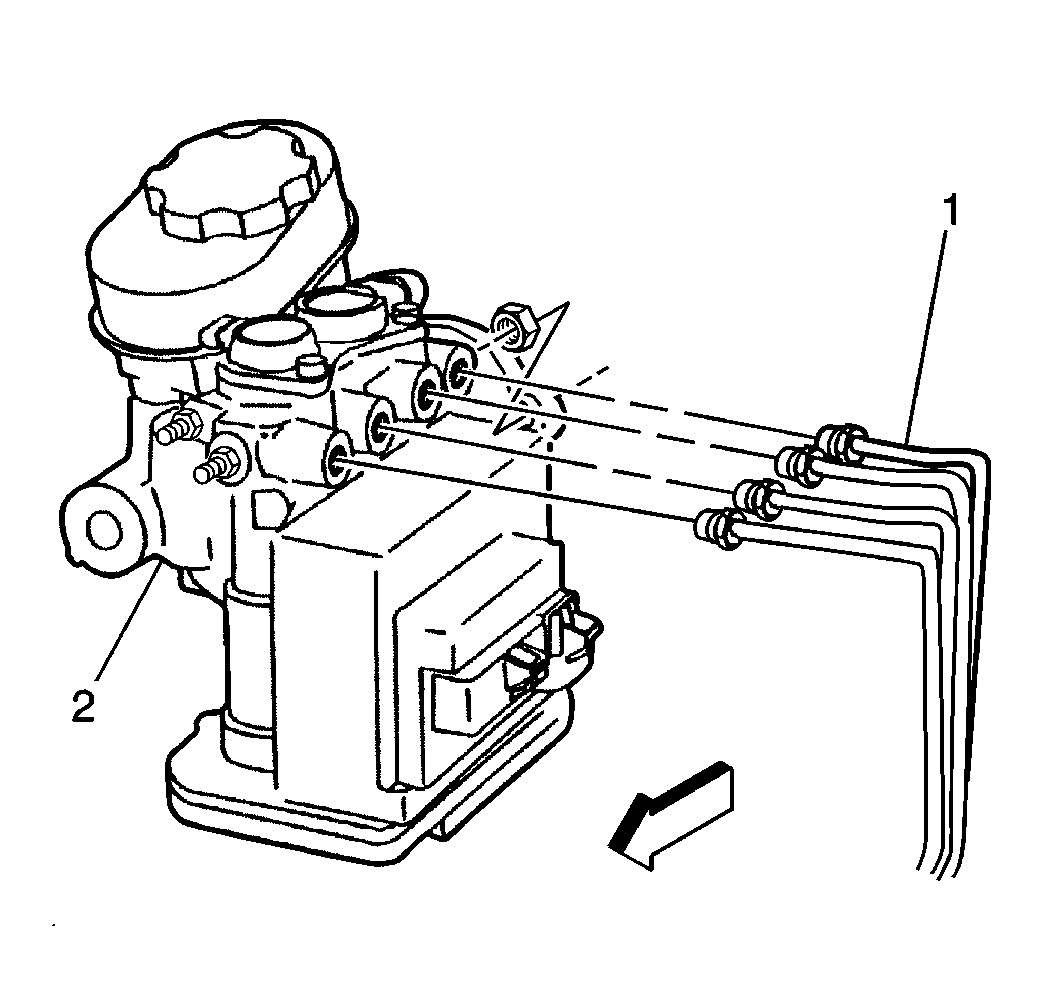
- Disconnect the forward
brake pipe connection(s) (1) at the master cylinder.
- Fill the master cylinder with brake fluid until fluid begins to
flow from the forward pipe connector port.
- Connect the forward brake pipe to the master cylinder. Tighten
the pipe.
- Slowly depress the brake pedal and hold the pedal.
- Loosen the forward brake pipe connection at the master cylinder
in order to purge air from the cylinder.
- Tighten the connection.
- Slowly release the brake pedal.
- Wait 15 seconds.
- Repeat the previous steps until all air is removed from the bore.
Use extreme care in order to prevent brake fluid from contacting painted
surfaces.
- Bleed the master cylinder at the rear (cowl end) connections after
all the air has been removed at the forward connections. Slowly depress the
brake pedal and hold the pedal.
- Check for a firm pedal feel and proper brake pedal travel. If
the wheel cylinders and calipers do not contain air, bleeding is not necessary,
but is recommended in order to remove any moisture or debris.
- After all of the air is removed from the master cylinder, bleed
the wheel cylinders in the following order, if necessary:
- Raise and support the vehicle. Refer to
Lifting and Jacking the Vehicle
in General Information.

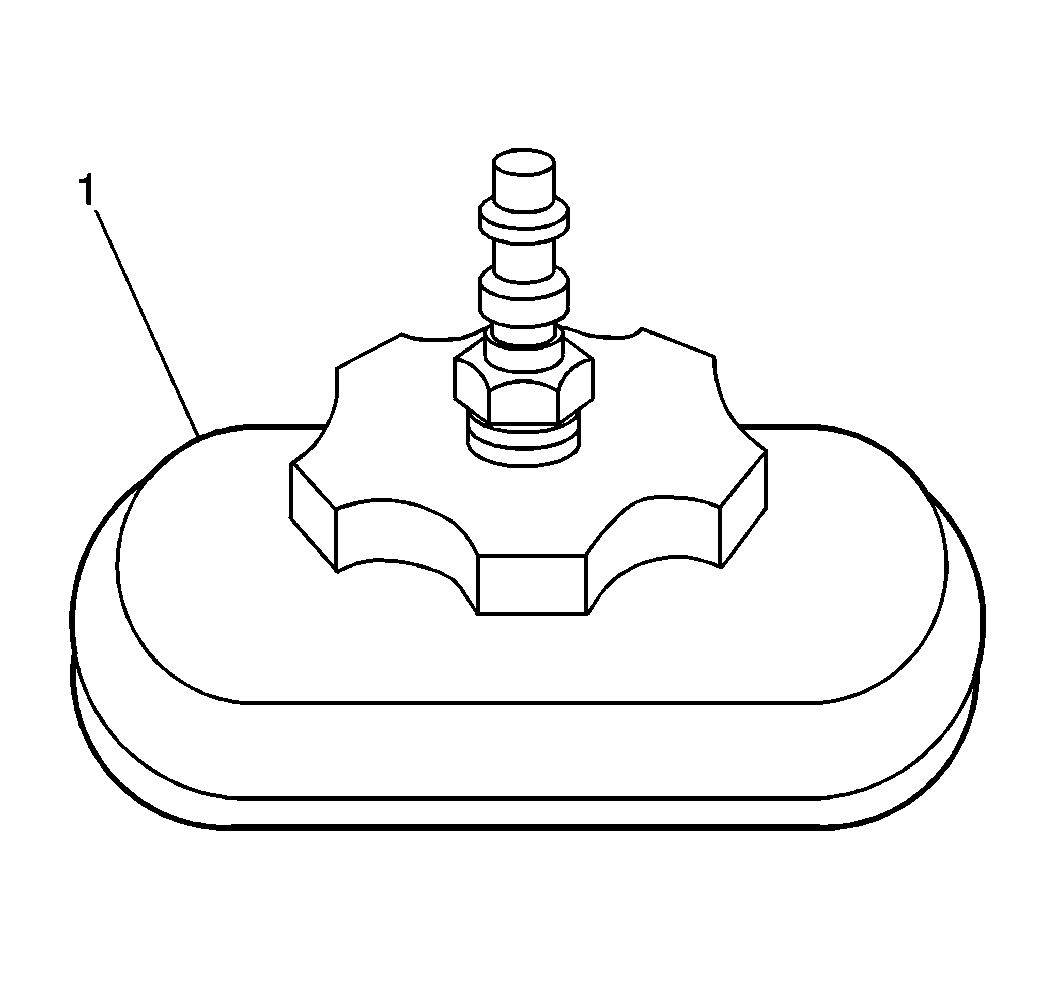
- Place a proper size box
end wrench (1) (or special tool) over the caliper/cylinder bleeder
valve.
- Attach a transparent tube (2) over the bleeder screw.
Submerge the other end in a transparent container partially filled with
clean brake fluid.
- Slowly depress the brake pedal and hold the pedal.
- Loosen the bleeder screw in order to purge the air from the cylinder/caliper.
Notice: Use the correct fastener in the correct location. Replacement fasteners
must be the correct part number for that application. Fasteners requiring
replacement or fasteners requiring the use of thread locking compound or sealant
are identified in the service procedure. Do not use paints, lubricants, or
corrosion inhibitors on fasteners or fastener joint surfaces unless specified.
These coatings affect fastener torque and joint clamping force and may damage
the fastener. Use the correct tightening sequence and specifications when
installing fasteners in order to avoid damage to parts and systems.
- Tighten the bleeder
screw.
Tighten
| • | Tighten the rear bleeder screws to 7 N·m (62 lb in). |
| • | Tighten the front bleeder screws to 13 N·m (115 lb in). |
- Slowly release the pedal.
- Wait 15 seconds.
- Repeat the previous steps until all air is removed from the caliper.
Do not pump the brake pedal rapidly. Pumping the pedal pushes the master
cylinder secondary piston down the bore and causes difficult bleeding.
- Lower the vehicle.
- Fill the master cylinder
to the proper level with the specified brake fluid.
- Check the brake pedal for sponginess or excessive travel.
Repeat the entire manual bleeding procedure if sponginess or excessive
travel are present.
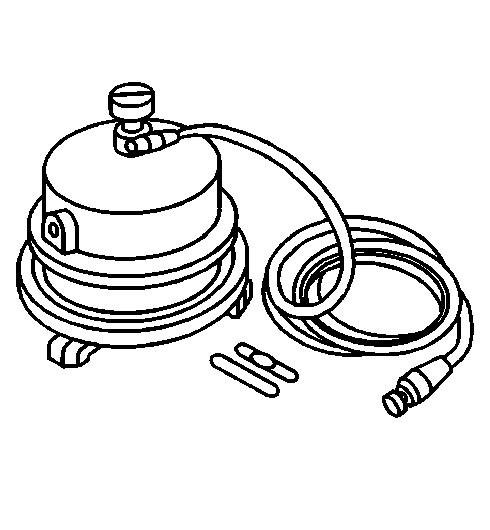
Pressure Bleeding
Tools Required
| • | J 29532 Diaphragm
Type Brake Bleeder |
| • | J 35589 Pressure
Bleeder Adapter Cap |
Notice: Pressure bleeding equipment must be of the diaphragm type. It must have
a rubber diaphragm between the air supply and the brake fluid to prevent air,
moisture, oil and other contaminants from entering the hydraulic system.
- Install the J 35589
to the master cylinder (1).
- Charge the J 29532
to 140-172 kPa (20-25 psi).
- Connect the line to the J 35589
.
- Open the line valve.
- Raise and support the vehicle. Refer to
Lifting and Jacking the Vehicle
in General Information.
- Bleed the wheel cylinders/calipers in the following order:
- Place the J 21472
over the caliper/cylinder bleeder valve.
- Attach a transparent tube over the bleeder screw.
Submerge the opposite hose end in a transparent container partially
filled with clean brake fluid.
- Open the bleeder screw at least 3/4 of a turn. Allow the fluid
to flow until no air is visible in the fluid.
Notice: Use the correct fastener in the correct location. Replacement fasteners
must be the correct part number for that application. Fasteners requiring
replacement or fasteners requiring the use of thread locking compound or sealant
are identified in the service procedure. Do not use paints, lubricants, or
corrosion inhibitors on fasteners or fastener joint surfaces unless specified.
These coatings affect fastener torque and joint clamping force and may damage
the fastener. Use the correct tightening sequence and specifications when
installing fasteners in order to avoid damage to parts and systems.
- Close the bleeder
screw.
Tighten
| • | Tighten the rear bleeder screws to 7 N·m (62 lb in). |
| • | Tighten the front bleeder screws to 13 N·m (115 lb in). |
- Repeat the previous steps until all of the calipers/cylinders
have been bled.
- Lower the vehicle.
- Inspect the brake pedal for sponginess.
Repeat this entire pressure bleeding procedure if sponginess occurs.
- Remove the J 35589
and the J 29532
.
- Fill the master cylinder
to the proper level.
