NEW PROCEDURE FOR REPLACEMENT OF FINAL DRIVE PINION

MODELS AFFECTED: 1980-89 MODELS WITH THM 125, THM 125C/HYDRA-MATIC 3T40, AND THM 440-T4/HYDRA-MATIC 4T60 TRANSAXLE
BULLETIN COVERS
A new service procedure to replace final drive pinion gear washers (807) and differential carrier sun gear bearing (677) on THM 440-T4/HYDRA-MATIC 4T60 or (676) on THM 125C/HYDRA-MATIC 3T40.
SERVICE PROCEDURE
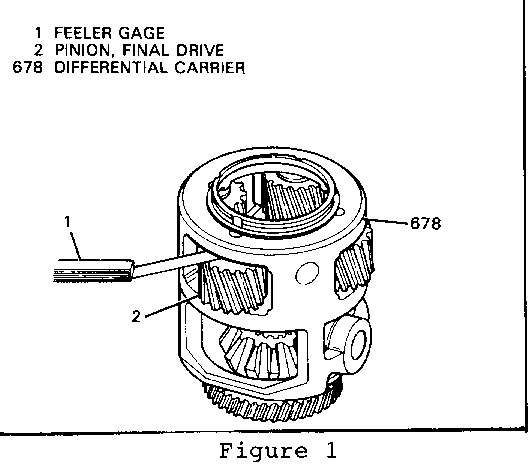
Checking End Play
Measure pinion gear end play using feeler gage. The correct end play range is 0.24mm - 0.63mm (0.009" - 0.025"). If out of range, follow the procedure given in this bulletin, since it is not currently included in the Unit Repair section of your Service Manual. (Refer to Illustration)
Disassembly
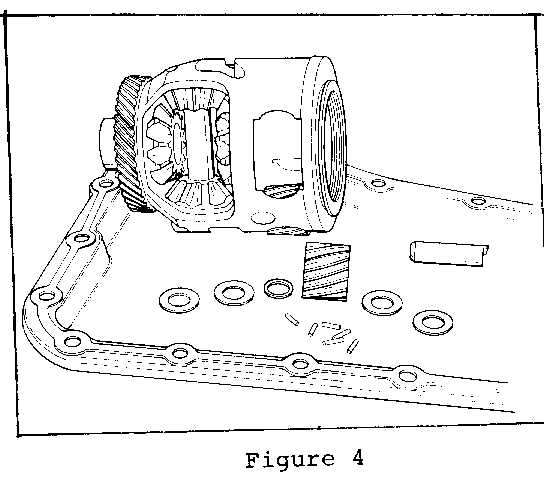
1. After removing final drive from unit, clean the entire bottom pan since it will be used to hold needle bearings.
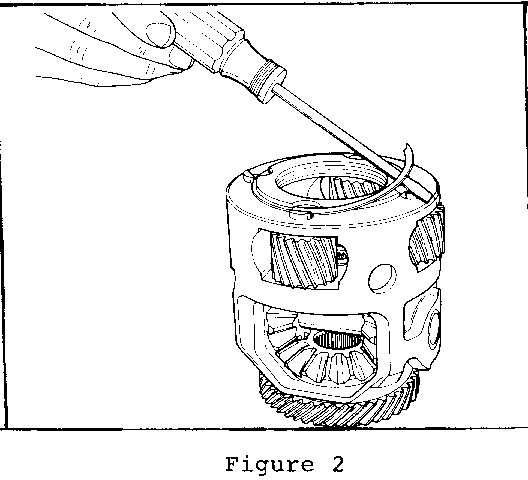
2. Using a screwdriver, remove the spiral snap ring (wear safety glasses). (Figure 1)
3. Be careful when pulling out the pinion gear shaft (804) from the pinion gear so the needle bearings do not get lost. (Figure 2) Put a mark on the gear with chalk or crayon so the gear can be installed the same way it was removed. Overhaul one pinion at a time so parts do not get mixed.
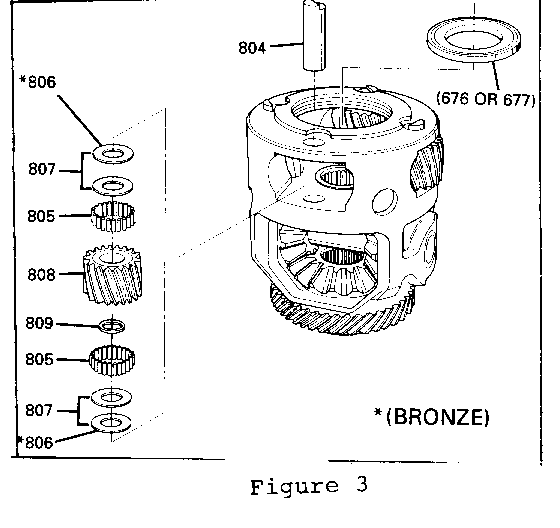
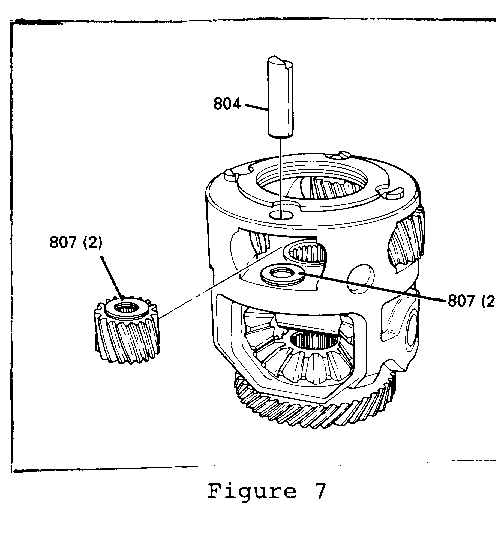
4. Tilt the final drive and remove the pinion gear (808), washers (806, 807, 809) and needle bearings. (The needle bearings will fall out of pinion gear. Use the bottom pan to catch/hold them.) (Figure 3)
5. Inspect washers, needle bearings, and pinion shaft for wear. Discard bronze washer (806) and replace with new steel washer (807) from the service kit.
* If replacement of only the thrust bearing (Figure 2) (677) 4T60 or (676) 3T40 is necessary, use Steps 1 through 3. After Steps 1 through 3 are completed, move the pinion gears to provide clearance to replace the thrust bearing, then complete Steps 6 through 7 of the assembly procedure.
Assembly
1. After cleaning the pinion gear, apply Transjel J36850 (assembly lubricant or petroleum jelly) to the inside of the gear. (Do not use any grease or axle grease.)
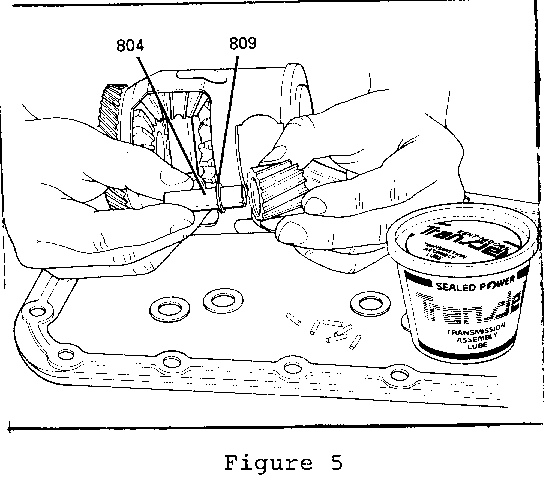
2. Install square cut washer (809) onto the pinion gear shaft (804). Insert the shaft and washer into the gear so the washer is flush with gear and shaft is 3/4 inside gear.
Important: Square cut washer is to be assembled between the two rows of needle bearings.
3. Install needle bearings (805) (one at a time) into the gear - 44 per pinion (22/row) for 3.06 and 3.33 ratios - 36 per pinion (18/row) for 2.84 ratio. Occasionally, twist the pinion shaft so the needle bearings will line up and allow for all needle bearings to be installed. (Figure 5)
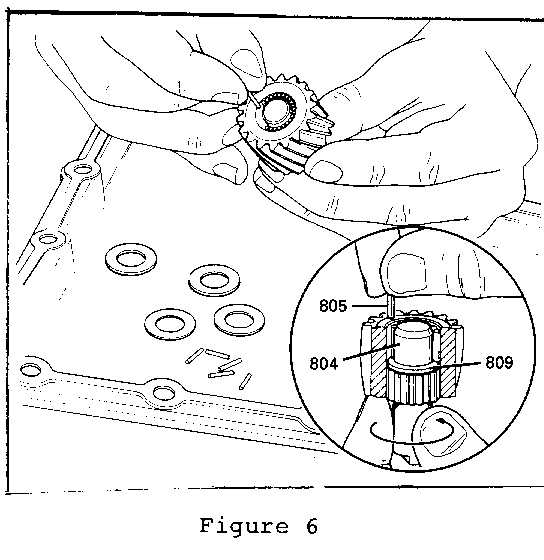
4. Install 2 washers (807) into the final drive assembly. (Figure 6)
5. Install the remaining 2 washers (807) (on top of the pinion gear). (Figure 6)
6. Insert the pinion gear and washers (in same position it was removed) into the final drive. Check the chalk or crayon mark.
Important: Make sure the pinion gear is installed the same way that it was removed. If the gear is installed upside down, it may cause a noise because of the change in set-wear pattern.
7. Install the pinion gear shaft (804) (without dislodging the needle bearings) and install the spiral snap ring. (Figure 6)
Important: Make sure there are no extra needle bearings left after replacing the washers. There must be no spaces between needle bearings. Check for pinion end play. Do not install more than the required amount of washers, four (4) per each pinion (2 on each side of pinion), into the final drive.
LABOR TIME INFORMATION
Add .4 hours to Labor Operation K7620 whenever this service procedure is performed.
SERVICE PARTS INFORMATION
Whenever ordering replacement parts for the final drive assembly refer to the following part numbers:
Package Description Part Numbers -------------------- ------------- Package: Pinion, thrust washers for 2.84 ratio 8637994 final drive - 16 steel washers (807)
Package: Pinion, thrust washers for 3.06 and 3.33 8637995 ratio final drive - 16 steel washers (807)
Bearing, differential sun gear 8646254
Parts are currently available from GMSPO.
SERVICE MANUAL REFERENCE
Whenever service and/or replacement to the final drive assembly is necessary, refer to the Unit Repair section of your Service Manual.
General Motors bulletins are intended for use by professional technicians, not a "do-it-yourselfer". They are written to inform those technicians of conditions that may occur on some vehicles, or to provide information that could assist in the proper service of a vehicle. Properly trained technicians have the equipment, tools, safety instructions and know-how to do a job properly and safely. If a condition is described, do not assume that the bulletin applies to your vehicle, or that your vehicle will have that condition. See a General Motors dealer servicing your brand of General Motors vehicle for information on whether your vehicle may benefit from the information.
