Removal Procedure
- Disable the SIR system. Refer to SIR Disabling and Enabling .
- Remove the driver seat. Refer to Bucket Seat Replacement in Seats.
- Remove the J-clip from the lower rear seat back.
- Remove the seat back cover. Refer to Front Seat Back Cushion Cover Replacement in Seats.
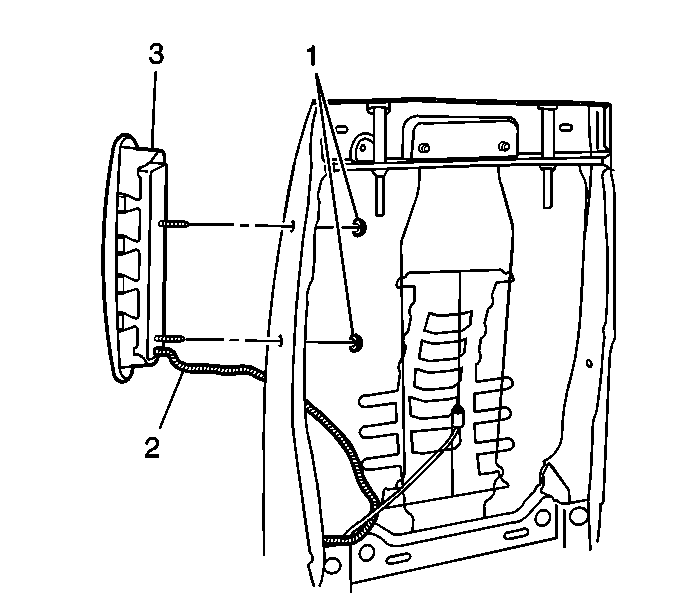
- Remove the air bag fasteners (1).
- Note the routing of the air bag wiring harness (2) and the retaining clip attachments within the driver seat.
- Remove the retaining clips on the air bag wiring harness from the driver seat frame.
- Gently pull the air bag wiring harness (2) up into the seat back while guiding the harness through the wire triangle of the seat frame.
- Remove the air bag (3) from the seat back frame.
- Fully deploy the module before disposal. If the module was replaced under warranty, fully deploy and dispose of the module after the required retention period. Refer to Inflator Module Handling and Scrapping .
Caution: Refer to SIR Caution in the Preface section.
Caution: Refer to SIR Inflator Module Handling and Storage Caution in the Preface section.
Caution: Following the deployment of a side impact air bag, inspect the following
parts for damage. Replace these parts if necessary:
• The seat cushion frame • The seat recliner, if equipped • The seat adjuster • The seat back frame
Installation Procedure
- Install the driver side air bag (3) to the seat while guiding the air bag wiring harness (2) through the trim cup.
- Install the air bag fasteners (1).
- Gently pull the air bag wiring harness (2) down into the seat cushion while guiding the harness through the wire triangle of the seat frame.
- Install the harness retaining clips to the seat frame.
- Install the seat back cover. Refer to Front Seat Back Cushion Cover Replacement in Seats.
- Connect together the J-clip that is along the lower rear seat back.
- Install the driver seat. Refer to Bucket Seat Replacement in Seats.
- Enable the SIR system. Refer to SIR Disabling and Enabling .
Notice: Use the correct fastener in the correct location. Replacement fasteners must be the correct part number for that application. Fasteners requiring replacement or fasteners requiring the use of thread locking compound or sealant are identified in the service procedure. Do not use paints, lubricants, or corrosion inhibitors on fasteners or fastener joint surfaces unless specified. These coatings affect fastener torque and joint clamping force and may damage the fastener. Use the correct tightening sequence and specifications when installing fasteners in order to avoid damage to parts and systems.
Tighten
Tighten the fasteners (1) to 10 N·m (89 lb in).
