FUEL TANK UNDERBODY CLUNK (INSTALL TANK STRAPS/SPACERS)

SUBJECT: FUEL TANK/UNDERBODY CREAK/GROAN NOISE (SERVICE PROCEDURE FOR INSTALLING FUEL TANK STRAPS AND SPACERS)
VEHICLES AFFECTED: 1989-91 'W' CARS
This bulletin cancels and supersedes Product Service Bulletin # 91-2-165. Additional information and part numbers are provided to address another fuel tank related noise condition incline/driveway.
Condition:
----------- Some 1989-91 W-cars may exhibit a creak/groan or in severe instances a clunk/thud type noise coming from the rear of the vehicle. This noise is most apparent when a vehicle twisting motion is generated, such as that which would be experienced when turning up a steep incline/driveway.
Cause:
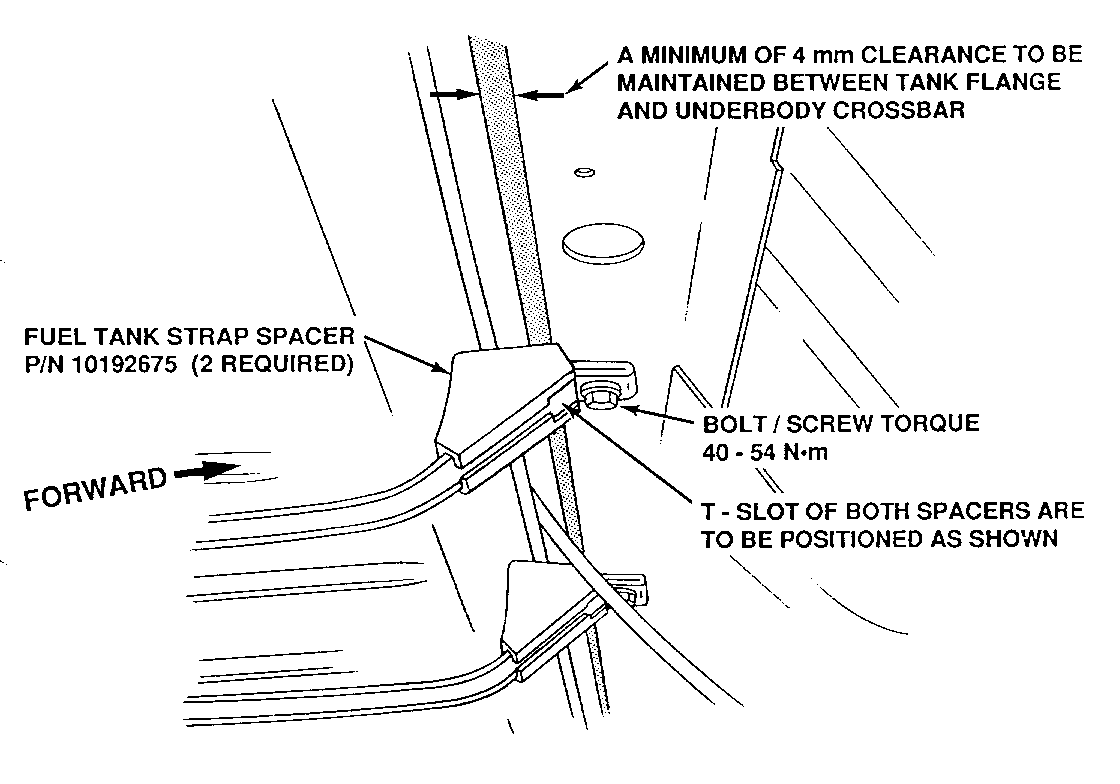
-------- These noise conditions may be caused by the fuel tank flange contacting the underbody crossbar located forward of the fuel tank or movement between the tank and retaining straps.
Correction:
------------- On 1989-91 vehicles assembled prior to VIN breakpoints indicated below, install new fuel tank straps,
P/N 10199250 (2 required), and strap spacers, P/N 10192675 (2 required) .
On 1991 vehicles assembled after VIN breakpoints it will only require installation of tank straps, P/N 10199250 (2 required) and the transfer of existing strap spacers.
VIN Breakpoints
Oldsmobile - MD332722 Pontiac - MF235111 Buick - M1848929 Chevrolet - M9170499 (Oshawa #1) - M1124665 (Oshawa #2)
Service Procedure:
1. Raise vehicle on hoist. 2. Remove exhaust intermediate pipe heat shield. 3. Support fuel tank assembly. 4. Remove RH fuel tank strap attaching bolts/screws, remove spacer from strap if present, discard strap. 5. Install strap spacer, P/N 10192675, on new strap, P/N 10199250, as shown on Illustration.
NOTICE: DO NOT BEND FUEL TANK STRAPS, AS THIS MAY DAMAGE STRAPS.
6. Position strap and loosely install attaching bolts/screws. 7. Repeat steps 4 thru 6 for LH strap. 8. Insuring a minimum of 4 mm of clearance is maintained between fuel tank flange and underbody bar, torque attaching bolts/screws to 40-54 N.m (29-39 ft.lbs.) . 9. Install exhaust heat shield and torque bolts/screws to 2 N.m (1.5 ft.lbs.) . 10. Remove support from under fuel tank and lower vehicle.
Use the most applicable Labour Operation and Time from the Canadian Labour Time Guide.
General Motors bulletins are intended for use by professional technicians, not a "do-it-yourselfer". They are written to inform those technicians of conditions that may occur on some vehicles, or to provide information that could assist in the proper service of a vehicle. Properly trained technicians have the equipment, tools, safety instructions and know-how to do a job properly and safely. If a condition is described, do not assume that the bulletin applies to your vehicle, or that your vehicle will have that condition. See a General Motors dealer servicing your brand of General Motors vehicle for information on whether your vehicle may benefit from the information.
