For 1990-2009 cars only
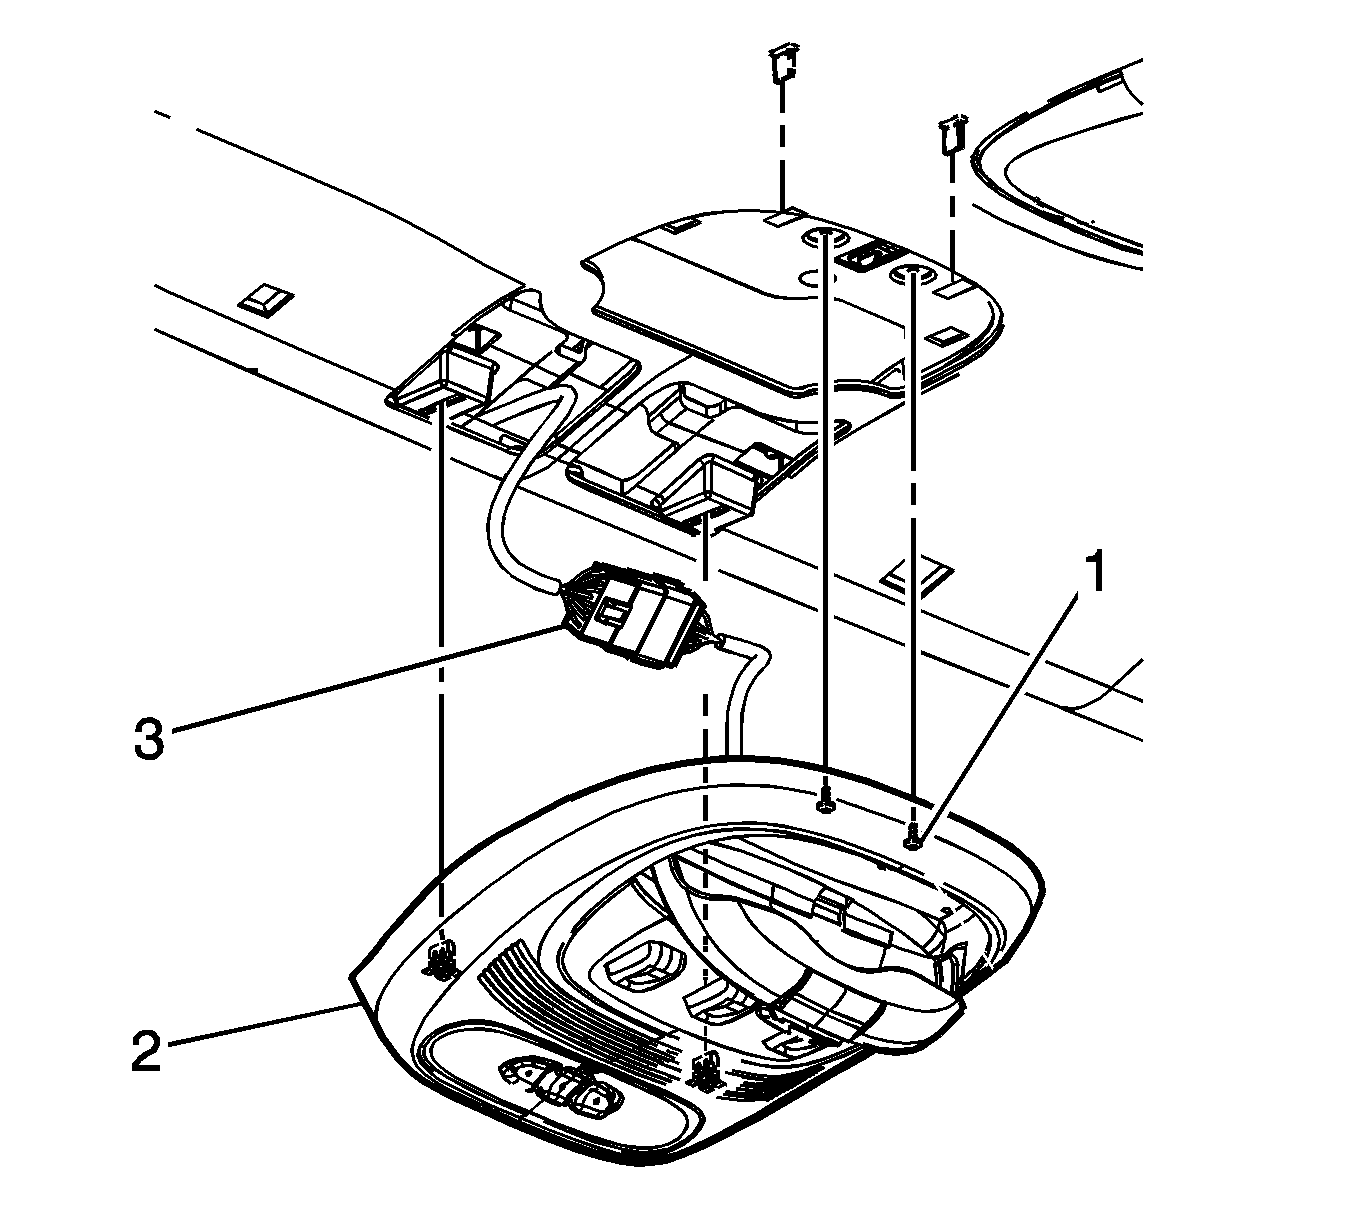
Roof Console Replacement Envoy XUV
Removal Procedure
- Open the sunglasses compartment cover or the beauty cover on the console.
- Remove the 2 screws (1) that retain the console (2) to the roof panel.
- Pull the console down to disengage clips.
- Disconnect the electrical connectors (3).
- Remove the console from the vehicle.
- If replacing the console, remove the switches. Refer to Quarter Window Switch Replacement in Body Rear End.
- If replacing the console, remove the garage door opener, if equipped. Refer to Garage Door Opener Replacement in Garage Door Opener.
- If replacing the console, remove the OnStar® microphone if, equipped. Refer to Mobile Telephone Microphone Replacement in Cellular Communication.
- If replacing the console, remove the noise cancellation microphone if, equipped. Refer to Radio Volume Compensator Interior Noise Microphone Replacement in Entertainment.
- If replacing the console, remove the personal message player/recorder, if equipped. Refer to Personal Message Player/Recorder Replacement in Entertainment.
Installation Procedure
- If replacing the console, install the personal message player/recorder, if equipped. Refer to Personal Message Player/Recorder Replacement in Entertainment.
- If replacing the console, install the noise cancellation microphone, if equipped. Refer to Radio Volume Compensator Interior Noise Microphone Replacement in Entertainment.
- If replacing the console, install the OnStar® microphone, if equipped. Refer to Mobile Telephone Microphone Replacement in Cellular Communication.
- If replacing the console, install the garage door opener, if equipped. Refer to Garage Door Opener Replacement in Garage Door Opener.
- If replacing the console, install the switches. Refer to Quarter Window Switch Replacement in Body Rear End.
- Connect the electrical connectors (3).
- Install the front retaining clips by pressing the console (2) into the roof.
- Install the 2 screws (1) retaining the console to the roof panel.
- Close the sunglasses compartment cover on the console or snap the beauty cover into place.
Notice: Refer to Fastener Notice in the Preface section.
Tighten
Tighten the screws to 1.2 N·m (10 lb in).
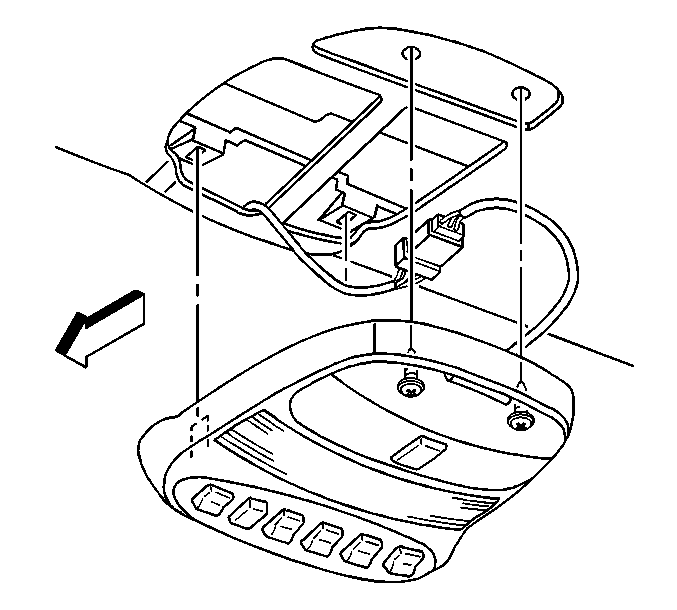
Roof Console Replacement Trailblazer, Envoy, Rainier
Removal Procedure
- Remove the dome lamp lenses by gently prying the lenses from the console.
- Remove the 2 screws that retain the console to the roof panel.
- Release the front retaining tabs.
- Lower the console and disconnect the electrical connectors as needed.
- Remove the console from the vehicle
- If replacing the console, remove the garage door opener if equipped. Refer to Garage Door Opener Replacement .
- If replacing the console, remove the OnStar® microphone if equipped. Refer to Mobile Telephone Microphone Replacement .
- If replacing the console, remove the personal message player/recorder if equipped. Refer to Personal Message Player/Recorder Replacement .
- If replacing the console, remove the power sunroof switch if equipped. Refer to Sunroof Switch Replacement .
- If replacing the console, remove the noise cancellation microphone if equipped. Refer to Radio Volume Compensator Interior Noise Microphone Replacement .
Installation Procedure
- If replacing the console, install the noise cancellation microphone if equipped. Refer to Radio Volume Compensator Interior Noise Microphone Replacement .
- If replacing the console, install the power sunroof switch if equipped. Refer to Sunroof Switch Replacement .
- If replacing the console, install the personal message player/recorder if equipped. Refer to Personal Message Player/Recorder Replacement .
- If replacing the console, install the OnStar® microphone if equipped. Refer to Mobile Telephone Microphone Replacement .
- If replacing the console, install the garage door opener if equipped. Refer to Garage Door Opener Replacement .
- Position the console to the roof panel.
- Connect the electrical connectors as needed.
- Seat the front retaining tabs.
- Install the 2 screws retaining the console to the roof panel.
- Install the dome lamp lenses.
Notice: Refer to Fastener Notice in the Preface section.
Tighten
Tighten the screws to 1.2 N·m (10 lb in).
