Outside Rearview Mirror Glass Replacement w/o DR2
Removal Procedure

Caution: When working with any type of glass or sheet metal with exposed or rough
edges, wear approved safety glasses and gloves in order to reduce
the chance of personal injury.
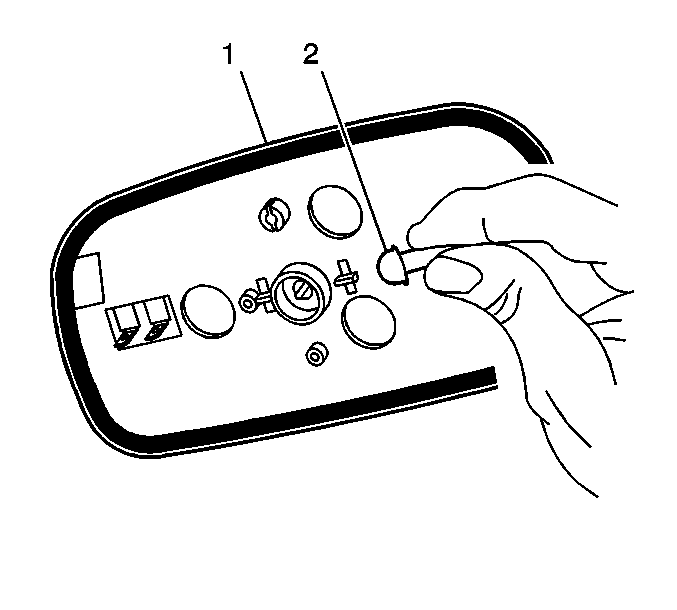
- Remove the mirror and the
plastic backing plate assembly (2).
| 1.1. | Manually tilt the mirror glass (2) inboard towards the
vehicle. |
| 1.2. | Insert fingers behind the mirror glass assembly (2). |
| 1.3. | Gently pull the mirror glass assembly (2) from the housing (1). |
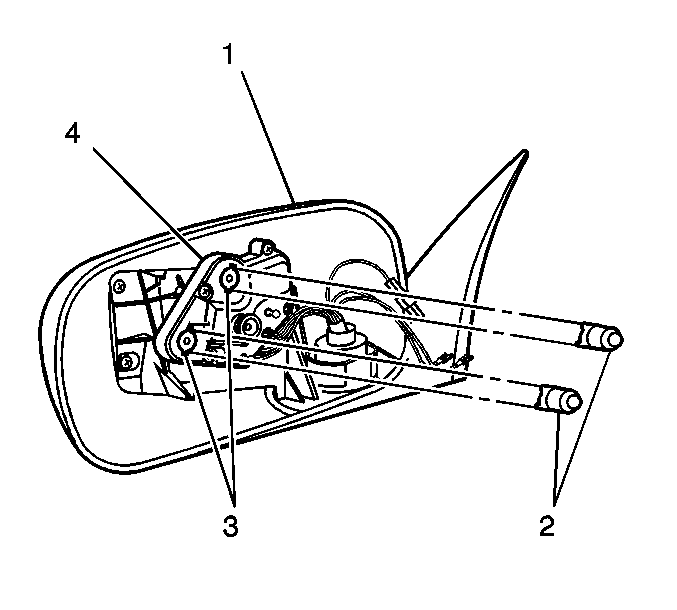
- Disconnect the electrical connectors.
- Remove the actuators (2)
that may have remained attached to the mirror face backing (1).
Push the actuator in the direction of one of the two slots of the molded
ring where the actuator ball attaches in order to disengage it from the mirror
glass assembly (1).
Installation Procedure
- Ensure that the actuator
springs (7) are not pushed down on the actuator shafts, but are seated
in the groove provided.
- Install the actuator shafts (2)
on to the power drive unit (4) by pressing and rotating the actuator
on to the power drive unit.
- Connect the electrical connectors to the mirror glass assembly.
- Align the mirror face
assembly pivot points (3) to the actuator shafts (5) and the
memory pins (4).
- Install the mirror glass
assembly.
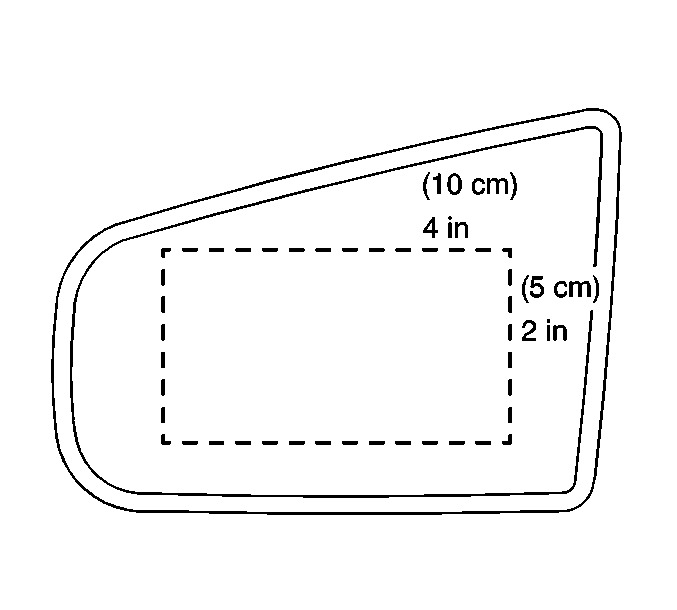
| 5.1. | Use a 5 cm by 10 cm (2 in by 4 in)
sanding block and firmly press the mirror glass assembly with enough force
in order to engage the center pivot point on to the power drive unit. |
| 5.2. | Apply pressure to the top of the mirror glass assembly with the
sanding block until an audible snap is heard. |
| 5.3. | Manually tilt the mirror glass assembly outboard away from the
vehicle. |
| 5.4. | Apply pressure to the outboard portion of the mirror glass assembly
with the sanding block until an audible snap is heard. |
- Ensure proper operation of the outside rear view mirror by operating
in all directions.
Outside Rearview Mirror Glass Replacement w/ DR2
Removal Procedure
Caution: When working with any type of glass or sheet metal with exposed or rough
edges, wear approved safety glasses and gloves in order to reduce
the chance of personal injury.
- Remove the mirror and plastic
backing plate assembly from the mirror housing (1).
| 1.1. | Manually tilt the mirror glass inboard towards the vehicle. |
| 1.2. | Insert fingers behind the mirror glass assembly. |
| 1.3. | Gently pull the assembly from the housing. |
- Disconnect the electrical connectors.
- If one or both of the
actuator shaft(s) (2) come off with the mirror glass assembly, push
the actuator in the direction of one of the two slots of the molded ring
where the actuator ball attaches to and disengage it from the mirror glass
assembly.
- Verify that the springs (7) on the actuator shafts (8)
are not pushed down on the shafts.
- Ensure that the springs (5) are seated in the grooves.
Installation Procedure
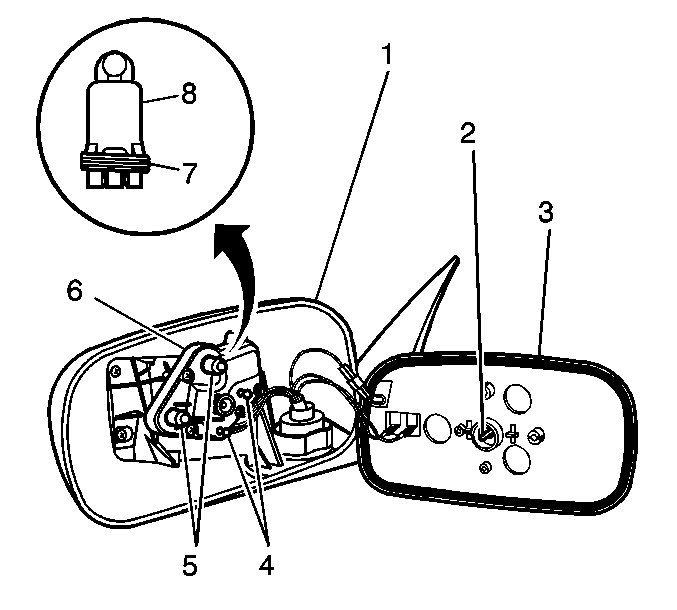
- Snap the actuator shafts
into the power drive unit (8).
- Connect the electrical connectors.
- Rotate the actuator shafts in order to align the ears with the
corresponding slots in the back side of the mirror face (7).
- Align the swivel (3) on the power drive unit (8)
to the pivot points on the mirror backing plate.
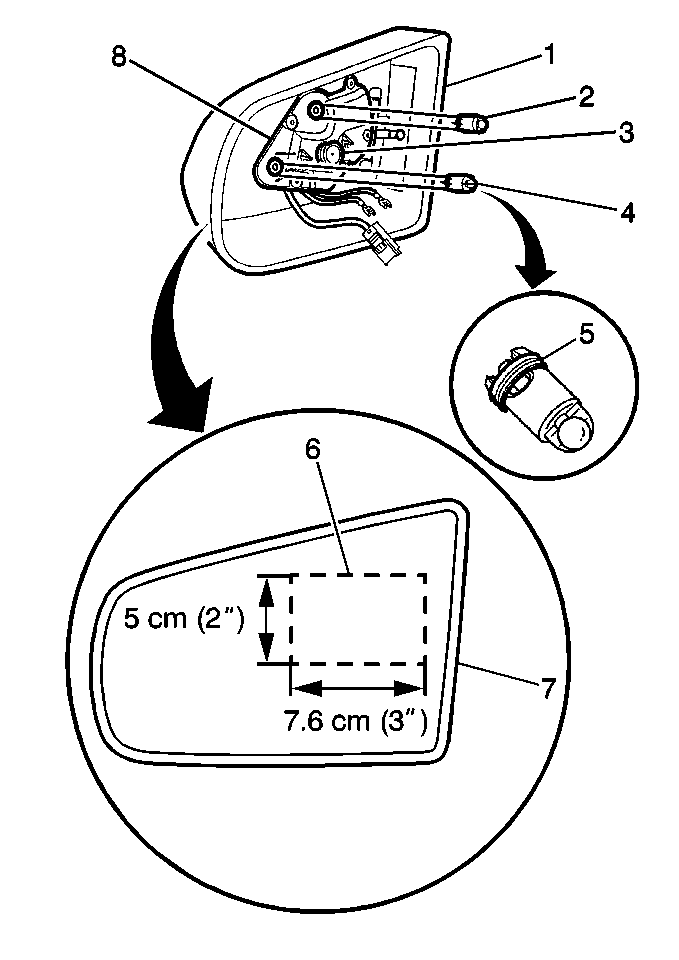
Notice: To avoid damaging electrochromic mirrors, yellowing and/or silver delamination,
pressure must not be applied to the center of the mirror. Place a 6 x 9 cm
(2 x 3 in) block of wood in the indicated target area.
This will distribute pressure evenly.
- Hold a block against the mirror face while you perform the following
procedure:
| 5.1. | Push in on the block (6) until you hear a snap. |
| 5.2. | Tilt the mirror (7) toward the upper actuator shaft (2). |
Apply pressure on the block until the ratchet sound stops.
| 5.3. | Tilt the mirror (7) toward the outside actuator shaft (4). |
Apply pressure on the block until the ratchet sound stops.
- Inspect the mirror for proper operation.
If the mirror is not operating properly, inspect the actuator shaft
alignments again.
