Removal Procedure
Caution: Provide additional support when a vehicle is on a hoist:
• Before removing parts, support the opposite end. This helps prevent
the vehicle from slipping off. • Before removing major components, chain the vehicle frame to the
hoist pads at the same end as the removal. This helps avoid a tip-off.
Notice: Do not attempt to straighten any kinked nylon fuel lines. Replace any kinked nylon fuel feed or return pipes in order to prevent damage to the vehicle.
Important: Do Not attempt to repair sections of nylon fuel pipes. If the nylon fuel pipes are damaged, replace them.
- Relieve the fuel system fuel pressure. Refer to the Fuel Pressure Relief .
- Drain the fuel tank. Refer to Fuel Tank Draining .
- Raise the vehicle.
- Remove the fuel tank filler pipe EVAP pipe from the fuel tank EVAP pipe.
- Remove the fuel tank filler pipe from the fuel tank.
- Remove the quick-connect fittings at the fuel tank. Refer to Servicing Quick Connect Fittings .
- Remove the rubber exhaust pipe hangers in order to allow the exhaust system to drop slightly.
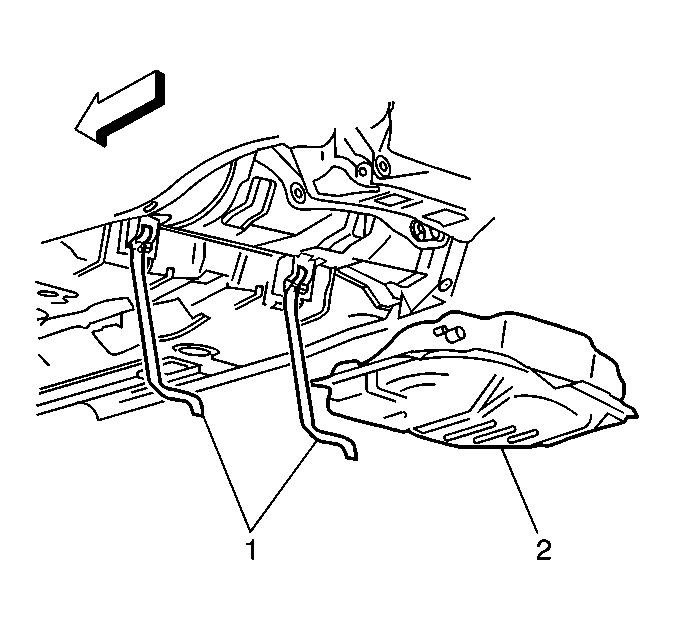
- Remove the fuel tank strap attaching bolts which retain the fuel tank straps (1), and support the fuel tank with the aid of an assistant (2).
- Lower the fuel tank enough in order to disconnect the fuel sender electrical connector and remove the fuel sender retaining clips.
- Remove the EVAP pipe from the rear of the fuel tank.
- Remove the fuel tank from the vehicle and place the fuel tank in a suitable work area.
Notice: Do not bend the fuel tank straps as this may damage the straps.
Disassemble Procedure
- If the fuel tank is not being replaced, go to Installation Procedure.
- Disassemble the fuel sender assembly. Refer to Fuel Sender Assembly Service .
Assemble Procedure
Assemble fuel sender assembly. Refer to Fuel Sender Assembly Service .
Installation Procedure
- Position and support the fuel tank, with the aid of an assistant.
- Install the EVAP pipe to the rear of the fuel tank.
- Install the fuel sender electrical connector.
- Install the fuel sender retaining clips.
- Install the fuel tank retaining strap attaching bolts (2).
- Install the quick-connect fittings. Refer to Servicing Quick Connect Fittings .
- Install the fuel tank filler pipe EVAP pipe to the fuel tank.
- Install the fuel tank filler pipe to the fuel tank.
- Install the rubber exhaust pipe hangers.
- Lower the vehicle.
- Add fuel to the fuel tank.
- Install the fuel tank filler pipe cap.
- Install the negative battery cable.
Tighten
Tighten the fuel tank retaining strap bolts (2) to 40 N·m(30 lb
ft).
Tighten
Tighten the fuel tank filler pipe EVAP pipe hose clamp to 2.8 N·m
(24.8 lb in).
Tighten
Tighten the fuel tank filler pipe hose clamp to 2.8 N·m
(24.8 lb in).
| 13.1. | Turn the ignition switch ON for 2 seconds. |
| 13.2. | Turn the ignition switch OFF for 10 seconds. |
| 13.3. | Turn the ignition switch ON. |
| 13.4. | Check for fuel leaks. |
