Air Conditioning Compressor Replacement L26
Tools Required
J 39400-A Halogen Leak Detector
Removal Procedure
- Recover the refrigerant. Refer to Refrigerant Recovery and Recharging .
- Remove the drive belts. Refer to Drive Belt Replacement .
- Remove the splash shield from the right side of the engine. Refer to Engine Splash Shield Replacement in Body Front End.
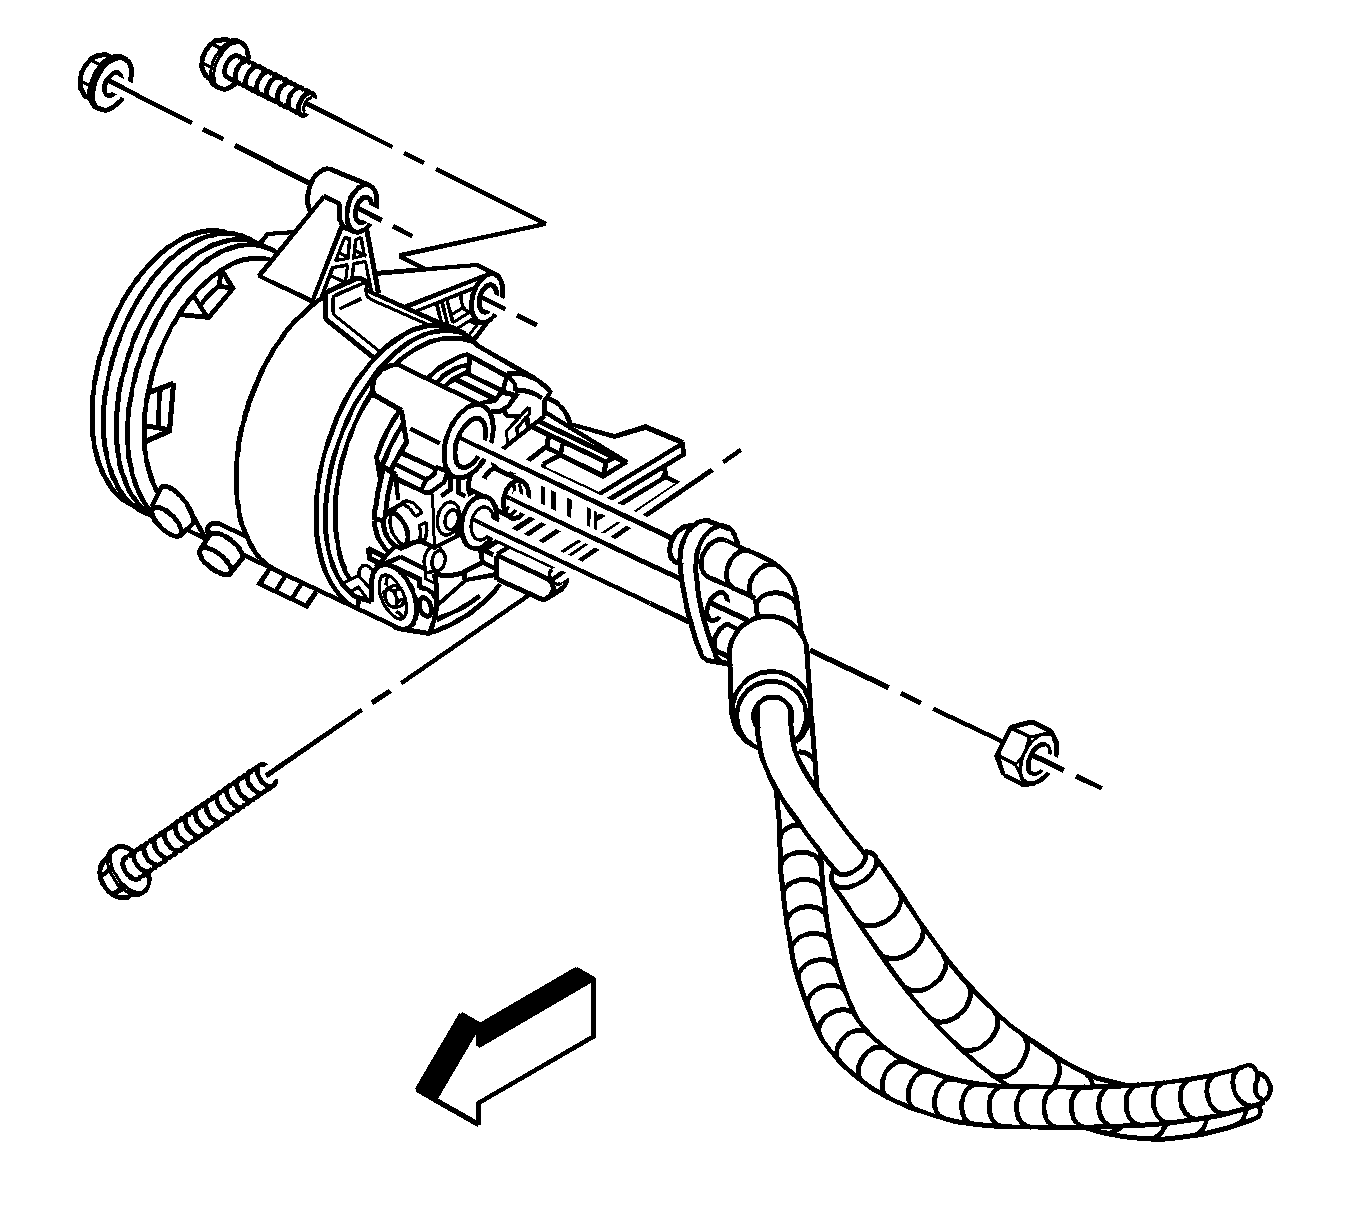
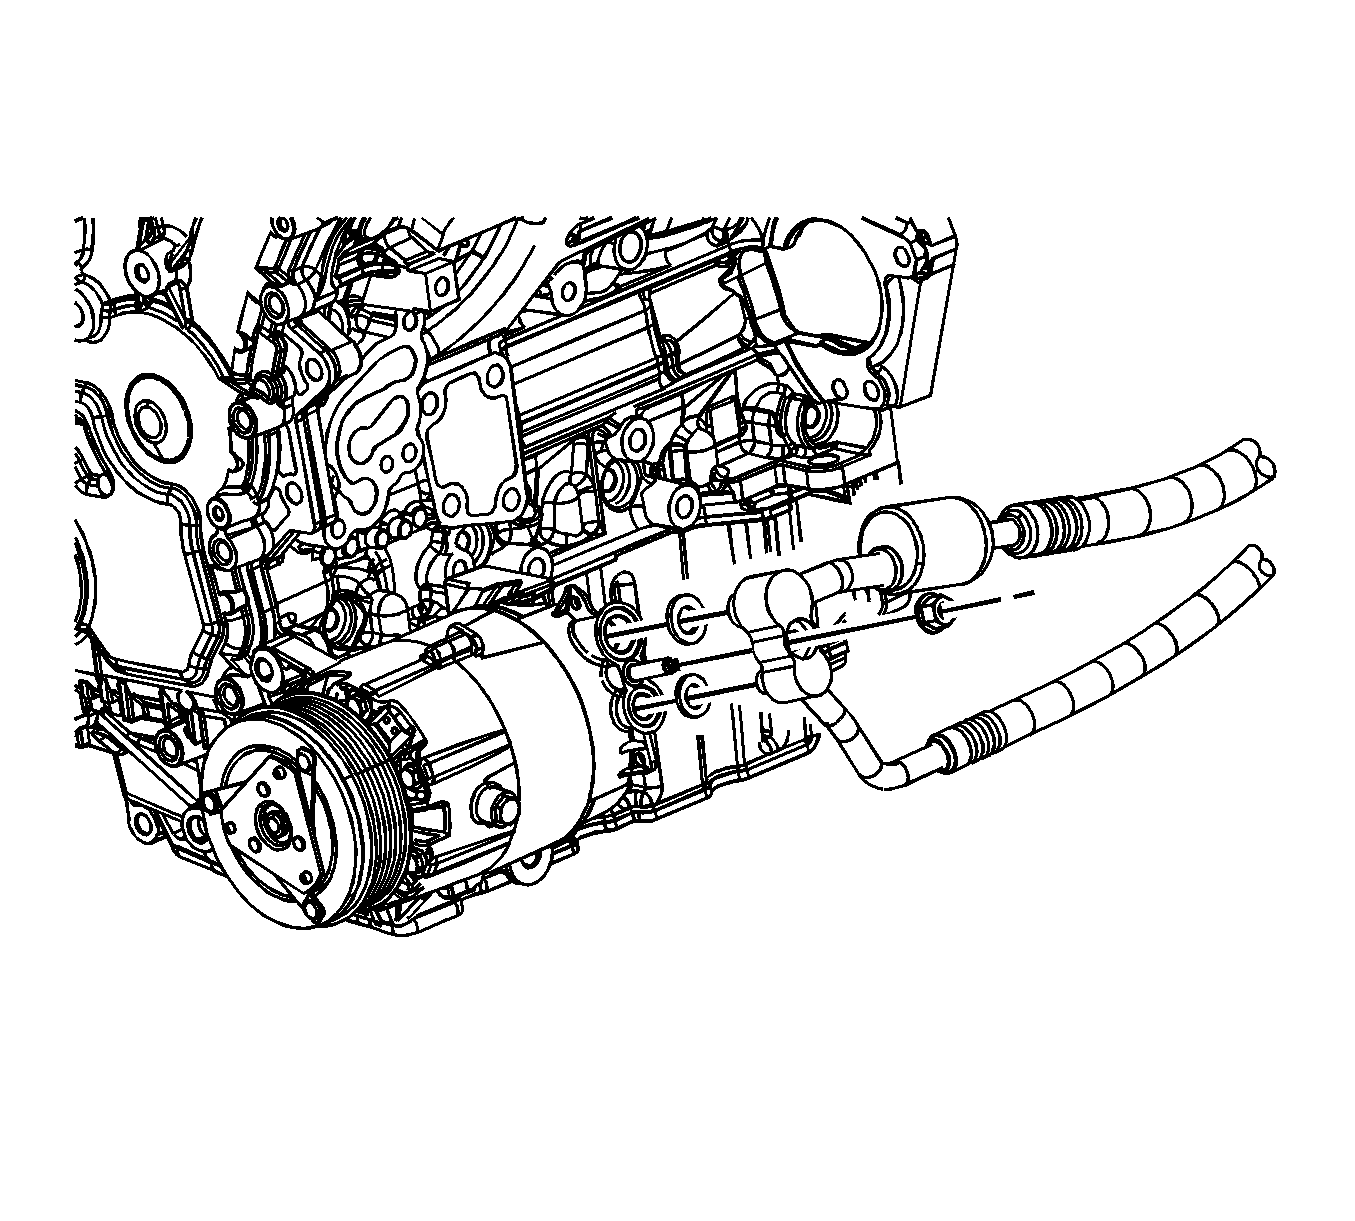
- Remove the hose nut from the A/C compressor.
- Remove the hose from the A/C compressor.
- Disconnect the electrical connector from the A/C compressor.
- Loosen the rear mounting bolt from the A/C compressor.
- Remove the front mounting bolt from the A/C compressor.
- Remove the front mounting nut from the A/C compressor.
- Remove the A/C compressor.
- If replacing the compressor, balance the compressor oil. Refer to Air Conditioning Compressor Oil Balancing .
Important: Remove and discard all sealing washers.
Important: Replacement compressors are shipped with polyalkylene glycol (PAG) oil
Installation Procedure
- Install the compressor drain plug.
- Position the A/C compressor onto the front A/C compressor mounting stud and the rear A/C compressor mounting bolt.
- Install the A/C compressor front bolt.
- Install the A/C compressor front mounting nut.
- Tighten the A/C compressor rear bolt.
- Install new sealing washers. Refer to Sealing Washer Replacement .
- Install the hose to the A/C compressor.
- Install the nut to the A/C compressor hose.
- Connect the electrical connector to the A/C compressor.
- Install the splash shield to the right side of the engine. Refer to Engine Splash Shield Replacement in Body Front End.
- Install the drive belts. Refer to Drive Belt Replacement .
- Evacuate and recharge the A/C system. Refer to Refrigerant Recovery and Recharging .
- Leak test the fittings of the component using J 39400-A .
Notice: Refer to Fastener Notice in the Preface section.
Tighten
Tighten the drain plug to 16 N·m (12 lb ft).
Tighten
Tighten the bolts to 50 N·m (36 lb ft).
Tighten
Tighten the nut to 50 N·m (36 lb ft).
Tighten
Tighten the bolt to 50 N·m (36 lb ft).
Tighten
Tighten the nut to 17 N·m (12.5 lb ft).
Air Conditioning Compressor Replacement LY7
Tools Required
J 39400-A Halogen Leak Detector
Removal Procedure
- Recover the refrigerant. Refer to Refrigerant Recovery and Recharging .
- Remove the drive belts. Refer to Drive Belt Replacement .
- Remove the splash shield from the right side of the engine. Refer to Engine Splash Shield Replacement in Body Front End.
- Disconnect the electrical connector from the A/C compressor.
- Remove the compressor hose nut from the A/C compressor.
- Remove the compressor hose from the A/C compressor.
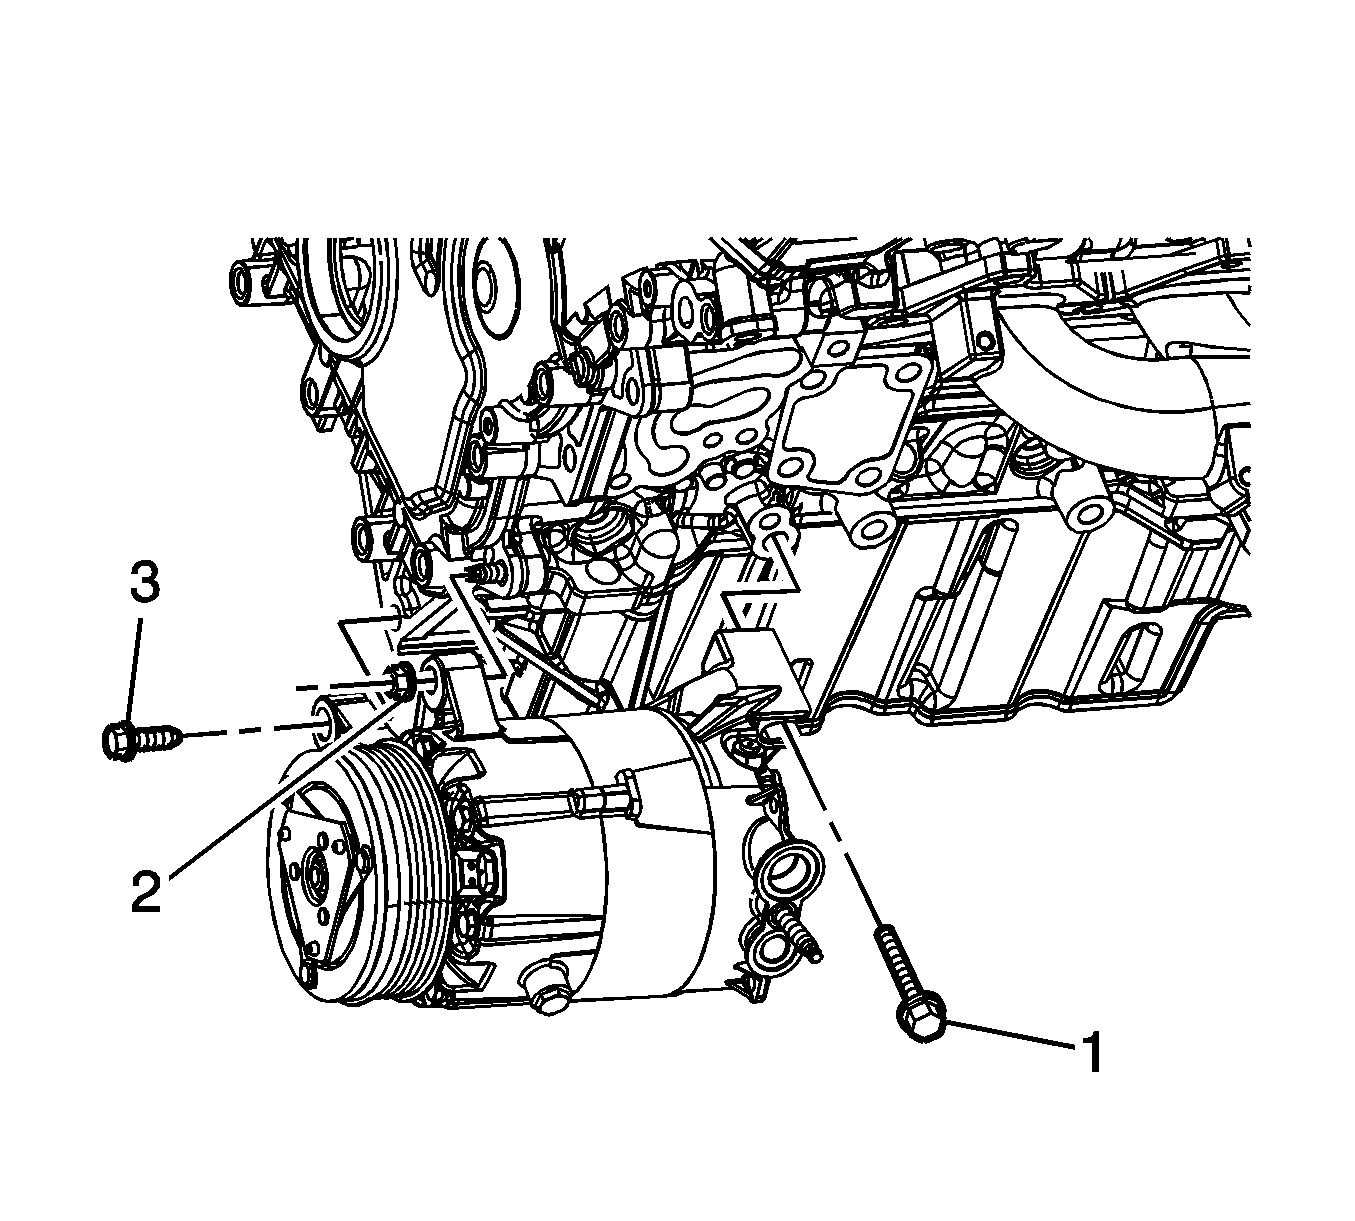
- Loosen the rear mounting bolt (1) from the A/C compressor.
- Remove the front mounting bolt (3) from the A/C compressor.
- Remove the front mounting nut (2) from the A/C compressor.
- Remove the A/C compressor.
- If replacing the compressor, balance the compressor oil. Refer to Air Conditioning Compressor Oil Balancing .
Important: Remove and discard all sealing washers.
Important: Replacement compressors are shipped with polyalkylene glycol (PAG) oil
Installation Procedure
- Install the compressor drain plug.
- Position the A/C compressor onto the front A/C compressor mounting stud and the rear A/C compressor mounting bolt (1).
- Install the A/C compressor front bolt (3).
- Install the A/C compressor front mounting nut (2).
- Tighten the A/C compressor rear bolt.
- Install new sealing washers. Refer to Sealing Washer Replacement .
- Install the compressor hose to the A/C compressor.
- Install the nut to the A/C compressor hose.
- Connect the electrical connector to the A/C compressor.
- Install the splash shield to the right side of the engine. Refer to Engine Splash Shield Replacement in Body Front End.
- Install the drive belts. Refer to Drive Belt Replacement .
- Evacuate and recharge the A/C system. Refer to Refrigerant Recovery and Recharging .
- Leak test the fittings of the component using J 39400-A .
Notice: Refer to Fastener Notice in the Preface section.
Tighten
Tighten the drain plug to 16 N·m (12 lb ft).
Tighten
Tighten the bolts to 50 N·m (36 lb ft).
Tighten
Tighten the nut to 50 N·m (36 lb ft).
Tighten
Tighten the bolt to 50 N·m (36 lb ft).
Tighten
Tighten the nut to 17 N·m (12.5 lb ft).
