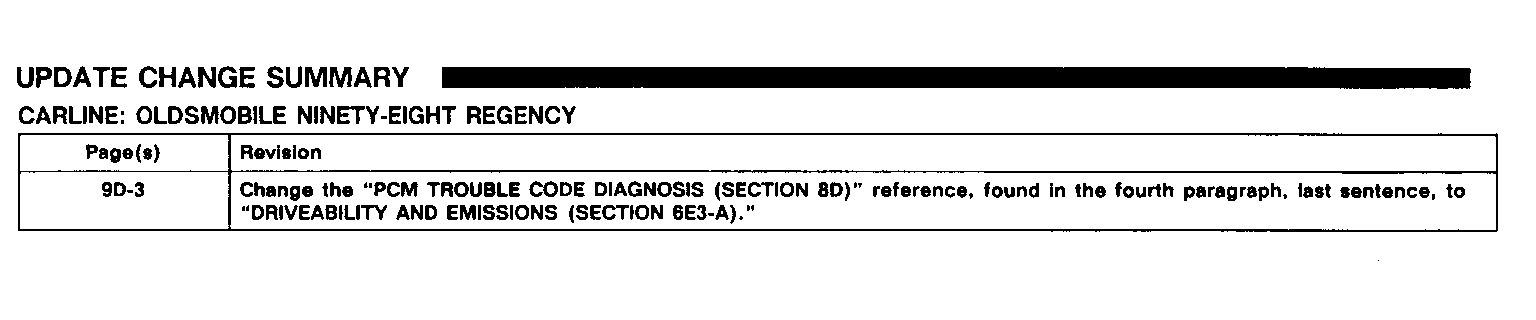
SERVICE MANUAL UPDATE SEC. 8A DIGITAL CLUSTER REPLACEMENT

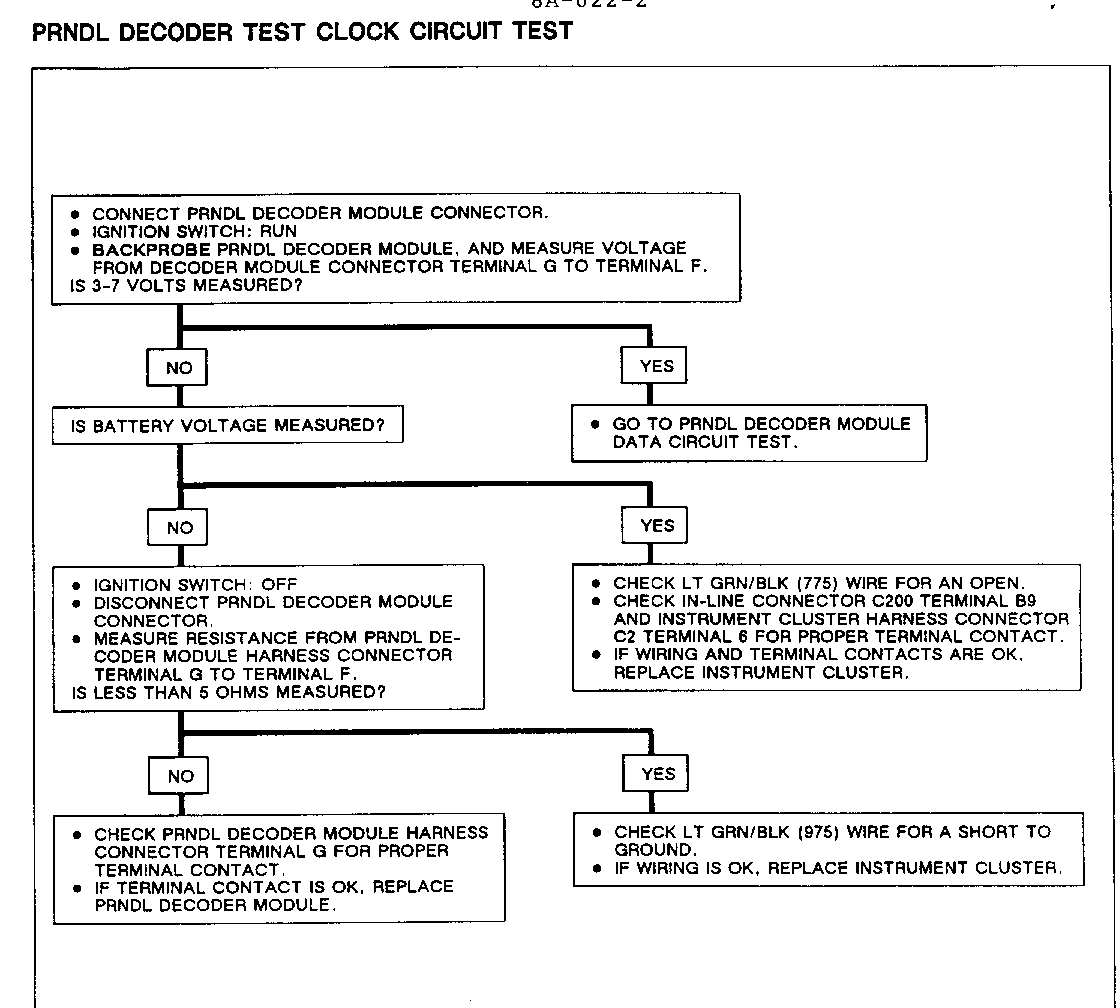
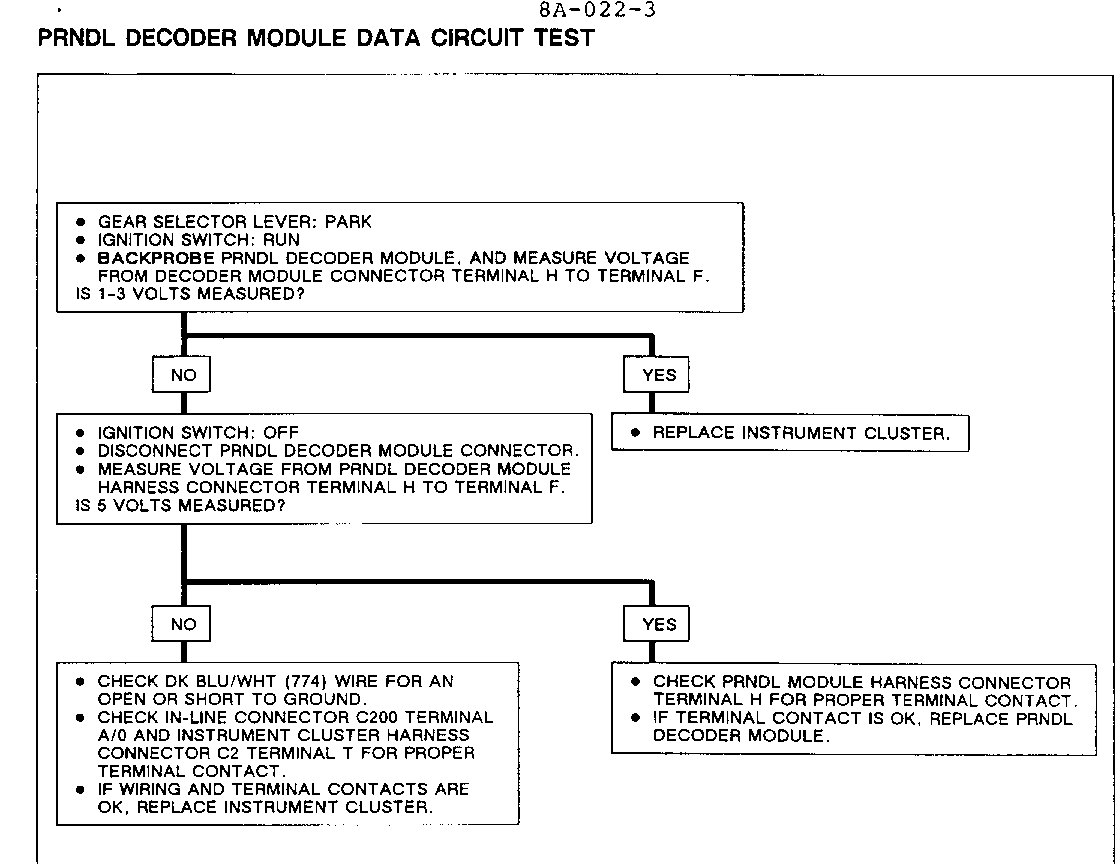
SUBJECT: SERVICE MANUAL UPDATE - SECTION 8A-ELECTRICAL DIAGNOSIS I/P DIGITAL CLUSTER U52 REPLACEMENT TESTS FOR PRNDL DECODER
VEHICLES AFFECTED: 1988-91 OLDSMOBILE "C AND H" CARS PONTIAC H CAR; BUICK C CAR
The PRNDL DECODER MODULE EXCHANGE TEST, found in the above mentioned Service Manuals is insufficient due to the lack of available parts at the dealerships. It also reflects a "parts changing" attitude toward diagnosis which should be discouraged.
The enclosed tests should replace the PRNDL DECODER MODULE EXCHANGE TEST found on the following pages:
1991 Oldsmobile Eighty-Eight, page 8A-82-15 (Test J) 1990 Oldsmobile 88 Royale/98 Regency, page 8A-82-15 (Test J) 1989 Oldsmobile 88 Royale/98 Regency, page 8A-82-15 (Test J) 1988 Oldsmobile 88 Royale/98 Regency, page 8A-82-16 (Test M)
Please update your respective Service Manual accordingly.
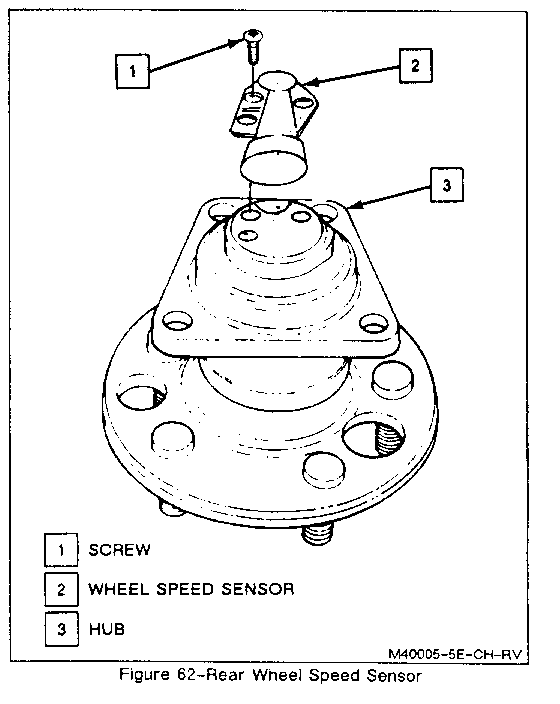
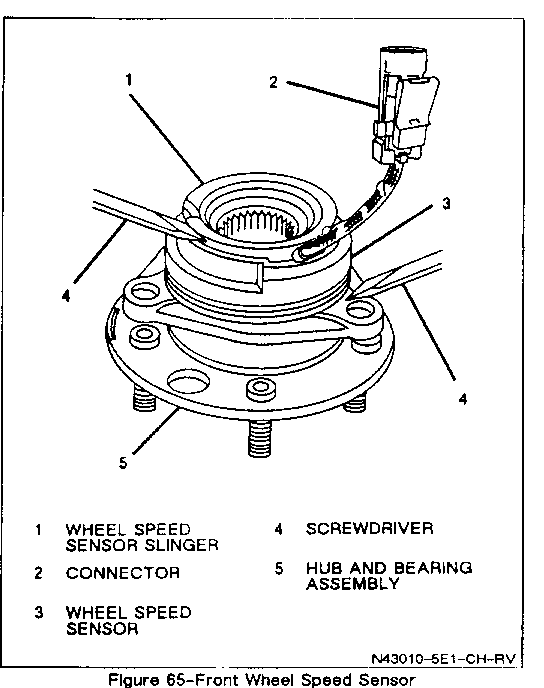
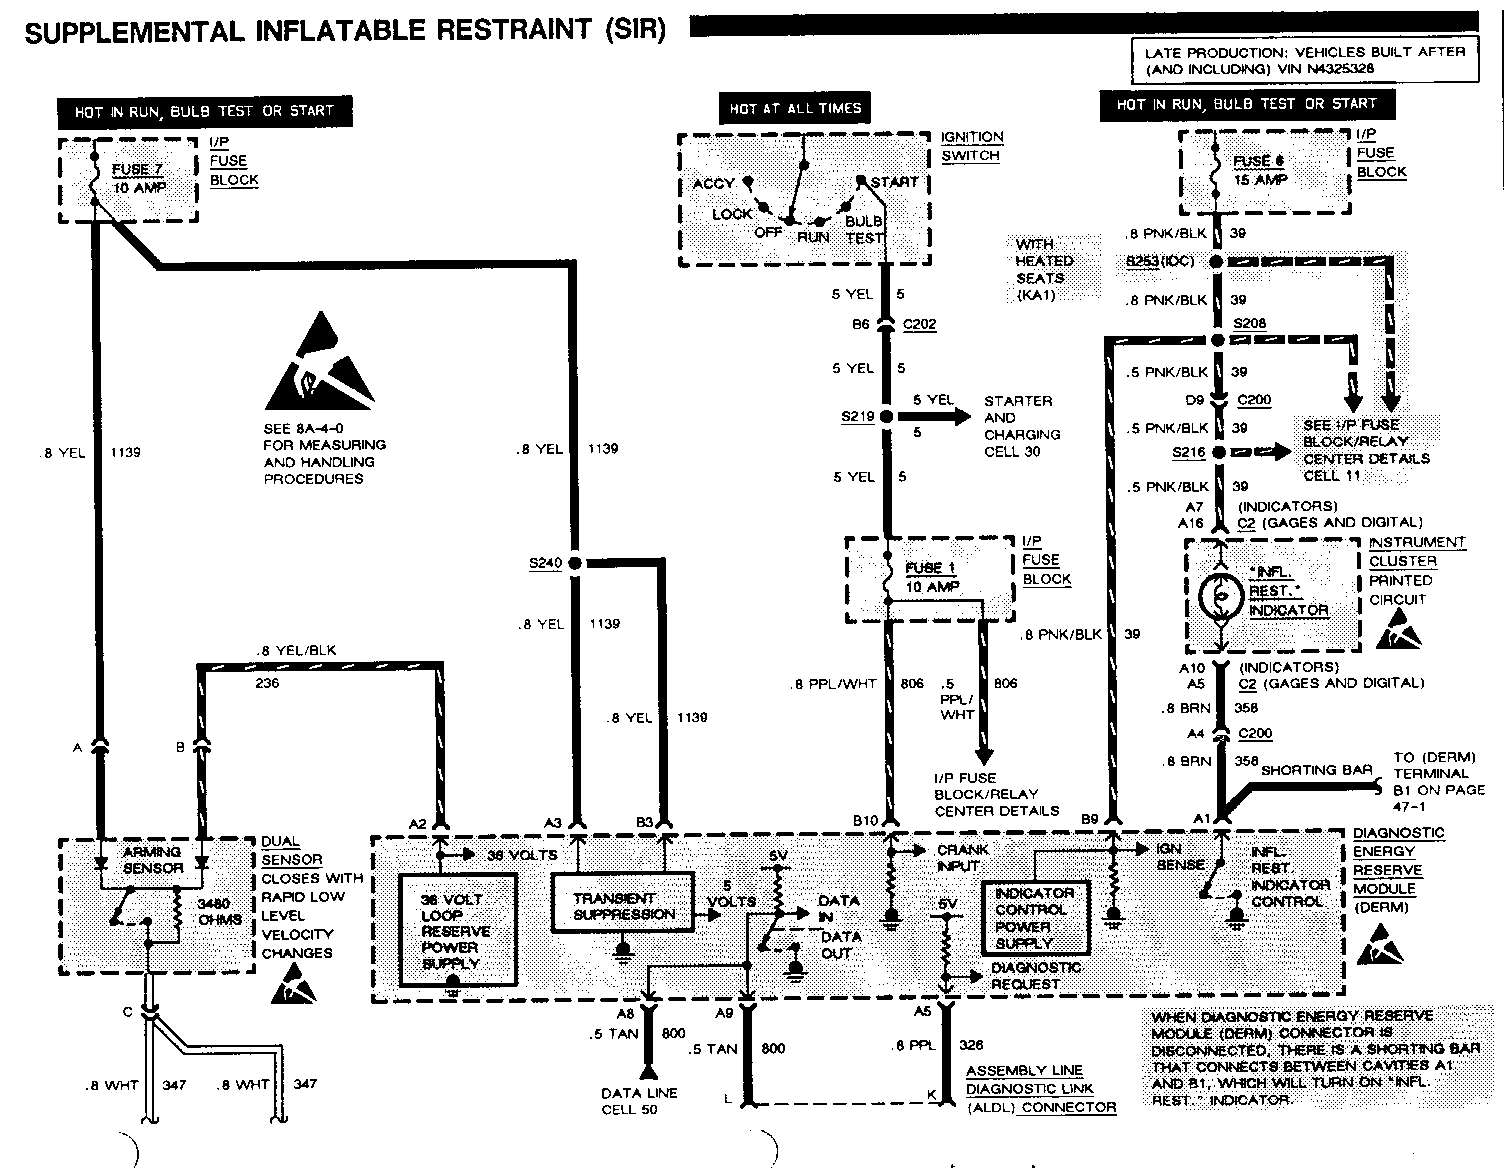
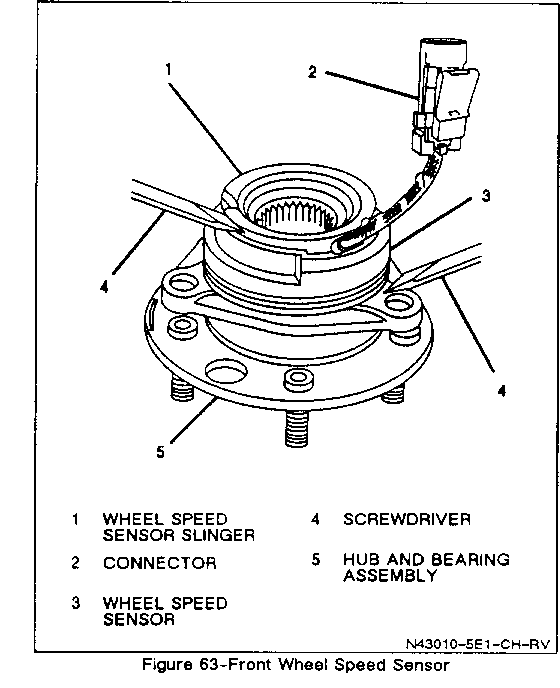
3. Hub and bearing assembly, refer to FRONT SUSPENSION (SECTION 3C).
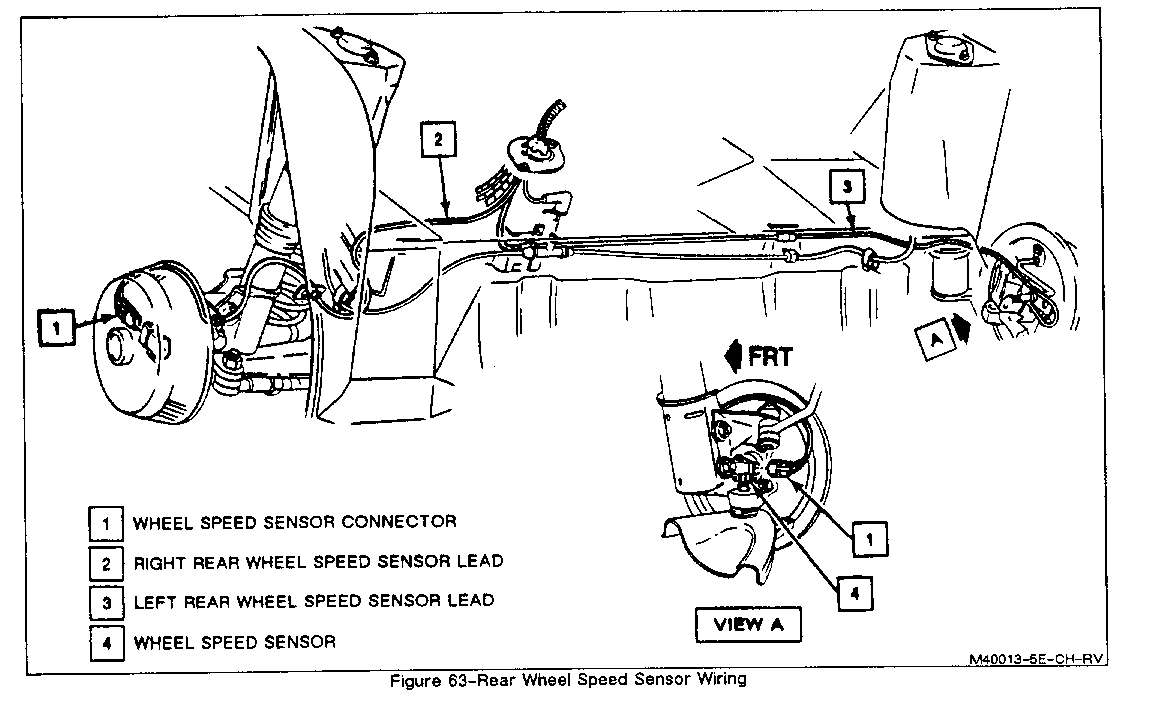
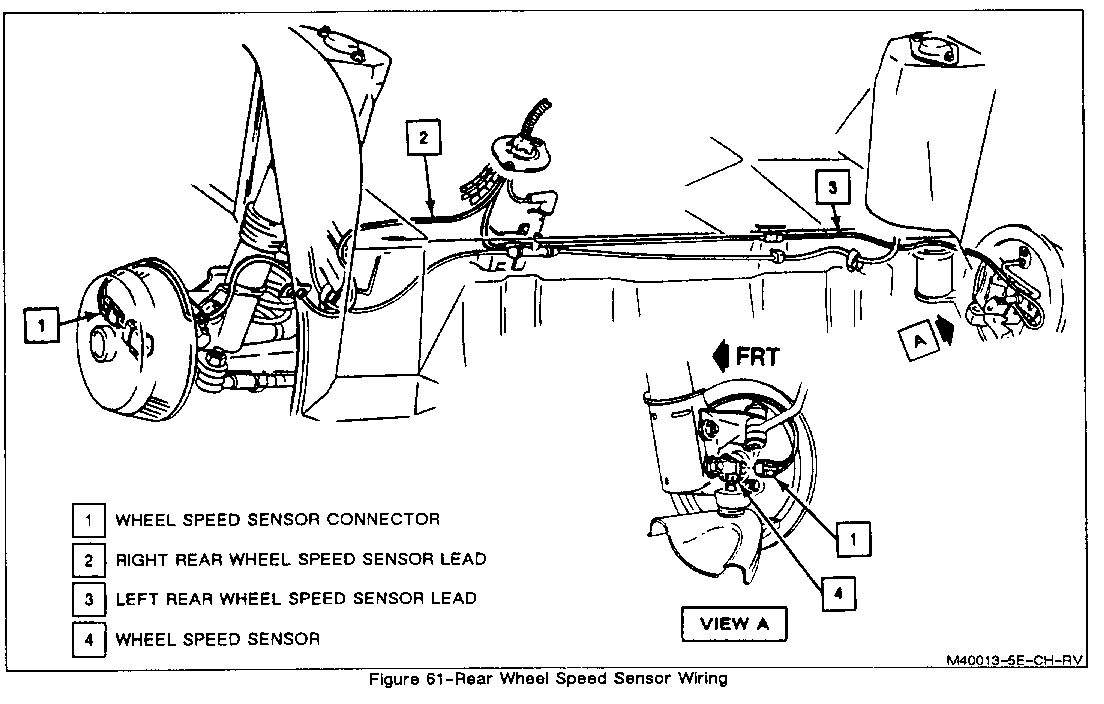
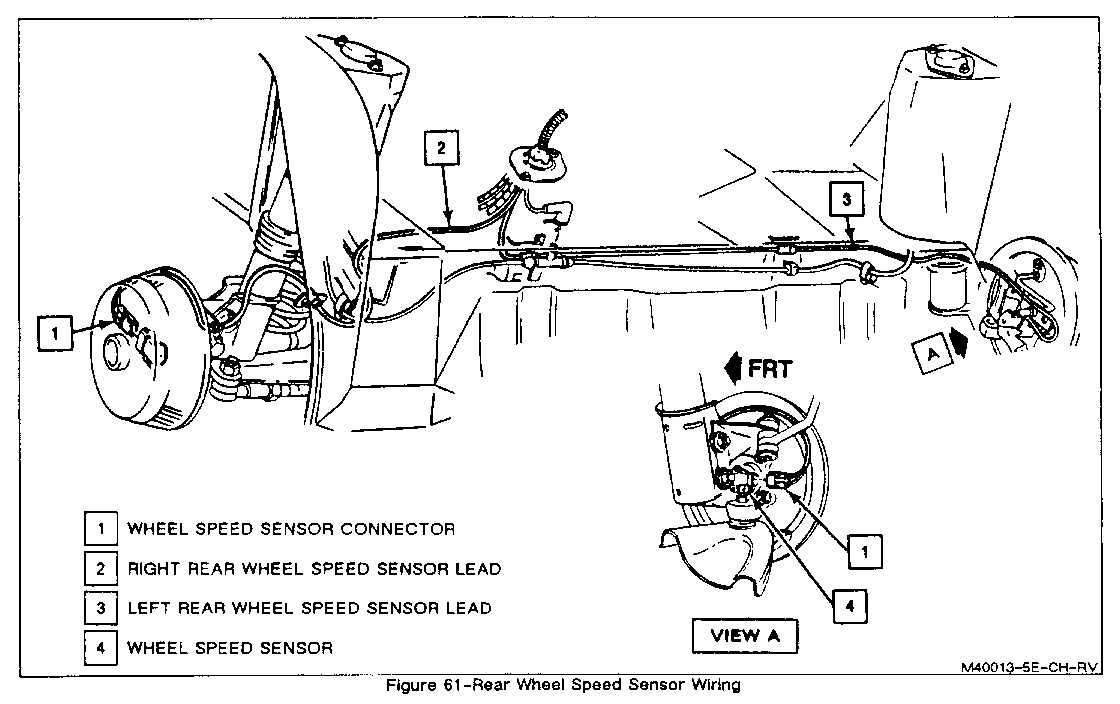
4. Wheel speed sensor connector. Rear Wheel Speed Sensors
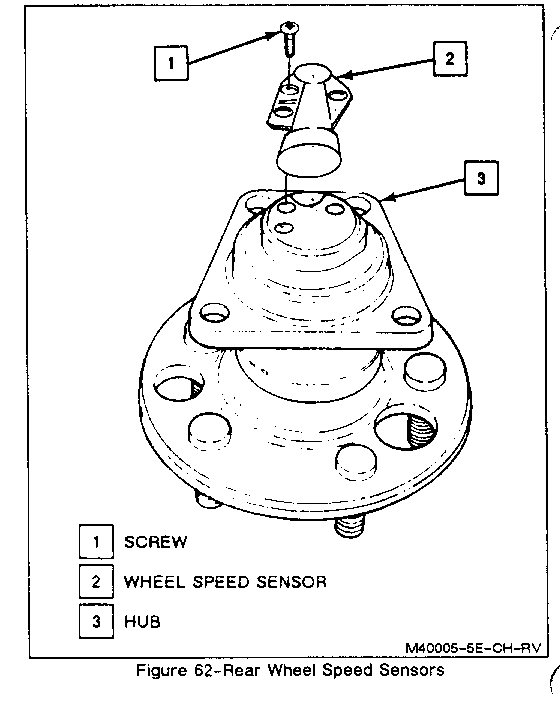
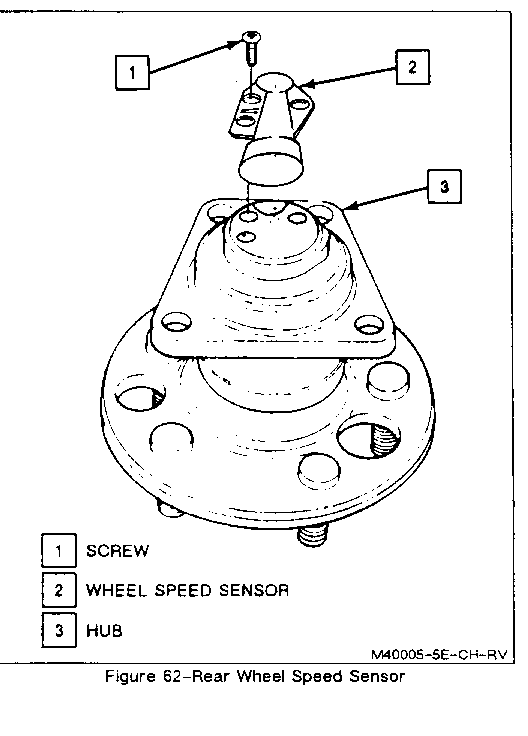
Figures 61 and 62
Remove or Disconnect
1. Hub and bearing assembly, refer to REAR SUSPENSION (SECTION 3D).
Clean
o All dirt and debris from sensor housing/sensor interface area.
2. Torx screws.
3. Sensor.
Important
o Do not allow debris to enter sensor housing when sensor is removed.
o Do not add lubricant to bearing through sensor housing opening. The bearing is lubricated for the life of the vehicle.
o Do not clean grease from toothed sensor ring. Grease does not affect sensor operation.
Inspect
o Sensor ring and sensor plate for contact. When contact is found, refer to REAR SUSPENSION (SECTION 3D) to replace complete bearing.
Install or Connect
1. Sensor, be sure 0-ring is not torn or missing.
2. Torx screws.
Tighten
o Screws to 3.7 N-m (33 lb. in.).
3. Hub and bearing assembly, refer to REAR SUSPENSION (SECTION 3D).
Wheel Speed Sensor Rings
Front Wheel Speed Sensor Rings
The front sensor ring is part of the drive axle, refer to DRIVE AXLE (SECTION 4D) for replacement when the sensor ring is damaged. Rear Wheel Speed Sensor Rings
The rear sensor ring is part of the hub and bearing assembly, refer to REAR SUSPENSION (SECTION 3D) for replacement when the sensor ring is damaged.
Inspect
o Sensor ring and sensor plate for contact. When contact is found, refer to REAR SUSPENSION (SECTION 3D) to replace complete bearing.
ABS Pump Relay
The ABS pump relay is located at the center rear of the engine compartment, below the LH underhood fuse block. Refer to schematics in this section to identify, relay by its associated wire colors.
Main Relay
The main relay is located at the relay center rear of the engine compartment, below the LH underhood fuse block. Refer to schematics in this section to identify relay by its associated wire colors. Antilock Diode
The antilock diode is taped to the EBCM harness near the EBCM. Brake Switch
TCC/Antilock
The TCC/antilock brake switch is part of the electrical and vacuum release brake switch, refer to CRUISE CONTROL (SECTION 9B).
Traction Control Switch
The traction control switch is located in the instrument panel center trim plate, refer to INSTRUMENT PANEL, GAGES AND CONSOLE (SECTION 8C).
Fluid Level Sensor
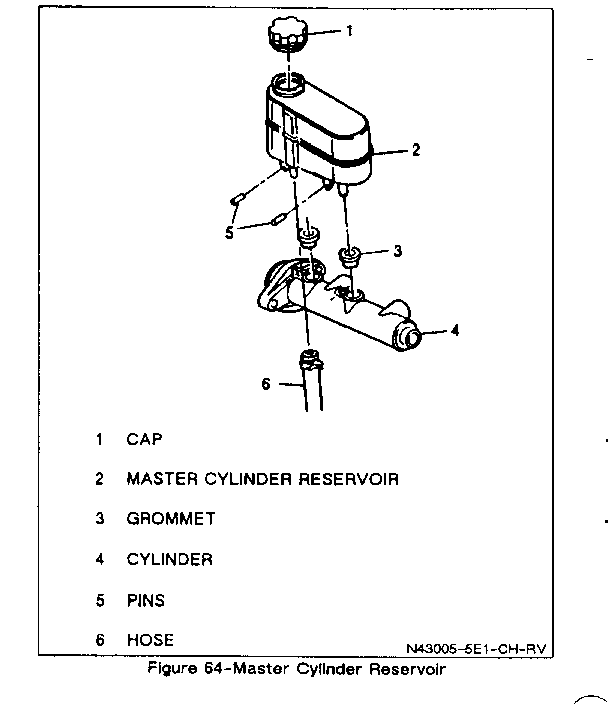
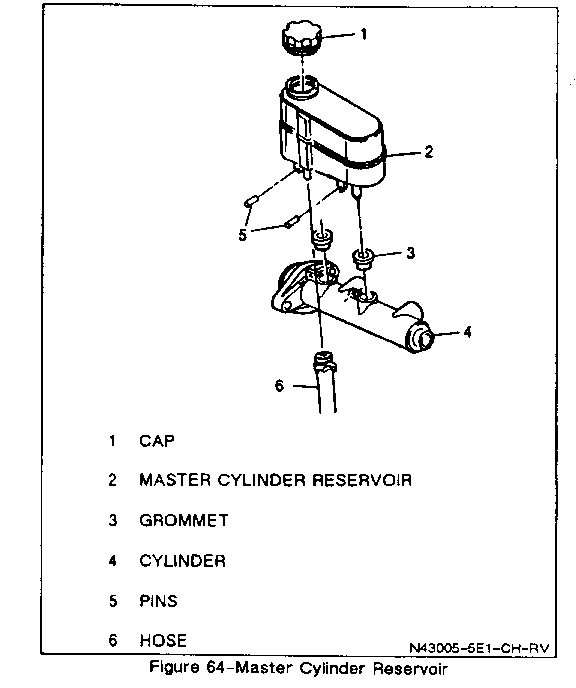
Master Cylinder Reservoir
Figure 64
Remove or Disconnect
1. Master cylinder reservoir connector.
2. Clamp on reservoir hose to master cylinder reservoir.
3. Hub and bearing assembly, refer to FRONT SUSPENSION (SECTION 3C).
4. Wheel speed sensor connector.
Rear Wheel Speed Sensors
Figures 63 and 64
Remove or Disconnect
1. Wheel speed sensor connector.
2. Hub and bearing assembly, refer to REAR SUSPENSION (SECTION 3D).
Clean
o All dirt and debris from sensor housing/sensor interface area.
3. Torx screws.
4. Sensor.
Important
o Do not allow debris to enter sensor housing.
o Do not add lubricant to bearing through sensor housing opening. The bearing is lubricated for the life of the vehicle.
o Do not clean grease from toothed sensor ring. Grease does not affect sensor operation.
Inspect
o Sensor ring and sensor plate for contact. When contact is found, refer to REAR SUSPENSION (SECTION 3D) to replace complete bearing.
Install or Connect
1. Sensor, be sure 0-ring is not torn or missing.
2. Torx screws.
Tighten
o Screws to 3.7 N - m (33 lb. in.).
3. Hub and bearing assembly, refer to REAR SUSPENSION (SECTION 3D).
4. Wheel speed sensor connector.
Wheel Speed Sensor Rings
Front Wheel Speed Sensor Rings
The front sensor ring is part of the drive axle, refer to DRIVE AXLE (SECTION 4D) for replacement when the sensor ring is damaged.
Rear Wheel Speed Sensor Rings
The rear sensor ring is part of the hub and bearing assembly, refer to REAR SUSPENSION (SECTION 3D) for replacement when the sensor ring is damaged.
Inspect
Sensor ring and sensor plate for contact. When contact is found, refer to REAR SUSPENSION (SECTION 3D) to replace complete bearing.
ABS Pump Relay
The ABS pump relay is located at the center rear of the engine compartment, below the LH underhood fuse block. Refer to schematics in this section to identify. relax, by its associated wire colors.
Main Relay
The main relay is located at the relay center rear of the engine compartment, below the LH underhood fuse block. Refer to schematics in this section to identify relay by its associated wire colors. Antilock Diode
The antilock diode is taped to the EBCM harness near the EBCM. TCC/Antilock Brake Switch
The TCC/antilock brake switch is part of the electrical and vacuum release brake switch, refer to CRUISE CONTROL (SECTION 9B). Traction Control Switch
The traction control switch is located in either the instrument panel center trim plate (Touring Sedan only), refer to INSTRUMENT PANEL, GAGES AND CONSOLE (SECTION 8C) for replacement or in the driver's front door trim panel (Elite only), refer to BODY (SECTION 10) for replacement.
Fluid Level Sensor
Master Cylinder Reservoir
Figure 66
Remove or Disconnect
1. Master cylinder reservoir connector.
Rear Wheel Speed Sensors
Figures 61 and 62
Remove or Disconnect
1. Hub and bearing assembly, refer to REAR SUSPENSION (SECTION 3D).
Clean
o All dirt and debris from sensor housing/sensor interface area.
2. Torx screws.
3. Sensor.
Important
o Do not allow debris to enter sensor housing when sensor is removed.
o Do not add lubricant to bearing through sensor housing opening. The bearing is lubricated for the life of the vehicle.
o Do not clean grease from toothed sensor ring. Grease does not affect sensor operation.
Inspect
o Sensor ring and sensor plate for contact. When contact is found, refer to REAR SUSPENSION (SECTION 3D) to replace complete bearing.
Install or Connect
1. Sensor, be sure 0-ring is not torn or missing.
2. Torx screws.
Tighten
o Screws to 3.7 N,m (33 lb. in.).
3. Hub and bearing assembly, refer to REAR SUSPENSION (SECTION 3D).
Wheel Speed Sensor Rings
Front Wheel Speed Sensor Rings
The front sensor ring is part of the drive axle, refer to DRIVE AXLE (SECTION 4D) for replacement when the sensor ring is damaged. Rear Wheel Speed Sensor Rings
The rear sensor ring is part of the hub and bearing assembly, refer to REAR SUSPENSION (SECTION 3D) for replacement when the sensor ring is damaged.
Inspect
Sensor ring and sensor plate for contact. When contact is found, refer to REAR SUSPENSION (SECTION 3D) to replace complete bearing.
ABS Pump Relay
The ABS pump relay is located at the center rear of the engine compartment, below the LH underhood fuse block. Refer to schematics in this section to identify relay by its associated wire colors. Main Relay
The main relay is located at the relay center rear of the engine compartment, below the LH underhood fuse block. Refer to schematics in this section to identify relay by its associated wire colors. Antilock Diode
The antilock diode is taped to the EBCM harness near the EBCM.
TCC/Antilock Brake Switch
The TCC/antilock brake switch is part of the electrical and vacuum release brake switch, refer to CRUISE CONTROL (SECTION 9B).
Fluid Level Sensor
Master Cylinder Reservoir
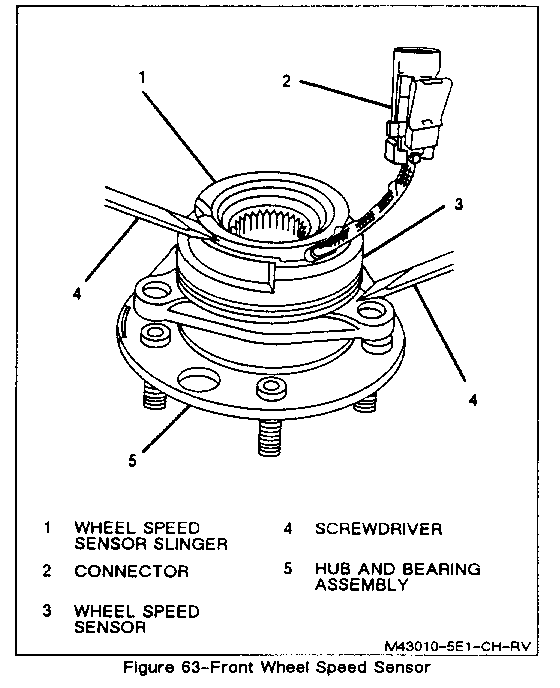
Figure 63
Remove or Disconnect
1. Master cylinder reservoir connector.
2. Clamp on reservoir hose to master cylinder reservoir.
o Obtain a 15.5 mm (5/8 in.) plug to be used in Step 3.
o Obtain container to catch brake fluid from reservoir in Step 3.
3. Reservoir hose from master cylinder reservoir and plug hose to prevent escape of brake fluid.
4. Tap back spring slotted pins until they are clear of reservoir.
5. Master cylinder reservoir.
6. Master cylinder reservoir seals; note seal orientation.
Install or Connect
1. New seals to master cylinder, refer to Figure 63.
o Lubricate new seals with clean brake fluid when installing.
Clean
o Reservoir and ports with denatured alcohol.
2. Master cylinder reservoir,
3. Tap spring slotted pins until they secure reservoir.
4. Reservoir hose to master cylinder.
5. Clamp on reservoir hose to master cylinder reservoir.
6. Master cylinder reservoir connector.
o Fill brake fluid reservoir, refer to "Checking and Filling Brake Fluid" in this section.
o Bleed brake system, refer to "Bleeding Brake System" in this section.
Clean
Brake fluid from PMV area to prevent damage to vehicle components.
Pressure Modulator Valve (PMV) Reservoir
The PMV reservoir fluid level sensor is integral to the fluid reservoir. For PMV reservoir replacement, refer to 'Pressure Modulator Valve (PMV) Reservoir" in this section.
Transaxle Temperature Switch
The temperature switch is part of the transaxle assembly. For replacement, refer to 4T60-E AUTOMATIC TRANSAXLE UNIT REPAIR.
HYDRAULIC COMPONENTS
Pressure Modulator Valve (PMV) Assembly
Figures 63 through 68
Remove or Disconnect
1. Air cleaner assembly.
2. Negative battery cable.
3. Electrical connectors to PMV assembly.
Fluid level switch. Pump motor. Valve block.
4. Clamp on reservoir hose to PMV reservoir.
o Obtain a 15.5 mm (5/8 in.) plug to be used in Step 5.
3. Hub and bearing assembly, refer to FRONT SUSPENSION (SECTION 3C).
4. Wheel speed sensor connector.
Rear Wheel Speed Sensors
Figures 61 and 62
Remove or Disconnect
1. Wheel speed sensor connector.
2. Hub and bearing assembly, refer to REAR SUSPENSION (SECTION 3D).
Clean
o All dirt and debris from sensor housing/sensor interface area.
3. Torx screws.
4. Sensor.
Important
o Do not allow debris to enter sensor housing.
o Do not add lubricant to bearing through sensor housing opening. The bearing is lubricated for the life of the vehicle.
o Do not clean grease from toothed sensor ring. Grease does not affect sensor operation.
Inspect
o Sensor ring and sensor plate for contact. When contact is found, refer to REAR SUSPENSION (SECTION 3D) to replace complete bearing.
Install or Connect
1. Sensor, be sure 0-ring is not torn or missing.
2. Torx screws.
Tighten
o Screws to 3.7 N-m (33 lb. in.).
3. Hub and bearing assembly, refer to REAR SUSPENSION (SECTION 3D).
4. Wheel speed sensor connector. Wheel Speed Sensor Rings
Front Wheel Speed Sensor Rings
The front sensor ring is part of the drive axle, refer to DRIVE AXLE (SECTION 4D) for replacement when the sensor ring is damaged. Rear Wheel Speed Sensor Rings
The rear sensor ring is part of the hub and bearing assembly, refer to REAR SUSPENSION (SECTION 3D) for replacement when the sensor ring is damaged. Flo] Inspect
o Sensor ring and sensor plate for contact. When contact is found, refer to REAR SUSPENSION (SECTION 3D) to replace complete bearing:.
ABS Pump Relay
The ABS pump relay is located at the center rear of the engine compartment, below the LH underhood fuse block. Refer to schematics in this section to identify, relay by its associated wire colors.
Main Relay
The main relay is located at the relay center rear of the engine compartment, below the LH underhood fuse block. Refer to schematics in this section to identify relay by its associated wire colors. Antilock Diode
The antilock diode is taped to the EBCM harness near the EBCM.
TCC/Antilock Brake Switch
The TCC/antilock brake switch is part of the electrical and vacuum release brake switch, refer to CRUISE CONTROL (SECTION 9B).
Traction Control Switch
The traction control switch is located in the console center trim plate, refer to INSTRUMENT PANEL, GAGES AND CONSOLE (SECTION 8C) for replacement.
Fluid Level Sensor
Master Cylinder Reservoir
Figure 64
Remove or Disconnect
1. Master cylinder reservoir connector.
2. Clamp on reservoir hose to master cylinder reservoir.


General Motors bulletins are intended for use by professional technicians, not a "do-it-yourselfer". They are written to inform those technicians of conditions that may occur on some vehicles, or to provide information that could assist in the proper service of a vehicle. Properly trained technicians have the equipment, tools, safety instructions and know-how to do a job properly and safely. If a condition is described, do not assume that the bulletin applies to your vehicle, or that your vehicle will have that condition. See a General Motors dealer servicing your brand of General Motors vehicle for information on whether your vehicle may benefit from the information.
