BASECOAT/CLEARCOAT FINISHES PANEL REPAIR PROCEDURES

VEHICLES AFFECTED: All FWD 'C' Oldsmobile, Buick and Cadillacs; 'P' Pontiac, and 'Y' Corvette Bodies
In the 1984 model year, there will be three body styles that are finished using a base coat/clear coat (BCICC) paint technology. This system provides the paint finish with added glamour and resistance to chemical spotting. It is also less poluting with respect to solvent evaporation during application and makes a more efficient use of petrochemical resources.
The paint material is a thermosetting type that is similar to the hi-solids enamel used by GM on some vehicles since 1982. Refinishing does require some specific techniques and materials because of the clear top coat. To assist in refinishing base coat/clear coat vehicles, this bulletin provides information on the following topics.
- vehicle application - base coat/clear coat identification - substrate identification - paint refinish systems
Vehicle Application
A base coat/clear coat finish will be on the following vehicles.
Body Style Sales Name Plant Code Introduction Date ---------- ---------- ---------- ----------------- Y 1964 Corvette 5 Spring 1983 P 1984 Fiero P Fall 1983 C-FWD* 1985 Olds Regency 1 and 4 Spring 1984 1985 Buick Electra 1 1985 Cadillac DeVille 4 FWD = Front Wheel Drive
Base Coat/Clear Coat Identification ------------------------------------ This technology can be identified on the vehicle by the paint description on the body plate. Vehicles built after November will also have this information on the Service-Parts Identification label.
If in doubt, lightly rub the panel to be repaired with a fine sandpaper. Sanding on clear coated vehicles will produce a whitish powder. Sanding on non-clear coated vehicles will produce a powder in the paint colour.
Substrate Indentification
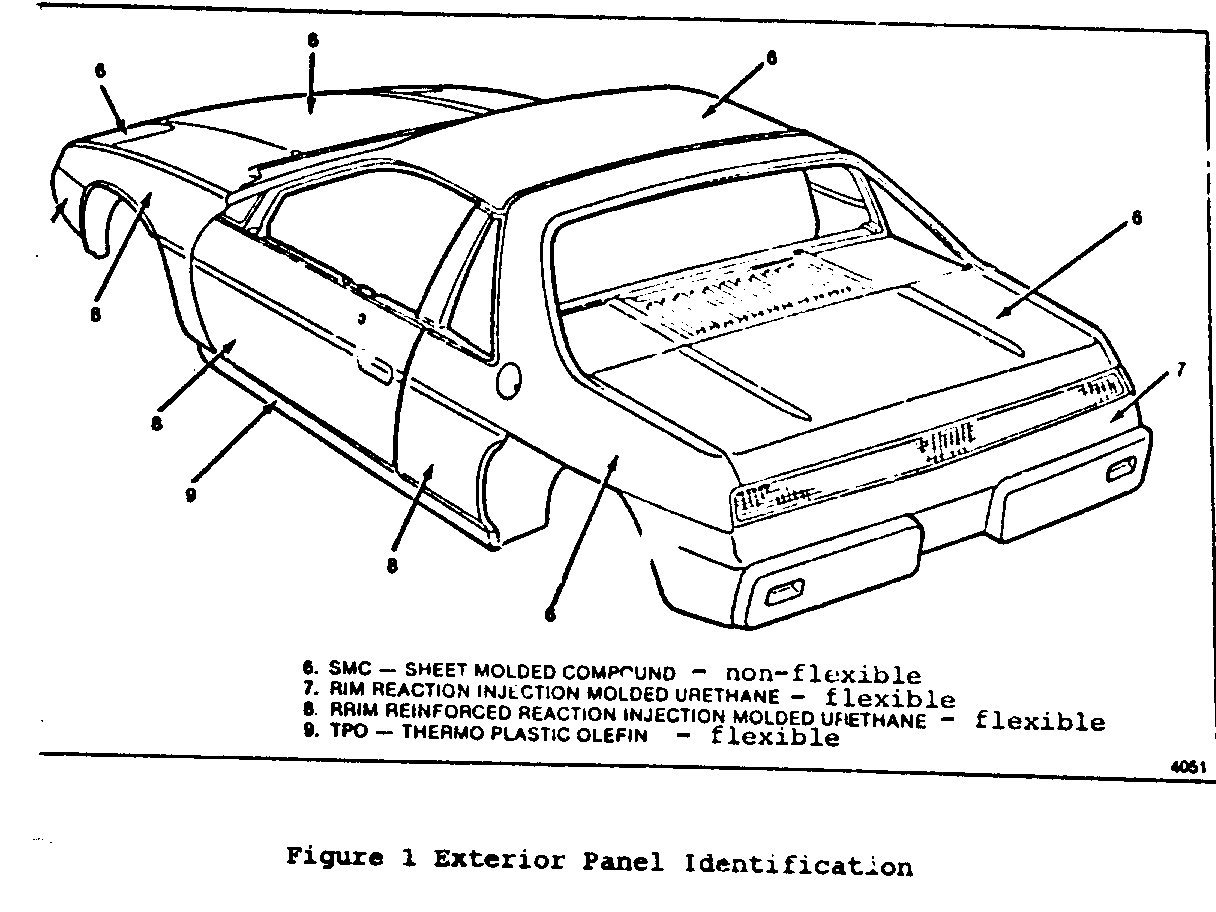
As with all paint systems, basecoat/clearcoat finishes require a different procedure for flexible or non-flexible parts. The flexible parts are as follows: Flexible Parts -------------- 1984 Chevrolet Corvette Front and Rear Fascia 1984 Pontiac Fiero Fascias and some body panels See Figure 1
Paint Refinish Systems
When refinishing any base coat/clear coat vehicles, the following points should be noted:
- the clear coat magnifies any imperfections. Extreme cleanliness and fine preparation is essential.
- the type of substrate, flexible or non-flexible, must be identified. A flex agent may be necessary according to the type and source of the repair material.
- full panel repairs should be performed on flexible panels. Spot repairs are not recommended.
- the factory finish is extremely smooth. An adhesion promoting sealer may be necessary for some brands of lacquer material.
- the base colour coat must not be sanded before the clear coat is applied.
- the sensitive feather edge of the adhesion promoting sealer could be damaged during buffing. Care should be exercised during this step.
- a lacquer or an enamel clear coat may be applied over the repair: however, some enamel systems require additives containing isocyanates. It is essential that all recommendations and warnings listed on the container label for materials selected be followed.
This bulletin contains both a general procedure and detailed instructions for base coat/clear coat refinishing. Refer to the following chart for the location of each.
Repair System System Overview Detailed Instructions* ------------- --------------- ---------------------- Spot Repait Figure 2 Page 6 Panel Repair rigure 3 Page 9 Panel Repair Figure 3 With Flex Agent Page 12 Flexible Parts added to Prime, Colour and Clear Coats as per Paint Material Instructions
*There may be some specific differences in the air pressures, flash times and reduction amounts depending on the product used. This bulletin provides guidelines. Follow manufacturer's label directions.
Nonflexible Panel Repair System
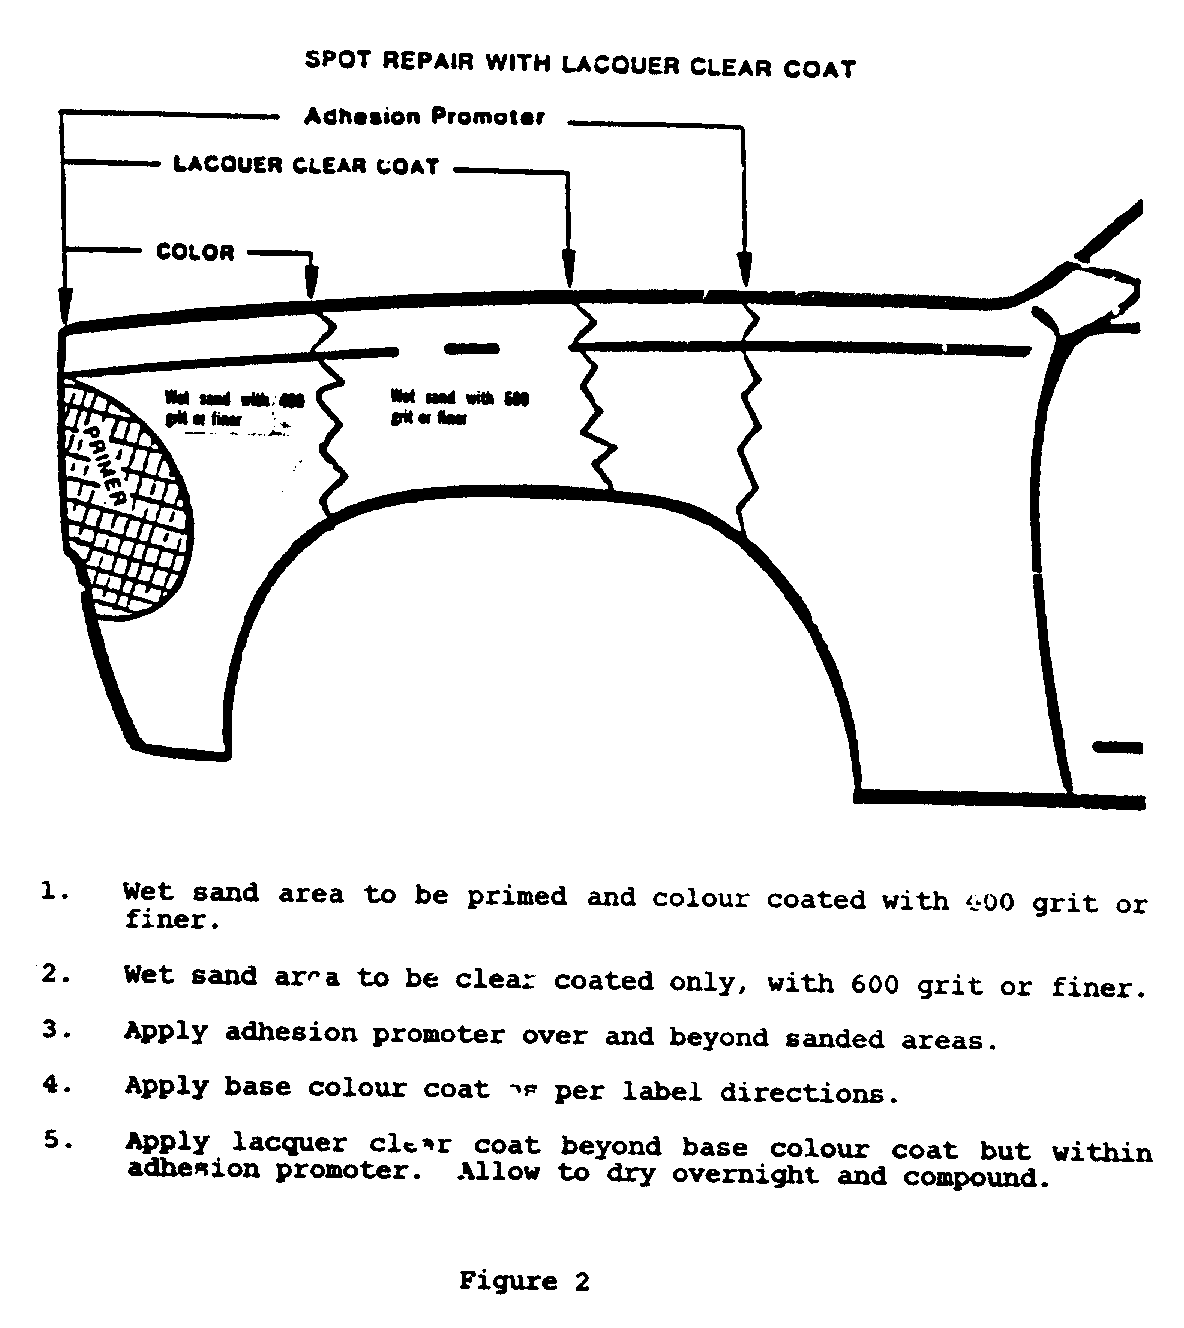
1. Procedure - Spot or Repair Blending (Figure 1)
Basecoat
1. Wash with a mild detergent and water to remove any water soluable contaminates, then clean with a wax and grease removing solvent to remove any tar, silicone or other road film not removed with the detergent wash. It is recommended that a further rinse be performed with a wash solvent such as DuPont 38125, Inmont Prime Wipe 884 or equivalent.
2. Repair and featheredge the damaged area(s) as required.
3. If a substrate is metal, treat the surface with a metal conditioner and conversion coating according to the label directions and allow to dry thoroughly. Apply a primer-surfacer to repair and featheredge damaged area(s) as reguired. Allow to dry 20-30 minutes before sanding.
4. Using wet or dry #400 grit sandpaper or finer, sand entire area(s) to be refinished with the tasecoat colour. Areas to be clear coated only, should be wet sanded with #600 or finer sandpaper.
5. Use a wash solvent to remove sanding sludge and tack wipe.
6. If required, apply one or two coats of an 'adhesion promoter' over and 6-8 inches beyond the area(s) to be refinished. Allow to flash a minimum of 30 minutes before applying base colour coat.
7. Reduce the base colour 150-200% with an extra-slow drying lacguer solvent. The viscosity of the reduced base colour is very important in order to match the OEM (original equipment manufacturers) finish. The best way of checking the viscosity of a reduced paint material is with a Zahn #2 paint viscosity cup or its equivalent. The temperature influences viscosity directly. If a cold can of paint is brought into an average temperature room (65-70 degrees), it will be thicker and more viscous. Adding solvent to make the paint sprayable is not always the best action. The paint should be allowed to reach workable, or average room temperatures. Follow manufacturer's recommended paint viscosity cup reading for their material.
8. Spray base colour at 35-45 lbs air pressure at the gun. Apply only the number of coats needed to get full hiding. This will require two or three medium-wet coats. Allow each coat to flash approximately five minutes and spray each coat slightly wider than the previously applied coat. A premixed mist coat of clear acrylic paint material may be used if desired to melt overspray into the base colour. Allow to dry for 20 minutes before applying clear coat. Do not sand base colour coat unless it is necessary.
9. If the basecoat must be sanded, proceed as follows (I or II):
I -
a. Allow the base colour to dry.
b. Sand with an ultra-fine wet-or-dry sandpaper to remove the imperfection(s).
c. Reclean and tack wipe the repair area(s).
d. Apply an additional coat of base colour.
e. Allow to dry 20 minutes before applying the clear coat.
OR II -- a. Allow base colour to dry.
b. Apply a thin clear coat to protect the base colour and allow it to dry.
C. Sand with ultrafine wet or dry to remove the imperfections.
d. Reclean with a wash solvent and tack wipe the repair areas.
e. Continue with application of the clear coat.
Clearcoat
A. Lacquer Clearcoat
1. Reduce the clearcoat 125-150% with an extra-slow drying lacquer thinner to the recommended paint viscosity cup reading of the manufacturer who's paint product you are using.
2. Spray at least two medium-wet coats of clear at 35-40 lbs air pressure at the gun. More may be desired. Spray first coat beyond base colour coat and allow to flash for approximately 5-10 minutes. Spray each additional coat of clear slightly beyond the previously applied clearcoat. Allow flash time between coats. After the final coat of clear is applied, apply a mist-coat (clear acrylic and thinner) to melt in overspray. Stay within the applied adhesion promoter with all spray operations. Allow the repair to dry overnight, then, rub out with a light-cutting hand or machine polishing compund.
3. Allow the repair to dry over night, then rub out with a light-cutting hand or machine polishing compound. Use caution and polish away from the sensitive adhesion promoting sealer feather edge.
B. Enamel Clearcoat
CAUTION:
There are a number of paint systems available for service use: however, many require additives containing isocyandtes. It is essential that all recommendations and warnings listed on the container label for materials selected be followed.
It is mandatory that adequate respiratory protection be worn. Consult your appropriate Provincial Authority or supplier of respiratory protection for examples of such equipment.
Such protection should be worn during the entire painting process. Persons with respiratory problems, or those allergic to isocyanates must not be exposed to isocyanate vapours or spray mist.
1. Following paint manufacturer's label directions, activate the the Polyurethane Enamel Clearcoat material. Mix material thoroughly. Pot life of activated mixture is approximately eight (8) hours.
Some manufacturers do not recommend the use of enamel clear coat material over an "adhesion promoter."
2. Reduce the clearcoat per label directions. Some activated Polyurethane Enamel Clearcoat materials are ready to spray as packaged under normal conditions. As conditions vary, to enhance flow out and leveling up to 10% more than the specified enamel reducer may be added to the activated clearcoat mixture. Check the viscosity of the activated clearcoat mixture with a Zahn #2 Paint Viscosity Cup or its equivalent. Follow the paint manufacturer's labeled recommendations for paint viscosity cup reading.
3. Using 50 lbs of air pressure at the gun, spray two medium-wet coats of enamel clear coat mixture. Allow the first coat to set-up for 15-20 minutes before applying the second final coat. Allow to cure overnight.
Clean spray painting equipment with lacquer thinner immediately after use.
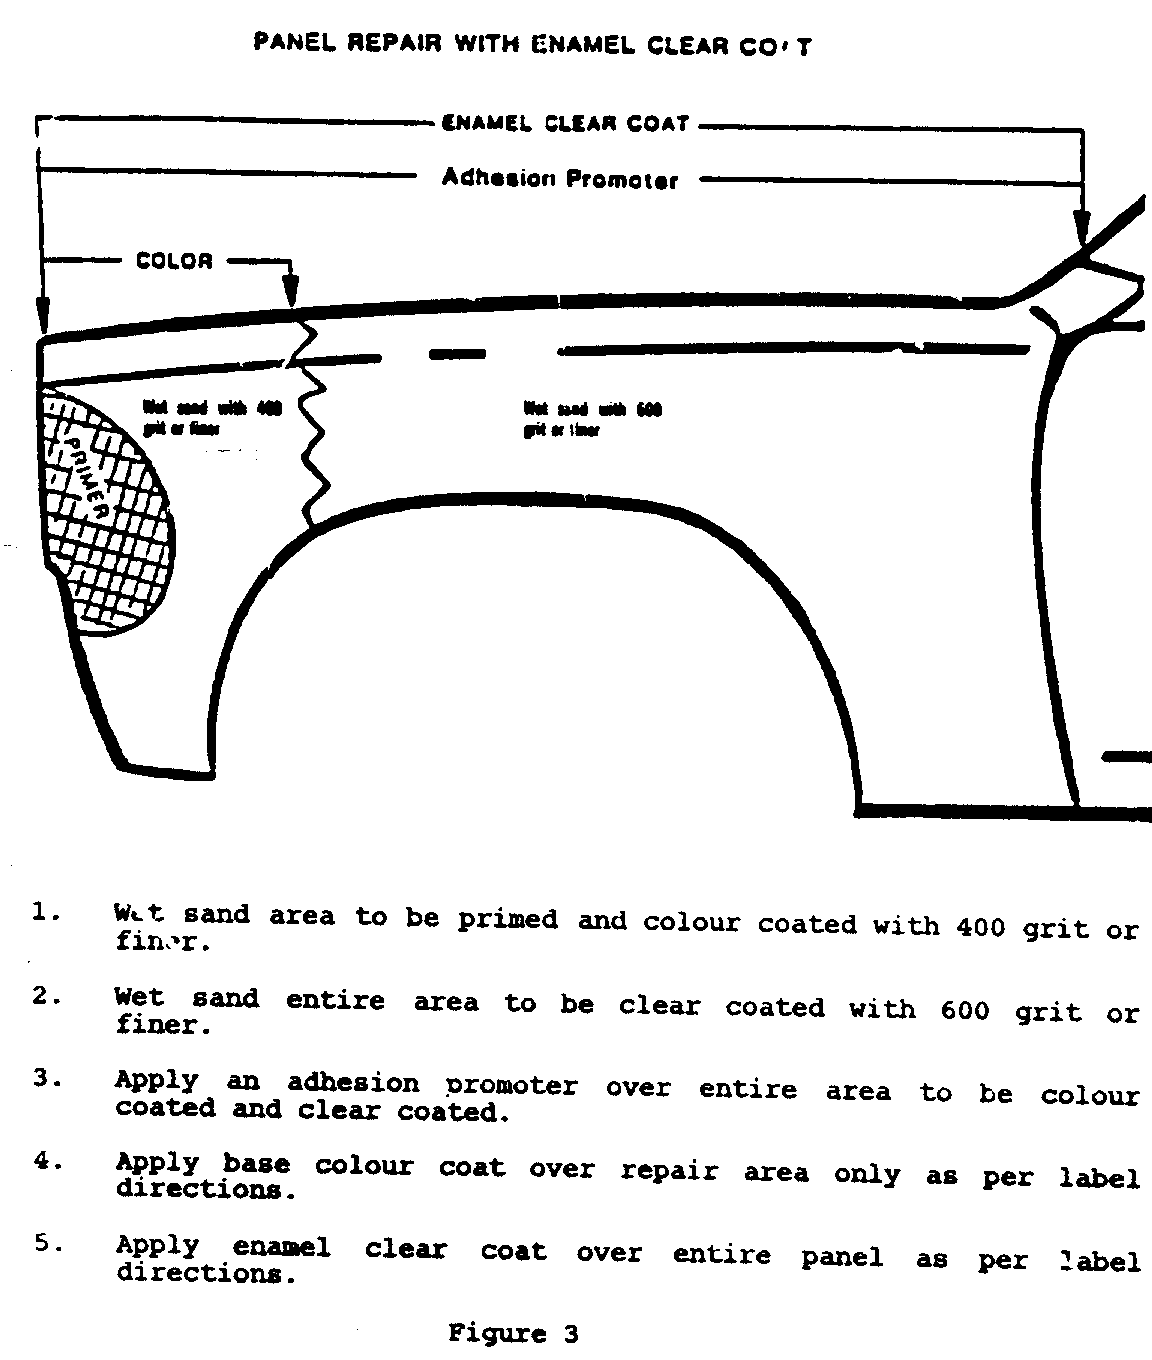
2. Procedure - Full Panel Repair (Figure 2) ---------------------------------------- Basecoat --------- 1. Wash with is mild detergent and water to remove any water soluable contaminates, then clean with a wax and grease removing solvent to remove any tar, silicone or other road film not removed with the detergent wash. It is recommended that a further rinse be performed with a wash solvent such as DuPont 38125, Inmont Prime Wipe 884, or equivalent.
2. Sand the complete panel(s) with 400 grit or finer wet-or-dry sandpaper. Repair and featheredge the damaged areas as required. Treat all bare metal with recommended metal conditioner and conversion coating. Follow the manufacturer's label directions.
3. Apply primer-surfacer to all bare metal areas. Keep primer-surfacer within the damaged area(s). Allow to dry 23-30 minutes before sanding.
4. Using #400 grit or finer sandpaper, sand the primer-surfacer to level the imperfection.
5. Reclean panel(s) with a wash solvent to remove sanding sludge and then tack wipe.
6. Apply one coat of an 'adhesion promoter' over the entire area(s) to be painted. Allow a minimum of 30 minutes dry time.
7. The base colour should be reduced 150-200% with an extra-slow drying lacquer solvent. The viscosity of the reduced base colour is very important in order to match the O.E.M. (original equipment manufacturer) finish. The best way of checking the viscosity of a reduced paint material is with a Zahn #2 paint viscosity cup or its equivalent.
Temperature influences viscosity directly. If a cola can of paint is brought into an average temperature room (65-70 degrees), it will be thicker and more viscous. Adding solvent to make the paint sprayable is not always the best action. The paint should be allowed to reach workable or average room temperatures. Follow manufacturer's recommended paint viscosity cup reading for their specific material.
8. Apply two or three medium wet coats of base colour.
NOTE: Apply only the number of coats necessary to achieve full hiding. Spray at 35-45 lbs air pressure at the gun. Allow each coat to flash approximately five minutes before applying the final coat of base colour, allow it to dry for 20 minutes before applying the clear coat.
9. If the base coat must be sanded, proceed as follows (I or II):
I - a. Allow the base colour to dry.
b. Sand with ultra-fine wet-or-dry sandpaper to remove the imperfection(s).
c. Reclean and tack wipe the repair area(s).
d. Apply one more additional coat of base colour.
e. Allow to dry 20 minutes before applying the clear coat.
OR
II
a. allow base colour to dry.
b. Apply a thin clear coat to protect the base colour and allow it to dry.
c. Sand with ultrafine wet or dry to remove the imperfections.
d. Reclean with a wash solvent and tack wipe the repair areas.
e. Continue with application of the clear coat.
Clearcoat
Lacquer Clearcoat
1. Reduce the clear coat 125-150% with an extra-slow drying lacquer thinner to the recommended paint viscosity cup reading of the manufacturer of the paint you are using.
2. Spray two medium-wet coats of reduced clear at 35-45 lbs air pressure at the gun. Allow the first coat to flash completely before applying the second coat. At least two coats must be used. Additional coats may be applied if desired. If additional leveling is desired a final coat of premixed mist-coat material (clear acrylic and thinner) can be sprayed at 20 lbs air pressure at the gun.
3. Allow overnight dry or longer, then, rub out using a light-cutting hand or machine polishing compound.
B. Enamel Clearcoat ---------------- CAUTION: There are a number of paint systems available for service use: however, many require additives containing isocyanates. It is essential that all recommendations and warnings listed on the container label for materials selected be followed.
It is mandatory that adequate respiratory protection be worn. Consult your appropriate Provincial Authority or supplier of respiratory equipment for examples of such equipment.
Such protection should be worn during the entire painting process. Persons with respiratory problems, or those allergic to isocyanates must not be exposed to isocyanate vapours or spray mist.
1. Following the paint manufacturers label directions, activate the Polyurethane Enamel Clear Coat material. Mix the material thoroughly. Pot life of activated mixture is approximately eight (8) hours.
2. Some activated Polyurethane Enamel Clear Coat materials are ready to spray as packaged under normal conditions. As conditions vary, to enhance flow out and leveling, up to 10% more than the specified enamel reducer may be added to the activated clear coat mixture. Check the viscosity of the activated mixture with a Zahn #2 paint viscosity cup or its equivalent. Follow the paint manufacturer's labeled recommendations for paint viscosity cup reading.
3. Spray two medium coats of activated clear coat material at 50 lbs air pressure at the gun over entire area(s) to be refinished. For panel repairs, allow 15-20 minutes dry time between coats. For overall refinishing, apply a first coat, allow to flash, then apply a second coat. Spraying medium-wet coats of clear coat material to reduce surface texture (orange peel) and provide optimum appearance. Allow to cure overnight.
Flexible Panel Repair System
Procedure - Full Panel
Full panel repairs must be performed, spot repairs are not recommended.
CAUTION:
There are a number of flexible paint systems available for service use: however, many required additives containing isocyanates. It is essential that all recommendations and warnings listed on the container label for materials selected be followed.
It is mandatory that adequate respiratory protection be worn. Consult your appropriate Provincial Authority or supplier of respiratory equipment for examples of such equipment.
Such protection should be worn during the entire paint process. Persons with respiratory problems, or those allergic to isocyanates must not be exposed to isocyaaate vapours or spray mist.
1. Flexible Undercoat Requirements
If the part to be painted is a replacement, it will be factory primed with an elastomeric enamel-based primer. As long as the original primer is not scratched exposing the plastic substrate, all that is required is to solvent clean, sand with #400 paper or a red 'Scotch-Brite' pad, reclean and apply elastomeric colour.
However, if the plastic substrate is exposed or the part is repaired with flexible filler material, a flexible primer surfacer must be used to provide the filling properties required. This is to prevent a 'bull's-eye' condition or highlighting of the bare substrate or filler repair after colour is applied.
Prepare the flexible primer surfacer as follows:
a. Clean the entire part with a wax, grease and silicone removing solvent applied with a water dampened cloth. Wipe dry. Rinse with a wash solvent as per label directions.
NOTE: The step above begins to prepare the entire part for colour coats. A Spot repair is not recommended because dry spray at the blend area of applied elastomeric colour does not 'wet out' satisfactorily.
b. Featheredge the scuff or filler repair with #320 sandpaper, blow off the dust and tack wipe.
c. Mix and apply four medium dry coats of flexible primer surfacer. Follow the manufacturer's instructions for specific mix ratios and additives.
NOTE: Use a fast evaporating thinner as recommended to reduce the primer-surfacer and do not apply excessively wet coats. Bare flexible plastic surface and/or flexible filler materials have a tendency to swell from thinner absorption, resulting in a visible or 'highlighted' repair.
d. Allow to dry at least one hour and block sand with #400 sandpaper. Sand the entire part with #400 sandpaper or a red 'Scotch-Brite' pad to remove all gloss in preparation for colour application. When paints are modified with a flex additive, the possibility of mixture 'pot life' exists; therefore, spray equipment should be emptied and flushed immediately after use.
NOTE: Some manufacturers do not recommend the use of flex additives in their basecolour material, but do recommend its use for their lacquer and enamel clear coats. Read and follow manufacturers' label directions.
2. Body Colour with Flexible Additive Systems
There are several flexible topcoat systems available for the painter's selections in most cases, it is a matter of personal preference. Basecoat/clearcoat material can be either enamel or lacquer-based.
a. Thoroughly sand the entire part with #400 sandpaper or a red 'Scotch-Brite' pad to remove all gloss. Reclean.
b. Mix the base colour, flexible additive, if recommended, and thinner. Follow the manufacturer's label instructions.
c. Apply a sufficient number of coats to achieve complete hiding and colour match. Allow a flash time between coats.
d. Allow the base colour coat to dry 30-60 minutes before applying the clear coat. Do not sand the base coat before applying the clear coat.
NOTE: If sanding of the base coat is necessary to remove imperfections, such as dirt or sags, sand with #400 grit or finer sandpaper, reclean the area(s). Apply one additional coat of base material and let dry.
OR
Apply a thin coat of clear material, sand with fine paper, reclean with wash solvent then continue application of clear material.
3. Clear Coat Application
a. Mix and reduce the clear coat (lacquer or enamel) material as per the label instructions.
NOTE: Use flex additive if recommended by the paint source.
b. Strain the mixture and apply 2-3 coats with 35-40 lbs air pressure at the gun.
c. Allow each coat to flash completely before applying the next coat. Allow at least 4 hours air dry time or force dry for 30 minutes with a heat lamp at 180 degrees Fahrenheit before putting into service.
NOTE: Compounding is not necessary when a flexible additive is used in the top coat paint material. The mixture will dry with acceptable gloss.
Compounding dulls the gloss of elastomeric finishes causing a flat appearance. The finish cannot be brought back to the same gloss level without applying more paint.
General Motors bulletins are intended for use by professional technicians, not a "do-it-yourselfer". They are written to inform those technicians of conditions that may occur on some vehicles, or to provide information that could assist in the proper service of a vehicle. Properly trained technicians have the equipment, tools, safety instructions and know-how to do a job properly and safely. If a condition is described, do not assume that the bulletin applies to your vehicle, or that your vehicle will have that condition. See a General Motors dealer servicing your brand of General Motors vehicle for information on whether your vehicle may benefit from the information.
