Circuit Description
The Powertrain OBD system check is an organized approach to identifying a problem created by an electronic engine control system malfunction. The Powertrain OBD system check must be the starting point for any driveability complaint diagnosis. The Powertrain OBD system check directs the service technician to the next logical step in diagnosing a complaint. Do not perform this check if no driveability complaint exists. Understanding the table and using it correctly will reduce diagnostic time and prevent the replacement of good parts.
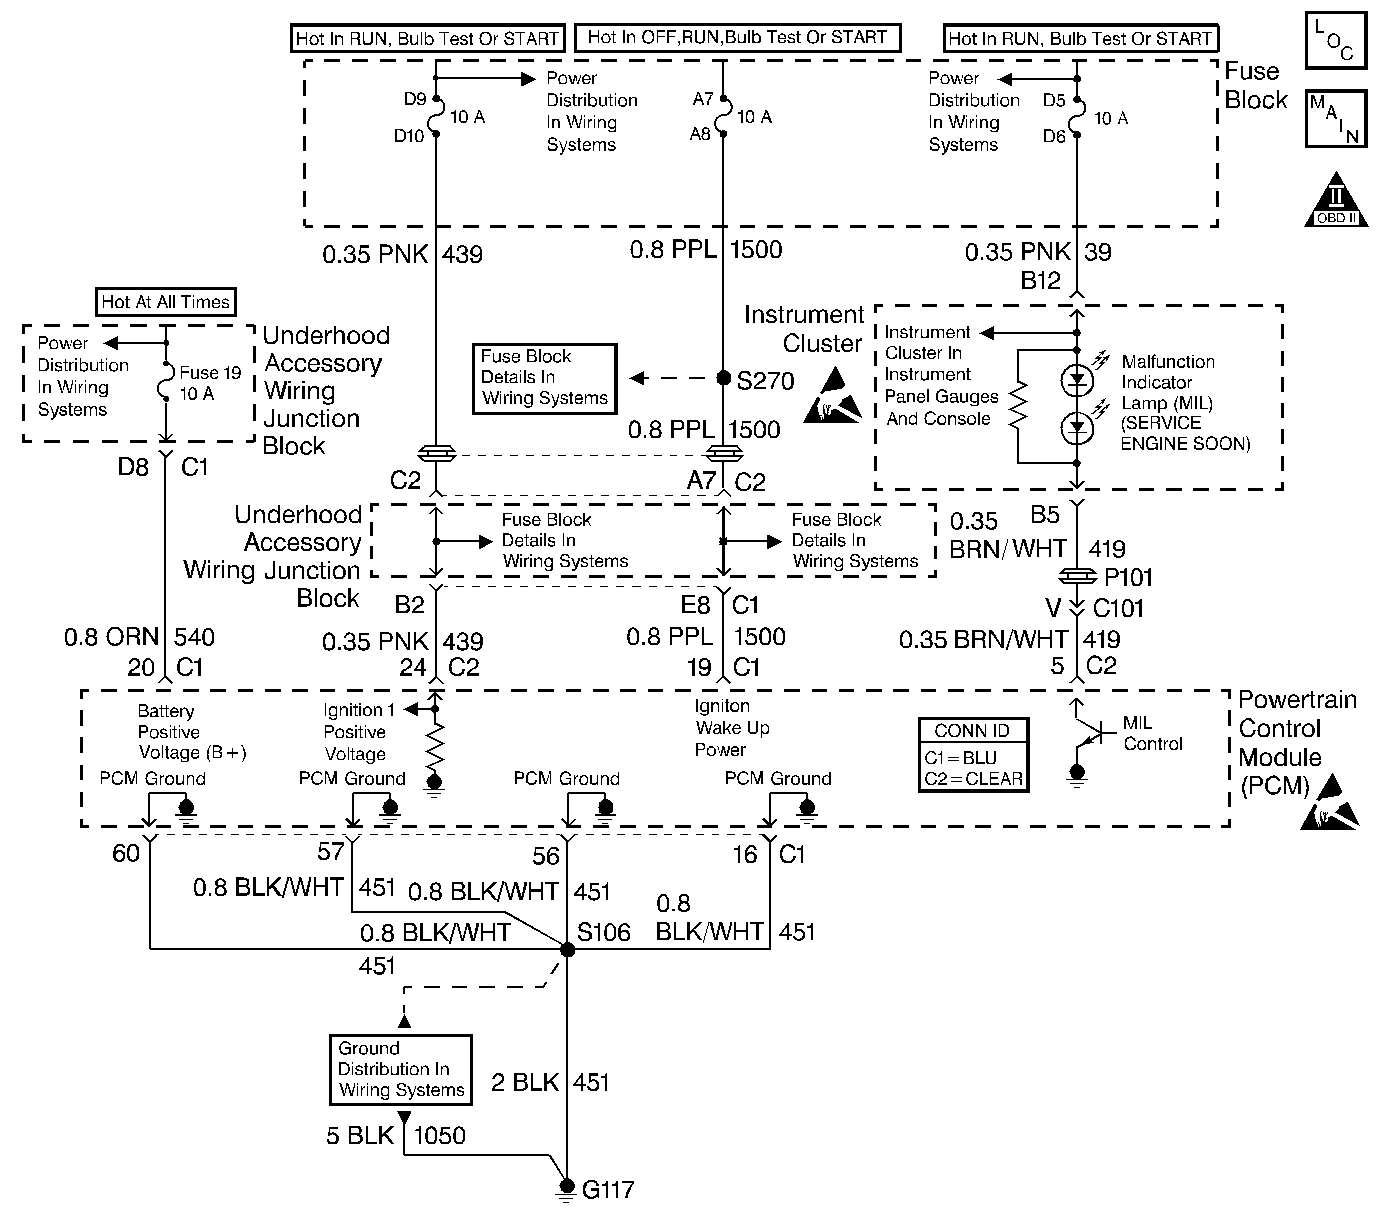
Important: This vehicle is equipped with a Powertrain Control Module (PCM) utilizing an Electrically Erasable Programmable Read Only Memory (EEPROM). When diagnostics call for replacement of the PCM, the new PCM must be programmed. Refer to Powertrain Control Module Replacement/Programming .
Diagnostic Aids
Inspect all related wiring and connections including the connections at the PCM. These may cause an intermittent malfunction. Check terminals for the following:
| • | Damaged |
| • | Corroded |
| • | Pushed out terminals |
Refer to Intermittents and Poor Connections Diagnosis Connector Repairs and Wiring Repairs .
Test Description
Number(s) below refer to the Step number(s) on the Diagnostic Table:
-
The MIL should be on steady with the key on engine off. If not, go to No Malfuntion Indicator Lamp Diagnosis.
-
This test ensures that the PCM is capable transmitting Class II serial data to the DLC and that the Class II data circuit is not open or shorted. If a DLC problem exists, the Data Link Connector Diagnosis should be used to diagnose the condition.
-
If the engine will not start, the Engine Cranks but Does Not Run Diagnostic should be used to diagnose the condition.
-
The scan tool may display DTCs which are diagnosed in Automatic Transaxle Diagnosis. Refer to DTC List for a complete list of DTCs supported by this vehicle application.
-
A scan tool parameter which is not within the typical range may help to isolate the area which is causing the problem.
Step | Action | Value(s) | Yes | No | ||||||||
|---|---|---|---|---|---|---|---|---|---|---|---|---|
1 |
IMPORTANT: :
Is the MIL on? | -- | ||||||||||
2 |
Does the scan tool display PCM data? | -- | ||||||||||
3 | Attempt to start the engine. Did the engine start and continue to run? | -- | ||||||||||
4 | Display DTC Info Last Test Fail. If any DTCs are stored as last test failed, save the freeze frame and fail record information using the Capture Info feature on the scan tool. Are any DTCs indicated as last test failed? | -- | Diagnose the applicable DTCs | |||||||||
5 | Display DTC Fail Records with the scan tool. If any DTC Fail Records are stored, save the freeze frame and fail record information using the Capture Info feature on the scan tool. Are any Fail Records stored? | -- | Go to applicable DTC | |||||||||
6 | Compare PCM data values displayed on the scan tool to the typical engine scan data values. Are the displayed values normal or close to the typical values? | -- | System OK | Go to indicated Component System Checks |
