Caution: Before servicing any electrical component, the ignition and start switch must be in the OFF or LOCK position and all electrical loads
must be OFF, unless instructed otherwise in these procedures. If a tool or equipment could easily come in contact with a live exposed electrical terminal, also disconnect the negative battery cable. Failure to follow these precautions may cause personal injury
and/or damage to the vehicle or its components.
Caution: This vehicle is equipped with a Supplemental Inflatable Restraint (SIR) System. Failure to follow the correct procedure could cause the following conditions:
| • | Unnecessary SIR system repairs |
| • | Refer to SIR Component Views in order to determine if you are performing service on or near the SIR components or the SIR wiring. |
| • | If you are performing service on or near the SIR components or the SIR wiring, disable the SIR system. Refer to Disabling the SIR System. |
Caution: Keep fingers and tools away from the opening in the starter
drive housing while performing the Starter No Load Test. The strong shifting
action of the solenoid could cause personal injury or damage as the drive
pinion moves into the cranking position and spins.
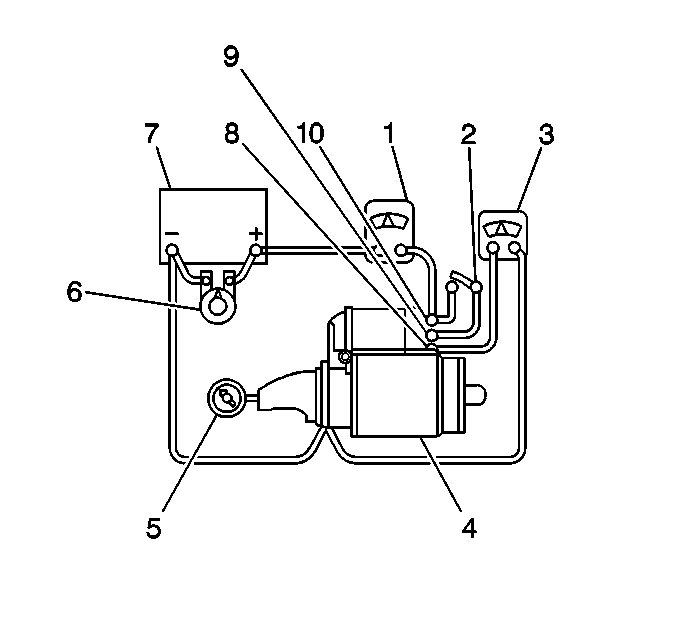
- Secure the starter motor in a vise or a suitable test stand.
- Turn OFF the carbon pile and open the switch.
- Connect a voltmeter (3) from the starter motor terminal to the
starter motor frame (ground).
- Connect the starter motor and an ammeter (1) in series, from the
positive terminal of a fully charged 12 volt battery.
- Connect a switch from the S terminal (9) of the starter motor
solenoid to the starter motor solenoid Bat terminal (10).
Notice: Never operate the starter motor for more than 30 seconds at a time.
Allow it to cool for at least two minutes. Overheating, caused by too much
cranking, will damage the starter motor.
- Close the switch.
- Adjust the carbon pile load to obtain 10 volts on the voltmeter.
- Note the following meter readings:
| • | The armature speed on an RPM indicator. |
| • | The current draw on an ammeter. |
- Turn OFF carbon pile and open the switch.
- Compare the measurements with the specifications. Refer to
Starter Motor Usage
.
The test results indicate the following conditions:
| • | Rated current draw (amps) and rated no-load speed (RPM) indicate
the normal condition of the starter motor. |
| • | Low, no load speed (RPM) and high current draw (amps) indicates
too much friction, causing the armature to drag. This can result from any
of the following conditions: |
| - | Tight, dirty, or worn bushings or bearings |
| - | A grounded or shorted armature |
| • | Failure to operate (no RPM), with high current draw (amps), indicates
the following conditions: |
| - | A direct short to ground in the starter terminal or in the fields. |
| - | Seized bearings (This should have been determined by turning the
armature by hand). |
| • | Failure to operate (no RPM), with low or no current draw (amps),
indicates the following conditions: |
| - | An open in the armature coils |
| - | High insulation between the commutator bars or other causes which
would prevent contact between brushes and commutator. |
| • | Low, no load speed (RPM) and low current draw (amps), indicates
a high internal resistance caused by the following conditions: |
| - | Poor electrical connections |
| - | Defective electrical leads |
| - | Other causes listed under Failure to operate (no RPM), with low
or no current draw (amps), above. |
| • | High, no load speed (RPM) and high current draw (amps) normally
indicates shorted fields. |
