Removal Procedure
Important: With the leather seat option, the left, front seat is equipped with a side impact air bag. This must be disabled before any work is done on the seat.
- If the seat is equipped with and air bag, refer to
SIR Service Precautions
in SIR.
Disable the SIR system. Refer to
Disabling the SIR System
in SIR.
- Remove the head restraint. Refer to
Front Seat Head Restraint Replacement
.
- Remove the front bucket seat adjuster track covers. Refer to
Front Seat Adjuster Track Finish Cover Replacement
.
- Position the front bucket seat in the full forward and the full up position.
- If one side of the seat adjuster is not working, and the bolts that secure the adjuster to the floor pan are not accessible, refer to
Front Seat Adjuster Replacement
.
- If the power seat motor is not operable, and the bolts that secure the adjuster to the floor pan are not accessible, refer to
Front Seat Adjuster Replacement
.
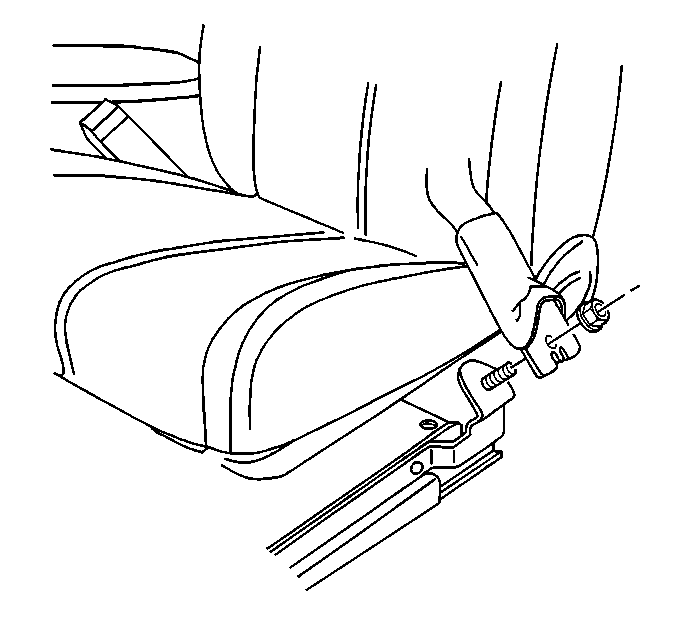
- Remove the front bucket seat belt anchor plate nut.
- Remove the bolts which secure the seat adjuster to the floor pan at the rear of the seat.
- Tip the seat forward and disconnect the following connectors, if equipped:
| • | The power seat electrical connector |
| • | The electrical seat heater connector |
| • | The driver side air bag electrical connector |
- Disengage the front bucket seat hook attachments from the floor pan.
- Remove the front bucket seat from the vehicle.
Installation Procedure
- Position the front bucket seat into the vehicle.
- Engage the front bucket seat front hook attachments to the floor pan.
- Tip the seat forward and connect the following connectors, if equipped:
| • | The power seat electrical connector |
| • | The electrical seat heater connector |
| • | The driver side air bag electrical connector |
Notice: Use the correct fastener in the correct location. Replacement fasteners
must be the correct part number for that application. Fasteners requiring
replacement or fasteners requiring the use of thread locking compound or sealant
are identified in the service procedure. Do not use paints, lubricants, or
corrosion inhibitors on fasteners or fastener joint surfaces unless specified.
These coatings affect fastener torque and joint clamping force and may damage
the fastener. Use the correct tightening sequence and specifications when
installing fasteners in order to avoid damage to parts and systems.
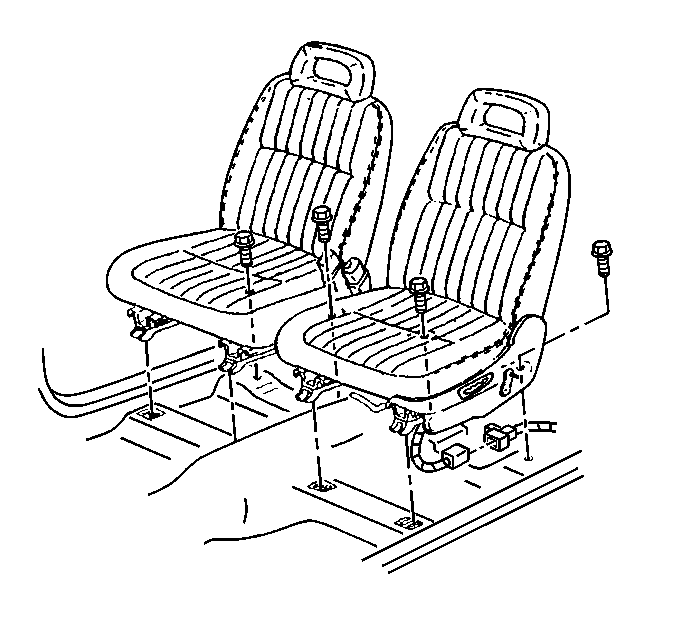
- Install the front bucket seat adjuster-to-floor pan bolts.
Tighten
Tighten the bolts to 42 N·m (31 lb ft).
- Install the adjuster track covers. Refer to
Front Seat Adjuster Track Finish Cover Replacement
.
- Install the seat belt anchor plate nut.
Tighten
Tighten the nut to 42 N·m (31 lb ft).
- Install the head restraint. Refer to
Front Seat Head Restraint Replacement
.
- Enable the SIR system if seat is equipped with air bag. Refer to
Enabling the SIR System
in SIR.
- Inspect the front bucket seat for proper operation and adjustment.
- Position the seat to the original position.
