Powertrain Control Module Replacement/Programming PCM Replacement/Programming
Service of the PCM should normally consist of either replacement of the PCM
or EEPROM programming. If the diagnostic procedures call for PCM Replacement, check
the PCM first to see if it is the correct part. If the PCM is faulty, remove it
and install the new service PCM.
The new service PCM will not be programmed. You must program the new PCM. DTC
P0602 indicates the EEPROM is not programmed or has malfunctioned.
Notice: In order to prevent possible electrostatic discharge damage to the PCM,
do not touch the connector pins or soldered components on the circuit board.
Notice: Turn the ignition OFF when installing or removing the PCM connectors
and disconnecting or reconnecting the power to the PCM (battery cable, PCM
pigtail, PCM fuse, jumper cables, etc.) in order to prevent internal PCM damage.
Important: When replacing the production PCM with a
service PCM (controller), it is important to transfer the broadcast code and production
PCM number to the service PCM label. Do not record on PCM cover. This will allow
positive identification of PCM parts throughout the service life of the vehicle.
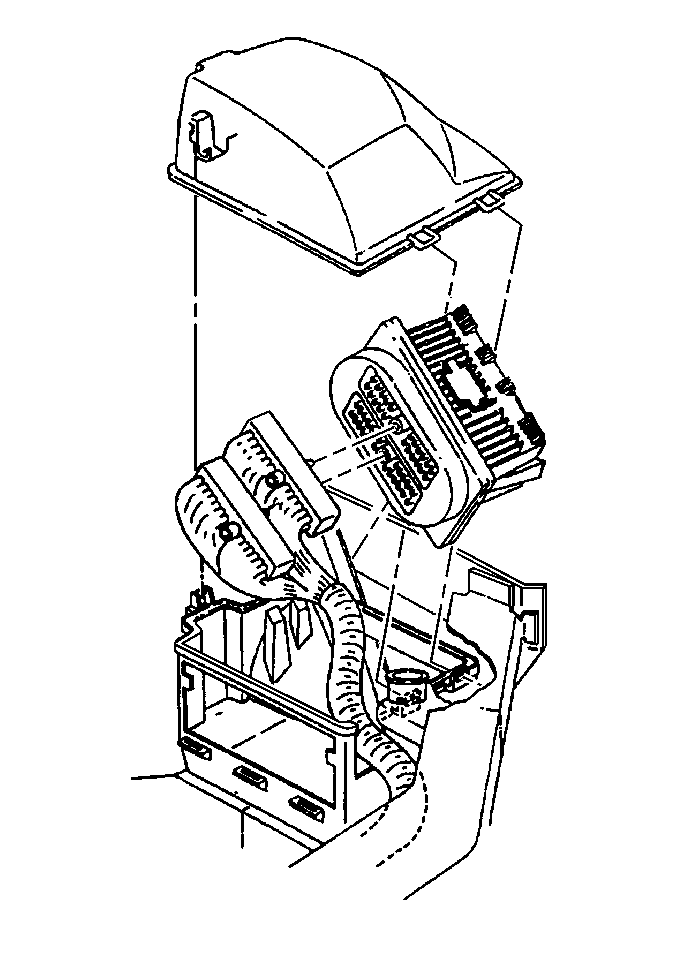
Removal Procedure
Important: It is necessary to record the remaining engine
oil life. If the replacement module is not programed with the remaining engine oil
life, the engine oil life will default to 100%. If the replacement module is not programmed
with the remaining engine oil life, the engine oil will need to be changed at 5000 km
(3,000 mi) from the last engine oil change.
- Using a scan tool, retrieve the percentage of remaining engine oil. Record the
remaining engine oil life.
- Disconnect the negative battery
cable.
- Remove the left strut brace.
- Remove the Air cleaner housing cover and the PCM from the housing assembly.
- Disconnect the harness connectors from the PCM.
- Remove the PCM from the engine compartment.
- If the PCM is being replaced, remove the KS module for installation in
the new PCM.
Installation Procedure
- If a new PCM is being installed,
install the KS module from the original PCM.
- Install the connectors to PCM.
- Install the PCM into the Air cleaner housing assembly.
- Install the Air cleaner housing cover.
- Connect the negative battery cable.
- If a new PCM is being installed, program the EEPROM.
EEPROM Programming
- Set-up - Ensure that the following conditions have been met:
| • | The battery is fully charged and a battery charger is not connected. |
| • | The Techline equipment cable connection at the DLC is secure. |
- Program the PCM using the latest software matching the vehicle. Refer
to up-to-date Techline equipment user's instructions.
- If the PCM fails to program, proceed as follows:
| • | Ensure that all PCM connections are OK. |
| • | Check the Techline equipment for the latest software version. |
| • | Attempt to program the PCM. If the PCM still cannot be programmed properly,
replace the PCM. You must program the replacement PCM. |
Crankshaft Position System Variation Learn Procedure
The crankshaft position system variation compensating values are stored in
the PCM non-volatile memory after a learn procedure has been performed. If the actual
crankshaft position system variation is not within the crankshaft position system
variation compensating values stored in the PCM, DTC P0300 may set (refer to Diagnostic Aids
for DTC P0300).
The Crankshaft Position System Variation Learn Procedure should be performed
if any of the following conditions are true:
| • | The PCM has been replaced. |
| • | The engine has been replaced. |
| • | The crankshaft has been replaced. |
| • | The crankshaft harmonic balancer has been replaced. |
| • | The crankshaft position sensor has been replaced. |
Caution: Before performing the Crankshaft Position System Variation Learning
Procedure always set the vehicle parking brake and block the drive wheels
in order to prevent personal injury. Release the throttle immediately when
the engine starts to decelerate in order to eliminate over revving the engine.
Once the learn procedure is completed, the control module will return engine
control to the operator and the engine will respond to the throttle position.
Important: The scan tool crankshaft position system
variation learn function will be inhibited if engine coolant temperature is less
than 70°C (158°F). Allow the engine to warm to at least 70°C (158F)
before attempting the crankshaft position system variation learn procedure.
The scan tool crankshaft position system variation learn function will be inhibited
if any powertrain DTCs other than DTC P1336 are set before or during the crankshaft
position system variation learn procedure. Diagnose and repair any DTCs if set.
The crankshaft position system variation learn function will be inhibited if
the PCM detects a malfunction involving the camshaft position signal circuit, the
3X reference circuit, or the 18X reference circuit.
- Set the parking brake.
- Block the drive wheels.
- Ensure that the hood is closed.
- Start the engine and allow engine coolant temperature to reach at least
70°C (158°F).
- Turn OFF the ignition switch.
- Select and enable the crankshaft position variation learn procedure with
the scan tool.
- Start the vehicle.
- Apply and hold the service brake pedal firmly.
- Ensure that the transaxle is in Park.
- Increase accelerator pedal position until CKP system variation learn
fuel cutoff is reached. CKP system variation learn fuel cutoff is reached at 5150
RPM. Immediately release the accelerator pedal when fuel cutoff is reached.
- The crankshaft position system variation compensating values are learned
when RPM decreases back to idle. If the procedure terminates, refer to Important
above for instructions.
- Observe DTC status for DTC P1336.
- If the scan tool indicates that DTC P1336 ran and passed, the crankshaft
position system variation learn procedure is complete. If the scan tool indicates
DTC P1336 failed or not run, check for other DTCs. If no DTCs other than P1336 are
set, repeat the crankshaft position system variation learn procedure as necessary.
Functional Check
- Perform the On-Board Diagnostic System Check.
- Start the engine and the engine run for one minute.
- Use the scan tool in order to scan for the DTCs.
- If DTC P0325 sets, the KS module is not fully seated, is missing, or
is malfunctioning.
